Siemens SITOP UPS1600 Manual
Hide thumbs
Also See for SITOP UPS1600:
- Equipment manual (264 pages) ,
- Manual (232 pages) ,
- Getting started (40 pages)
Table of Contents
Advertisement
SITOP UPS1600 / UPS1100
SITOP power supplies
SITOP UPS1600 / UPS1100
Manual
SITOP UPS1600 10 A
6EP4134-3AB00-0AY0
6EP4134-3AB00-1AY0
6EP4134-3AB00-2AY0
SITOP UPS1600 20 A
6EP4136-3AB00-0AY0
6EP4136-3AB00-1AY0
6EP4136-3AB00-2AY0
SITOP UPS1600 40 A
6EP4137-3AB00-0AY0
6EP4137-3AB00-1AY0
6EP4137-3AB00-2AY0
SITOP UPS1100
Battery module 1.2 Ah
6EP4131-0GB00-0AY0
Battery module 2.5 Ah
6EP4132-0GB00-0AY0
Battery module 3.2 Ah
6EP4133-0GB00-0AY0
Battery module 5 Ah
6EP4133-0JB00-0AY0
Battery module 7 Ah
6EP4134-0GB00-0AY0
Battery module 12 Ah
6EP4135-0GB00-0AY0
04.2016
A5E37775406-6-76
___________________
Overview
___________________
Safety instructions
___________________
Description, device design,
dimension drawing
___________________
Engineering and remote
access
___________________
Troubleshooting
___________________
Mounting/removing
___________________
Mounting position, mounting
clearances
___________________
Installation
___________________
Technical data
___________________
Safety, approvals, EMC
___________________
Environmental conditions
___________________
Environment
___________________
Service & Support
1
2
3
4
5
6
7
8
9
10
11
12
Advertisement
Table of Contents

Related Manuals for Siemens SITOP UPS1600


Summary of Contents for Siemens SITOP UPS1600
- Page 1 ___________________ SITOP UPS1600 / UPS1100 Overview ___________________ Safety instructions ___________________ Description, device design, SITOP power supplies dimension drawing ___________________ Engineering and remote access SITOP UPS1600 / UPS1100 ___________________ Troubleshooting ___________________ Mounting/removing Manual ___________________ Mounting position, mounting clearances ___________________ SITOP UPS1600 10 A...
- Page 2 Note the following: WARNING Siemens products may only be used for the applications described in the catalog and in the relevant technical documentation. If products and components from other manufacturers are used, these must be recommended or approved by Siemens. Proper transport, storage, installation, assembly, commissioning, operation and maintenance are required to ensure that the products operate safely and without any problems.
-
Page 3: Overview
The key benefits of the product include: ● Compact SITOP UPS1600 24 V/10 A, 20 A and 40 A DC-UPS modules with digital inputs/outputs, optional with USB or two Ethernet/PROFINET interfaces ● SITOP UPS1100 24 V/1.2 Ah, 2.5 Ah, 3.2 Ah, 7 Ah and 12 Ah battery modules with maintenance-free lead-gel batteries or 5 Ah with LiFePo batteries and integrated electronics;... - Page 4 ● Complete integration in TIA: User-friendly engineering in the TIA Portal, S7 function blocks for integration in user programs and WinCC faceplates Ordering data The following device options are available: SITOP UPS1600 uninterruptible power supply Type Order number Input 24 V DC...
- Page 5 Battery module 3.2 Ah 6EP4133-0GB00-0AY0 Battery module 5 Ah 6EP4133-0JB00-0AY0 Battery module 7 Ah 6EP4134-0GB00-0AY0 Battery module 12 Ah 6EP4135-0GB00-0AY0 Accessories Type Order number Device identification labels 20 mm × 7 mm, pastel 3RT1900-1SB20 turquoise SITOP UPS1600 / UPS1100 Manual, 04.2016, A5E37775406-6-76...
- Page 6 Overview SITOP UPS1600 / UPS1100 Manual, 04.2016, A5E37775406-6-76...
-
Page 7: Table Of Contents
Table of contents Overview..............................3 Safety instructions ..........................11 Description, device design, dimension drawing..................13 Device description ........................13 2.1.1 SITOP UPS1600 ........................13 2.1.2 SITOP UPS1100 ........................16 Connections and terminal designation..................17 2.2.1 SITOP UPS1600 ........................17 2.2.1.1 Power terminals ........................ - Page 8 Inserting SITOP UPS1600 into a project ................45 3.3.5 Assigning the SITOP UPS1600 to a controller ..............47 3.3.6 Assigning a battery module SITOP UPS1100 to the basic device SITOP UPS1600 .... 48 3.3.7 Parameterizing the UPS1600 ....................51 3.3.8 Loading the configuration (commissioning) ................
- Page 9 Other mounting positions ...................... 147 Altitude derating ........................148 Installation ............................149 Connecting the SITOP UPS1600 at its input ................ 150 Connecting the SITOP UPS1600 at its output ..............151 Connecting the BAT SITOP UPS1600 ................. 151 USB interface ........................152 PROFINET/Ethernet connection ...................
- Page 10 Table of contents Safety, approvals, EMC ........................165 Safety ........................... 165 Test voltage .......................... 166 Approvals ..........................167 EMC ............................. 168 Environmental conditions ........................169 Environment ............................173 Service & Support ..........................175 SITOP UPS1600 / UPS1100 Manual, 04.2016, A5E37775406-6-76...
-
Page 11: Safety Instructions
Siemens recommends strongly that you regularly check for product updates. For the secure operation of Siemens products and solutions, it is necessary to take suitable preventive action (e.g. cell protection concept) and integrate each component into a holistic, state-of-the-art industrial security concept. - Page 12 Safety instructions SITOP UPS1600 / UPS1100 Manual, 04.2016, A5E37775406-6-76...
-
Page 13: Description, Device Design, Dimension Drawing
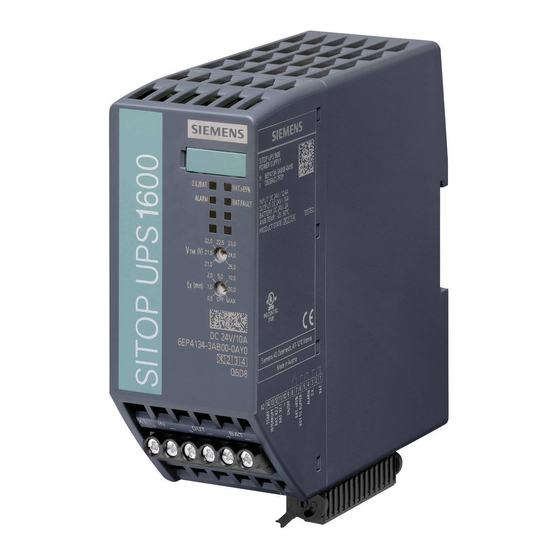
2.1.1 SITOP UPS1600 The SITOP UPS1600 10 A, 20 A and 40 A are built-in devices of the SITOP series for mounting on TH35-15/7.5 standard mounting rails (EN 60715). When installing the SITOP UPS1600 devices and SITOP UPS1100 battery modules, the relevant DIN/VDE regulations or country-specific regulations (e.g. - Page 14 DC-UPS at a glance. The SITOP UPS1600 is fully integrated in Totally Integrated Automation (TIA), the Siemens open system architecture for integrated automation solutions. The engineering is performed in the TIA Portal and reduces to just a few clicks for the user.
- Page 15 USB interface X3 (only for ... - 1AY0) ⑦ Rotary coding switch, switch-in threshold ⑧ Rotary coding switch, buffer time ⑨ Signaling (LEDs) ⑩ DIN rail slider ⑪ Convection ⑫ Clearance above/below Image 2-1 SITOP UPS1600 design (example 6EP4136-3AB00-2AY0) SITOP UPS1600 / UPS1100 Manual, 04.2016, A5E37775406-6-76...
-
Page 16: Sitop Ups1100
SITOP UPS1600. A green LED lights continually to indicate that there is a communication connection to the SITOP UPS1600. The LED flashes when the batteries are being replaced or for faults and alarms. -
Page 17: Connections And Terminal Designation
③ The UPS1100 battery modules are connected via BAT (see also Chapter Installation (Page 149)) Connections and terminal designations (see Image 2-1 SITOP UPS1600 design (example 6EP4136- 3AB00-2AY0) (Page 15)) ① One screw terminal each DC input IN+, IN- ②... -
Page 18: Signal Terminal
Description, device design, dimension drawing 2.2 Connections and terminal designation Image 2-4 Terminal data SITOP UPS1600 40 A 2.2.1.2 Signal terminal Image 2-5 Signal connector Image 2-6 Signal connector connection schematic Pin Terminal designation Function BAT. 24 V DC OK / BAT... -
Page 19: Usb Port
(see Section USB connector (Page 140)) is implemented using a defined cable/connector (Y-Con USB - Yamaichi). 2.2.1.4 PROFINET/Ethernet connection Image 2-8 PROFINET/Ethernet connection ⑤ Ethernet interface corresponds to the standard full duplex with up to 100 Mbit/s electrical (100BASE-TX) according to IEEE 802.3.. SITOP UPS1600 / UPS1100 Manual, 04.2016, A5E37775406-6-76... - Page 20 ● Monitoring via the Web server ● Integration and communication of the DC-UPS with other automation components from Siemens and the open environment, e.g. IPC, PLC, HMI ● Firmware update of the device via UPS Manager, web server or STEP 7 SITOP UPS1600 / UPS1100 Manual, 04.2016, A5E37775406-6-76...
-
Page 21: Sitop Ups1100
② Input terminals and signal terminal can be used to establish the connection to SITOP UPS1600. (also see Chapter Installation (Page 149)). Connections and terminal designations (see Image 2-2 SITOP UPS1100 design (example 6EP4133- 0GB00-0AY0) (Page 16)) ① One screw terminal each DC input +, - ②... -
Page 22: Operator Controls
If the buffer time is to be set using the software (only for devices with an interface (…-1AY0, …-2AY0)) (possible setting range, see Section Parameterizing SITOP UPS1600 (Page 70)), the rotary coding switch for the connection threshold (see Section Rotary coding switch, switch-in threshold (Page 22)) must be set to REN. -
Page 23: Jumper Variants
Note It is only permissible to operate the rotary switch using an insulated screwdriver. For notes on actuating the rotary coding switch (screwdriver, torque), see Image 2-3 Terminal data SITOP UPS1600 10 A, 20 A (Page 17). 2.3.1.3 Jumper variants On/Off (pin 9) ④... - Page 24 Buffering not permitted 0,5 - MAX 0,5 - MAX The software settings apply Not relevant The web server can be activated, and a temporary Internet address assigned (precondition: IP address is 0.0.0.0 (when deliv- ered)) SITOP UPS1600 / UPS1100 Manual, 04.2016, A5E37775406-6-76...
- Page 25 To prevent data losses, PCs must be shut down in time before the buffer time ends. If the input voltage returns after the shutdown has already started, the SITOP UPS1600 terminates the buffer mode and transitions into normal operation. The PC will be shut down, however, it is not switched off.
-
Page 26: Sitop Ups1100
2.3.2.1 Buttons for battery replacement ⑧ For the SITOP UPS1100, below the cover there is a button for battery replacement. Battery change, see Battery replacement (Page 153) Image 2-13 Buttons for battery replacement SITOP UPS1600 / UPS1100 Manual, 04.2016, A5E37775406-6-76... -
Page 27: Operating Displays And Signaling
Battery test LED 5 for PROFINET-specific diagnostic dis- plays LED 6 for PROFINET-specific diagnostic dis- plays LED 7 Connection status Ethernet port 1 LED 8 Connection status Ethernet port 2 Image 2-14 Operating displays SITOP UPS1600 / UPS1100 Manual, 04.2016, A5E37775406-6-76... - Page 28 Green Battery charge state >85 % LED 3 (alarm) Signaling 6EP4134-3AB00- ... 6EP4136-3AB00- ... 6EP4137-3AB00- ... Output off for 45 seconds because of overcurrent, overtemperature or buffer operation not possible Buffer operation possible SITOP UPS1600 / UPS1100 Manual, 04.2016, A5E37775406-6-76...
- Page 29 LEDs 5 and 6 are active only for ... -2AY0. LED 7 (Ethernet LED / P2) Signaling 6EP4134-3AB00-2AY0 6EP4136-3AB00-2AY0 6EP4137-3AB00-2AY0 Device not connected with controller Green Device connected with controller, no activity Green/orange alternately Device connected with controller, send/receive data (RX/TX) SITOP UPS1600 / UPS1100 Manual, 04.2016, A5E37775406-6-76...
-
Page 30: Relay Outputs
Deenergized state: Not ready for buffering Cycle 0.25 Hz: Battery defective or set buffer time is not reached. REL3 (NO contact): Energized state: Buffering of the selected buffer time is possible, or charge state > 85 %. SITOP UPS1600 / UPS1100 Manual, 04.2016, A5E37775406-6-76... -
Page 31: Sitop Ups1100
6EP4131-0GB00-0AY0 (1.2 Ah) 6EP4132-0GB00-0AY0 (2.5 Ah) 6EP4133-0GB00-0AY0 (3.2 Ah) 6EP4133-0JB00-0AY0 (5 Ah) 6EP4134-0GB00-0AY0 (7 Ah) 6EP4135-0GB00-0AY0 (12 Ah) Flashing green Error or alarm, battery replacement initiated (0.5/0.5) Battery off, no communication Green Battery OK SITOP UPS1600 / UPS1100 Manual, 04.2016, A5E37775406-6-76... -
Page 32: Block Diagram
Description, device design, dimension drawing 2.5 Block diagram Block diagram 2.5.1 SITOP UPS1600 Image 2-17 Block diagram SITOP UPS1600 SITOP UPS1600 / UPS1100 Manual, 04.2016, A5E37775406-6-76... -
Page 33: Sitop Ups1100
Description, device design, dimension drawing 2.5 Block diagram 2.5.2 SITOP UPS1100 Image 2-18 Block diagram SITOP UPS1100 SITOP UPS1600 / UPS1100 Manual, 04.2016, A5E37775406-6-76... -
Page 34: Dimensions And Weight
Description, device design, dimension drawing 2.6 Dimensions and weight Dimensions and weight 2.6.1 SITOP UPS1600 Image 2-19 6EP4134-3AB00-0AY0, 6EP4134-3AB00-1AY0, 6EP4136-3AB00-0AY0,6EP4136- 3AB00-1AY0 dimensioned drawing Image 2-20 6EP4134-3AB00-2AY0, 6EP4136-3AB00-2AY0 dimensioned drawing SITOP UPS1600 / UPS1100 Manual, 04.2016, A5E37775406-6-76... - Page 35 Description, device design, dimension drawing 2.6 Dimensions and weight Image 2-21 Dimension drawing 6EP4137-3AB00-0AY0, 6EP4137-3AB00-1AY0 Image 2-22 Dimension drawing 6EP4137-3AB00-2AY0 SITOP UPS1600 / UPS1100 Manual, 04.2016, A5E37775406-6-76...
-
Page 36: Sitop Ups1100
70 × 138.7 × 150 70 × 138.7 × 150 70 × 138.7 × 150 Weight Approx. 0.65 kg Approx. 0.65 kg Approx. 0.7 kg 2.6.2 SITOP UPS1100 Image 2-23 6EP4131-0GB00-0AY0 dimensioned drawing SITOP UPS1600 / UPS1100 Manual, 04.2016, A5E37775406-6-76... - Page 37 Description, device design, dimension drawing 2.6 Dimensions and weight Image 2-24 Dimension drawing 6EP4132-0GB00-0AY0 Image 2-25 6EP4133-0GB00-0AY0 dimensioned drawing SITOP UPS1600 / UPS1100 Manual, 04.2016, A5E37775406-6-76...
- Page 38 Description, device design, dimension drawing 2.6 Dimensions and weight Image 2-26 Dimension drawing 6EP4133-0JB00-0AY0 Image 2-27 6EP4134-0GB00-0AY0 dimensioned drawing SITOP UPS1600 / UPS1100 Manual, 04.2016, A5E37775406-6-76...
- Page 39 (12 Ah) Dimensions (W × H × D) in 189 × 185.5 × 112.7 186 × 186 × 110.3 253 × 186 × 110 Weight Approx. 3.4 kg Approx. 6.1 kg Approx. 9.8 kg SITOP UPS1600 / UPS1100 Manual, 04.2016, A5E37775406-6-76...
- Page 40 Description, device design, dimension drawing 2.6 Dimensions and weight SITOP UPS1600 / UPS1100 Manual, 04.2016, A5E37775406-6-76...
-
Page 41: Engineering And Remote Access
Functions of the individual software products ● SIMATIC STEP 7 in the TIA Portal The SITOP UPS1600 can be used with STEP 7 in the TIA portal 12 with service pack 1 (SP1). From SW version V2.1, STEP 7 can be used in the TIA Portal from Version 13. -
Page 42: Overview Of Application Examples
At our support web site you can find the following application example to parameterize the SITOP UPS1600 uninterruptible power supply: ● "SITOP UPS1600: Graphic blocks and STEP 7 communication blocks" to integrate SITOP UPS1600 into an automation system : (https://support.industry.siemens.com/cs/ww/en/view/78817848) SITOP UPS1600 / UPS1100 Manual, 04.2016, A5E37775406-6-76... -
Page 43: Simatic Step 7 In The Tia Portal
TIA Portal from Version 12 with service pack 1 (SP1). From SW version V2.1, STEP 7 can be used in the TIA Portal from Version 13. In SIMATIC STEP 7 in the TIA Portal , the basic device SITOP UPS1600 and its battery modules SITOP UPS1100 can be integrated in projects, parameterized and diagnosed. - Page 44 "Restart". The installed devices are imported into the module catalog and can then be integrated in the project. You can find the SITOP UPS1600 in the hardware catalog under "Power Supplies\SITOP UPS\UPS1600". Note You can find additional information on installing hardware support packages in the manual of your STEP 7 software.
-
Page 45: Installing The Generic Station Description File (Gsd)
Inserting SITOP UPS1600 into a project To be able to use the SITOP UPS1600, you must assign it as IO device to an IO controller (SIMATIC S7 control). Further, SITOP UPS1600 can be equipped in the project with one or several SITOP UPS1100 battery modules. - Page 46 Alternatively, you can add the module to the Network view by double-clicking on the entry in the hardware catalog. You have now inserted the SITOP UPS1600 into the project. The rectangle displayed in the network view symbolizes the SITOP UPS1600.
-
Page 47: Assigning The Sitop Ups1600 To A Controller
Assigning the SITOP UPS1600 to a controller To be able to use the SITOP UPS1600 you must assign an IO controller as IO device. 1. Click in the network view on the blue lettering "Not assigned" at the left next to the symbol of the SITOP UPS1600. -
Page 48: Assigning A Battery Module Sitop Ups1100 To The Basic Device Sitop Ups1600
● Temperature-controlled charging ● Battery fast test ● Diagnostics using the SITOP UPS Manager and the web server Using an example, in the following steps, it is shown how the SITOP UPS1600 is assigned a SITOP UPS1100 battery module. Note Only SITOP UPS1100 battery modules of the same type can be inserted into the slots of a SITOP UPS1600. - Page 49 For GSD devices, values can be manually specified for a (third-party) battery module; however, it is not necessary to add a battery module to the configuration. 1. In the device view, select the SITOP UPS1600 basic device. 2. In the Hardware catalog , navigate to the SITOP UPS1100 battery module under Power Supplies\SITOP UPS\UPS1100.
- Page 50 The battery module is inserted at the selected slot. 6. Save the hardware configuration. You have assigned a battery module to the basic device SITOP UPS1600. How you change the number and type of SITOP UPS1100 battery modules used is described under Parameterizing UPS1600 with STEP 7 in the TIA Portal (Page 51).
-
Page 51: Parameterizing The Ups1600
3.3.7 Parameterizing the UPS1600 The adjustable parameters of the SITOP UPS1600 can be found in STEP 7 in the TIA Portal in the inspector window under Properties when the appropriate device was selected. For parameterization, in the area navigation, the settings under "Base Unit", "Energy storage"... - Page 52 When the connection threshold is fallen below, selects whether the system is buffered or the output is shut down. ● Switch-in threshold Setting the switch-in threshold. ● Buffer time Length of time during which the system should be buffered by the SITOP UPS1600. SITOP UPS1600 / UPS1100 Manual, 04.2016, A5E37775406-6-76...
- Page 53 "Buffer time" parameter is not relevant in this case. ● Additional buffer time after PC shutdown Time during which the system should be buffered by the SITOP UPS1600 after the PC was shut down. ● Expected buffer current Load current, which is expected at the device output during buffer operation.
- Page 54 The battery is not charged with more than the selected charge current. The manufacturer's details for the permitted battery charge current must be observed. Further, the following, device-dependent values apply: – SITOP UPS1600 10 A: Maximum permissible charge current 3,000 mA Derating for T > 40 °C or U <...
-
Page 55: Loading The Configuration (Commissioning)
Identifying a SITOP UPS1600 in the network From the STEP 7 in the TIA Portal , you can get the LED "SF" at the SITOP UPS1600 to flash. This means that you can clearly identify a module in the network, e.g. if several SITOP UPS1600 are installed in the network. - Page 56 7. Check at which SITOP UPS1600 in the network the "SF" LED flashes. By checking the flashing LEDs, you can uniquely identify all SITOP UPS1600 in a network. Note the device name and the IP address of the required SITOP UPS1600 in order to load a configuration.
- Page 57 ● The SITOP UPS1600 is located in the PROFINET IO system of an IO controller. ● The PG/PC is connected to the same network to which the SITOP UPS1600 and the controller are connected. The interface of the PG/PC must be set to TCP/IP.
- Page 58 Engineering and remote access 3.3 SIMATIC STEP 7 in the TIA Portal Image 3-1 Online / offline SITOP UPS1600 / UPS1100 Manual, 04.2016, A5E37775406-6-76...
- Page 59 4. Click on the "Finish" button. Result The set parameters have been loaded to the SITOP UPS1600 via the controller. SITOP UPS1600 / UPS1100 Manual, 04.2016, A5E37775406-6-76...
-
Page 60: Diagnostics
Article number Firmware Name Rack Slot Firmware file Firmware version Suitable for modules with Status Activate firmware after update Assign name PROFINET device name Type Reset to factory settings MAC address IP address SITOP UPS1600 / UPS1100 Manual, 04.2016, A5E37775406-6-76... - Page 61 Proceed as follows to start the online and diagnostics view of the particular module: Project tree: 1. Open the device folder of the SITOP UPS1600 in the Project tree. Is located (after the assignment to the control system) in the folder of the control system under "Distributed I/O "...
-
Page 62: Firmware Update
3.3.10 Firmware update WARNING The SITOP UPS1600 is reset while updating the firmware. For safety reasons, the output is switched off. Ensure that no damage is caused to the plant or system. Ensure that the PG/PC and/or all switches, routers and gateways that are used have an independent power supply during the firmware update. - Page 63 3. In the network view, select the components whose firmware is to be updated. 4. Change to the device view. 5. Click on "Go online". 6. In the shortcut menu of the SITOP UPS1600, select "Online & Diagnostics". The "Online access" menu opens. 7. In the "Functions" folder, select the "Firmware update" group.
- Page 64 13.The device is automatically restarted after the LEDs no longer flash. Note During the firmware update, if the power supply of the SITOP UPS1600, or PG/PC or intermediate switches, routers or gateways is interrupted, then under certain circumstances, a fallback firmware is activated. If the SITOP UPS1600 can then no longer be accessed remotely, you must assign the a new IP address, or under the menu item "Assign name"...
-
Page 65: Restore Factory Settings
The parameter values for SITOP UPS1600 and the energy storage device are kept. Proceed as follows to reset the SITOP UPS1600 factory settings: 1. Select SITOP UPS1600 in the Network view and change to the Device view. 2. Click on "Go online". -
Page 66: Simatic Step 7
The uninterruptible power supply SITOP UPS1600 can be used with SIMATIC STEP 7 from Version 5.4 and higher. In SIMATIC STEP 7 , the basic device SITOP UPS1600 and its SITOP UPS1100 battery modules can be integrated in the project, parameterized and diagnosed. -
Page 67: Inserting Sitop Ups1600 Into A Project
3.4 SIMATIC STEP 7 3.4.3 Inserting SITOP UPS1600 into a project To be able to use the SITOP UPS1600, it must be assigned as IO device to an IO controller (SIMATIC S7 control system) . Preconditions ● The GSD file of the SITOP UPS1600 has been correctly installed. - Page 68 8. Close the "Properties - Ethernet interface PN-IO" dialog box. The subnet is displayed as a horizontal line in the hardware view. Inserting SITOP UPS1600 from the hardware catalog 1. Select the subnet. 2. Open the "Catalog" window using the "View > Catalog" menu command.
- Page 69 Engineering and remote access 3.4 SIMATIC STEP 7 3. In the hardware catalog, navigate to the SITOP UPS1600 under "PROFINET IO \ I/O \ UPS1600". 4. Click the desired SITOP UPS1600; keep the left mouse button pressed and drag the SITOP UPS1600 to the subnet.
-
Page 70: Parameter Assignment
The controller and the networked SITOP UPS1600 are displayed. 2. In the Network view click on SITOP UPS1600. The hardware configuration opens. 3. Double click in the hardware configuration on the SITOP UPS1600 entry in the station window for slot 0.1. - Page 71 18.5 V Wait time for stable input voltage 200 … 65,000 ms 500 ms Downtime alarm 0 … 20.000 ms 125 ms Buffering allowed Yes / No Enable reset after buffering Yes / No SITOP UPS1600 / UPS1100 Manual, 04.2016, A5E37775406-6-76...
- Page 72 ● Additional backup time after the PC has been shutdown The time to be buffered by the SITOP UPS1600 once the PC has been shut down. ● Connection threshold If the connection threshold value is fallen below, the SITOP UPS1600 starts buffering. If the value of the connection threshold is subsequently exceeded again, then the SITOP UPS1600 stops buffering.
- Page 73 When UPS1100 battery modules are used, both parameters are automatically set, and do not have to be defined. The following, device-dependent maximum values apply: – SITOP UPS1600 10 A: Maximum permissible charge current 3,000 mA Derating for T > 40 °C or U <...
- Page 74 Free text ● Contact Enter, for example, a contact address or the name of a staff member. ● Location Enter a description of the location that can be used to locate the SITOP UPS1600. Web server Parameter Value range Default setting...
-
Page 75: Loading The Configuration To The Sitop Ups1600 (Commissioning)
3.4.5 Loading the configuration to the SITOP UPS1600 (commissioning) In the delivered state, the SITOP UPS1600 has not yet been assigned any IP address and the DHCP protocol is deactivated. When the SITOP UPS1600 is first connected with an IO controller (SIMATIC S7 control system), it must be assigned a device name and an IP address by the IO controller. - Page 76 The IO controller is assigned the configured IP address. Note Ensure that the article number of the SITOP UPS1600 configured offline matches the article number of the device connected online. The following response is obtained after loading the configuration into the device:...
-
Page 77: Diagnostics
3.4 SIMATIC STEP 7 Allocating the SITOP UPS1600 a device name (online) In order that the configured IO controller can address the SITOP UPS1600, you must assign each individual IO device (including SITOP UPS1600) the configured device name. For the procedure described below, the SITOP UPS1600 and the station for the PG/PC must be accessible online on the Ethernet. -
Page 78: Firmware Update
3.4.7 Firmware update WARNING The SITOP UPS1600 is reset while updating the firmware. For safety reasons, the output is switched off. Ensure that no damage is caused to the plant or system. Ensure that the PG/PC and/or all switches, routers and gateways that are used have an independent power supply during the firmware update. - Page 79 Ethernet subnet. 3. Select the "Target system > Update firmware" menu command. 4. Select the SITOP UPS1600 whose firmware is to be updated. 5. In the open "Update firmware" dialog, press the "Browse" button to select the path to the directory with the unzipped files.
-
Page 80: Restore Factory Settings
With STEP 7 Version 5.5, it is possible to restore the factory setting of modules using the "Target system -> Edit Ethernet node". 1. To select the MAC address of the SITOP UPS1600, which should be reset to the factory setting, click in dialog "Edit Ethernet node" on "Browse". - Page 81 Engineering and remote access 3.4 SIMATIC STEP 7 SITOP UPS1600 / UPS1100 Manual, 04.2016, A5E37775406-6-76...
-
Page 82: Sitop Ups Manager
Functions of the SITOP UPS Manager You can execute the following tasks with the SITOP UPS Manager: ● Configure the SITOP UPS1600 uninterruptible power supply and the battery modules ● Protect a computer or a computer network provided by the uninterruptible power supply with the master-slave technique ●... -
Page 83: Opc Ua Server
● The DC-UPS software at the PC communicates via USB and the USB board - or via Ethernet and the ProfiNet board with the DC UPS main board. ● OPC clients can connect with the OPC server in the DC-UPS software via Ethernet and a binary protocol or SOAP. SITOP UPS1600 / UPS1100 Manual, 04.2016, A5E37775406-6-76... - Page 84 (only at beginning) buffer threshold GetDataObject.2 x (only at beginning) buffering allowed GetDataObject.3 battery information GetDataObject.4 Mlfb GetDataObject.4.1 x (cyclic) serial number GetDataObject.4.2 x (cyclic) type GetDataObject.4.3 manufacturing date GetDataObject.4.4 EOCV GetDataObject.4.5 charge current GetDataObject.4.6 SITOP UPS1600 / UPS1100 Manual, 04.2016, A5E37775406-6-76...
- Page 85 GetDataObject.14.6 downtime alarm GetDataObject.15 x (only at beginning) battery capacity GetDataObject.16 x (only at beginning) buffer time 2 GetDataObject.17 x (only at beginning) expected buffer current GetDataObject.18 x (only at beginning) SITOP UPS1600 / UPS1100 Manual, 04.2016, A5E37775406-6-76...
- Page 86 Parameter Path SitopUPSManager- Service Mainboard state information input voltage ok GetCyclicData.STAT.Bit0 buffer mode active GetCyclicData.STAT.Bit2 ready for buffering GetCyclicData.STAT.Bit3 charge sufficient GetCyclicData.STAT.Bit4 battery change recommended GetCyclicData.STAT.Bit5 battery connection fault GetCyclicData.STAT.Bit6 SITOP UPS1600 / UPS1100 Manual, 04.2016, A5E37775406-6-76...
- Page 87 GetDataObject.417.0 total calculated battery health GetDataObject.420.0 total battery change recommended GetDataObject.414.0 total battery connection fault GetDataObject.424.0 battery #0 calculated battery GetDataObject.417.1 capacity calculated battery GetDataObject.420.1 health battery change GetDataObject.414.2 recommended SITOP UPS1600 / UPS1100 Manual, 04.2016, A5E37775406-6-76...
- Page 88 GetDataObject.4.9.n buffer time GetDataObject.4.10.n total charging cur- GetDataObject.4.11.n rent total culled current GetDataObject.4.12.n EOCV GetDataObject.4.5.n charge current GetDataObject.4.6.n capacity GetDataObject.4.8.n stop buffering GetDataObject.4.7.n voltage (SBV) type GetDataObject.4.3.n min temp GetDataObject.4.13.n SITOP UPS1600 / UPS1100 Manual, 04.2016, A5E37775406-6-76...
- Page 89 GetDataObject.6 charge current GetDataObject.7 reset reset time GetDataObject.9 hardware settings buffer time GetDataObject.14.1 buffer threshold GetDataObject.14.2 buffering allowed GetDataObject.14.3 enable reset GetDataObject.14.4 start from battery GetDataObject.14.5 sel. bat. profile GetDataObject.14.6 SITOP UPS1600 / UPS1100 Manual, 04.2016, A5E37775406-6-76...
- Page 90 #0 alarms battery defect Battery deep discharge, no charging possible Battery temperature high Battery temperature low Communication to battery fault Wrong battery configuration Battery parameters corrupt Fuse broken battery #n alarms battery defect SITOP UPS1600 / UPS1100 Manual, 04.2016, A5E37775406-6-76...
-
Page 91: The User Interface Of The Sitop Ups Manager
The previous table lists all of the alarms. 3.5.3 The user interface of the SITOP UPS Manager ① Tabs for selecting the submenus ② Language selection ③ Save bar ④ Connection lamps SITOP UPS1600 / UPS1100 Manual, 04.2016, A5E37775406-6-76... -
Page 92: Installation/Uninstallation
The Windows XP and Windows 7 (32 bit and 64 bit) operating systems are supported. Ethernet or USB interface To install and use the SITOP UPS Manager in conjunction with the SITOP UPS1600, the computer must be connected with the SITOP UPS1600 via Ethernet or USB port. - Page 93 – Installer language, English or German – Agreement declaration with the license conditions – Installation scope: Activate option "USB driver" if your SITOP UPS1600 has a USB interface. You can select between application and service. – Installation path: Use the recommended target directory "C:\Program Files (x68\SITOPUPSManager" or select another one.
-
Page 94: Options Of Establishing A Connection To The Sitop Ups1600
SITOP SITOP UPS1600 interface. Configuring the SITOP UPS1600 with the Primary Setup Tool The Primary Setup Tool is a Siemens product that is free of charge, and which is used to identify and configure network-capable devices. You can download the Primary Setup Tool at (http://support.automation.siemens.com/WW/view/en/19440762). - Page 95 Engineering and remote access 3.5 SITOP UPS Manager Preconditions ● The SITOP UPS1600 is connected with the client (PG/PC) via the Ethernet interface. ● The Primary Setup Tool is installed on the client. ● Firewall settings that are necessary: – Communication via 5000 is permitted.
- Page 96 3.5 SITOP UPS Manager 4. Select the menu command "Network > Search". SITOP UPS1600 appears in the tree view as "DC-UPS :" with its MAC address and its IP address. 5. Open the SITOP UPS1600 entry and select "Ind. Ethernet interface".
- Page 97 ● The local computer is one of several computers and performs the master function. Local computer = master PC ● The local computer is one of several computers at the SITOP UPS1600 and operates as slave. Local computer = slave PC In the master-slave configuration, the SITOP UPS1600, the master PC and the slave PC are connected at the same physical Ethernet.
- Page 98 SITOP UPS Manager if a master-slave configuration is to be used. 6. Enter the IP address of the SITOP UPS1600 in the "IP address of the DC-UPS" field. 7. If you are prompted as to whether you want to restart the SITOP UPS Manager, confirm this with "Yes".
-
Page 99: Establishing A Connection Via Usb
5. Check that the connection lamps light green. The connection lamps light green, the connection to the SITOP UPS1600 via USB has been established, if the (local) PC is connected as master PC to the SITOP UPS1600. SITOP UPS1600 / UPS1100... -
Page 100: Configuration In The Sitop Ups Manager
3.5 SITOP UPS Manager 3.5.8 Configuration in the SITOP UPS Manager Once you have connected the SITOP UPS1600 and the SITOP UPS Manager, you have the following configuration options: ● Create a new configuration. ● Load a configuration from a data medium or from a device. -
Page 101: Configuring The Sitop Ups1600
3.5.8.2 Configuring the SITOP UPS1600 Using the SITOP UPS Manager, you can configure the SITOP UPS1600 and its energy storage device, and then load to the device (if it is an uncoded battery - for UPS1100, the values are automatically identified). To change the charge parameters switch-in threshold or buffer time, you must set the corresponding rotary coding switch to the "REN"... - Page 102 This function allows IPCs to automatically restart. ● Enable reset time after buffering: If the value is set to "Yes", the SITOP UPS1600 shuts down the output for the selected interrupt time if, in the meantime, the input voltage returns after the buffer time has expired.
-
Page 103: Behavior Of The Sitop Ups Manager
The applications can be started depending on the following events and factors: ● Power failure ● Power return ● State of the buffer readiness by the SITOP UPS1600: – General buffer readiness – Remaining buffer time ● State of the SITOP UPS1600 battery: –... - Page 104 Note NOTICE: If the buffer time (see Section Configuring the SITOP UPS1600 (Page 101)) is set shorter than this time, the SITOP UPS1600 switches off before the PC has been shut down. The PC is then no longer protected. Behavior for missing buffer readiness Make the settings under "Software configuration >...
- Page 105 ● Start the application if the connection to the SITOP UPS1600 is interrupted. ● Open the SITOP UPS Manager if there is a connection to the SITOP UPS1600. ● Open the SITOP UPS Manager if the connection to the SITOP UPS1600 was interrupted.
-
Page 106: Display And Visualization
– Battery charge over time – Charge current over time ● Online functions: – Updating the firmware Displaying pending alarms 1. Select "Display > Pending alarms". The pending alarms are displayed in a tabular form. SITOP UPS1600 / UPS1100 Manual, 04.2016, A5E37775406-6-76... - Page 107 – outgoing: Rectification of the alarm event Data and parameters SITOP UPS1600 1. Select "Display > Operating data". 2. Under "Base Unit" you can find data and parameters of the SITOP UPS1600. The following data are displayed: ● Order number ●...
- Page 108 ● Battery charge level ● Battery temperature ● Measured charge current Trend charts You have the possibility of graphically displaying values about the power supply under "Display> Trend chart", for instance the load current over time: SITOP UPS1600 / UPS1100 Manual, 04.2016, A5E37775406-6-76...
- Page 109 ● Charge current over time Procedure 1. Select "Display > Trend diagram". 2. Select "Base Unit" to display trend diagrams for SITOP UPS1600 values select "Energy storage" to display trend diagrams for the energy storage device values. 3 diagrams are available below both points.
-
Page 110: Determining The Firmware Version
Engineering and remote access 3.5 SITOP UPS Manager 3.5.11 Determining the firmware version The firmware version of the SITOP UPS1600 can be determined as follows using the UPS Manager: Precondition The SITOP UPS1600 is connected to your PC via USB. -
Page 111: Firmware Update
3.5.12 Firmware update WARNING The SITOP UPS1600 is reset while updating the firmware. For safety reasons, the output is switched off. Ensure that no damage is caused to the plant or system. Ensure that the PG/PC and/or all switches, routers and gateways that are used have an independent power supply during the firmware update. - Page 112 (less than 4.5X) of the SITOP UPS Managers does not support this update. The installation file for the SITOP UPS Manager is available at no charge on the SITOP home page (http://www.siemens.com/sitop-ups1600) or directly (https://support.industry.siemens.com/cs/ww/en/view/75854607).
-
Page 113: Web Server
Engineering and remote access 3.6 Web server Web server The web server is used to monitor the SITOP UPS1600. It operates independently of UPS Manager and PROFINET access. It is not possible to write access the SITOP UPS1600. New functions of the web server from V2.1 and higher: ●... -
Page 114: The Web Server User Interface
In the address dialog box of the web browser, enter the IP address of the SITOP UPS1600 in the form http://ww.xx.yy.zz (input example: http://192.168.0.14). The start page of SITOP UPS1600 is opened. You can navigate to further menus from the start page. -
Page 115: Functions Of The Web Server
Display The following functions are available: ● View the data of the SITOP UPS1600 (basic device), see View the data of the SITOP UPS1600 (basic device) (Page 115) ● View the energy storage data, see Viewing the energy storage data (Page 116) ●... -
Page 116: Viewing The Energy Storage Data
You can use the web server to obtain information about active alarms and the history of the alarms. Every alarm that concerns the SITOP UPS1600 and the connected battery modules is recorded. You can display pending alarms via "Pending alarms". - Page 117 – outgoing: Rectification of the alarm event Note The alarm history is displayed only when no further communications relationships to the SITOP UPS1600 have been established. Examples for further communications relationships are communication relationships via STEP 7 or the SITOP UPS Manager.
-
Page 118: Determining The Firmware Version
3.6 Web server 3.6.7 Determining the firmware version The firmware version of the SITOP UPS1600 can be determined as follows via Ethernet using the web server: Using the menu command "Display > Operating data > Base unit" the firmware version of the SITOP UPS1600 is displayed. -
Page 119: Web Server Settings / User Administration
● Permit access only with HTTPS Define whether access is only permissible via HTTPS. ● Download certificate You can download the certificate for encrypted connection via HTTPS by pressing the "Download certificate" button. SITOP UPS1600 / UPS1100 Manual, 04.2016, A5E37775406-6-76... - Page 120 2. Select submenu "General > Communication interface > Web server". 3. Select entry "User administration". 4. In the editor area under "Add new user" enter the password and select the individual access rights for a new user. SITOP UPS1600 / UPS1100 Manual, 04.2016, A5E37775406-6-76...
- Page 121 2. Select submenu "General > Communication interface > Web server". 3. Select entry "User administration". 4. In the editor area under "Add new user" enter the password and select the individual access rights for a new user. SITOP UPS1600 / UPS1100 Manual, 04.2016, A5E37775406-6-76...
-
Page 122: Cyclic And Acyclic Data
(input/output data) and acyclic data (reading/writing data sets). Input/output data SITOP UPS1600 sends, in cyclic intervals (1 ms - 512 ms for IRT or 1 ms - 2048 ms for RT), data about the actual operating states to the PROFINET IO-Controller. You will find more information on this at Input and output data (Page 122). -
Page 123: Reading And Writing Data Sets
• 3.7.2 Reading and writing data sets An overview of all data sets, which are communicated between the SITOP UPS1600 and the PROFINET IO-Controller is provided in the following table. Here, a distinction is made between the following data sets: ●... -
Page 124: Data Sets
Data sets In this section you can find detailed information about the individual data sets that are sent from the PROFINET IO-Controller to the SITOP UPS1600 - and which can be read from the SITOP UPS1600. 0x0001: Buffering parameters (reading/writing) - Page 125 0x0004: Reset parameters (reading/writing) Data Description Data type Reset time [1 s] Reset time: Time during which the SITOP UPS1600 output is Unsigned8 shutdown if the connected devices are reset. 0x0005: Battery information parameters (reading) Data Description...
- Page 126 3.7 Cyclic and acyclic data Data Description Data type Batt 1: Buffer time [1 s] Required buffer time, after which the SITOP UPS1600 shuts down Unsigned32 in the buffer mode. Batt 1: Total charging current Total charge current (battery-specific data): Total charge within the...
- Page 127 Batt 3: Standby time [1 s] Standby time. Unsigned32 Batt 3: Buffer time [1 s] Required buffer time, after which the SITOP UPS1600 shuts down Unsigned32 in the buffer mode. Batt 3: Total charging current Total charge current (battery-specific data): Total charge within the...
- Page 128 Batt 5: Standby time [1 s] Standby time. Unsigned32 Batt 5: Buffer time [1 s] Required buffer time, after which the SITOP UPS1600 shuts down Unsigned32 in the buffer mode. Batt 5: Total charging current Total charge current (battery-specific data): Total charge within the...
- Page 129 Batt 6: Total culled current [1 mAh] Total charge level used (battery-specific data): Time, in which the Unsigned32 battery is connected to the SITOP UPS1600 and power was drawn. Batt 6: EOCV [0.01 V] "End-of-charge voltage": Battery voltage when charging changes Unsigned16 to trickle charging.
- Page 130 SITOP UPS1600. Enable reset Enable reset: If, during buffer operation, the input voltage be- Unsigned8 comes available again, then the output of the SITOP UPS1600 is switched off for a selectable time in order to reset connected loads. Start from battery Start from battery: Setting at the signal terminal for function "Start...
- Page 131 Output voltage [0.01 V] Voltage measured at the output of the SITOP UPS1600. Unsigned16 Load current [5 mA] Load current measured at the output of the SITOP UPS1600. Unsigned16 Measured charge current [1 mA] Measured battery charge current of the SITOP UPS1600.
- Page 132 Battery 6 temperature [1 °C] Battery 6: Battery temperature Integer8 Device temperature [1 °C] Temperature in the housing Integer8 Device temperature Status of LEDs 1 to 4 for the SITOP UPS1600 Unsigned8 0x0040: Identification value parameters (reading/writing) Data Description Data type Contact Name of the contact person.
- Page 133 Engineering and remote access 3.7 Cyclic and acyclic data Data Description Data type HttpAccessEnable from V2.1 Enable/disable HTTP access: Unsigned8 0: disable • 255: enable • Fill byte(s) from V2.1 Unsigned8 SITOP UPS1600 / UPS1100 Manual, 04.2016, A5E37775406-6-76...
- Page 134 Engineering and remote access 3.7 Cyclic and acyclic data SITOP UPS1600 / UPS1100 Manual, 04.2016, A5E37775406-6-76...
-
Page 135: Troubleshooting
Wrong battery number Attempting to retrieve data about a battery which does not exist or is not connected. Wrong address Wrong Flash address in software update - software update file is corrupt. SITOP UPS1600 / UPS1100 Manual, 04.2016, A5E37775406-6-76... - Page 136 Unknown battery Data from the battery cannot be read correctly. Battery is defective or not supported by SIEMENS. Overcurrent Output current of DC UPS is too high. Output is switched off for 20 s The output is switched on again after 20 s.
- Page 137 Different battery types connected. Only batteries of (battery index: x). the same type can be operated together. Battery parameters corrupt Battery defective - replace battery. (battery index: {1:d}). Fuse is defective (battery Fuse is defective. index: x). SITOP UPS1600 / UPS1100 Manual, 04.2016, A5E37775406-6-76...
- Page 138 Troubleshooting SITOP UPS1600 / UPS1100 Manual, 04.2016, A5E37775406-6-76...
-
Page 139: Mounting/Removing
Removal (example 6EP4136-3AB00-2AY0) (Page 139)) and disengage the device at the bottom edge of the standard mounting rail. Then you can remove the device from the upper edge of the standard mounting rail. Image 5-1 Removal (example 6EP4136-3AB00-2AY0) SITOP UPS1600 / UPS1100 Manual, 04.2016, A5E37775406-6-76... -
Page 140: Signal Connector
(6a). Removal To remove the USB connector, press to release the strain relief (6b) (see Image 5-3 Mounting/removal: USB connector (Page 140)) and then remove the connector. Image 5-3 Mounting/removal: USB connector SITOP UPS1600 / UPS1100 Manual, 04.2016, A5E37775406-6-76... -
Page 141: Profinet/Ethernet Connector
Push the connector onto the socket in the housing until the strain relief (5b) snaps into the housing (5a). Removal To remove the PROFINET/Ethernet connector, press to release the strain relief (5b) (see Image 5-4 Mounting/removal: Ethernet (Page 141)) and then remove the connector. Image 5-4 Mounting/removal: Ethernet SITOP UPS1600 / UPS1100 Manual, 04.2016, A5E37775406-6-76... -
Page 142: Sitop Ups1100
To remove the device, pull it forcibly downwards while removing it from the lower edge of the standard mounting rail (see Image 5-5 Removal (example 6EP4133-0GB00-0AY0 (3,2 Ah)) (Page 143)). Then you can remove the device from the upper edge of the standard mounting rail. SITOP UPS1600 / UPS1100 Manual, 04.2016, A5E37775406-6-76... - Page 143 Mounting/removing 5.2 SITOP UPS1100 Image 5-5 Removal (example 6EP4133-0GB00-0AY0 (3,2 Ah)) SITOP UPS1600 / UPS1100 Manual, 04.2016, A5E37775406-6-76...
- Page 144 Mounting/removing 5.2 SITOP UPS1100 SITOP UPS1600 / UPS1100 Manual, 04.2016, A5E37775406-6-76...
-
Page 145: Mounting Position, Mounting Clearances
A clearance of at least 50 mm should be maintained above and below the device. No clearance is required at the side. Output current as a function of the ambient temperature Image 6-1 6EP4134-3AB00-... : Output current in the standard mounting position SITOP UPS1600 / UPS1100 Manual, 04.2016, A5E37775406-6-76... -
Page 146: Other Mounting Positions
Mounting position, mounting clearances 6.1 SITOP UPS1600 Image 6-2 6EP4136-3AB00-... : Output current in the standard mounting position Image 6-3 6EP4137-3AB00-... : Output current in the standard mounting position 6.1.2 Other mounting positions Not released. SITOP UPS1600 / UPS1100 Manual, 04.2016, A5E37775406-6-76... -
Page 147: Sitop Ups1100
All mounting positions have been released, except the following: For UPS1100 1.2 Ah: Mounting position (2) (see the following diagram) all other UPS1100: Mounting position (5) (see the following diagram) Image 6-4 Mounting positions forbidden for the UPS1100 SITOP UPS1600 / UPS1100 Manual, 04.2016, A5E37775406-6-76... -
Page 148: Altitude Derating
Mounting position, mounting clearances 6.3 Altitude derating Altitude derating Output current as a function of the altitude derating Image 6-5 Altitude derating Details see chapter Environmental conditions (Page 169) SITOP UPS1600 / UPS1100 Manual, 04.2016, A5E37775406-6-76... -
Page 149: Installation
The fuses should only be inserted in the fuse holder when commissioning the device. SITOP UPS1100 1.2 Ah is only recommended in conjunction with SITOP UPS1600 10 A. SITOP UPS1100 2.5 Ah, 3.2 Ah and 5 Ah are only recommended in conjunction with SITOP UPS1600 10 A and 20 A. -
Page 150: Connecting The Sitop Ups1600 At Its Input
Image 7-1 Wiring Connecting the SITOP UPS1600 at its input SITOP UPS1600 is designed to be connected to a 24 V DC supply. The 24 V supply voltage must be SELV in accordance with EN60950-1 and EN50178. Image 7-2 Input side connection ①... -
Page 151: Connecting The Sitop Ups1600 At Its Output
7.2 Connecting the SITOP UPS1600 at its output Connecting the SITOP UPS1600 at its output The output of the SITOP UPS1600 is no-load, overload and short-circuit proof. If an overload occurs, the electronic current limiting function limits the output current to a maximum value (see Section Technical data (Page 155)). -
Page 152: Usb Interface
Connections 7/12 Ah ① Connection X1 The connections "X1+" and "X1-" are used to transfer power between the SITOP UPS1600 and the SITOP UPS1100. 1. Ensure that the cables are dimensioned corresponding to the fuses in the SITOP UPS1100 and the impedances between SITOP UPS1600 and SITOP UPS1100 are the same. -
Page 153: Maintenance
③ 4. Remove fuse 5. Replace the batteries. 6. Press the button for at least 2 s ④ stops flashing and lights continuously. 7. Insert the fuse. 8. Close the cover (screw). SITOP UPS1600 / UPS1100 Manual, 04.2016, A5E37775406-6-76... - Page 154 ● Buffer time counter ● Summed charge current ● Summed load current ● Calculated capacity Note Replace the battery only in normal operation, not in backup operation. Image 7-5 Maintenance Image 7-6 Wiring schematic SITOP UPS1600 / UPS1100 Manual, 04.2016, A5E37775406-6-76...
-
Page 155: Technical Data
Approx. 25 A Approx. 46 A at the maximum charge cur- at the maximum charge cur- at the maximum charge cur- rent (3 A) rent (4 A) rent (5 A) Reverse polarity protec- tion SITOP UPS1600 / UPS1100 Manual, 04.2016, A5E37775406-6-76... -
Page 156: Sitop Ups1100
27.5 V 28.8 V at 40 C 26.6 V 27.2 V 28.8 V at 50 C 26.8 V 27.8 V at 60 C 26.4 V See also SITOP UPS1600 (Page 157) Output (Page 157) SITOP UPS1600 / UPS1100 Manual, 04.2016, A5E37775406-6-76... -
Page 157: Output
40 °C - or if the input voltage at the UPS1600 is less than 24 V. Derating: 10 A: 3 A→2 A 20 A: 4 A→3 A 40 A: 5 A→3 A SITOP UPS1600 / UPS1100 Manual, 04.2016, A5E37775406-6-76... -
Page 158: Sitop Ups1100
4.1 minutes 4 minutes 18.8 minutes 12.5 minutes 26 minutes 20 A 2.9 minutes 1 minute 12.9 minutes 9 minutes 19.6 minutes 30 A 4.6 min 12.1 min 40 A 2.8 min 8.5 min SITOP UPS1600 / UPS1100 Manual, 04.2016, A5E37775406-6-76... -
Page 159: Efficiency
30 ms Short-circuit protec- Shutdown after 30 ms tion Reverse polarity With respect to the input voltage U and with respect to batteries protection Overload/short-circuit Yes, restart in normal operation indicator SITOP UPS1600 / UPS1100 Manual, 04.2016, A5E37775406-6-76... -
Page 160: Mtbf
Mean Time Between Failures SN29500: >320000 hours at 40 °C, rated load, 24-h operation Mechanical system 8.7.1 SITOP UPS1600 Table 8- 4 SITOP UPS1600 10 A / 20 A 6EP4134-3AB00- ... (10 A) 6EP4136-3AB00- ... (20 A) ... -0AY0 ... -1AY0 ... -2AY0 ... - Page 161 Type of mounting / S7-300 rail mounting Mounting Can be snapped onto standard TH35x7,5/15 mounting rails (EN 60715) Table 8- 5 SITOP UPS1600 40 A 6EP4137-3AB00- ... (40 A) ... -0AY0 ... -1AY0 ... -2AY0 Connection system Screw-type terminal Connections / DC input IN+, IN-: 1 screw terminal each for 0.5 - 16 (4) mm²...
-
Page 162: Sitop Ups1100
Height of the housing 186 mm 186 mm 186 mm Depth of the housing 112.7 mm 110.3 mm 110 mm Installation width 189 mm 186 mm 253 mm Mounting height 201 mm 201 mm 201 mm SITOP UPS1600 / UPS1100 Manual, 04.2016, A5E37775406-6-76... - Page 163 Type of mounting / wall mounting Type of mounting / rail mounting Type of mounting / S7-300 rail mounting Mounting Wall mounting, can be Wall mounting snapped onto standard TH35x15 mounting rails (EN 60715) SITOP UPS1600 / UPS1100 Manual, 04.2016, A5E37775406-6-76...
-
Page 164: Dimension Drawing
CAD data that can be downloaded from the Internet: 6EP4134-3AB00-0AY0 (http://www.automation.siemens.com/bilddb/index.aspx?objKey=G_KT01_XX_00813) 6EP4134-3AB00-1AY0 (http://www.automation.siemens.com/bilddb/index.aspx?objKey=G_KT01_XX_00816) 6EP4134-3AB00-2AY0 (http://www.automation.siemens.com/bilddb/index.aspx?objKey=G_KT01_XX_00819) 6EP4136-3AB00-0AY0 (http://www.automation.siemens.com/bilddb/index.aspx?objKey=G_KT01_XX_00810) 6EP4136-3AB00-1AY0 (http://www.automation.siemens.com/bilddb/index.aspx?objKey=G_KT01_XX_00807) 6EP4136-3AB00-2AY0 (http://www.automation.siemens.com/bilddb/index.aspx?objKey=G_KT01_XX_00804) 6EP4137-3AB00-0AY0 (http://www.automation.siemens.com/bilddb/index.aspx?objKey=G_KT01_XX_01019) 6EP4137-3AB00-1AY0 (http://www.automation.siemens.com/bilddb/index.aspx?objKey=G_KT01_XX_01022) 6EP4137-3AB00-2AY0 (http://www.automation.siemens.com/bilddb/index.aspx?objKey=G_KT01_XX_01025) 6EP4131-0GB00-0AY0 (http://www.automation.siemens.com/bilddb/index.aspx?objKey=G_KT01_XX_00829) 6EP4132-0GB00-0AY0 (http://www.automation.siemens.com/bilddb/index.aspx?objKey=G_KT01_XX_01013) 6EP4133-0GB00-0AY0 (http://www.automation.siemens.com/bilddb/index.aspx?objKey=G_KT01_XX_00832) 6EP4134-0GB00-0AY0 (http://www.automation.siemens.com/bilddb/index.aspx?objKey=G_KT01_XX_00835) 6EP4135-0GB00-0AY0 (http://www.automation.siemens.com/bilddb/index.aspx?objKey=G_KT01_XX_01016) 6EP4133-0JB00-0AY0 (http://www.automation.siemens.com/bilddb/index.aspx?objKey=G_KT01_XX_01105) SITOP UPS1600 / UPS1100 Manual, 04.2016, A5E37775406-6-76... -
Page 165: Safety, Approvals, Emc
6EP4134-3AB00- ..., 6EP4136-3AB00- ..., 6EP4137-3AB00- ... 6EP4131-0GB00- ..., 6EP4132-0GB00- ..., 6EP4133-0GB00- ..., 6EP4134-0GB00- ..., 6EP4135-0GB00- ..., 6EP4133-0JB00- ... Protection class Class III Degree of protection IP20 (EN 60529) Test voltage See Table 9-1 Test voltage (Page 166) SITOP UPS1600 / UPS1100 Manual, 04.2016, A5E37775406-6-76... -
Page 166: Test Voltage
200 V DC 140 V AC Field test 200 V DC 2200 V DC 140 V AC 1500 V AC Remark: Tripping current for DC measurement: 0 mA Tripping current for AC measurement: <100 mA SITOP UPS1600 / UPS1100 Manual, 04.2016, A5E37775406-6-76... -
Page 167: Approvals
3G Ex nA IIC T4 Gc cCSAus HazLoc Class I, I, Div 2, Group A,B,C,D T4 Div 2, Group A,B,C,D T4 6EP4133-0JB00- 0AY0: No explosion protection certification CB certification Yes, (IEC 60950-1) Yes, (IEC 60950-1) Marine approvals SITOP UPS1600 / UPS1100 Manual, 04.2016, A5E37775406-6-76... -
Page 168: Emc
EN 61000-4-6 10 V; 0.15 - 80 MHz Magnetic fields EN 61000-4-8 Not applicable Emitted interference EN 55022 Class B Generic standards EN 61000-6-2 Immunity for industrial environments EN 61000-6-3 Emission for residential areas SITOP UPS1600 / UPS1100 Manual, 04.2016, A5E37775406-6-76... -
Page 169: Environmental Conditions
-7.5% / 1000 m or the ambient temperature must be reduced by 5 K / 1000 m see Image 6-5 Altitude derating (Page 148) Storage: 1080 - 660 hPa (-1000 - 3500 m) • SITOP UPS1600 / UPS1100 Manual, 04.2016, A5E37775406-6-76... - Page 170 3.5 mm deflection in the range 5 – 9 Hz 1 g acceleration in the range 9 – 150 Hz EN 60068-2-27 shock, test Ea: • acceleration 150 m/s , test duration 11 ms SITOP UPS1600 / UPS1100 Manual, 04.2016, A5E37775406-6-76...
- Page 171 -7.5% / 1000 m or the ambient temperature must be reduced by 5 K / 1000 m see Image 6-5 Altitude derating (Page 148) Storage: 1080 - 660 hPa (-1000 - 3500 m) • SITOP UPS1600 / UPS1100 Manual, 04.2016, A5E37775406-6-76...
- Page 172 Environmental conditions SITOP UPS1600 / UPS1100 Manual, 04.2016, A5E37775406-6-76...
-
Page 173: Environment
Packaging and packaging aids can and should always be recycled. The product itself may not be disposed of as domestic refuse. Note The rechargeable batteries must be disposed of, discharged according to the applicable regulations. SITOP UPS1600 / UPS1100 Manual, 04.2016, A5E37775406-6-76... - Page 174 Environment SITOP UPS1600 / UPS1100 Manual, 04.2016, A5E37775406-6-76...
-
Page 175: Service & Support
● Phone: + 49 (0) 911 895 7222 ● E-Mail (mailto:support.automation@siemens.com) ● Internet: Online support request form (http://www.siemens.de/automation/support-request) Technical documentation on the Internet Operating instructions and manuals for SITOP are available in the Internet: Operating instructions/manuals (http://www.siemens.de/sitop/manuals) SITOP power supply homepage General news about our power supplies is available in the Internet at the SITOP homepage: SITOP (http://www.siemens.de/sitop) - Page 176 Service & Support Contact persons If you have any questions regarding the use of our products, then contact the Siemens contact person in your regional Siemens sales office. You can find these addresses as follows: ● On the Internet (http://www.siemens.de/automation/partner) ●...
Need help?
Do you have a question about the SITOP UPS1600 and is the answer not in the manual?
Questions and answers