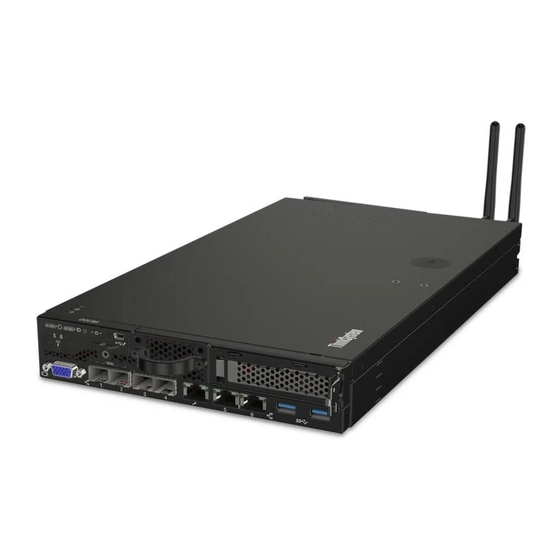
Lenovo ThinkSystem SE350 Manual
Friction 2-post screw-in rail kit
Hide thumbs
Also See for ThinkSystem SE350:
- Maintenance manual (196 pages) ,
- Configuration & installation manual (24 pages) ,
- Manual (8 pages)
Advertisement
Quick Links
ThinkSystem Friction 2-Post Screw-in Rail Kit
Read guidelines first
Review the documentation that comes with the rack for safety and cabling information. Before you install the
server in a rack, read the following guidelines:
• Some illustrations might differ from your server. All types of server are removed and installed in a similar
manner.
• See the Maintenance Manual for the maximum room air temperature.
• Do not block any air vents, usually 15 cm (6 inches) of air space provides proper airflow.
• Plan the device installation starting from the bottom of the rack.
• Install the heaviest device in the bottom of the rack.
• Do not extend more than one device out of the rack at the same time.
• Do not place any objects on the top of the rack-mounted devices.
• Connect all power cords to properly wired and grounded electrical outlets.
• Do not overload the power outlet when installing multiple devices in the rack.
• The maximum width of the mounting flange is 225.6 mm (8.9 inches).
Safety notice
CAUTION:
Make sure the rails support your server model and use
safe practices when lifting
1 1
Advertisement

Related Manuals for Lenovo ThinkSystem SE350


Summary of Contents for Lenovo ThinkSystem SE350
- Page 1 ThinkSystem Friction 2-Post Screw-in Rail Kit Read guidelines first Review the documentation that comes with the rack for safety and cabling information. Before you install the server in a rack, read the following guidelines: • Some illustrations might differ from your server. All types of server are removed and installed in a similar manner.
- Page 2 Rail Support Matrix For the detailed information about the rail support, see the following website: https://en.resources.lenovo.com/ brochures/thinksystem-rail-support-matrix Part number Find the rail part number on the label as shown, use the part number to identify your rail model in the Rail Support Matrix above.
- Page 3 The rail package contains the following items: Document Left rail Right rail Nine M5 screws (for square-hole and round-hole rack) Nine cage nuts (for square-hole rack) Nine clip nuts (for round-hole rack) Nine 10-32 screws (for threaded rack) Nine 12-24 screws (for threaded rack) Four screws...
-
Page 4: Installation Steps
Installation steps Remove Inner Rails Note: The graphic shown below is the right rail. Step 1. Pull the inner rail outward until you see the release latch. Step 2. Press the release latch. Step 3. Pull out the inner rail away from the outer rail. Step 4. - Page 5 Install Inner Rails on System Note: The graphic shown below is the right rail. Step 1. Align the mounting holes in the inner rail with the corresponding rail mounting pins on the side of the server. Step 2. Push the inner rail as shown until the mounting pins on the server lock into place with the inner rail. Step 3.
- Page 6 Adjust the Position of the Sliding Brackets (optional) Bracket position for different server depth: Server depth: 480 mm-560 mm (default position) Server depth: 675 mm-752 mm Server depth: 700 mm-779 mm Server depth: 725 mm-805 mm Note: Based on the server dimension, you may need to adjust the bracket to make sure the center of gravity of the server is within the rails.
- Page 7 Install Nuts to Rack Note: For threaded rack, skip to the next page for Step 5. • For round-hole rack, install clip nuts to the rack as shown Clip nut • For square-hole rack, install cage nuts to the rack as shown Cage nut...
- Page 8 Install Rails to Rack Notes: The graphic shown below is the right rail. Use the same method to install the rails to all types of racks: • For square-hole rack, use M5 screws and cage nuts • For round-hole rack, use M5 screws and clip nuts •...
- Page 9 Slide System into Rails in Rack Step 1. Carefully lift the server and align the server with the slide rails. Position the server as shown and push the server into the rack. Step 2. Press the release latches. Step 3. Push the server all the way into the rack until the server locks into place with a click.
- Page 10 Tighten Front Screws (optional) Secure the server before you move the rack or place the rack in a vibration-prone area. Open the rack release latches and tighten the screws to firmly secure the system. Rack release latches Front Screw 1 1 0 0...
- Page 11 Removal steps Remove System from Rack Note: Make sure you have enough help and use safe practices when performing Step 3 . Step 1. Disconnect all cables from the rear of the server. Open the rack release latch in the front of the server and loosen the front screws;...
- Page 12 First Edition (July 2019) © Copyright Lenovo 2019. LENOVO and THINKSYSTEM are trademarks of Lenovo. All other trademarks are the property of their respective owners. LIMITED AND RESTRICTED RIGHTS NOTICE: If data or software is delivered pursuant to a General Services Administration (GSA) contract, use, reproduction, or disclosure is subject to restrictions set forth in Contract No.