
Related Manuals for Solwave 180MWHD12


Summary of Contents for Solwave 180MWHD12
- Page 1 User Manual User Manual Commercial Microwaves Model: 180MWHD12, 180MWHD18, 180MWHD21 04/2020 Please read and keep these instructions. Indoor use only.
-
Page 2: Specifications
User Manual Specifications Model Voltage Power Dimensions (LxWxH) Net Wt. Shipping Wt. Plug Type 180MW12HD 120V 1200W 16.5" x 22.25" x 13.5" NEMA 5-20P 180MW18HD 208V/240V 1800W 16.5" x 22.25" x 13.5" NEMA 6-20P 180MW21HD 208V/240V 2100W 16.5" x 22.25" x 13.5" NEMA 6-20P IMPORTANT SAFETY INSTRUCTIONS 1. -
Page 3: Grounding Instuctions
User Manual Grounding Instuctions This appliance must be used with a grounded outlet. In the event of an electrical short circuit, grounding reduces the risk of electrical shock by providing an alternate pathway for the electrical current. This appliance is equipped with a cord and grounding plug. - Page 4 User Manual Materials and Utensils in Microwave Oven Tightly-closed containers could explode. Closed containers should be opened and plastic pouches pierced before cooking. There may be certain non-metallic utensils that are not safe to use for microwaving. If in doubt, test utensil in question with the following procedure: 1.
-
Page 5: Setting Up Your Oven
Plastic foam Plastic foam may melt or contaminate the liquid inside when exposed to high temperature. User Manual Wood Wood will dry out when used in the microwave oven and may split or crack. SETTING UP YOUR OVEN Names of Oven Parts and Accessories Setting Up Your Oven Remove the oven and all materials from the carton and oven cavity. -
Page 6: Countertop Installation
User Manual Countertop Installation Remove all packing material and accessories. Examine the oven for any damage such as dents or broken door. Do not install if oven is damaged. Cabinet: Remove any protective film found on the microwave cabinet surface. Countertop Installation 1) Select a level surface that provides enough open space for the intake and/or….Never remove the appliance’s feet or Remove all packing material and accessories. -
Page 7: Cleaning Instructions
User Manual Cleaning Instructions Always keep the oven clean. For cleaning instructions on particular pieces of the appliance, see below. Glass Viewing Window, Inner Door Panel, and Oven Front: 1. For best performance and to maintain a high degree of safety, inner door panel should be free of food and grease build-up. -
Page 8: Operation
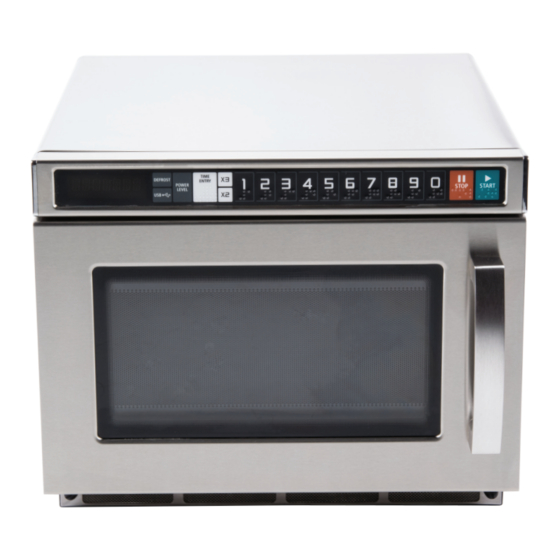
User Manual OPERATION Control Panel(with braille) and Features (2) (3) (4) (5) (8) (9) (1) Defrost Button (2) USB Buttons (3) Power Level Button (4) Time Entry Button (5) Double Quantity Button (6) Triple Quantity Button (7) Number Buttons (8) Stop/Reset Button (9) Start Button... - Page 9 User Manual OPERATION INSTRUCTION Appendix. A User Options Items bolded below are the default values. Option Discription Setting 3 3 s s e e c c o o n n d d s s b b e e e e p p O O P P : : 1 1 0 0 Continuous beep OP:11...
-
Page 10: Appendix. B Default Cook Times
User Manual Appendix. B Default Cook Times The oven shall ship with the following Preset Cook Times unless otherwise noted in the product Specification. Button Cook Factors Display (Time) Power 0:10 100% 0:20 100% 0:30 100% 0:45 100% 1:00 100% 1:30 100% 2:00... -
Page 11: Ready Mode
User Manual 1. Power Up 1. Power Up When the oven is electrified for the first time, the voltage will display for 3 times and When the oven is electrified for the first time, the voltage will display for 3 times and _ _ _ _ _ _ _ then "... - Page 12 User Manual 5. Pause Mode 5. Pause Mode 1. Power Up A) This mode allows a user to temporarily stop the cooking cycle to inspect or stir food. 1) This mode allow the users to temporarily stop the cooking cycle to inspect or When the oven is electrified for the first time, the volta _ _ _ _ _ _ _ stir the food item.
-
Page 13: Programming Mode
Mode, the oven shall go into The End of Cook Cycle Mode. 2) During this mode, "DONE" displays. User Manual 3) If either User Option OP:11 or "OP:12" is selected, the oven shall continue to sound until the user acknowledges this by either opening and closing the door or pressing the " "... - Page 14 Mode, the oven shall go into The End of Cook Cycle Mode. 2) During this mode, "DONE" displays. User Manual 3) If either User Option OP:11 or "OP:12" is selected, the oven shall continue to sound until the user acknowledges this by either opening and closing the door or pressing the " "...
- Page 15 This mode allow the users to temporarily stop the cooking cycle to inspect or stir the food item. User Manual se Mode While in Manual Cook Mode or Preset Program Cook Mode, if the door is open mode allow the users to temporarily stop the cooking cycle to inspect or and then closed, or if the "...
- Page 16 User Manual porarily stop the cooking cycle to inspect or 14. Stage Cooking Programming This mode allows the user to cook food items at manual cook mode and programming mode. reset Program Cook Mode, if the door is open A) Three stages can be set at most under cooking mode or programming mode. After setting pad is pressed, the oven will enter Pause Mode.
-
Page 17: Usb Function
User Manual 16. USB Function A) During Ready Mode, insert the U disk which saved the "Utable" file. B) Press "USB" button to update the data of computer board. "LOADING" displays. ) Close the door, the oven will turn back to Ready Mode. C) If the update is successful, the screen will display "SUCCESS". -
Page 18: Filter Cleaning
User Manual Filter cleaning Caution! Make sure the splash shield is installed correctly before use of the microwave oven! Filter Filter screws The front filter serves as the air inlet; the filter should be cleaned The front filter serves as the air inlet; the filter should be cleaned on time on time to keep the chamber clean. -
Page 19: Limited Warranty
Equipment that has been changed, altered, or modified or repaired by other than an Authorized Service Agency. Solwave shall not be held liable for any damages to any person or property which may result from the use of the equipment thereafter.
Need help?
Do you have a question about the 180MWHD12 and is the answer not in the manual?
Questions and answers