Advertisement
A S S E M B LY I N S T R U C T I O N S
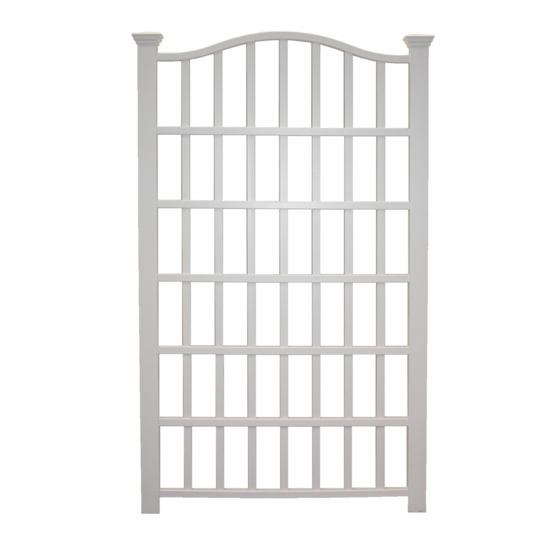
The Trellis
Please read through before starting assembly.
IMPORTANT: CHECK THE INSIDE OF YOUR POSTS FOR ALL MATERIALS.
Check Box for These Contents
1. Arched Top Rail (1) 1 1/2" Square x 53 3/4" - White / Composite
2. Post Caps (2) White / Composite
3. Posts (2) 2" x 3 1/2" x 95" - White / Composite
4. Vertical Spindles (2) 7/8" X 1 1/2" X 83" - White / Composite
5. Vertical Spindles (2) 7/8" X 1 1/2" X 84 3/4" - -2 White / -2 Composite
6. Vertical Spindles (2) 7/8" X 1 1/2" X 86 1/2" - White / Composite
7. Vertical Spindle (1) 7/8" X 1 1/2" X 87 1/4"- White / Composite
8. Horizontal Spindles (5) 1 1/2" x 1 1/2" x 53 3/4" - White / Composite
9. Bottom Rail (1) 1 1/2" x 1 1/2" x 53 3/4" - White / Composite
10. Ground Anchoring Stakes (2) 1 3/4" x 3 1/4" x 30" - White / Composite 11. 3/4"
Self-Auguring Stainless Steel Screw (25) White / Composite
Tools You Will Need
• Cordless Drill
• Hammer
• Tape Measure
• Level
• Shovel
General Information
• Read Instructions through carefully before beginning assembly.
• When assembling components, place on a non-abrasive surface
(i.e. shipping box) to avoid scratching.
• We recommend an area approx 5'x 8' for unobstructed assembling.
• You should not need to use excessive force when assembling component.
87.38 in
8 in
47 in
54 in
10
11
Not to Scale
2 in
1
2
3
4
5
6
7
8
9
96 in
1
Advertisement
Table of Contents

Related Manuals for New England Arbors The Trellis


Summary of Contents for New England Arbors The Trellis
- Page 1 A S S E M B LY I N S T R U C T I O N S The Trellis 87.38 in 96 in 8 in 47 in 2 in 54 in Please read through before starting assembly. IMPORTANT: CHECK THE INSIDE OF YOUR POSTS FOR ALL MATERIALS.
- Page 2 Continue assembly by inserting the top arched rail end into the post and progressively into each of the vertical spindles. Proceed to attach the second post to the trellis assembly as shown below. Ensure tabs are inserted all the way into the posts.
- Page 3 S T E P T W O Install the Screws While making sure the trellis is square, secure the trellis with 21 of the provided screws at the locations shown below: The Trellis rbors.com...
- Page 4 S T E P F O U R Install Trellis into Ground Move the trellis to its final location. When you are satisfied with the location, mark the positions of the posts, then move the trellis aside and lay it carefully on it’s side. Excavate the 2 post holes approximately 22"...
Need help?
Do you have a question about the The Trellis and is the answer not in the manual?
Questions and answers