Advertisement
Quick Links
Einbauanleitung
LamboStyleDoors
(Die Anleitung bezieht sich auf eine Fahrzeugseite –
gültig aber für beide Seiten)
Opel Corsa B Typ B, -B, S93
Artikel Nr. 500 60 001
Einbauvoraussetzungen:
- Gutachten mit Fahrzeugdaten überprüft.
- Batterie abgeklemmt.
- Vorderen Kotflügel demontiert.
- Unfallfreies Fahrzeug.
- Radhausverkleidung vorhanden.
Vorbereitungen:
(Demontage nach Fahrzeughersteller-Richtlinien)
- Türfangband demontieren
- Kabelsteckverbindung zwischen Tür
und A-Säule trennen
- Tür demontieren.
- Kotflügelbearbeitung => Seite 4
- Türkabelbaum mit beigelegtem Kabelsatz verlängern
=> Seite 6
- Montage Kohlefilter => Seite 11
- Montage LSD Doors => Seite 13
Eine Marke der KW automotive GmbH - Aspachweg 14 - D-74427 Fichtenberg
50060001 Opel Corsa B Typ B, -B, S93 / Type B, -B, S93
Installation Instructions
LamboStyleDoors
(The instruction are to be used as a reference. Please repeat
for both doors)
Opel Corsa B type B, -B, S93
Part number 500 60 001
Pre installation check list
- Double check vehicles data with TUV certificate
- Battery disconnected
- Front fender removed
- Vehicle must be accident free
- Vehicle must have inner fender cover
Preparations:
(Disassemble parts according to vehicle manufacturer
specifications)
- Disassemble the door stopper.
- Disconnect the cable connector between chassis
and door
- Disassemble the door.
- Modify the fender => Page 4
- Extend the factory door wire harness by use of the
supplied extension kit => Page 6
- Assembly of the Charcoal filter => Page 11
- Assembly the LSD Doors => Page 13
02.07.2013 Rev. A1- Seite/ Page 1
:
Advertisement

Related Manuals for LSD-Doors 500 60 001


Summary of Contents for LSD-Doors 500 60 001
- Page 1 Seiten) for both doors) Opel Corsa B Typ B, -B, S93 Opel Corsa B type B, -B, S93 Artikel Nr. 500 60 001 Part number 500 60 001 Einbauvoraussetzungen: Pre installation check list - Gutachten mit Fahrzeugdaten überprüft.
-
Page 2: Danger Warnings
Danger warnings Gefahrenhinweise Der Einbau des Scharniersystems muss gemäß der LSD Doors must be installed according to the provided vehicle fahrzeugspezifischen LSD Doors Montageanleitung erfolgen und specific instructions from LSD Doors and installation should be ist durch einen Fachbetrieb durchzuführen. performed by an authorized dealer. -
Page 3: Attention Notice
Irrtümer und Änderungen vorbehalten. Aktuelle Einbauanleitung Updated installation instructions can be found on www.lsd- unter www.lsd-doors.de. doors.com (guide notes subject to change without notice). Eine Marke der KW automotive GmbH - Aspachweg 14 - D-74427 Fichtenberg 50060001 Opel Corsa B Typ B, -B, S93 / Type B, -B, S93... - Page 4 Kotflügelbearbeitung / Modifying the fender Steps below are to be used as a reference. Folgende Schritte sind Empfehlungen und Please repeat for both fenders. für beide Kotflügelseiten zu wiederholen. Empfohlenes Werkzeug: Recommended tool: Pressluftsäge Pneumatic air saw Dieser Bereich muss ausgeschnitten werden / This part must be cut out Min.
- Page 5 A1.) 13 cm / 5,1 inch A2.) Eine Marke der KW automotive GmbH - Aspachweg 14 - D-74427 Fichtenberg 50060001 Opel Corsa B Typ B, -B, S93 / Type B, -B, S93 02.07.2013 Rev. A1- Seite/ Page 5...
- Page 6 Extending the wire Kabelverlängerung harness Recommend : Empfehlung: Extend the cable always 43,30 inch / 1,1 m (Kabel immer 1,1m verlängern) Bsp.: Nissan Z350 Kabelbaum kann abweichen. Nissan Z350 shown, your wire harness may look different. Originaler Türkabelbaum. Original door wire harness. VW EOS Ummantelung Türkabelbaums...
- Page 7 V e r w e c h s l u n g s g e f a h r auszuschließen, bitte jedes Kabel Türkabelbaums separat trennen Enden Kabel a b i Kabel versetzt durchrennen. Siehe unten. To avoid confusion please cut and uninsulate each wire off the wire harness separately...
- Page 8 Mit Hilfe eines Heißluftfönes die Löt- Schrumpfverbinder von außen nach innen erwärmen. Darauf achten damit das Lötzinn, im inneren des Löt- Schrumpfverbinders, das Kabel komplett umschließt (verläuft). Please use a hot air dryer to heat up the solder shrink connectors from outside to inside.
- Page 9 Die vorangegangen Schritte nun mit allen Kabeln wiederholen. Please repeat the earlier steps to all wires. Nissan Z350 Bei Verlängerungen am CAN- Datenbus ist besonderst auf die Schirmung und Verdrillung zu achten. When working with Share-data bus system please take special care to reroute the wires correctly and not to damage the wire insulation.
- Page 10 Die Schrumpfverbinder sollten zusätzlich jeweils einzeln mit dem mitgelieferten Gewebeband ummantelt werden. The shrinkable connectors can now be wrapped with the supplied waterproof insulation tape. Schluss dann kompletten Kabelbaum mit Hilfe des Gewebebandes wieder ummanteln. Achtung: Kabel beim Nissan Z350 ummanteln gerade halten.
- Page 11 Kohlefilter / Charcoal filter 1.) Für die Montage der LSD Doors muss der 1.) For the assembly the LSD Doors, shifted the charcoal Kohlefilter an einen anderen Ort verlegt werden. filter to another place. 2.) Original Schlauch abtrenne und mit dem 2.) Cutt off the standard hose and extended the hose mitgelieferten Unterdruckschlauch...
- Page 12 3.) Neuer Montageort befindet sich z.B. 3.) New assembly place is e.g. behind hinter der Stoßstange. the bumper. 4.) Kohlefilter mit Kabelbinder am Fahrzeug 4.) Fix the charcoal filter with cable ties on the befestigen. vehicle. Eine Marke der KW automotive GmbH - Aspachweg 14 - D-74427 Fichtenberg 50060001 Opel Corsa B Typ B, -B, S93 / Type B, -B, S93 02.07.2013 Rev.
-
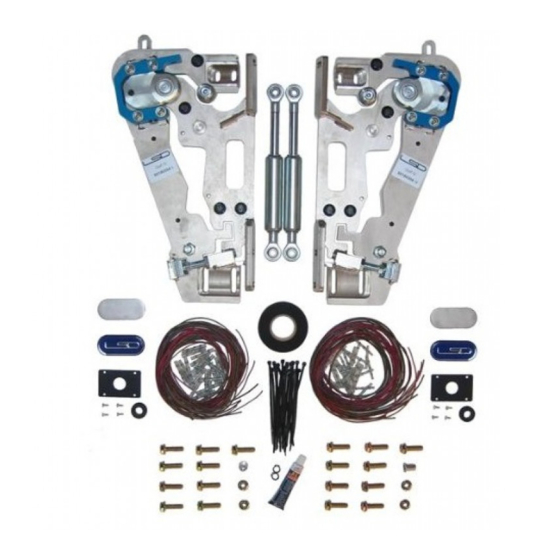
Page 13: Hardware List
Stückliste Hardware list (pro Fahrzeugseite) (per vehicle side) 68350023 68510040 68310044 65321350 Sicherungsring / Kabelbinder / Sperrzahnmutter / Unterlage / Snap ring Cable ties Serrated nut Washer 2x Dünn / 1x Dick / fine flat M8x40 65321837 65322362 68320055 65321523 65321315 Befestigungswinkel / Abdeckung A-Säule /... - Page 14 Stückliste Hardware list (pro Fahrzeugseite) (per vehicle side) 68580007 LSD-Schwingarm / LSD-Grundplatte / LSD-Türbeschlag / Aufkleber / LSD swing arm LSD ground plate LSD door system Sticker Für Kohlefilter / For the Charcoal filter 68330015 68510011 Unterlegscheibe / Kabelbinder / Flat washer Cable ties Eine Marke der KW automotive GmbH - Aspachweg 14 - D-74427 Fichtenberg...
- Page 15 Baugruppe Gleitrolle Links 50100029 4x 68320044 Rechts 50100030 Assembly group slide roller Left 50100029 Right 50100030 1. Einstellschraube - MAGIC STICK 1. MAGIC STICK - lower adjustement screw 2. C-Profil 2. M.A.R.A (Multiple - Axis - Rotational - Assembly) 3. 3. Befestigungspunk 3.
- Page 16 1.) Die originalen Scharnieren an der A-Säule 1.) The original hinges on the A-pillar (top & (oben und unten) müssen an der gestrichelten bottom) have to be modified. Linie abgesägt und plan geschliffen werden. Please cut off the OEM hinges and grind smooth as shown in photo.
- Page 17 2.) Die originalen Scharnieren an der Türe (oben 2.) The original hinges on the door (top & bottom) have to und unten) müssen zunächst an der gestrichelten be modified. Linie abgesägt und plan geschliffen werden. Please cut off the OEM hinges and grind smooth as shown in photo.
- Page 18 3.) An den Original Scharnieren der A-Säule 3.) Now you will need to create mounting points on the muss zunächst eine Befestigungsmöglichkeit für A-pillar, for attaching the LSD chassis plate. die LSD-Grundplatte geschaffen werden. The hinges have to be drilled and tapped on the points Hierfür bitte die Scharniere an den nachfolgend as shown in the picture..
- Page 19 4.) An den Original Scharnieren der Türe muss 4.) Now you will need to create mounting points on the zunächst eine Befestigungsmöglichkeit für den Door, for attaching the LSD swing arm. LSD-Schwingarm geschaffen werden. The hinges have to be drilled and tapped (M10)on the Hierfür bitte die Scharniere an den nachfolgend points shown in the picture..
- Page 20 5.) Original Kabelbaumdurchführung mit der 5.) Close the extended cable harness lead- through hole with the supplied cover plate (F), Abdeckung (F) und Schrauben (P) verschließen (erforderliche Bohrung: Ø 2 mm) und zusätzlich and screws (P) (required drilling: Ø 2 mm / 0,08 mit Karosseriekleber (L) abdichten.
- Page 21 7.) Nun kann die LSD-Grundplatte (R) an den 7.) Mount the LSD ground plate (R) to the new neuen Befestigungspunkten hinge mounting holes /points on the chassis. Use mitgelieferten Schrauben (I) befestigt werden. supplied bolts (I). Anzugsdrehmoment 30Nm. Tightening torque 22 ft - lb (30 Nm). Eine Marke der KW automotive GmbH - Aspachweg 14 - D-74427 Fichtenberg 50060001 Opel Corsa B Typ B, -B, S93 / Type B, -B, S93 02.07.2013 Rev.
- Page 22 8.) Türkabelbaum mit der Tür verbinden und mit 8.) Connect the door wire harness and save it Klebeband sichern. with tape. Eine Marke der KW automotive GmbH - Aspachweg 14 - D-74427 Fichtenberg 50060001 Opel Corsa B Typ B, -B, S93 / Type B, -B, S93 02.07.2013 Rev.
- Page 23 9.) LSD-Schwingarm (Q) an den neuen 9.) Now the LSD swing arm (Q) has to be Scharnieraufnahmen mit den mitgelieferten installed in the original mounting points on the Schrauben (I) befestigen. door with the supplied screws (I). Anzugsdrehmoment 30Nm. Tightening torque 22 ft - lb (30 Nm). Eine Marke der KW automotive GmbH - Aspachweg 14 - D-74427 Fichtenberg 50060001 Opel Corsa B Typ B, -B, S93 / Type B, -B, S93 02.07.2013 Rev.
- Page 24 10.) Türe an KFZ anbringen 10.) Place the door back on the und sie dabei komplett car, close door completely. schließen. TIPP: Dabei den Kugelkopf des TIP/ADVISE: Use the lower Magic Sticks (Einstellschraube) adjustment screw, MAGIC ( 1 ) a l s F ü...
- Page 25 13.) Türenhöhe durch 13.) Adjust the height of the vertikales verschieben door by moving the ground plate Grundplatte (R) vertically. You might have to ausrichten. Hierzu bitte loosen bolts (I) on the ground plate to do this. die Schrauben (I) an der Grundplatte lösen.
- Page 26 15.) Nun die Gasfeder (J) am 15.) Hang in the gas spring (J) on Befestigungspunkt des the fitting point of the swing arm. Schwingarms einhängen und Secure it with the supplied mit dem beigelegten security ring, by means of needle- Sicherungsring mit Hilfe einer nosed pliers.
- Page 27 17.) Only if required 17.) Nur bei Bedarf Ist der Magic Stick (Einstellschraube) (1) beim If the Magic Stick - lower adjustment screw (1) is Herunterschwenken nicht in der Führung, so ist not in correct position when the door is closed, spacer (D) has to be installed under the M.A.R.A.
- Page 28 18.) Die Gleitrolle (4) muss so eingestellt werden, 18.) Please adjust the slide roller (4) so the LSD dass LSD-Schwenkarm beim öffnen swing arm has initial contact and preload while schließen und beim hoch bzw. runterschwenken opening and closing. unter leichter Vorspannung geführt wird. Evtl. ist die Use a spacer (s) if applicable (H).
- Page 29 19.) Tür schließen und ins Türschloss 19.) Close the door again and let the door lock and set einrasten. in place. 20.) Nach erfolgten Einstellarbeiten bitte für die an 20.) After adjustments are finalized, drill an 9 mm / Position (3) vorgesehene Mutter (C) und 0.35 inch hole in the chassis, use hole (3) in the LSD chassis plate as a guide.
- Page 30 24.) Kabel verlegen und mit Kabelbinder 24.) Lay the wire harness on and attach it to the marked points, then secure with included cable ties (B) an den markierten Punkten befestigen. (B). Kabelverlegung unter dem Scharnier / Lay the cable under the hinge Eine Marke der KW automotive GmbH - Aspachweg 14 - D-74427 Fichtenberg 50060001 Opel Corsa B Typ B, -B, S93 / Type B, -B, S93 02.07.2013 Rev.
- Page 31 25.) Nun den bearbeiteten Kotflügel am 25.) Now reassemble the modified fender back on Fahrzeug montieren. the car. 26.) After that install the fender holder (E) with the 26.) Danach den Halter (E) mit der Schraube (N, screw (N, O). Please bend and cutting off the O) montieren.
Need help?
Do you have a question about the 500 60 001 and is the answer not in the manual?
Questions and answers