
Related Manuals for Fermax VIVO KIT


Summary of Contents for Fermax VIVO KIT
- Page 1 KIT VIVO VIVO KIT E S PA Ñ O L MANUAL DE INSTALADOR Y USUARIO E N G L I S H USER& INSTALLER’S MANUAL...
- Page 2 Fermax electrónica desarrolla y fabrica equipos de prestigio que cumplen los más altos estándares de diseño y tecnología. Su monitor de videoportero FERMAX le permitirá comunicarse con la placa de calle, ver la persona que le está llamando y abrirle la puerta de entrada si así lo desea.
-
Page 3: Table Of Contents
KIT VIVO KIT VIVO KIT VIVO KIT VIVO KIT VIVO KIT VIVO KIT VIVO KIT VIVO KIT VIVO KIT VIVO INDICE SECCIÓN I - Manual del Instalador ................5 Instalación Alimentador .................. 6 Instalación Placa de calle ................6 Instalación Monitor ..................8 Descripción de los equipos ................ - Page 4 KIT VIVO KIT VIVO KIT VIVO KIT VIVO KIT VIVO KIT VIVO KIT VIVO KIT VIVO KIT VIVO KIT VIVO - 8. AJUSTES GENERALES ............... 37 • 8.1 AJUSTES DE LLAMADA ............38 • 8.2 AJUSTES DE FONDO DE PANTALLA ........39 •...
-
Page 5: Sección I - Manual Del Instalador
KIT VIVO KIT VIVO KIT VIVO KIT VIVO KIT VIVO KIT VIVO KIT VIVO KIT VIVO KIT VIVO KIT VIVO Sección I - Manual del Instalador Pag 5... -
Page 6: Instalación Alimentador
KIT VIVO KIT VIVO KIT VIVO KIT VIVO KIT VIVO KIT VIVO KIT VIVO KIT VIVO KIT VIVO KIT VIVO INSTALACIÓN ALIMENTADOR Instalación en carril DIN Fijación con tornillos Desmontaje Montaje A IN -6 0 H z. A L I K I T N T A C I O... - Page 7 KIT VIVO KIT VIVO KIT VIVO KIT VIVO KIT VIVO KIT VIVO KIT VIVO KIT VIVO KIT VIVO KIT VIVO INSTALACIÓN PLACA DE CALLE MARINE Instalación con CAJA de EMPOTRAR - Conectar a tierra Instalación con CAJA de SUPERFICIE Acosejamos sellar la placa con un cordón de silicona para asegurar una mejor estanqueidad de ésta.
-
Page 8: Instalación Monitor
KIT VIVO KIT VIVO KIT VIVO KIT VIVO KIT VIVO KIT VIVO KIT VIVO KIT VIVO KIT VIVO KIT VIVO INSTALACIÓN MONITOR Pag 8... -
Page 9: Descripción De Los Equipos
KIT VIVO KIT VIVO KIT VIVO KIT VIVO KIT VIVO KIT VIVO KIT VIVO KIT VIVO KIT VIVO KIT VIVO DESCRIPCIÓN DE LOS EQUIPOS Placa de calle PROG 12 Vdc NO NC NO NC FINGERPRINT TAMPER READER KEYPAD RESET VIDEO Mini USB. -
Page 10: Programación
Alimentación 12 Vdc Consumo 190 mA mínimo 500 mA máximo 630 mA con 1 relé activo (conectado abrepuertas de 12Vdc Fermax) IP43 IP54 950 mA con 2 relés activos (conectados abrepuertas de 12Vdc Fermax) IK:07 IK:09 [-10 , +55 °C] Temperatura de funcionamiento [14, 131ºF]... -
Page 11: Monitor Vivo
LYNX (Ref. 1605) . Descripción de Funcionamiento: Botones e Iconos Tras el encendido, el monitor arranca y muestra el logotipo FERMAX, la versión del firmware y la dirección MAC. El proceso de arranque se completa en menos de 60 segundos y el monitor entra en modo stand-by. -
Page 12: Conexionado
(si está instalado el sensor de puerta, consulte a su instalador). Nota: Para más información, consultar al final de este manual la Sección II: Manual de Usuario o el Manual del Monitor VIVO (Cod. 97721), disponible en www.fermax.com. Conexionado Conexiones del monitor. -
Page 13: Características Técnicas
KIT VIVO KIT VIVO KIT VIVO KIT VIVO KIT VIVO KIT VIVO KIT VIVO KIT VIVO KIT VIVO KIT VIVO - RJ-45 10/100 Base - T Ethernet, alimentación a través de conector RJ-45. - NG, P: Para conectar un pulsador externo secundario SOS. Función no disponible en este kit. -
Page 14: Programación
KIT VIVO KIT VIVO KIT VIVO KIT VIVO KIT VIVO KIT VIVO KIT VIVO KIT VIVO KIT VIVO KIT VIVO PROGRAMACIÓN DEL MONITOR VIVO ¡El monitor, suminitrado en el kit de 1 Línea YA SALE PROGRAMADO de fábrica! Nota: Si por algún motivo necesita reprogramar el monitor, ver Anexo al final de la Sección del Instalador. -
Page 15: Configuración Idioma Y Fecha-Hora
KIT VIVO KIT VIVO KIT VIVO KIT VIVO KIT VIVO KIT VIVO KIT VIVO KIT VIVO KIT VIVO KIT VIVO CONFIGURACIÓN: Idioma y Fecha-Hora Idioma Seleccionar el idioma deseado para el monitor. El idioma por defecto de fábrica en el monitor es el inglés. Para ello se debe pulsar Ajustes generales y accedemos a la pantalla donde se encuentra la opción Ajustes de idioma. - Page 16 30 segundos el monitor vuelve a re- poso (pantalla apagada). Una vez introducidos los datos, pulsar para validarlos Nota: Para el resto de funciones que tiene este monitor, consultar el Manual del Monitor VIVO (Cod. 97721), disponible en www.fermax.es. Pag 16...
-
Page 17: Esquemas De Cableado
KIT VIVO KIT VIVO KIT VIVO KIT VIVO KIT VIVO KIT VIVO KIT VIVO KIT VIVO KIT VIVO KIT VIVO Esquemas de cableado Pag 17... - Page 18 KIT VIVO KIT VIVO KIT VIVO KIT VIVO KIT VIVO KIT VIVO KIT VIVO KIT VIVO KIT VIVO KIT VIVO ESQUEMA DE CABLEADO Kit 1L & 12 Vdc 100 - 240Vac SWITCH D max. 100 m. LINK/ACT PoE LINK/ACT PoE LINK/ACT 100M Max PoE 100-240V...
- Page 19 KIT VIVO KIT VIVO KIT VIVO KIT VIVO KIT VIVO KIT VIVO KIT VIVO KIT VIVO KIT VIVO KIT VIVO Kit 1L & 12 Vdc 100 - 240Vac SWITCH LINK/ACT PoE LINK/ACT PoE LINK/ACT 100M Max PoE 100-240V ALIMENTADOR ALIMENTATEUR POWER SUPPLY NETZGERÄT PROG...
-
Page 20: Anexo
(Para más opciones de programación con- sulte el manual web server Placas Lynx cod. 97744 en www.fermax.com). La Placa tiene un servidor web incorporado que permite cambios de configuración. A este servidor web se accede a través de la dirección IP de la placa. La dirección IP de la placa de kit es: 10.100.0.1. - Page 21 KIT VIVO KIT VIVO KIT VIVO KIT VIVO KIT VIVO KIT VIVO KIT VIVO KIT VIVO KIT VIVO KIT VIVO El sintetizador de voz se escuchará en el idioma seleccionado. Nota: Cada vez que se selecciona una opción diferente se tiene que pulsar la opción Guardar (de cada sección), para que los parámetros escogidos se salven y actualicen en los equipos.
- Page 22 KIT VIVO KIT VIVO KIT VIVO KIT VIVO KIT VIVO KIT VIVO KIT VIVO KIT VIVO KIT VIVO KIT VIVO Una vez en el idioma deseado, para realizar los ajuste de audio, seleccionar Aspecto >> Ajustes de llamada. PROGRAMAR Placa. Si por algún motivo necesita reprogramar la placa, la operación sería realizar un reset en la placa para restablecer los ajustes y valores de fábrica.
-
Page 23: Programación Monitor
KIT VIVO KIT VIVO KIT VIVO KIT VIVO KIT VIVO KIT VIVO KIT VIVO KIT VIVO KIT VIVO KIT VIVO PROGRAMAR Monitor. Si por algún motivo necesita reprogramar el monitor, la operación sería restablecer el monitor a la configuración de fábrica. Restaurar ajustes de fábrica. - Page 24 KIT VIVO KIT VIVO KIT VIVO KIT VIVO KIT VIVO KIT VIVO KIT VIVO KIT VIVO KIT VIVO KIT VIVO Como la operación de borrar es irreversible, cuando se confirma en la pantalla anterior sale un mensaje de aviso advirtiendo de la operación que se va a realizar y requiriendo una nueva confirmación para que se realice.
-
Page 25: Sección Ii - Manual Del Usuario
Gracias a su menú en pantalla se incluyen nuevas prestaciones para la configuración de los parámetros del monitor. Esperamos disfrute de sus funcionalidades. www.fermax.com Pag 25... -
Page 26: Monitor Vivo
LYNX (Ref. 1605) . Descripción de Funcionamiento: Botones e Iconos Tras el encendido, el monitor arranca y muestra el logotipo FERMAX, la versión del firmware y la dirección MAC. El proceso de arranque se completa en menos de 60 segundos y el monitor entra en modo stand-by. -
Page 27: Funcionamiento
(si está instalado el sensor de puerta, consulte a su instalador). Nota: Para más información, consultar el Manual del Monitor VIVO (Cod. 97721), dispo- nible en www.fermax.com. Funcionamiento 1. RECIBIR LLAMADAS Al recibir una llamada, la pantalla de conversación se abrirá automáticamente. -
Page 28: La Llamada No Se Contesta - Llamadas Perdidas
KIT VIVO KIT VIVO KIT VIVO KIT VIVO KIT VIVO KIT VIVO KIT VIVO KIT VIVO KIT VIVO KIT VIVO 1.1 La llamada no se contesta - Llamadas perdidas Cuando el monitor recibe una llamada, el video se muestra de inmediato y se reproduce el tono de timbre seleccionado en el monitor, dependiendo del origen de la llamada. -
Page 29: Rechazar Llamada
KIT VIVO KIT VIVO KIT VIVO KIT VIVO KIT VIVO KIT VIVO KIT VIVO KIT VIVO KIT VIVO KIT VIVO Al pulsar el icono registro de llamadas se accede a la pantalla Historial de llamadas. Al pulsar en la pestaña Llamadas perdi- Cuando elemento lista... -
Page 30: Responder Llamada - Ajustes De Audio Y Mute (Silenciar)
KIT VIVO KIT VIVO KIT VIVO KIT VIVO KIT VIVO KIT VIVO KIT VIVO KIT VIVO KIT VIVO KIT VIVO 1.3 Responder llamada - Ajustes de audio y mute (silenciar) Si la llamada se contesta pulsando el icono: responder llamada (teléfono verde), la comunicación de audio se conecta y los controles de audio se muestran: ajuste de audio y mute. -
Page 31: Ajustes De Video: Color, Brillo Y Contraste
KIT VIVO KIT VIVO KIT VIVO KIT VIVO KIT VIVO KIT VIVO KIT VIVO KIT VIVO KIT VIVO KIT VIVO 2. AJUSTES DE VIDEO: color, brillo y contraste El monitor permite realizar los ajustes brillo, contraste y color, pulsando el icono de Ajustes de video. - Page 32 KIT VIVO KIT VIVO KIT VIVO KIT VIVO KIT VIVO KIT VIVO KIT VIVO KIT VIVO KIT VIVO KIT VIVO Cuando se pulsa el icono de imágenes se accede a la pantalla ver imágen, que muestra la imagen más reciente, con la descripción definida del Terminal desde el que se ha realizado la llamada, la fecha y la hora.
-
Page 33: Apertura De Puerta
KIT VIVO KIT VIVO KIT VIVO KIT VIVO KIT VIVO KIT VIVO KIT VIVO KIT VIVO KIT VIVO KIT VIVO RESET DE IMÁGENES: Para borrar todas las imágenes existentes, se debe pulsar el botón borrar (papelera), durante más de 1 segundo. -
Page 34: Cámaras Ip
KIT VIVO KIT VIVO KIT VIVO KIT VIVO KIT VIVO KIT VIVO KIT VIVO KIT VIVO KIT VIVO KIT VIVO 5. AUTOENCENDIDO: CONEXIÓN PLACA DE CALLE / CÁMARA IP (si existe) Estando el monitor en reposo, si se pulsa el icono placa desde el menú inicio del monitor, se mostrará... -
Page 35: Modo No Molestar (Not Disturb): Cancelar Tono Llamada
KIT VIVO KIT VIVO KIT VIVO KIT VIVO KIT VIVO KIT VIVO KIT VIVO KIT VIVO KIT VIVO KIT VIVO Si el usuario se conecta con una cámara IP, en este caso no aparece el icono de la llave, ya que no hay relés para abrir. Notas: - El monitor detecta la cámara durante el arranque y una vez cada hora. -
Page 36: Limpieza De Pantalla
KIT VIVO KIT VIVO KIT VIVO KIT VIVO KIT VIVO KIT VIVO KIT VIVO KIT VIVO KIT VIVO KIT VIVO El modo normal se restablece después de que el periodo programado haya expirado o se pulse el icono no molestar en la pantalla inicio. Al deshabilitar el modo también se apaga el led no molestar. -
Page 37: Ajustes Generales
8.7 AJUSTES LLAMADA VIVIENDA A VIVIENDA. Función operativa en insta- laciones de edificios. 8.8 AJUSTES INSTALACIÓN. Funciones exclusivas del Instalador, se acce- de a éstas por medio del código PIN de instalador. Para más información, consultar el Manual del Monitor VIVO (Cod. 97721), disponible en www.fermax.com. Pag 37... -
Page 38: Ajustes De Llamada
KIT VIVO KIT VIVO KIT VIVO KIT VIVO KIT VIVO KIT VIVO KIT VIVO KIT VIVO KIT VIVO KIT VIVO Descripción y funcionamiento de los iconos de la pantalla de Ajustes generales, desa- rrollados para el Kit. 8.1 AJUSTES DE LLAMADA La función de ajustes de llamada permite seleccionar un tono de timbre para la placa de kit y su volumen. -
Page 39: Ajustes De Fondo De Pantalla
KIT VIVO KIT VIVO KIT VIVO KIT VIVO KIT VIVO KIT VIVO KIT VIVO KIT VIVO KIT VIVO KIT VIVO 8.2 AJUSTES DE FONDO DE PANTALLA La función de ajustes de fondo permite: - Seleccionar el color del fondo de la pantalla y la luminosidad. - Seleccionar el nivel de audio de la pantalla táctil. -
Page 40: Ajustes Internacionales (Fecha-Hora)
1234 y pulsar OK y accedemos a la pantalla donde se encuentran las opciones de Ajustes de privacidad. Para habilitar una función pulsar sobre ésta. Para deshabilitarla se realizaría la misma operación, pulsar sobre la función deseada. Para más información, consultar el Manual del Monitor VIVO (Cod. 97721), disponible en www.fermax.com. Pag 40... -
Page 41: Guía Rápida De Funcionamiento Para El Usuario
KIT VIVO KIT VIVO KIT VIVO KIT VIVO KIT VIVO KIT VIVO KIT VIVO KIT VIVO KIT VIVO KIT VIVO Guía rápida de funcionamiento para el Usuario 1. RECIBIR LLAMADAS Al recibir una llamada, la pantalla de conversación se abrirá automáticamente. Iconos que se pueden visualizar en ésta: Rechazar llamada. - Page 42 KIT VIVO KIT VIVO KIT VIVO KIT VIVO KIT VIVO KIT VIVO KIT VIVO KIT VIVO KIT VIVO KIT VIVO 5. AUTOENCENDIDO: CONEXIÓN PLACA DE CALLE / CÁMARA IP (si existe) Función para realizar la conexión con la placa de kit y cámaras IP (si existen). Inicialmente al realizar el autoencendido con la placa de kit, sólo se conecta el vídeo.
- Page 43 KIT VIVO KIT VIVO KIT VIVO KIT VIVO KIT VIVO KIT VIVO KIT VIVO KIT VIVO KIT VIVO KIT VIVO 8.3 AJUSTES DE IDIOMA La función de ajustes de idioma permite seleccionar el idioma deseado para el monitor. El idioma por defecto de fábrica en el monitor es el inglés. 8.4 AJUSTES DE IMÁGENES La función de ajustes de imágenes permite capturar imágenes automáticamente de cada llamada.
- Page 44 KIT VIVO KIT VIVO KIT VIVO KIT VIVO KIT VIVO KIT VIVO KIT VIVO KIT VIVO KIT VIVO KIT VIVO MENÚ AYUDA «?» En las pantallas donde exista un signo de interrogación, al pulsarlo se abre una pantalla de ayuda mostrando el icono con su significado. Pag 44...
- Page 45 KIT VIVO KIT VIVO KIT VIVO KIT VIVO KIT VIVO KIT VIVO KIT VIVO KIT VIVO KIT VIVO KIT VIVO Pag 45...
- Page 46 Fermax electronics develops and manufactures renown systems that meet the highest design and technology standards. Your FERMAX video door entry system will allow you to communicate with the entry panel, see who is calling you and open the front door if you wish.
- Page 47 VIVO KIT VIVO KIT VIVO KIT VIVO KIT VIVO KIT VIVO KIT VIVO KIT VIVO KIT VIVO KIT VIVO KIT TABLE OF CONTENTS SECTION I - Installation Manual ................5 Installing the Power Supply ..................6 Entry Panel Installation ................... 6 Installing the Monitor ..................
- Page 48 VIVO KIT VIVO KIT VIVO KIT VIVO KIT VIVO KIT VIVO KIT VIVO KIT VIVO KIT VIVO KIT VIVO KIT - 8. GENERAL SETTINGS ..............37 • 8.1 CALL SETTINGS ..............38 • 8.2 BACKGROUND SETTINGS ............. 39 • 8.3 LANGUAGE SETTINGS ............39 •...
-
Page 49: Section I - Installation Manual
VIVO KIT VIVO KIT VIVO KIT VIVO KIT VIVO KIT VIVO KIT VIVO KIT VIVO KIT VIVO KIT VIVO KIT Section I - Installation Manual Page 5... -
Page 50: Installing The Power Supply
VIVO KIT VIVO KIT VIVO KIT VIVO KIT VIVO KIT VIVO KIT VIVO KIT VIVO KIT VIVO KIT VIVO KIT INSTALLING THE POWER SUPPLY Installation in a DIN rail Fastened with screws Disassembly Assembly A IN -6 0 H z. - Page 51 VIVO KIT VIVO KIT VIVO KIT VIVO KIT VIVO KIT VIVO KIT VIVO KIT VIVO KIT VIVO KIT VIVO KIT MARINE ENTRY PANEL INSTALLATION Installation with FLUSH-MOUNTED BOX - Earth connection Installation with SURFACE-MOUNTED BOX We advise you to seal the panel with silicon to ensure waterproofness.
-
Page 52: Installing The Monitor
VIVO KIT VIVO KIT VIVO KIT VIVO KIT VIVO KIT VIVO KIT VIVO KIT VIVO KIT VIVO KIT VIVO KIT INSTALLING THE MONITOR Page 8... -
Page 53: Description Of The Equipment
VIVO KIT VIVO KIT VIVO KIT VIVO KIT VIVO KIT VIVO KIT VIVO KIT VIVO KIT VIVO KIT VIVO KIT DESCRIPTION OF EQUIPMENT Entry Panel PROG 12 Vdc NO NC NO NC FINGERPRINT TAMPER READER KEYPAD RESET VIDEO Mini-USB connector: For downloading the firmware (during manufacturing). -
Page 54: Programming
12 Vdc Consumption 190 mA minimum 500 mA maximum 630 mA with 1 active relay (connected to the 12Vdc Fermax lock-release) IP43 IP54 950 mA with 2 active relays (connected to the 12Vdc Fermax lock-release) IK:07 IK:09 [-10, +55 °C] Operating Temperature [14, 131ºF]... -
Page 55: Vivo Monitor
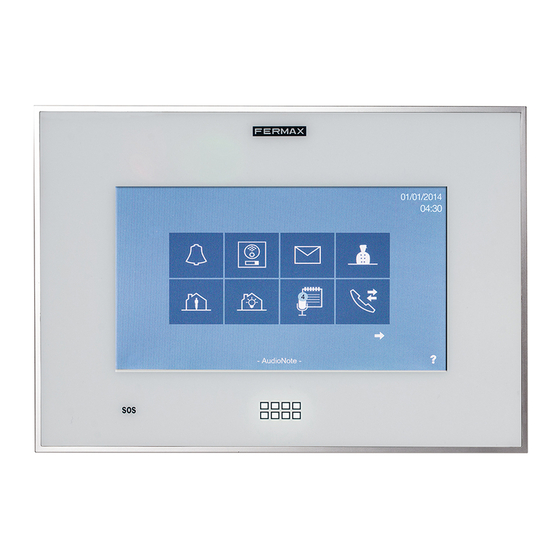
The monitor is installed on the wall via a VIVO LYNX Connector (Ref. 1605) . Operating Guide: Buttons and Icons Once on, the monitor starts up and displays the FERMAX logo, the firmware version and the MAC address. The start-up process takes less than 60 seconds and the monitor enters in stand-by mode. -
Page 56: Wiring
- When the door is opened from the monitor, the open door LED is lit, (if the door sensor is installed, ask your installer). Note: For more information, see the end of this manual in Section II: User Manual or VIVO Monitor Manual (Cod. 97721) available at www.fermax.com. Connections Monitor connections. -
Page 57: Technical Features
VIVO KIT VIVO KIT VIVO KIT VIVO KIT VIVO KIT VIVO KIT VIVO KIT VIVO KIT VIVO KIT VIVO KIT - RJ-45 10/100 Base - T Ethernet, power via the RJ-45 connector. - NG, P: To connect an external secondary SOS button. Function not available in this kit. -
Page 58: Programming
VIVO KIT VIVO KIT VIVO KIT VIVO KIT VIVO KIT VIVO KIT VIVO KIT VIVO KIT VIVO KIT VIVO KIT PROGRAMMING THE VIVO MONITOR The monitor supplied in the 1 Line kit comes ALREADY PROGRAMMED from the factory! Notice: If for whatever reason you need to re-program the monitor, see the Annex at the end of the Installer's Section. -
Page 59: Configuring Language And Date - Time
VIVO KIT VIVO KIT VIVO KIT VIVO KIT VIVO KIT VIVO KIT VIVO KIT VIVO KIT VIVO KIT VIVO KIT CONFIGURATION: Language and Date - Time Language Select the desired language for the monitor. The monitor's default language is English For this press General settings and access the screen with the Language settings option. - Page 60 30 seconds the monitor returns to standby (screen off). Once the data is entered, press to validate Note: For the remaining functions on this monitor, see the VIVO Monitor Manual (Cod. 97721) available at www.fermax.com. Page 16...
-
Page 61: Wiring Diagrams
VIVO KIT VIVO KIT VIVO KIT VIVO KIT VIVO KIT VIVO KIT VIVO KIT VIVO KIT VIVO KIT VIVO KIT Wiring Diagrams Page 17... - Page 62 VIVO KIT VIVO KIT VIVO KIT VIVO KIT VIVO KIT VIVO KIT VIVO KIT VIVO KIT VIVO KIT VIVO KIT WIRING DIAGRAM Kit 1L & 12 Vdc 100 - 240Vac SWITCH D max. 100 m. LINK/ACT PoE LINK/ACT PoE LINK/ACT 100M...
- Page 63 VIVO KIT VIVO KIT VIVO KIT VIVO KIT VIVO KIT VIVO KIT VIVO KIT VIVO KIT VIVO KIT VIVO KIT Kit 1L & 12 Vdc 100 - 240Vac SWITCH LINK/ACT PoE LINK/ACT PoE LINK/ACT 100M Max PoE 100-240V ALIMENTADOR ALIMENTATEUR POWER SUPPLY NETZGERÄT...
-
Page 64: Appendix
Panel configuration from the web server. (For further details about programming options ask for our web server Lynx Panels manual cod. 97744 in www.fermax.com). The Panel has an incorporated web server that allows for changes in configuration. This web server can be accessed via the panel's IP address. The IP address on the kit panel is: 10.100.0.1. - Page 65 VIVO KIT VIVO KIT VIVO KIT VIVO KIT VIVO KIT VIVO KIT VIVO KIT VIVO KIT VIVO KIT VIVO KIT You will hear the voice synthesiser in the selected language. Notice: Each time you select a different option you must press Save (in each section), in order to save the selected parameters and update them on the devices.
- Page 66 VIVO KIT VIVO KIT VIVO KIT VIVO KIT VIVO KIT VIVO KIT VIVO KIT VIVO KIT VIVO KIT VIVO KIT To change the audio settings, select Look & Feel >> Call settings. PROGRAM the Panel. If for whatever reason you need to re-program the panel, you must reset the panel to establish the setting's default values.
-
Page 67: Programming The Monitor
VIVO KIT VIVO KIT VIVO KIT VIVO KIT VIVO KIT VIVO KIT VIVO KIT VIVO KIT VIVO KIT VIVO KIT PROGRAM the Monitor. If for whatever reason you need to re-program the monitor, you must reset the monitor to the default settings. - Page 68 VIVO KIT VIVO KIT VIVO KIT VIVO KIT VIVO KIT VIVO KIT VIVO KIT VIVO KIT VIVO KIT VIVO KIT Since the deleting operation is irreversible, when it is confirmed on the previous screen a message is displayed warning you that the operation you are about to perform and requiring a new confirmation to perform it.
-
Page 69: Section Ii - User Manual
VIVO KIT VIVO KIT VIVO KIT VIVO KIT VIVO KIT VIVO KIT VIVO KIT VIVO KIT VIVO KIT VIVO KIT Section II - User Manual Congratulations on purchasing this quality product! The VIVO Video Door Entry System is hands-free and with a 7" full colour screen that allows you to communicate with the entry panel, see the caller and open the entrance door if you wish. -
Page 70: Vivo Monitor
The monitor is installed on the wall via a VIVO LYNX Connector (Ref. 1605) . Operating Guide: Buttons and Icons Once on, the monitor starts up and displays the FERMAX logo, the firmware version and the MAC address. The start-up process takes less than 60 seconds and the monitor enters in stand-by mode. -
Page 71: Operation
VIVO KIT VIVO KIT VIVO KIT VIVO KIT VIVO KIT VIVO KIT VIVO KIT VIVO KIT VIVO KIT VIVO KIT Buttons Operating description MENU button - When the touchscreen is in standby, the screen will light up by pressing the MENU button. -
Page 72: Unanswered Call- Missed Calls
VIVO KIT VIVO KIT VIVO KIT VIVO KIT VIVO KIT VIVO KIT VIVO KIT VIVO KIT VIVO KIT VIVO KIT 1.1 Not answering a call - Missed calls When the monitor receives a call, the video immediately appears and plays the selected... -
Page 73: Rejecting A Call
VIVO KIT VIVO KIT VIVO KIT VIVO KIT VIVO KIT VIVO KIT VIVO KIT VIVO KIT VIVO KIT VIVO KIT By pressing the call history icon you access the Call History screen. By pressing the Missed call tab, they are When the selected element on the list displayed. -
Page 74: Answer Call - Audio Settings And Mute
VIVO KIT VIVO KIT VIVO KIT VIVO KIT VIVO KIT VIVO KIT VIVO KIT VIVO KIT VIVO KIT VIVO KIT 1.3 Answer call - Audio settings and mute If the call is answered by pressing the icon: answer call (green telephone), the audio communication is connected and the audio controls appear: audio settings and mute. -
Page 75: Video Settings: Colour, Brightness And Contrast
VIVO KIT VIVO KIT VIVO KIT VIVO KIT VIVO KIT VIVO KIT VIVO KIT VIVO KIT VIVO KIT VIVO KIT 2. VIDEO SETTINGS: colour, brightness and contrast. The monitor allows you to adjust brightness, contrast and colour by pressing the Video settings icon. See page 14. - Page 76 VIVO KIT VIVO KIT VIVO KIT VIVO KIT VIVO KIT VIVO KIT VIVO KIT VIVO KIT VIVO KIT VIVO KIT When you press the images icon you access the picture view screen that shows the most recent picture, with the description defined by the Terminal from which you made the call, date and time.
-
Page 77: Open Door
VIVO KIT VIVO KIT VIVO KIT VIVO KIT VIVO KIT VIVO KIT VIVO KIT VIVO KIT VIVO KIT VIVO KIT RESETTING IMAGES: To delete all the images, press the delete button (trash bin) for more than 1 second. This requires confirmation. -
Page 78: Auto-Start: Connecting Panel / Ip Camera (If Exists)
VIVO KIT VIVO KIT VIVO KIT VIVO KIT VIVO KIT VIVO KIT VIVO KIT VIVO KIT VIVO KIT VIVO KIT 5. AUTO-START: CONNECTING OUTDOOR PANEL / IP CAMERA (if applicable) With the monitor in standby, if you press the panel icon from the monitor's start menu, the kit panel is displayed (with its default description) and if you have access to the IP cameras (if installed, ask your installer). -
Page 79: Do Not Disturb Mode: Canceling The Ring Tone
VIVO KIT VIVO KIT VIVO KIT VIVO KIT VIVO KIT VIVO KIT VIVO KIT VIVO KIT VIVO KIT VIVO KIT If the user connects with an IP camera, in this case no key icon appears since there are no relays to open. -
Page 80: Cleaning The Screen
VIVO KIT VIVO KIT VIVO KIT VIVO KIT VIVO KIT VIVO KIT VIVO KIT VIVO KIT VIVO KIT VIVO KIT The normal mode is reset after the programmed period has expired or by pressing the do not disturb icon on the home screen. Once disabled the led will turn off. -
Page 81: General Settings
8.6 PRIVACY SETTINGS 8.7 INTERCOM SETTINGS. Operative feature in building installations. 8.8. INSTALLATION SETTINGS Functions only for the Installer are only accessed via the installer's PIN. For more information, see the VIVO Monitor manual (Cod. 97721) available at www.fermax.com. Page 37... - Page 82 VIVO KIT VIVO KIT VIVO KIT VIVO KIT VIVO KIT VIVO KIT VIVO KIT VIVO KIT VIVO KIT VIVO KIT Description and operations for the General Settings screen, developed for the Kit. 8.1 RING SETTINGS The ring settings allow you to select a ringtone for the panel kit along with its volume.
-
Page 83: Background Settings
VIVO KIT VIVO KIT VIVO KIT VIVO KIT VIVO KIT VIVO KIT VIVO KIT VIVO KIT VIVO KIT VIVO KIT 8.2 BACKGROUND SETTINGS The Background settings allow you to: - Select the background colour and brightness. - Select the touch screen's audio level. Change the click volume 8.3 LANGUAGE SETTINGS... -
Page 84: Regional Settings (Date-Time)
VIVO KIT VIVO KIT VIVO KIT VIVO KIT VIVO KIT VIVO KIT VIVO KIT VIVO KIT VIVO KIT VIVO KIT Warning: Check the legal requirements for data protection and privacy to take and save public images. 8.5 REGIONAL SETTINGS (Date-Time) The regional settings option also allows you to adjust/update the date and time, adapting it to the user's local date format. -
Page 85: User Quick Operating Guide
VIVO KIT VIVO KIT VIVO KIT VIVO KIT VIVO KIT VIVO KIT VIVO KIT VIVO KIT VIVO KIT VIVO KIT User quick operating guide: 1. RECEIVING CALLS Upon receiving a call the conversation screen automatically opens. Icons displayed here: Reject call.This icon is hidden when you return the call (green telephone). - Page 86 VIVO KIT VIVO KIT VIVO KIT VIVO KIT VIVO KIT VIVO KIT VIVO KIT VIVO KIT VIVO KIT VIVO KIT 5. AUTO-START: CONNECTING OUTDOOR PANEL / IP CAMERA (if applicable) This function is for connecting with the kit panel and IP cameras (if applicable).
- Page 87 VIVO KIT VIVO KIT VIVO KIT VIVO KIT VIVO KIT VIVO KIT VIVO KIT VIVO KIT VIVO KIT VIVO KIT 8.3 LANGUAGE SETTINGS The language settings function allows you to select the desired language for the monitor. The default monitor language is English.
- Page 88 VIVO KIT VIVO KIT VIVO KIT VIVO KIT VIVO KIT VIVO KIT VIVO KIT VIVO KIT VIVO KIT VIVO KIT HELP MENU "?" Wherever a question mark appears on a screen, you can press it and a help screen appears explaining the icon.
- Page 89 VIVO KIT VIVO KIT VIVO KIT VIVO KIT VIVO KIT VIVO KIT VIVO KIT VIVO KIT VIVO KIT VIVO KIT Page 45...
Need help?
Do you have a question about the VIVO KIT and is the answer not in the manual?
Questions and answers