Silvercrest SWKS 2400 B1 Operating Instructions Manual
Hide thumbs
Also See for SWKS 2400 B1:
- Operating instructions manual (40 pages) ,
- Operating instructions manual (21 pages) ,
- Operating instructions manual (13 pages)
Chapters
Table of Contents

Related Manuals for Silvercrest SWKS 2400 B1


Summary of Contents for Silvercrest SWKS 2400 B1
- Page 1 HERVIDOR DE AGUA SWKS 2400 B1 HERVIDOR DE AGUA FERVEDOR DE ÁGUA Instrucciones de uso Manual de instruções KETTLE WASSERKOCHER Operating instructions Bedienungsanleitung IAN 78281...
- Page 2 Antes de empezar a leer abra la página que contiene las imágenes y, en seguida, familiarícese con todas las funciones del dispositivo. Antes de começar a ler abra na página com as imagens e, de seguida, familiarize-se com todas as funções do aparelho.
-
Page 4: Table Of Contents
ÍNDICE PÁGINA Introducción Uso previsto Volumen de suministro Elementos de operación Datos técnicos Indicaciones de seguridad Puesta en funcionamiento Cómo hervir agua Limpieza y mantenimiento Antes de limpiar el aparato......................4 En caso de restos de cal........................4 Retirar / insertar el filtro-vertedor ....................4 Almacenamiento Evacuación Garantía y servicio... -
Page 5: Introducción
HERVIDOR DE AGUA Datos técnicos Tensión: 220 - 240 V ~ / 50 Hz Introducción Consumo de potencia: 2000 - 2400 W Capacidad: máx. 1,7 l Felicidades por la compra de su aparato nuevo. mín. 0,7 l Ha optado por adquirir un producto de alta cali- dad. -
Page 6: Puesta En Funcionamiento
Cómo hervir agua • Pueden escapar vapores calientes. Además la jarra está muy caliente durante el funcionamien- to. Por ello utilice manoplas de cocina. Peligro! • Asegúrese de que el aparato se encuentra esta- No coloque nunca la base eléctrica 4 cerca del ble y en posición vertical antes de encenderlo. -
Page 7: Limpieza Y Mantenimiento
En caso de restos de cal Advertencia! Extraiga la clavija de red de la base de enchufe an- • Antes de la descalcificación retire el filtro- tes de levantar la jarra de la base 4. De ese modo vertedor 8 (véase capítulo "Retirar / insertar evita que el agua salpicada caiga sobre las cone- el filtro-vertedor"). -
Page 8: Evacuación
Evacuación Por el mero hecho de hacer uso de la garantía no implica la prolongación del período de válidez de En ningún caso deberá tirar el aparato la garantía. Ello rige también para piezas sustitui- con la basura doméstica. Este producto das y reparadas. - Page 9 - 6 -...
- Page 10 ÍNDICE PÁGINA Introdução Finalidade Material fornecido Elementos de comando Dados técnicos Indicações de segurança Colocação em funcionamento Ferver água Limpeza e conservação Antes de limpar o aparelho......................10 Resíduos de calcário ........................10 Retirar/colocar o filtro de escoamento ..................10 Armazenamento Eliminação Garantia e assistência técnica Importador Leia cuidadosamente o manual de instruções antes da primeira utilização e guarde-o para consultar posteriormente.
-
Page 11: Introdução
FERVEDOR DE ÁGUA Dados técnicos Tensão: 220 - 240 V ~ / 50 Hz Introdução Consumo de energia: 2000 - 2400 W Capacidade: máx.1,7 l Parabéns pela compra do seu aparelho novo. mín. 0,7 l Decidiu-se, assim, por um produto de elevada quali- dade. -
Page 12: Colocação Em Funcionamento
Ferver água • Antes de ligar o aparelho, certifique-se de que este se encontra numa posição estável e na ver- tical. Se o aparelho não estiver bem assente, a Perigo! água pode fazê-lo cair. Nunca coloque a base eléctrica 4 perto de água •... -
Page 13: Limpeza E Conservação
Resíduos de calcário Aviso! Retire a ficha da tomada antes de retirar o jarro da • Antes de remover o calcário, retire o filtro de base 4. Desta forma, evita que a água transborda- escoamento 8 (ver capítulo "Retirar/colocar o da entre em contacto com as ligações eléctricas na filtro"). -
Page 14: Eliminação
Eliminação O período de garantia não é prolongado em caso de reivindicação. Isto também se aplica às peças Nunca elimine o aparelho juntamente substituídas e reparadas. Danos e falhas eventual- com o lixo doméstico comum. mente já existentes na altura da compra devem ser Este produto está... - Page 15 - 12 -...
- Page 16 CONTENT PAGE Introduction Intended Use Items supplied Operating Elements Technical data Safety instructions Start-up Boiling water Cleaning and Care Before cleaning the appliance ....................16 In the event of scale deposits......................16 Removing/replacing the pouring sieve..................16 Storage Disposal Warranty & Service Importer Read the operating instructions carefully before using the appliance for the first time and preserve this booklet for later reference.
-
Page 17: Introduction
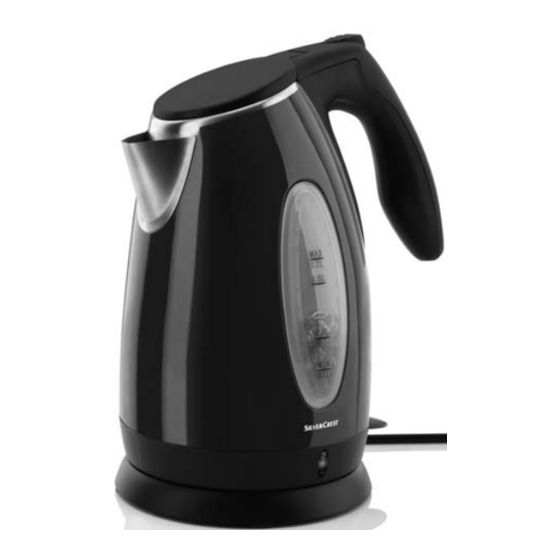
KETTLE Operating Elements 1 Lid Introduction 2 Unlocking button 3 ON/OFF switch Congratulations on the purchase of your new appli- 4 Base ance. 5 Rolled-up cable 6 Control lamp You have clearly decided in favour of a quality 7 Scale product. -
Page 18: Start-Up
To avoid burns and other injuries: Boiling water • Always heat water with the lid closed, otherwise the automatic cut-out may not function. Danger! Boiling water can then spray out over the edge. Never place the electrical base 4 in close proxi- •... -
Page 19: Cleaning And Care
In the event of scale deposits Warning! • Before descaling, remove the pourer sieve 8 First remove the plug from the wall power socket be- fore you lift the kettle from the base 4. This avoids (see chapter "Removing/replacing the pourer the risk that any water splashing out could come sieve"). -
Page 20: Disposal
Disposal The warranty period will not be extended by repairs made under warranty. This applies also to replaced Do not dispose of this appliance in and repaired parts. Any damage and defects extant your normal domestic waste. This pro- on purchase must be reported immediately after un- duct is subject to the provisions of Euro- packing the appliance, at the latest, two days after pean Directive 2002/96/EC. - Page 21 - 18 -...
- Page 22 INHALTSVERZEICHNIS SEITE Einleitung Verwendungszweck Lieferumfang Bedienelemente Technische Daten Sicherheitshinweise Inbetriebnahme Wasser aufkochen Reinigung und Pflege Bevor Sie das Gerät reinigen.......................22 Bei Kalk-Rückständen ........................22 Ausgießer-Sieb abnehmen / einsetzen..................23 Aufbewahren Entsorgen Garantie und Service Importeur Lesen Sie die Bedienungsanleitung vor der ersten Verwendung aufmerksam durch und heben Sie diese für den späteren Gebrauch auf.
-
Page 23: Einleitung
WASSERKOCHER Bedienelemente 1 Deckel Einleitung 2 Entriegelungstaste 3 EIN-/AUS-Schalter Herzlichen Glückwunsch zum Kauf Ihres neuen 4 Sockel Gerätes. 5 Kabelaufwicklung 6 Kontrollleuchte Sie haben sich damit für ein hochwertiges Produkt 7 Skala entschieden. Die Bedienungsanleitung ist Bestand- teil dieses Produkts. Sie enthält wichtige Hinweise 8 Ausgießer-Sieb für Sicherheit, Gebrauch und Entsorgung. -
Page 24: Inbetriebnahme
Inbetriebnahme • Lassen Sie beschädigte Netzstecker oder Netz- kabel sofort von autorisiertem Fachpersonal oder dem Kundenservice austauschen, um • Bevor Sie das Gerät in Betrieb nehmen, überzeu- Gefährdungen zu vermeiden. gen Sie sich davon, dass... • Ziehen Sie nach Gebrauch immer den Stecker –... -
Page 25: Reinigung Und Pflege
Reinigung und Pflege • Halten Sie beim Befüllen die Kanne senkrecht. Nur dann können Sie die Markierungen der Skala 7 richtig ablesen. Gefahr! Befüllen Sie die Kanne... Öffnen Sie niemals irgendwelche Gehäuseteile. Es – mindestens bis zur MIN-Markierung, damit das befinden sich keinerlei Bedienelemente darin. -
Page 26: Ausgießer-Sieb Abnehmen / Einsetzen
Entsorgen Ausgießer-Sieb abnehmen / einsetzen Werfen Sie das Gerät keinesfalls in den • Öffnen Sie den Deckel 1. normalen Hausmüll. Dieses Produkt • Drücken Sie von vorne gegen die mittig sitzende obere Rastnase des Ausgießer-Siebes 8 und unterliegt der europäischen Richtlinie 2002/96/EC. -
Page 27: Importeur
Die Garantiezeit wird durch die Gewährleistung nicht verlängert. Dies gilt auch für ersetzte und repa- rierte Teile. Eventuell schon beim Kauf vorhandene Schäden und Mängel müssen sofort nach dem Auspacken gemeldet werden, spätestens aber zwei Tage nach Kaufdatum. Nach Ablauf der Garantie- zeit anfallende Reparaturen sind kostenpflichtig. - Page 28 KOMPERNASS GMBH Burgstraße 21 D-44867 Bochum www.kompernass.com Estado de las informaciones · Estado das informações Last Information Update · Stand der Informationen: 08 / 2012 · Ident.-No.: SWKS2400B1072012-1 IAN 78281...