Pioneer DMH-WT8600NEX Operation Manual
Rds av receiver
Hide thumbs
Also See for DMH-WT8600NEX:
- Operation manual (145 pages) ,
- System firmware update instructions (9 pages) ,
- Installation manual (21 pages)
Table of Contents
Advertisement
Advertisement
Table of Contents

Related Manuals for Pioneer DMH-WT8600NEX


Summary of Contents for Pioneer DMH-WT8600NEX
- Page 1 DMH-WT8600NEX DMH-WT7600NEX DMH-WC6600NEX DMH-W4660NEX DMH-W4600NEX RDS AV RECEIVER ® Operation Manual Important (Serial number) The serial number is located on the bottom of this unit. For your own security and convenience, be sure to record this number on the enclosed warranty card.
- Page 2 Contents Thank you for buying this Pioneer product. Please read through these instructions so you will know how to operate your model properly. After you have finished reading the instructions, keep this document in a safe place for future reference.
- Page 3 ■ External component ..............92 ■ iDatalink ..................93 ■ Metra Axxess ................98 ■ Settings..................101 Displaying the setting screen ........................101 System settings .............................. 101 Theme settings............................... 110 Audio settings ..............................112 Video settings ..............................116 Communication settings ..........................117 ■...
- Page 4 FEDERAL COMMUNICATIONS COMMISSION SUPPLIER'S DECLARATION OF CONFORMITY Product Name: RDS AV RECEIVER Model Number: DMH-WT8600NEX, DMH-WT7600NEX, DMH-WC6600NEX, DMH-W4660NEX, DMH- W4600NEX Responsible Party Name: PIONEER ELECTRONICS (USA), INC. SERVICE SUPPORT DIVISION Address: 2050 W. 190TH STREET, SUITE 100, TORRANCE, CA 90504, U.S.A. Phone: 1-800-421-1404 URL: https://www.pioneerelectronics.com/PUSA/...
- Page 5 • If liquid or foreign matter should get inside this product, park your vehicle in a safe place, turn the ignition switch off (ACC OFF) immediately and consult your dealer or the nearest authorized Pioneer Service Station. Do not use this product in this condition because doing so may result in a fire, electric shock, or other failure.
- Page 6 Pioneer Service Station. Using this product in this condition may result in permanent damage to the system. • Do not disassemble or modify this product, as there are high-voltage components inside which may cause an electric shock. Be sure to consult your dealer or the nearest authorized Pioneer Service Station for internal inspection, adjustments or repairs.
- Page 7 Pioneer receiver unless it is connected to and displays the same view as the factory backup camera. Connection to the factory backup camera will require an adaptor, sold separately. Not all vehicles may be able to connect.
- Page 8 • To prevent data loss and damage to the storage device, never remove it from this product while data is being transferred. • Pioneer cannot guarantee compatibility with all USB mass storage devices and assumes no responsibility for any loss of data on media players, iPhone, smartphone, or other devices while using this product.
- Page 9 There may be glue on the edge of the film. However, this does not affect the usability of this unit.* * DMH-WT8600NEX, DMH-WT7600NEX, DMH-WC6600NEX Notes on internal memory • The information will be erased by disconnecting the yellow lead from the battery (or removing the battery itself ).
- Page 10 This indicates to touch and hold the appropriate soft key on the touch screen. This indicates to swipe in the direction of the arrow on the touch screen. This indicates to drag in the direction of the arrow on the touch screen. - 10 -...
- Page 11 Parts and controls Main unit 8600NEX 7600NEX 6600NEX 4660NEX 4600NEX Touch to display the home menu screen. Touch and hold to power off. To power back on, touch any button. Touch to activate the voice recognition mode such as Siri® when the iPhone is connected to the unit via Bluetooth or USB.
- Page 12 Volume VOLUME MODE Press to switch between the Application screen and the AV operation screen. Press and hold to turn off the display. SRC/OFF Press to cycle through all the available sources. Press and hold to turn the source off. TOP MENU Not used.
- Page 13 Basic operation Preparing the remote control 8600NEX 7600NEX 6600NEX 4660NEX Remove the insulation sheet before use. How to replace the battery Insert the CR2025 (3 V) battery with the plus (+) and minus (-) poles orientated properly. WARNING Batteries (battery pack or batteries installed) must not be exposed to excessive heat such as sunshine, fire or the like.
- Page 14 Important • Do not store the remote control in high temperatures or direct sunlight. • Do not let the remote control fall onto the floor, where it may become jammed under the brake or gas pedal. Starting up the unit Start the engine to boot up the system.
- Page 15 Using the touch panel You can operate this product by touching the keys on the screen directly with your fingers. NOTE To protect the LCD screen from damage, be sure to touch the screen only with your finger gently. Common touch panel keys : Returns to the previous screen.
- Page 16 Operating the time bar You can change the playback point by dragging the key. The playback time corresponding to the position of the key is displayed while dragging the key. Operating the on-screen keyboard Displays the characters that are entered. Enters the characters in the text box.
- Page 17 Home menu screen Widget (page 22) Touch to see the selected source/application. Customizing the widget (page 22) When you finish customizing, touch Favorite source/application area Touch to see the selected source/application. Customizing the home menu screen (page 18) The following items can be customized. •...
- Page 18 Customizing the home menu screen NOTES • The layout of the widgets and favorite icons on the home menu screen is saved for each mobile device connected via Bluetooth. The layout changes depending on the mobile device that is connected to this unit. •...
- Page 19 Favorite radio stations screen Favorite radio stations Touch to make changes to the selected radio station. List of favorite radio stations Touch to select the favorite radio station from the list screen (page 19). Updates the favorite radio stations. The next 3 stations on the favorites list are displayed. NOTE This function is only available when there are more than 4 favorite radio stations on the list.
- Page 20 Suggested radio stations This unit suggests radio stations to you according to your frequently listened music and radio stations. Important To use the suggested radio stations function, you may need to connect this unit to the Internet via a Wi- Fi network and set [Suggestions] (page 101) to [On].
- Page 21 List screen Available radio stations Touch to tune in to the selected radio station. Notification Notification displays the notifications from the connected iPhone or smartphone (Android™) and sports information registered on CarAVAssist. NOTES • This function needs to be connected via Bluetooth to an iPhone or a smartphone with CarAVAssist installed (page 41).
- Page 22 Notification screen Received notifications Touch to display the details of the notification. Widget Widgets enable you to see your favorite sources and application information on the home menu screen and access shortcuts to them. Customizing the widget NOTE This function is available only when you stop your vehicle in a safe place and apply the parking brake. Touch Touch and hold the widgets area.
- Page 23 Widget area To rearrange the widgets, drag them to the desired locations. To remove a widget, drag the widget to Available source/application lists for the widgets Flick left/right to switch between widget lists. Adjusts the size of the widgets Touch a corner of the selected widget and drag it to adjust the size. You can fit up to four widgets in the widgets area by adjusting their size.
- Page 24 Bluetooth® Bluetooth connection Turn on the Bluetooth function on the device. Touch then swipe left on the screen. Touch then Touch [Connection]. Touch The unit starts to search for available devices, then displays them in the device list. Touch in the list. If you touch the device name, the Wi-Fi connection for Apple CarPlay or Android Auto is established.
- Page 25 CAUTION Never turn this product off and disconnect the device while the Bluetooth setting operation is being processed. Menu Item Description [Auto Connect] Select [On] to connect the last connected Bluetooth device [On] [Off] automatically when using the hands-free phone function. NOTE If two Bluetooth devices were connected the last time, the two devices are connected to this product automatically in the order...
- Page 26 Hands-free phoning To use this function, you need to connect your cellular phone to this product via Bluetooth in advance (page 24). CAUTION For your safety, avoid talking on the phone as much as possible while driving. Making a phone call Touch then swipe left on the screen.
- Page 27 The following items are displayed. • Name of the current cellular phone • List number of the current cellular phone • Reception status of the current cellular phone • Battery status of the current cellular phone If you connect two cellular phones to this product at the same time, you can switch between the cellular phones using the switch devices key.
- Page 28 Using the preset dial lists ▶Registering a phone number You can easily store up to six phone numbers per device as presets. Touch then swipe left on the screen. Touch [Phone]. Touch On the [Phone Book] screen, touch the desired name to display the contact’s phone number.
- Page 29 NOTE When two phones are connected at the same time, if an incoming call is received on the second phone while you are talking on the first phone, the dial confirmation screen for the second phone will be displayed. Voice recognition function (for iPhone) By connecting your iPhone to this product, you can use the voice recognition function (Siri Eyes Free Mode) on this product.
- Page 30 Setting the private mode During a conversation, you can switch to private mode (talk directly on your cellular phone). Touch to turn private mode on or off. NOTES • If two cellular phones are connected to this product and the first phone is set to private mode, you can receive incoming calls on the second phone while maintaining the call in progress on the first phone.
- Page 31 • The registered name will appear if the phone number is already registered in the phone book. When multiple names are registered for the same phone number, the names are displayed in the same order as in the phone book. ▶The received call and dialed number histories •...
- Page 32 Touch [Bluetooth Audio]. The Bluetooth audio playback screen appears. Basic operation Bluetooth audio playback screen Track number indicator Switches between playback and pause. Skips files forward or backward. Sets a repeat play range. Switches between random and normal file playback order. Selects a file or folder from the list to playback.
- Page 33 Wi-Fi® By connecting this unit to a Wi-Fi network, you can browse the Internet and use Apple CarPlay via the wireless connection. Wi-Fi connection Turn on the Wi-Fi function on the device. Touch then swipe left on the screen. Touch then Touch [Wi-Fi Settings: Hotspot].
- Page 34 Access point setting screen Available network SSIDs Touch to connect selected network. Automatic connection status Touch to switch between the network automatically or manually. Network connection priority Drag the network upward to prioritize the connection by touching Searches for existing networks. Touch to go to Adding access point screen (page 34).
- Page 35 Connects Wi-Fi network. Touch to select desired network then enter the password if required. If you want to connect to a network that is not listed on the screen, touch [Other (Add network)] and enter the required information. Searches again for existing networks. WPS Wi-Fi connection You can connect easily to a Wi-Fi network, if WPS (Wi-Fi Protected Setup™) is available on the connected device.
- Page 36 NOTE This setting is available only when you stop your vehicle in a safe place and apply the parking brake. The menu items vary according to the source/application. Menu Item Description [Wi-Fi] Switch Wi-Fi connection on or off. [On] [Off] [Hotspot setting] Set up the Wi-Fi access point (page 33).
- Page 37 The Wi-Fi audio playback screen appears. NOTES • [Wi-Fi Audio] is displayed as [Android Auto] when the Android Auto is in use. • [Wi-Fi Audio] is displayed as [Apple CarPlay] when the Apple CarPlay is in use. Basic operation Wi-Fi audio screen (Example: Apple CarPlay) Wi-Fi audio with Apple CarPlay operation is same as the iPod®...
- Page 38 • When you use the browser, do not install software or programs that Pioneer is not involved with. If you install such software or programs, mechanical trouble may occur with this unit, or your entered information and the personal information registered in this unit may be put at risk.
- Page 39 Web browser screen Available website thumbnails Touch to go to the selected website. Swipe left/right to switch between registered webpage list. Website screen Browser toolbar To display the toolbar, swipe down from the top of the screen. Returns to the web browser screen. Displays the previous page.
- Page 40 NOTE When using the browser while Apple CarPlay or Android Auto is in operation, the browser is displayed on the connected rear monitor only when the browser is displayed on the main monitor. Otherwise, a black screen is displayed on the connected rear monitor. - 40 -...
- Page 41 CarAVAssist CarAVAssist is an application that allows you to configure and transfer various settings of this unit and register URLs as favorites so that you can browse them using this unit's web browser. You can also update this unit's firmware wirelessly by using this application. Before you start WARNING Do not attempt to operate the application while driving.
- Page 42 • Registering your favorite teams to receive information about them on the sports application of the unit • Organizing notifications on your smartphone (Android) for displaying on the unit • Downloading the latest firmware For details, refer to “Help” in the CarAVAssist application. Transferring the data Connect your iPhone or smartphone with CarAVAssist installed on it to this product via Bluetooth (page 24).
- Page 43 Touch [Firmware Update]. Touch [CarAVAssist]. Follow the on-screen instructions to finish updating the firmware. NOTES • This product will reset automatically after the firmware update is completed if the update is successful. • If an error message appears on the screen, touch the display and perform the above steps again. - 43 -...
- Page 44 Source/application Supported source and application You can play or use the following sources or application with this product. • HD Radio™ Technology/Radio (page 47) • USB (page 53) The following sources or applications can be played back or used by connecting an auxiliary device.
- Page 45 Source list Touch to see the selected source. Selecting [Power OFF] will turn off most of the functions on this unit. The [Power OFF] mode is released in the following cases: • Footage from the rear view camera is input when the vehicle is in reverse. •...
- Page 46 Displays the source/application list. Settings (page 101) and Favorite menu (page 119) Selects or customizes the equalizer curve (page 114). Hands-free phoning (page 26) Selecting a source/an application NOTE [Source OFF] is only available for AV sources. Source/application selection screen Touch then swipe left on the screen.
- Page 47 HD Radio™ Technology/ Radio HD Radio™ 8600NEX 7600NEX 6600NEX 4660NEX Radio 4600NEX About HD Radio stations HD Radio stations offer high quality audio and data services. HD Radio stations are brought to you by your local FM or AM stations. HD Radio stations feature the following: •...
- Page 48 Digital, CD-quality sound. HD Radio Technology enables local radio stations to broadcast a clean digital signal. AM sounds like today’s FM and FM sounds like a CD. Program Service Data: Contributes to the superior user experience of HD Radio Technology. Presents song name, artist, station IDs, HD2/HD3 Channel Guide, and other relevant data streams.
- Page 49 Basic operation HD Radio, Radio screen HD Radio indicator and signal type indicator Recalls the preset channel stored to a key from memory. Stores the current broadcast frequency to a key. Displays the preset channel list. Select an item on the list ([1] to [6]) to switch to the preset channel. Selects the FM1, FM2, FM3 or AM band.
- Page 50 * DMH-WT8600NEX, DMH-WT7600NEX, DMH-WC6600NEX, DMH-W4660NEX Storing the strongest broadcast frequencies (BSM) The BSM (best stations memory) function automatically stores the six strongest broadcast frequencies under the preset channel keys [1] to [6]. NOTES • Storing broadcast frequencies with BSM may replace those you have already saved.
- Page 51 Area radio stations list screen Available radio stations Touch to tune in to the selected radio station. Radio settings Touch then swipe left on the screen. Touch then The system setting screen appears. Touch [AV Source Settings]. Touch [Radio settings]. The menu items vary according to the source.
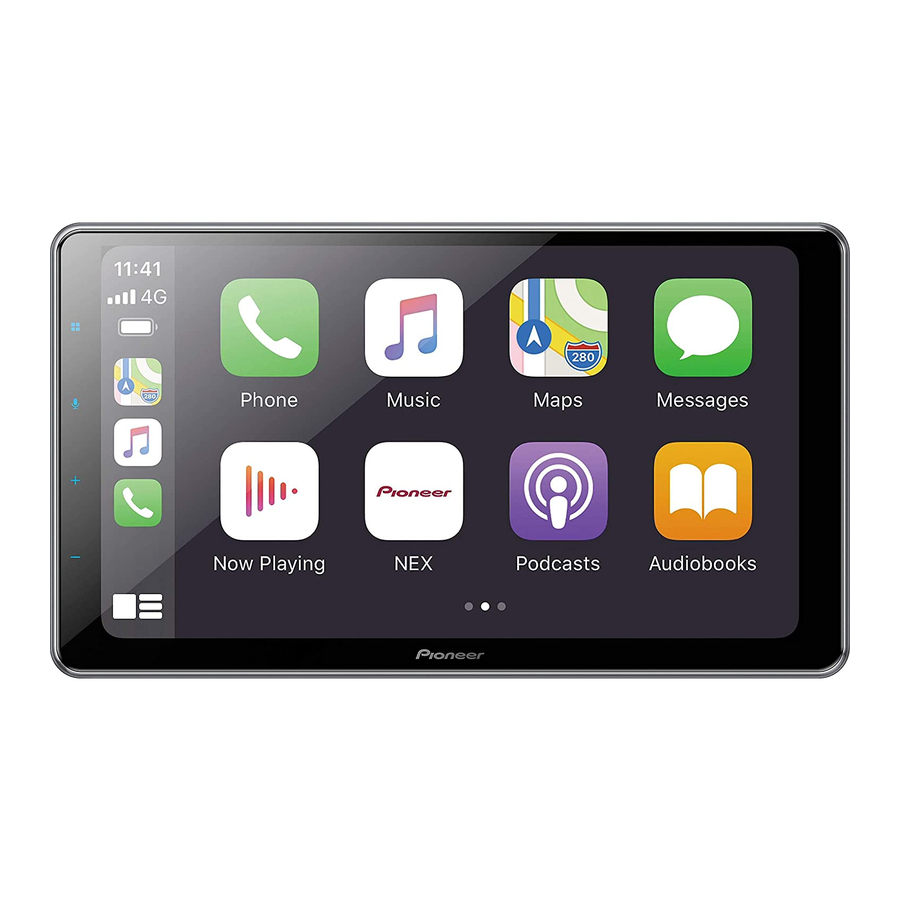
- Page 52 • [Level4] for FM and [Level2] for AM are available only with the stations with the strongest signals. • This setting is available only when [HD Radio] is selected as the source. * DMH-WT8600NEX, DMH-WT7600NEX, DMH-WC6600NEX, DMH-W4660NEX - 52 -...
- Page 53 Plugging/unplugging a USB storage device You can play audio, video, or still image files stored in a USB storage device. Plugging a USB storage device Plug a USB Type-C® storage device into the USB Type-C cable. When you use a USB Type-A storage device, use a USB Type-C to USB Type-A adaptor (supplied) for plugging.
- Page 54 Starting procedure Touch then swipe left on the screen. Plug the USB Type-C storage device into the USB Type-C cable (page 53). Touch [USB]. Playback is performed in order of folder numbers. Folders are skipped if they contain no playable files. Basic operation You can set the screen size for the video and image files (page 120).
- Page 55 Sets a repeat play range for all files/the current folder/the current file. Switches between random and normal file playback order. Displays the hidden function bar. You can also display the hidden function bar by flicking the bar from the right to the left.
- Page 56 Constructs the database for using the Music Browse mode (page 56). Switches the current music information display. ▶Selecting a file using Music Browse mode You can select files to play back using the category list if the files contain tag information.
- Page 57 Video source screen Hides the touch panel keys. To display the keys again, touch anywhere on the screen. Switches between playback and pause. Performs fast reverse or fast forward. Touch again to change the playback speed. Stops playback. Touch again to start from the beginning next time. Performs frame-by-frame playback.
- Page 58 Skips files forward or backward. Still image source Image files are not displayed in the rear display. Still image screen Hides the touch panel keys. To display the keys again, touch anywhere on the screen. Switches between playback and pause. Skips files forward or backward.
- Page 59 Sets a repeat play range for all files/the current folder. Plays all files in the current repeat play range or does not play them in random order. Switches the following media file types. [Music]: Audio files [Video]: Video files [Photo]: Image files Selects a file from the list.
- Page 60 iPhone® NOTE iPhone may be referred to as iPod in this manual. Connecting your iPhone When connecting an iPhone to this product, the settings are automatically configured according to the device to be connected. For details of the compatibility, refer to Compatible iPhone models (page 134).
- Page 61 Displays the link search screen. Select a song from the list related to the song currently playing. If you touch the artwork, the list of songs in the album is displayed. NOTE This function is not available while playing Apple Music® Radio. Switches between playback and pause.
- Page 62 iPhone application screen Switches between playback and pause. Skips files forward or backward. Apple Music Radio source Important Apple Music Radio may not be available in your country or region. For details about Apple Music Radio, visit the following site: https://www.apple.com/music/ Apple Music Radio screen Switches between playback and pause.
- Page 63 Displays the pop-up menu for Apple Music Radio. • Touch [Play More Like This] to play back songs similar to the current song. • Touch [Play Less Like This] to set it not to play back the current song again. •...
- Page 64 • Apple CarPlay allows access to applications other than those listed that are subject to limitations while driving. • PIONEER IS NOT RESPONSIBLE AND DISCLAIMS LIABILITY FOR THIRD PARTY (NON-PIONEER) APPS AND CONTENT, INCLUDING WITHOUT LIMITATION ANY INACCURACIES OR INCOMPLETE INFORMATION.
- Page 65 Touch then The communication setting screen appears. Touch [Driving Position]. Select the item. [Left] Select for a left-hand drive vehicle. [Right] Select for a right-hand drive vehicle. Starting procedure Wired connection Connect an Apple CarPlay compatible device to this unit via USB. Touch the Apple CarPlay icon.
- Page 66 If the device that you want to connect does not appear, touch on the screen again. You can also start Apple CarPlay with the desired device by opening the Bluetooth or Apple CarPlay setting menu while displaying the device search or device list screen. You can use Siri function by touching button once Apple CarPlay is activated.
- Page 67 • Android Auto allows access to applications other than those listed that are subject to limitations while driving. • PIONEER IS NOT RESPONSIBLE AND DISCLAIMS LIABILITY FOR THIRD PARTY (NON-PIONEER) APPS AND CONTENT, INCLUDING WITHOUT LIMITATION ANY INACCURACIES OR INCOMPLETE INFORMATION.
- Page 68 Touch then swipe left on the screen. Touch then The communication setting screen appears. Touch [Driving Position]. Select the item. [Left] Select for a left-hand drive vehicle. [Right] Select for a right-hand drive vehicle. Starting procedure Wired connection Connect an Android Auto™ compatible device to this unit via USB. Touch the Android Auto icon.
- Page 69 You can use voice recognition function by touching button once Android Auto is activated. NOTES • For details on USB connection, refer to the Installation Manual. • When the device for Android Auto is connected to this unit, the device is also connected via Bluetooth at the same time.
- Page 70 Touch then swipe left on the screen. Touch then Touch [Android Auto Auto-launch] to switch [On] or [Off]. - 70 -...
- Page 71 Sports Check team information such as the game scores and game information of your favorite teams registered on CarAVAssist. Using sports The unit displays three days of sports information, for the previous, current, and next day. Important • To use the sports function, you need to connect this unit to the Internet via a Wi-Fi network. •...
- Page 72 Weather Display the current temperature and daily or hourly forecast in your current location. The weather function uses a location service to determine your current location. Using weather Important • To use the weather function, you need to connect this unit to the Internet via a Wi-Fi network. •...
- Page 73 NOTE If a data item is unknown or missing, “-” is displayed. - 73 -...
- Page 74 Amazon Alexa You can talk to Amazon Alexa on the unit. With Alexa Built-in, you can ask to play music, place calls, listen to audiobooks, hear the news, check the weather, control smart home devices and more-all while you keep your hands on the wheel and eyes on the road. For details, visit the Amazon website for your region.
- Page 75 Touch then Touch [Amazon Alexa setting]. Touch [Setup]. The introduction screen appears. Touch [Get started]. Use your mobile device to go to the displayed URL or scan the QR code. Enter your Amazon account Email address and password. Enter the code that is shown in step 6. A completion message is displayed when the unit is authorized.
- Page 76 Voice operation Talk to Amazon Alexa to perform the desired operation by using “Alexa” as the wake word. NOTE Wake words other than “Alexa”, such as “Echo”, “Amazon”, or “Computer”, are not supported. Entertainment You can play content through Amazon Music, Kindle books text-to-speech, or Audible by talking to Amazon Alexa.
- Page 77 Switches between playback and pause. Skips songs forward or backward. Switches the repeat function ON/OFF. Switches between random and normal song playback order. Alexa screen 2 (Example: Amazon Music) Gives a Like to the currently playing song. Gives a Dislike to the currently playing song. Phone call control Alexa allows you to use voice commands to place or answer calls using a mobile device paired to this unit.
- Page 78 NOTE Support for the Alexa Calling service will be available soon. Before using phone call control Before using this function, connect your mobile device to this unit via Bluetooth. Touch then swipe left on the screen. Touch then Touch [Amazon Alexa setting] then [Main Menu]. Touch [Settings] then [Contact list].
- Page 79 Starting procedure ▶Touch operation Touch then swipe left on the screen. Touch [Alexa]. Talk to Amazon Alexa to perform the desired hands-free phone operation. ▶Voice operation Talk to Amazon Alexa to perform the desired hands-free phone operation by using “Alexa” as the wake word. For example, say “Alexa, call home”...
- Page 80 [Settings] [Contact list] Displays the list of mobile devices that are connected to Amazon Alexa (page 78). NOTE The device search list screen is displayed when no mobile device is paired via Bluetooth. [Hands-free listening] Switches whether or not to use the wake word (“Alexa”). [Notifications] Switches whether or not notifications of received messages are displayed.
- Page 81 SiriusXM® Satellite Radio Only SiriusXM® brings you more of what you love to listen to, all in one place. Get over 140 channels, including commercial-free music plus the best sports, news, talk, comedy, and entertainment. Welcome to the world of satellite radio. A SiriusXM Connect Vehicle Tuner and Subscription are required.
- Page 82 Listening to SiriusXM Touch then swipe left on the screen. Touch [SiriusXM]. Basic operation TIPS • On the Featured Favorites Band, the current broadcast frequency cannot be stored to a key (page 86). • If fewer than two music channels are stored as presets, you cannot use the TuneMix function. •...
- Page 83 Switches TuneMix™ to on or off. tune You can use TuneMix™ from each of the music channels stored as presets on the current band. NOTES • When fewer than two music channels are stored as presets, you cannot use TuneMix™. •...
- Page 84 Selects a channel from the list. Select the category name or the list of all channels then touch the desired channel. To switch the display list, touch TIPS • The displayed list switches in the following order. Channel Name—Artist Name—Song Title—Content Info •...
- Page 85 NOTES • When fewer than two music channels are stored as presets, you cannot use TuneScan™. • TuneScan™ may take a few minutes to become available after the product is turned on or the preset band is changed. tune Touch to display the following display.
- Page 86 Using Featured Favorites Band Featured Favorites are groups of channels that are created by the SiriusXM Programming department allowing you to discover new channels. Featured Favorite channels are dynamic and can change often, allowing you to discover new channels. For details, see [Featured Favorites] and [Featured Band Update Message] in SiriusXM settings (page 86).
- Page 87 Menu Item Description [Parental Control] Enter the current passcode then touch to set this function (the default passcode is 0000). • To edit the passcode, touch [Edit Code] then touch followed by entering the new passcode. • To lock the channel, touch the appropriate channel. appears and the channel is locked.
- Page 88 Menu Item Description [SiriusXM Reset] Set to restore to the default SiriusXM settings by touching [Restore]. CAUTION Do not turn off the engine while restoring the settings. NOTE The source is turned off before the process starts. - 88 -...
- Page 89 HDMI CAUTION For safety reasons, video images cannot be viewed while your vehicle is in motion. To view video images, stop in a safe place and apply the parking brake. NOTE A micro HDMI® cable (sold separately) is required for connection. For details, refer to the Installation Manual.
- Page 90 You can display the video image output by the device connected to video input. CAUTION For safety reasons, video images cannot be viewed while your vehicle is in motion. To view video images, stop in a safe place and apply the parking brake. NOTE A Mini-jack AV cable (sold separately) is required for connection.
- Page 91 Hides the touch panel keys. To display the keys again, touch anywhere on the screen. You can set the screen size for the video image (page 120). Switches between the video input and audio input. - 91 -...
- Page 92 You can display the video image output using the device connected to the back camera input or 2nd camera input.* For details, refer to the Installation Manual. * The 2nd camera input is available only for DMH-WT8600NEX/DMH-WT7600NEX/DMH-WC6600NEX/ DMH-W4660NEX. Starting procedure Touch then swipe left on the screen.
- Page 93 iDatalink Using iDatalink You can access the satellite radio source provided for the vehicle. The vehicle information and many OEM systems such as steering wheel controls, warning chimes, driver safety systems, and etc. can be displayed on this product by connecting the optional iDatalink adaptor.
- Page 94 NOTE When the serial number input is required, input the device number of this product. Install the vehicle/head unit-specific firmware on your iDatalink Maestro module. Connect this product to the iDatalink Maestro and install this product to the vehicle. The iDatalink function will be active. NOTES •...
- Page 95 Using the functions on [Car Features] You can check and use the following screens after selecting [Car Features] in the starting procedure. Touch one of the icons on the left side of the screen to change a feature. Displays the Gauge screen. Displays the Vehicle Information screen.
- Page 96 Vehicle Information screen Climate screen Parking Assist screen - 96 -...
- Page 97 Speed Radar Detector screen Displaying obstacle detection information CAUTION This function is intended solely to assist the driver’s vision. It does not detect all dangers and obstacles and is not a substitute for your attentiveness, judgement, and care while parking your vehicle. NOTE This function is only available for vehicles equipped with a parking sensor system.
- Page 98 Metra Axxess Using Metra Access the vehicle information and many of the OEM systems such as climate control, driver safety systems, etc. and display them on this product by replacing the Metra parts kit with interface conversion. NOTE Since the type of module varies depending on the vehicle model, search for your vehicle via the following URL to determine which features are available for each module.
- Page 99 Displays the Vehicle Information screen. Displays the Climate screen. Displays the Radio ID screen. Vehicle information screen Climate screen - 99 -...
- Page 100 Radio ID screen - 100 -...
- Page 101 Settings You can adjust various settings in the main menu. Displaying the setting screen Touch then swipe left on the screen. Touch Touch one of the following categories, then select the options. System settings (page 101) Theme settings (page 110) Audio settings (page 112) Video settings (page 116) Communication settings (page 117)
- Page 102 [AUX Input] Set to [On] for AUX source (page 90). [On] [Off] * DMH-WT8600NEX, DMH-WT7600NEX, DMH-WC6600NEX, DMH-W4660NEX [Camera settings] A separately sold rear view camera (e.g. ND-BC8) is required for utilizing the rear view camera function. (For details, consult your dealer.) ▶Rear view camera...
- Page 103 CAUTION Pioneer recommends the use of a camera which outputs mirror reversed images, otherwise the screen image may appear reversed. • Immediately verify whether the display changes to the rear view camera image when the shift lever is moved to REVERSE (R) from another position.
- Page 104 Menu Item Description [Parking Assist Guide Adjusting the guidelines by dragging or touching Adjust] on the screen. Touch [Default] to reset the settings. CAUTION • When adjusting the guidelines, park the vehicle in a safe place and apply the parking brake; this setting is available only when the vehicle is parked with the parking brake applied.
- Page 105 [System Language] Menu Item Description [System Language] Select the system language. NOTES • If the embedded language and the selected language setting are not the same, the text information may not display properly. • Some characters may not be displayed properly. [Restore Settings] Menu Item Description...
- Page 106 [Dimmer Settings] NOTE This setting is available only when you stop your vehicle in a safe place and apply the parking brake. Menu Item Description [Dimmer Trigger] Setting the dimmer brightness. [Auto] Switches the dimmer to on or off automatically according to your vehicle’s headlight turning on or off.
- Page 107 To adjust following menu, touch to adjust. Menu Item Description [Brightness] Adjust the black intensity. [-24] to [+24] [Contrast] Adjust the contrast. [-24] to [+24] [Color]* Adjust the color saturation. [-24] to [+24] [Hue]* Adjust the tone of color (which color is emphasized, red, or [-24] to [+24] green).
- Page 108 Menu Item Description [Firmware Update] Update to the latest version of the firmware by using a USB storage device or wireless connection. To update the firmware via wireless connection, CarAVAssist is required. For details on performing the wireless update, refer to Updating the firmware wirelessly (page 42).
- Page 109 Menu Item Description [3D Calibration Status] Check the sensor learning status, such as the degree of learning. You can also check the current sensor values and the total number of speed pulses. To delete the learned results stored in the sensor, follow the below instructions.
- Page 110 [OEM Settings] Menu Item Description [OEM Settings] (page 97). [OEM Volume Settings] Menu Item Description [OEM Volume Settings] (page 97). [Amazon Alexa setting] Setting the Amazon Alexa (page 79). [Terms of Use / Privacy] Menu Item Description [Terms of Use / Privacy] Select to accept or withdraw from the Internet Communication Service the Terms of Use and Privacy Policy.
- Page 111 Menu Item Description [Background] Select the wall paper from the preset items in this product or original pictures via the external device. The wall paper can be set from selections for the home menu screen and AV operation screen. The colors of the center image and the second image from the right (for the AV operation screen) change randomly, or they change to match the color used for the artwork image.
- Page 112 Menu Item Description [Home Custom Setting] Customize the home menu screen of the following items. • Switch the favorite source/application area • Customize the displayed favorite source/application and widget • Rearrange the displayed favorite source/application and widget • Adjust the size of the displayed widget *1 Refer to Still image source (page 58).
- Page 113 Menu Item Description [Source Level Adjuster] Adjust the volume level of each source to prevent radical [-4] to [+4] changes in volume when switching between sources other than FM. Touch to adjust the source volume after comparing the FM tuner volume level with the level of the source.
- Page 114 Menu Item Description [Balance] Touch to adjust the left/right balance. NOTE This function is available when [Network Mode] is selected as the speaker mode, or when [Standard Mode] is selected as the speaker mode and [Subwoofer] is selected in [Rear Speaker Output]. [Time Alignment] Select or customize the time alignment settings to reflect [On] [Off]...
- Page 115 Menu Item Description [Rear Speaker Output] Select the rear speaker output. [Rear] [Subwoofer] NOTE This function is available when [Standard Mode] is selected as the speaker mode. [Mute Level] If an interruption caused by an audio signal occurs while Apple CarPlay or Android Auto is being used, select mute or attenuate the volume of the AV source and iPhone/ smartphone application.
- Page 116 Touch then Touch [Crossover] or [Subwoofer Settings]. Touch to switch the speaker. Drag the graph line to set the cutoff position. Drag the lowest point of the graph to set the cutoff slope. The following items can also be set. Switches the subwoofer phase between normal and reverse position.
- Page 117 Description [RSE] Select the suitable video signal setting when you connect [Auto] [PAL] [NTSC] [PAL- this product to a rear monitor via iDatalink. M] [PAL-N] [SECAM] * DMH-WT8600NEX, DMH-WT7600NEX, DMH-WC6600NEX, DMH-W4660NEX Communication settings [Connection] Menu Item Description [Connection] Displaying a list of mobile devices that have been connected via Bluetooth or USB.
- Page 118 [Wireless Settings: Smartphone] Setting the infrastructure mode network (page 36). [Driving Position] Menu Item Description [Driving Position] Setting the driving position. [Right] [Left] • Apple CarPlay™ (page 64) • Android Auto™ (page 67) [Android Auto Auto-launch] Menu Item Description [Android Auto Auto- Select [On] to display the Android Auto screen launch] automatically when an Android device is connected to the...
- Page 119 Favorite menu Registering your favorite menu items in shortcuts allows you to quickly jump to the registered menu screen by a simple touch on the [Favorites] screen. NOTE Up to 12 menu items can be registered in the favorite menu. Creating a shortcut Touch then swipe left on the screen.
- Page 120 Other functions Setting the clock display You can set the time format, time zone, daylight saving, and the date format. However, the time and date are automatically adjusted by the GPS antenna and cannot be adjusted by the user. Touch the current time on the screen. Set the following items in the settings.
- Page 121 Touch the desired mode. [Full] Displays images across the entire screen. NOTE Some images may not be displayed across the entire screen. [Zoom] Displays the images enlarging them vertically. [Normal] Displays images without changing the ratio. [Trimming] An image is displayed across the entire screen with the horizontal-to-vertical ratio left as is.
- Page 122 – Correct the settings. solution to your problem cannot be found here, contact your dealer or the nearest The audio or video skips. authorized Pioneer service facility. → This product is not firmly secured. – Secure this product firmly. Common problems No sounds are produced.
- Page 123 – Update the iPhone software version. Black screen displayed when the vehicle → An error has occurred. is in reverse, with no camera installed. – Reconnect the iPhone with the USB → Back camera input is set to On. interface cable for iPhone. –...
- Page 124 Problems with Application corrective action. If the error persists, screen record the error message and contact your dealer or your nearest Pioneer service center. A black screen is displayed. → While operating an application, the application was ended on the Common smartphone side.
- Page 125 In the U.S.A., visit www.siriusxm.com switched off/on, contact your dealer or call 1-866-635-2349 if you have or the nearest authorized Pioneer questions about your subscription service center for assistance. package or would like to subscribe to this channel.
- Page 126 – Check that the files in the USB storage No Response device are compatible with this → This product cannot recognize the product. connected USB storage device. → Security for the connected USB storage – Disconnect the device and replace it device is enabled.
- Page 127 Apple CarPlay Pioneer Service Station. Connection failed. Android Auto → Communication failed and the system is trying to connect. Android Auto has stopped. → Wait for a while. Then, perform the → The connected device is not compatible actions below if the error message is still with Android Auto.
- Page 128 the screen. If the error message is still device fall onto the floor, where it may displayed after performing on-screen become jammed under the brake or gas instructions, please reconnect the pedal. device. • There may be a slight delay when starting playback of audio files encoded with image data.
- Page 129 USB storage device AAC compatibility • This product plays back AAC files CODEC FORMAT MP3, WMA, encoded by iTunes. WAV, AAC, FLAC, DSD, AVI, SAMPLING FREQUENCY 8 kHz to 48 kHz MPEG-PS, TRANSMISSION RATE 16 kbps to 320 MPEG-TS, MP4, kbps (CBR) 3GP, MKV, MOV, ASF, FLV,...
- Page 130 display them with a reduced font size. Maximum resolution 1 920 × 1 080 However, the maximum number of the Maximum frame rate 30 fps characters that you can display varies .mkv according to the width of each character, and of the display area. Compatible video codec MPEG4, H.264, •...
- Page 131 Wi-Fi® is a registered trademark of Wi-Fi registered trademarks owned by Bluetooth SIG, Alliance®. Inc. and any use of such marks by PIONEER Wi-Fi Protected Setup™ is a trademark of CORPORATION is under license. Other Wi-Fi Alliance®.
- Page 132 WARRANTIES OF MERCHANTABILITY AND FITNESS FOR A PARTICULAR PURPOSE ARE DISCLAIMED. IN NO EVENT SHALL THE FOUNDATION OR CONTRIBUTORS BE LIABLE FOR ANY DIRECT, INDIRECT, INCIDENTAL, SPECIAL, EXEMPLARY, OR CONSEQUENTIAL DAMAGES (INCLUDING, BUT NOT LIMITED TO, PROCUREMENT OF Windows Media is either a registered trademark SUBSTITUTE GOODS OR SERVICES;...
- Page 133 High-Resolution Audio • Pioneer accepts no responsibility for data lost from an iPhone, even if that data is lost while using this product. Please back up your iPhone data regularly. • Do not leave the iPhone in direct sunlight for extended amounts of time.
- Page 134 • iPhone XS Max App Store • iPhone XR • iPhone X App Store is a service mark of Apple Inc. • iPhone 8 • iPhone 8 Plus • iPhone 7 • iPhone 7 Plus iOS is a trademark on which Cisco holds •...
- Page 135 Using app-based changes to or discontinuation of the connected Content application(s) or connected content service by its provider. • Pioneer is not liable for any issues that may arise from incorrect or flawed app- Important based content. Requirements to access app-based •...
- Page 136 Heat visible. In that case, please consult your from the heater may break the LCD dealer or the nearest authorized Pioneer screen, and cool air from the cooler may Service Station. cause moisture to form inside this product, resulting in possible damage.
- Page 137 (DMH-WT8600NEX) Specifications Body: 1.4 kg (3.1 lbs) General Monitor: Rated power source: 0.9 kg (2.0 lbs) 14.4 V DC (10.8 V to 15.1 V allowable) (DMH-WT7600NEX) Grounding system: Body: Negative type 1.4 kg (3.1 lbs) Maximum current consumption: Monitor: 10.0 A 0.7 kg (1.5 lbs)
- Page 138 Color system: HPF (High): ON/OFF PAL/NTSC/PAL-M/PAL-N/SECAM Frequency: compatible 1.25 kHz/1.6 kHz/2 kHz/2.5 kHz/3.15 Temperature range: kHz/4 kHz/5 kHz/6.3 kHz/8 kHz/10 kHz/ -10 ˚C to +60 ˚C (+14 ˚F to +140 ˚F) 12.5 kHz Slope: Audio -6 dB/oct, -12 dB/oct, -18 dB/oct, -24 Maximum power output: dB/oct •...
- Page 139 H.264 video decoding format: 12 dBf (1.1 μV/75 Ω, mono, S/N: 30 dB) Base Line Profile, Main Profile, High Signal-to-noise ratio: Profile (DMH-WT8600NEX/DMH-WT7600NEX/ H.263 video decoding format: DMH-WC6600NEX/DMH-W4660NEX) Base Line Profile 0/3 65 dB (digital broadcasting) (IHF-A VC-1 video decoding format:...
- Page 140 Frequency range: 73.7 g (0.2 lbs) 530 kHz to 1 710 kHz CTA2006 Specifications Usable sensitivity: 25 μV (S/N: 20 dB) Signal-to-noise ratio: (DMH-WT8600NEX/DMH-WT7600NEX/ DMH-WC6600NEX/DMH-W4660NEX) 60 dB (digital broadcasting) (IHF-A network) 60 dB (analog broadcasting) (IHF-A network) Power output: (DMH-W4600NEX) <...
- Page 141 © 2020 PIONEER CORPORATION. All rights reserved. <OPM_DMHWC6600NEXUC_EN_B> UC...