Table of Contents
Advertisement
Advertisement
Table of Contents

Related Manuals for Western Digital WD ShareSpace


Summary of Contents for Western Digital WD ShareSpace
- Page 1 WD ShareSpace ™ Network Storage System User Guide...
-
Page 2: Important Safety Instructions
12. In accordance with workstation regulation standards, do not place this device in the visual field of the user due to the glossy front of the case. WARNING! The WD ShareSpace uses a lithium battery, type CR2032. There is danger of an explosion if the battery is incorrectly replaced. Replace only with the same or equivalent battery type recommended by the manufacturer. -
Page 3: Table Of Contents
Format and Configuration ........3 WD ShareSpace File Storage ....... . .3 Specifications . -
Page 4: Table Of Contents
Media Devices..........67 iTunes with WD ShareSpace ....... 74 External USB Drive Sharing &... -
Page 5: Table Of Contents
Index ......... . 198 WD SHARESPACE... -
Page 6: Wd Service And Support
00 531 650442 Korea +82-2-2093-1007 Malaysia +800 6008 6008/1 800 88 1908/+65 62430496 Philippines 1 800 1441 0159 Singapore +800 6008 6008/+800 608 6008/+65 62430496 Taiwan +800 6008 6008/+65 62430496 WD SERVICE AND SUPPORT - 1 WD SHARESPACE USER MANUAL... -
Page 7: Registering Your Wd Product
WD SHARESPACE USER MANUAL Registering Your WD Product Your WD product includes 30 days of free technical support during the applicable warranty period for your product. The 30-day period commences on the date of your first telephone contact with WD technical support. Register online at register.wdc.com. -
Page 8: Overview
Format and Configuration WD ShareSpace is preformatted for maximum reliability as a RAID 5 volume (for four- drive systems) or for maximum capacity as a single large, spanned volume (for two- drive systems). - Page 9 Downloader” on page 164). • Configuration—this is a read-only share containing only a Help file and the login page. It is not meant for sharing or storing data and should not be modified. WD SHARESPACE USER MANUAL OVERVIEW - 4...
-
Page 10: Specifications
• Power supply 19V DC, 5A Environmental • Operating temperature: 5 to 35 °C (41 to 95 °F) • Non-operating temperature: -20 to 65°C (-4 to 149 °F) ® ® ® ® 2003 ® ® Tiger ® WD SHARESPACE USER MANUAL OVERVIEW - 5... -
Page 11: Kit Contents
Kit Contents WD ShareSpace with four or two drives AC adapter and power cords Accessories Visit shopwd.com (U.S. only) to view additional accessories like cables, power supplies, additional hard drives, and drive mounting rails for this product. Outside the U.S., visit support.wdc.com. -
Page 12: Pre-Installation
Also, write the purchase date and other notes such as your operating system and version. This information is necessary for setup and technical support. Serial Number: Model Number: Purchase Date: System and Software Notes: WD SHARESPACE USER MANUAL OVERVIEW - 7... -
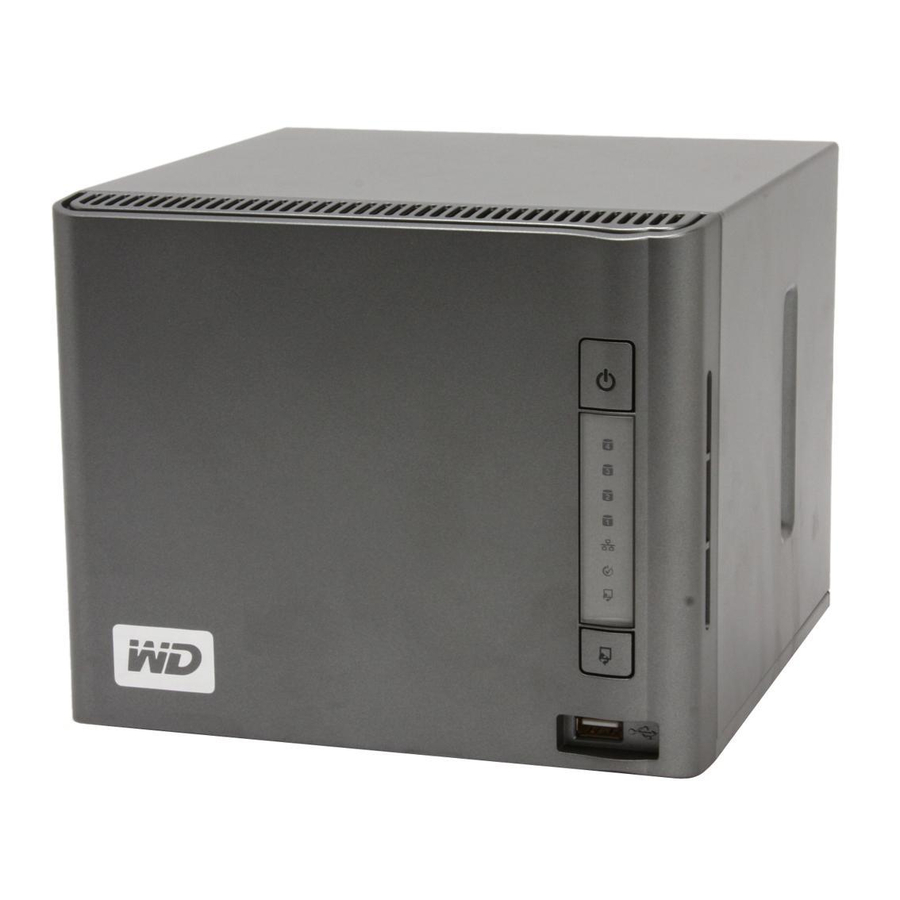
Page 13: System View
(up to 30 seconds) as the device powers up. Holding the button down for four seconds powers off the device. Power port Reset button Ethernet port USB ports 2 and 3 Kensington ® security slot WD SHARESPACE USER MANUAL OVERVIEW - 8... -
Page 14: Led Indicators
• System initialize operation in progress Flashing • One flash per second—system is formatting a USB drive • One flash per second (backup)—USB device to WD ShareSpace • Two flashes per second (backup)—WD ShareSpace to USB device • System initialize operation completed... -
Page 15: Usb Backup Button
The reset button restores machine name, network mode/IP address, and admin password to default factory settings without erasing shared folders and volumes. For more information on how to reset the system, see “Resetting the WD ShareSpace” on page 182. Kensington Hardware Features... -
Page 16: Wd Sharespace Basic Setup
WD ShareSpace Basic Setup Step 1: Connect WD ShareSpace to the Network Follow the steps below to connect the WD ShareSpace to a small home/office network. 1. Connect one end of the Ethernet cable into the Ethernet port located on the back of the device. -
Page 17: Step 2: Access Wd Sharespace On The Network
Step 2: Access WD ShareSpace on the Network You can easily find your WD ShareSpace on the local area network (LAN). Follow the appropriate procedure below: Windows • “Using WD Discovery (Windows only)” on page 12. • “Using Windows Network and Sharing Center” on page 14. - Page 18 5. If you have connected the WD ShareSpace properly as shown in the Connect screen on page 13, click Next. 6. The Application Installer screen opens, displaying a list of options. Click WD Discovery Tool. Once the WD Discovery Tool installation is complete, it automatically launches and the WD Discovery icon displays on your desktop.
- Page 19 Using Windows Network and Sharing Center Windows Vista and Windows 7 offer an alternative to WD Discovery for easy setup and mapping of the WD ShareSpace. 1. For Windows Vista/Windows 7, click Start>Computer>Network. 2. Right-click WDShareSpace in the Network and Sharing center and select Install from the drop-down menu.
- Page 20 Windows starts searching for the driver. Depending on your system setup, it may take a minute or so to locate the driver. 5. When installation is complete, a confirmation message displays. Click Close. WD SHARESPACE USER MANUAL WD SHARESPACE BASIC SETUP - 15...
- Page 21 A WDShareSpace icon displays next to WDShareSpace, and an Open option displays in the drop-down menu. To open the WD ShareSpace shares: 1. Right-click WDShareSpace and select Open from the drop-down menu. WD SHARESPACE USER MANUAL WD SHARESPACE BASIC SETUP - 16...
- Page 22 To view the WD ShareSpace web page: Right-click WDShareSpace and select View device webpage from the drop- down menu. The login page appears. Note: (See “Accessing WD ShareSpace’s Network Storage Manager” on page 92 for information on logging in.) WD SHARESPACE...
- Page 23 To view the properties of the WD ShareSpace: 1. Right-click WDShareSpace and select Properties from the drop-down menu. The WDShareSpace Properties screen displays. 2. Click OK to close the screen. Mac OS X Leopard/Snow Leopard 1. Turn on your computer and wait for the operating system to load.
- Page 24 Instead of moving the original item, this creates an alias at the new location. • Double-click the item you want to alias (e.g., the Public share icon), and then click File>Make Alias. WD SHARESPACE USER MANUAL WD SHARESPACE BASIC SETUP - 19...
- Page 25 2. Open Finder. Click Network and then double-click the WDShareSpace icon. 3. Type “admin” in both the Name and Password fields, and make sure the Remember this password in my keychain check box is selected. Click Connect. WD SHARESPACE USER MANUAL WD SHARESPACE BASIC SETUP - 20...
- Page 26 Instead of moving the original item, this creates an alias at the new location. Double-click the item you want to alias (e.g., the Public share icon), and then • click File>Make Alias. WD SHARESPACE USER MANUAL WD SHARESPACE BASIC SETUP - 21...
- Page 27 The Public share icon displays on your desktop. Congratulations! Your WD ShareSpace is now ready for use and is accessible as a drive letter in My Computer (Windows) or a shared drive icon on the desktop (Mac). You can now...
-
Page 28: Backing Up Computers On A Network
WD ShareSpace to be the same. Otherwise, on a Windows system, you will have to log in to your WD ShareSpace every time you reconnect to your home network before WD Anywhere Backup will begin to back up your files. - Page 29 WD SHARESPACE USER MANUAL 7. Select your preferred language from the list and click OK. 8. Close all other open applications, and then click Next to continue. 9. If you accept the terms of the agreement, click I Agree to continue.
- Page 30 Note: The WD Anywhere Backup icon now appears on your desktop, and WD Anywhere Backup is listed in Program Files. 10. Continue with “One-Click Backup” on page 28 or “Creating a Customized Backup Plan” on page 32. WD SHARESPACE USER MANUAL BACKING UP COMPUTERS ON A NETWORK - 25...
- Page 31 Mac OS X 1. Turn on your computer and wait for the operating system to load. 2. Double-click the WD ShareSpace icon on the desktop. 3. Double-click WD_Anywhere_Backup.dmg. 4. On the WD Anywhere Backup screen, click the WD Anywhere Backup icon.
- Page 32 WD SHARESPACE USER MANUAL 6. On the Welcome screen of the Install WD Anywhere Backup wizard, click Continue. 7. On the Software License Agreement screen, click Continue. 8. To accept the software license agreement, click Agree. 9. Click Install. 10. Enter your Mac user name and password.
-
Page 33: Configuring Wd Anywhere Backup
This feature backs up your data to the WD ShareSpace so you can restore your data in the event that your computer’s hard drive crashes. - Page 34 Note: The screen below only appears when you have WD ShareSpace attached to your computer’s local area network. This screen offers two options: Automatic Backup: The main option is to have the WD ShareSpace automatically and continuously back up your files, providing assurance that your files can always be restored.
- Page 35 WD SHARESPACE USER MANUAL Note: If you do not want these messages to display in the future, select Do not show this message in the future. 3. A registration screen appears. If desired, enter the optional registration information. Click Continue.
- Page 36 1. Click the Customize My Backup link at the bottom right of the WD Anywhere Backup Configuration screen. The Welcome to the WD Anywhere Backup Wizard screen appears. 2. Continue with step 3 in “Creating a Customized Backup Plan” on page 32. WD SHARESPACE USER MANUAL BACKING UP COMPUTERS ON A NETWORK - 31...
- Page 37 WD SHARESPACE USER MANUAL Creating a Customized Backup Plan Creating and customizing a backup plan gives the advanced user complete control over which files are backed up. 1. If WD Anywhere Backup is not already running, click the WD Anywhere Backup icon on the desktop.
- Page 38 WD SHARESPACE USER MANUAL 4. Click Network Places and locate your WD ShareSpace on your local area network. Click Next. The Select Items to Back Up screen displays. You have two options: To select specific items, see “Selecting your own backup items” on page 36.
- Page 39 Select All to select all of the items. 3. To add more items, click the Add Backup Items button. The Local Folders tab displays. Select additional folders and click Select. WD SHARESPACE USER MANUAL BACKING UP COMPUTERS ON A NETWORK - 34...
- Page 40 Click the Select button. 5. On the Items Selected for Backup screen, click Next. 6. Continue with “Completing the Backup Plan” on page 37. WD SHARESPACE USER MANUAL BACKING UP COMPUTERS ON A NETWORK - 35...
- Page 41 None to clear all selections, or click Select All to select all of the items. When finished, click Next. (b) On the Local Folders tab, select each folder you want to back up and click Select. WD SHARESPACE USER MANUAL BACKING UP COMPUTERS ON A NETWORK - 36...
- Page 42 5. Continue with Completing the Backup Plan below. Completing the Backup Plan 1. Name your backup plan and click Next. You can create additional backup plans by repeating the steps above. WD SHARESPACE USER MANUAL BACKING UP COMPUTERS ON A NETWORK - 37...
- Page 43 To pause the backup, click the Pause until System Idle link. 4. To keep the backup running in the background, click Continue. The WD Anywhere Backup screen displays the progress of the backup. WD SHARESPACE USER MANUAL BACKING UP COMPUTERS ON A NETWORK - 38...
- Page 44 WD SHARESPACE USER MANUAL When the backup finishes, the Backup Complete screen appears. Alternatively, close the screen, click the WD Anywhere Backup icon, and select Show backup status. As files are backed up, a small notification window appears. BACKING UP COMPUTERS ON A NETWORK - 39...
- Page 45 3. Click the box next to the folders or files you want to restore. 4. From the Restore Files to list, select a location for your restored files and click the Restore button. WD SHARESPACE USER MANUAL BACKING UP COMPUTERS ON A NETWORK - 40...
- Page 46 5. Select the No, just reactivate the backup plan and start backing up option and click the Next button. Your backup plan will be reactivated, and your computer will back up files onto your selected backup destination. WD SHARESPACE USER MANUAL BACKING UP COMPUTERS ON A NETWORK - 41...
- Page 47 Selecting a Backup Plan If you have more than one backup plan, select the one you want by clicking in its box. A blue border surrounds the selected plan. WD SHARESPACE USER MANUAL Change Selected Files Remove Backup Plan...
- Page 48 You can change the number of versions of the same files WD Anywhere Backup should keep. For example, you may want to keep yesterday’s version as well as today’s version. WD SHARESPACE USER MANUAL BACKING UP COMPUTERS ON A NETWORK - 43...
- Page 49 WD Anywhere keeps a log of all actions and backup errors. 1. Select the backup plan, and click the Show Backup Log icon. (See “Icons” on page 42.) The Backup Log appears. WD SHARESPACE USER MANUAL BACKING UP COMPUTERS ON A NETWORK - 44...
- Page 50 7. To see which files have been backed up, click the click here to launch the WD Anywhere Restore application link. (For information on restoring, see “Restoring a Backup Plan” on page 40.) WD SHARESPACE USER MANUAL BACKING UP COMPUTERS ON A NETWORK - 45...
-
Page 51: Using Time Machine
Setting up Time Machine To set up Time Machine to back up files on your WD ShareSpace drive: 1. Use one of the following methods to open Time Machine. • Click the Time Machine icon in the Dock. - Page 52 3. Click the Choose Backup Disk button and select the WD ShareSpace drive where you want the backups stored. 4. Click the Use for Backup button. A screen prompts you for your user name and password. Enter wd_backup as the user name and backup as the password (not case-sensitive).
- Page 53 • Weekly until the WD ShareSpace drive is full. If a backup is interrupted, for example, if the computer goes into sleep mode or the WD ShareSpace drive is disconnected, it will resume automatically once the computer is available. To see information such as available capacity and the date and time of the oldest,...
-
Page 54: Starting A Backup
2. Click the Time Machine icon in the Dock or select Enter Time Machine from the drop-down menu. All of your backups display in a cascade, with the most recent backup in the front. WD SHARESPACE USER MANUAL USING TIME MACHINE™ - 49... - Page 55 Keep Original - Does not restore the item from the backup drive Keep Both - The original item will remain and the backed-up item will be added to the selected location on your computer. Replace - The backed-up item replaces the original item. WD SHARESPACE USER MANUAL Backups Time line...
-
Page 56: Deleting The Entire Backup
“Connection Failed” message. To delete your entire backup: 1. In Finder, select the WD ShareSpace drive and click the Connect As button. 2. Enter wd_backup as the user name and backup as the password (not case- sensitive) and click Connect. -
Page 57: Changing Your Password
The following screen displays. 3. Select the backup folder and then drag the *.sparsebundle file to the Trash icon. Changing Your Password You can change your default password for your WD ShareSpace to access Time Machine. To change your password: 1. - Page 58 WD SHARESPACE USER MANUAL 3. Click the Users button in Basic mode. 4. Click the icon to the right of the user name (WD_Backup). 5. When the Users page appears, enter your new password in the New and Confirm password fields and click Submit.
- Page 59 WD SHARESPACE USER MANUAL 6. A confirmation message displays. USING TIME MACHINE™ - 54...
-
Page 60: Mionet Remote Access
MioNet also enables you to share a folder of pictures on your WD ShareSpace with friends (no upload required) or a folder of documents with your business colleagues. - Page 61 6. Click the MioNet New Account button if you are a new MioNet user; click MioNet - Existing Account if you are an existing user. The MioNet registration screen appears. 7. Complete the registration form and click Submit to create an account. WD SHARESPACE USER MANUAL MIONET REMOTE ACCESS - 56...
- Page 62 8. When MioNet finds the WD ShareSpace you are registering, enter a name for the device and click OK. 9. A confirmation message appears. Click OK. MioNet displays a list of the public folders stored on your WD ShareSpace and includes a private folder that was created with the MioNet username.
-
Page 63: Using Mionet Web (After Registration)
Note: In this User Manual, we discuss the most basic options. For more advanced options, see the MioNet Help or MioNet User Guide (available when you click the Online Help icon). WD SHARESPACE USER MANUAL and enter your username and... - Page 64 Sharing Files with Others Sharing Photos You can easily share a folder of photos on your WD ShareSpace with others. It is a simple three-step process. First you choose the folder you wish to share, then who you want to share with, and finally what permissions they have to access the folder.
- Page 65 (b) Enter the user’s email address and click the Continue button. (c) Continue with step 6. 5. To find another MioNet user you have never shared with before: utton. Next b button. WD SHARESPACE USER MANUAL MIONET REMOTE ACCESS - 60...
- Page 66 6. From the list of users, select the user(s) you want to share with and click the Next button. Note: You can press the Ctrl key in Windows or the Command key on the Mac to select multiple users. utton. WD SHARESPACE USER MANUAL MIONET REMOTE ACCESS - 61...
- Page 67 1. Click the Transfer Files to Others icon to open a dialog window showing your WD ShareSpace folders. 2. Click the + to navigate through your directory to highlight the folder you wish to transfer files from and click Next. WD SHARESPACE USER MANUAL MIONET REMOTE ACCESS - 62...
- Page 68 5. To find a MioNet user you have never shared with before: (a) Click the Find MioNet user (b) Enter the user name or email address of the user and click the Find button. button. Next button. button. WD SHARESPACE USER MANUAL MIONET REMOTE ACCESS - 63...
- Page 69 MioNet automatically opens up in the user’s web browser and provides instant secure access to the folders or files on your computer. They can then double- click the file to open it and save it to their local PC. WD SHARESPACE USER MANUAL MIONET REMOTE ACCESS - 64...
-
Page 70: How To Play/Stream Video, Music & Photos
How to Play/Stream Video, Music & Photos Media Servers Overview WD ShareSpace is designed to serve as your home's central media hub. It enables you to stream photos, music, and videos to your home entertainment center and/or other PCs on your home network. -
Page 71: Media Storage
Media Storage You can access and store media content on WD ShareSpace via network shares. Shares are folders that can be used to organize and store files on your WD ShareSpace. Shares can be shared with everyone (public) or with selected users on your network (private). -
Page 72: Media Devices
WD ShareSpace. Following are general steps for using the WD TV Live to access files on a WD ShareSpace. Note: Please refer to your WD TV Live HD Media Player user guide for more specific instructions on connecting to the WD ShareSpace and accessing and playing your media content. - Page 73 It can be Music 9. Press to select Network Shares Enter. 10. Press to select the WD ShareSpace and press Enter. , Video , or Photo or Media servers HOW TO PLAY/STREAM VIDEO, MUSIC & PHOTOS - 68 WD SHARESPACE...
- Page 74 Note: Please go to the Microsoft Media Player support site for more information on using and updating your media player. To stream media using Windows Media Player 11 or 12 Library: 1. Click Control Panel>Network and Sharing Center. 2. Click Customize. WD SHARESPACE USER MANUAL HOW TO PLAY/STREAM VIDEO, MUSIC & PHOTOS - 69...
- Page 75 WD SHARESPACE USER MANUAL 3. Click Private, and then click Next. 4. Launch Windows Media Player (Start>All Programs>Windows Media Player). 5. Click Library>Media Sharing. HOW TO PLAY/STREAM VIDEO, MUSIC & PHOTOS - 70...
- Page 76 Note: Please go to the Microsoft Xbox 360 support site for more information on using and updating your XBox 360. 1. Ensure that your Xbox 360 and WD ShareSpace are powered on and connected to your local area network. 2. From the main Xbox user interface, scroll to the My Xbox screen 3.
- Page 77 4. Depending on the brand of photo frame you have, you may need to access Settings/Network Setup screen in the user interface to establish connection so that your photo frame can link to your WD ShareSpace. Please refer to the user guide for your Digital Media Adapter (DMA) or specific instructions.
- Page 78 The following are general steps for using a network music player to access WD ShareSpace: 1. Connect WD ShareSpace to your local area network and power on the device. 2. Connect and configure your network music player on your home’s wired or wireless network switch or router.
-
Page 79: Itunes With Wd Sharespace
WD ShareSpace iTunes Media Server Overview With the iTunes Media Server, you or anyone connected to the WD ShareSpace can play music files stored on the system using iTunes. This service creates a virtual music library on the device and treats it as an iTunes repository, making it possible for music files to stream from the WD ShareSpace to Windows or Mac computers running iTunes. - Page 80 WD SHARESPACE USER MANUAL 3. Double-click an audio file to play. The audio file is streamed in iTunes, and audio files from the WD ShareSpace are displayed under the Shared list. HOW TO PLAY/STREAM VIDEO, MUSIC & PHOTOS - 75...
-
Page 81: External Usb Drive Sharing & Backup
USB2 and USB3 from top to bottom. Note: The WD ShareSpace supports external USB storage; USB optical drives (CD/DVD combo or DVD dual/multi drive) are not supported. The USB ports currently support attached drives with FAT32, NTFS, EXT3, or HFS+J file systems. - Page 82 The system will back up data from the USB drive to the “Public” default share folder on the WD ShareSpace. The share folder will be automatically named after the USB drive plugged into Port 1.
- Page 83 ShareSpace, an error will display when the USB drive is full. The error will appear as a flashing red LED on the front of the ShareSpace, as well as a text message at the top of the WD ShareSpace’s Network Storage Manager web page.
-
Page 84: Using Wd Discovery (Windows Only)
WD Discovery provides the following options: Mapping a Network Drive To access and store data on WD ShareSpace after setting up the device, you must first map a network drive to one or more of the default shares. Install the WD Discovery application on each Windows computer in your network to easily map a network drive, browse network shares, or create a desktop shortcut. - Page 85 “admin.” A message appears asking whether you want to map the drive automatically. Continue with “Automatic Drive Mapping” or “Manual Drive Mapping” on page 81. WD SHARESPACE USER MANUAL and then All Programs>WD USING WD DISCOVERY (WINDOWS ONLY) - 80...
- Page 86 3. Click My Computer (Computer on Windows Vista/Windows 7). The network drives display. You can now drag and drop files into the network drive folders using My Computer or Windows Explorer. WD SHARESPACE USER MANUAL USING WD DISCOVERY (WINDOWS ONLY) - 81...
-
Page 87: Browse Network Shares
Network Shares in the Things To Do list. 4. After successful login, the share folders on the device are listed. Click a share to view and access share files in Windows Explorer. WD SHARESPACE USER MANUAL USING WD DISCOVERY (WINDOWS ONLY) - 82... -
Page 88: Desktop Shortcut Creation
Desktop Shortcut Creation WD Discovery can create a desktop shortcut that points to a networked WD ShareSpace. Follow these steps to create a desktop shortcut: 1. Ensure that the device is powered on and connected to the network. 2. Launch WD Discovery from the Start menu or the desktop. -
Page 89: Turning Identify Led On Or Off
Click OK. Turning Identify LED On or Off Users with multiple WD ShareSpace devices can use the blue Identify LED feature to find out which WD ShareSpace in the network is currently being accessed by WD Discovery. WD Discovery allows you to turn on or turn off Identify LED on a networked WD ShareSpace. -
Page 90: Automatically Updating Wd Discovery
4. The Identify LED on the target device is turned on. The LED icon appears to the left of the device name in WD Discovery. To turn off the Identify LED on a remote networked WD ShareSpace device: 1. Ensure that the device is powered on and connected to the network. - Page 91 1. On the WD Discovery Auto Update Progress screen, click Yes. A message indicates that the download may take several minutes. When the update is complete, a confirmation message appears: 2. To launch WD Discovery, click Yes. WD SHARESPACE USER MANUAL USING WD DISCOVERY (WINDOWS ONLY) - 86...
-
Page 92: Network Storage Manager: Basics
WD ShareSpace’s Network Storage Manager is a powerful and convenient user interface for managing and configuring your WD ShareSpace. Note: Accessing and setting up the WD ShareSpace’s Network Storage Manager is not required to begin using your WD ShareSpace right away. - Page 93 “Setting Up the Device for the First Time” on page 89. Mac OS X To configure the WD ShareSpace for Mac OS X: 1. Turn on your computer and wait for the operating system to load. 2. Open the Safari web browser.
- Page 94 Setting Up the Device for the First Time Follow the steps below to continue setting up the device for all operating systems. Note: You only have to perform the setup the first time you log in to WD ShareSpace’s Network Storage Manager.
-
Page 95: Click Next
My Network Places. To connect more than one storage device to the same network, you must specify a unique device name for each storage device. WARNING! Renaming WD ShareSpace forces all the network computers to remap their shared network resources. Change the device name only when necessary. - Page 96 See “Reset Button” on page 10 for instructions. 8. Accept the default DHCP (Dynamic Host Configuration Protocol) client settings. If you are not using DHCP, click Static and manually assign the IP address. Click Next. WD SHARESPACE USER MANUAL NETWORK STORAGE MANAGER: BASICS - 91...
- Page 97 Note: If you are using Windows, you may notice a warning notice bar display during the final initialization of your WD ShareSpace. The bar warns that the Internet Explorer has blocked an Active X controller message. This warning disappears on its own, or you can click the X button to the right of the bar.
- Page 98 4. The login page appears. Type in the administrator name and password (the default password is “admin” unless it has already been changed by the administrator). In the Tool list, click WD ShareSpace’s Network Storage Manager. In the Language list, click the language for your region. Click Login.
-
Page 99: Wd Sharespace's Network Storage Manager Features
WD ShareSpace’s Network Storage Manager Features The web-based management utility includes the following features: • LAN access—the device supports local area network access of the web-based user interface, enabling management from anywhere in the network. • Secured access—the device can be accessed and configured by the web-based, password protected user interface over SSL (Secure Socket Layer). -
Page 100: User Interface Overview
Advanced Mode and Basic Mode any time. Note: See “Network Storage Manager: Advanced Mode” on page 108 for instructions on using Advanced Mode. WD SHARESPACE USER MANUAL NETWORK STORAGE MANAGER: BASICS - 95... -
Page 101: Basic Mode
Toolbar The toolbar located on the upper right of the WD ShareSpace’s Network Storage Manager user interface includes the following commands. Function Description Advanced Allows you to switch the user interface from basic to Advanced Mode. Basic Allows you to switch the user interface from advanced to Basic Mode. - Page 102 Device Name Use this option to enter or change a device name and/or a description of the device. The device name is the name by which your WD ShareSpace is identified on the LAN. 1. Click the Device Name button in Basic Mode home page.
- Page 103 WD SHARESPACE USER MANUAL Date & Time The date and time are synchronized automatically to the NTP (network time protocol) server by default. You have the option to set the date and time manually or allow the NTP to access the Internet to automatically set the time.
- Page 104 3. Click Submit. Users This button enables the administrator to control access to data on the WD ShareSpace across the network by creating user accounts with specific permissions. The administrator can also edit and delete user accounts. WD SHARESPACE USER MANUAL...
- Page 105 WD SHARESPACE USER MANUAL Users Page Icons Icon Description Denotes a user private share. There is no private share with this user name. There is a private share with this user name. Click this icon to change the user password.
- Page 106 2. Select the user account you want to delete, and then click the Delete icon 3. Click OK. For more user configuration options using the WD ShareSpace’s Network Storage Manager Advanced Mode, see “Users” on page 153. next to the appropriate user account.
- Page 107 (see page 101), or by setting permissions on an existing share (see “Folder Share Permissions” on page 156). You must first access WD ShareSpace’s Network Storage Manager to create a share. WD SHARESPACE...
- Page 108 3. Enter a share name in the Share field. The share name can contain up to 32 characters, including alphabetic, numeric, or underscore characters. 4. Enter a brief description in the Description field. WD SHARESPACE USER MANUAL NETWORK STORAGE MANAGER: BASICS - 103...
- Page 109 IP address, volume usage, and volume RAID type. Click the System Status button on the Basic mode home page to access system information. WD SHARESPACE USER MANUAL NETWORK STORAGE MANAGER: BASICS - 104...
- Page 110 Reset MioNet - Resets the MioNet account information on the WD ShareSpace. If the WD ShareSpace is registered to a MioNet account, that registration is erased so that the unit is now unregistered. This status is displayed in the upper right corner of the page.
- Page 111 WD SHARESPACE USER MANUAL To register with MioNet: 1. Click the Create MioNet account link in the note at the bottom of the page. The MioNet web registration page displays. 2. Enter the registration information required and click Submit. To log in to an existing MioNet account: 1.
- Page 112 USER MANUAL Shutdown/Reboot The Shutdown/Reboot button allows you to perform a system reboot or shutdown. To shut down the WD ShareSpace: 1. Click Shutdown/Reboot on the Basic mode home page. 2. On the Shutdown/Reboot page, click Shutdown. 3. Click OK.
-
Page 113: Network Storage Manager: Advanced Mode
This tab also allows viewing of logs from the system, Common Internet File System (CIFS), or File Transfer Protocol (FTP). For more details, “Status Tab” on page 160. WD SHARESPACE NETWORK STORAGE MANAGER: ADVANCED MODE - 108 USER MANUAL... -
Page 114: System Tab
NTP (Network Time Protocol) Service. You can also manually specify the IP address of the NTP servers to which you want to synchronize. WD SHARESPACE NETWORK STORAGE MANAGER: ADVANCED MODE - 109 USER MANUAL... - Page 115 HTTP. All traffic between the managing computer and the WD ShareSpace is encrypted. HTTPS provides a more secure means of configuring your device, but it may affect the responsiveness of the user interface.
- Page 116 Note: Email alerts may not work with some ISPs using strong spam filtering. For further information, go to support.wdc.com and search the knowledge base for answer ID 2570. WD SHARESPACE NETWORK STORAGE MANAGER: ADVANCED MODE - 111 USER MANUAL...
- Page 117 5. Click Send Test Mail to send a test alert and confirm your settings are correct. A test message will be sent to each entered email address. 6. Click Submit. WD SHARESPACE NETWORK STORAGE MANAGER: ADVANCED MODE - 112 USER MANUAL...
- Page 118 Panel>Administrative Tools>Services>Messenger. You can test the Messenger Service by clicking Send Test Pop-up. Make sure printer and file sharing is selected as an exception if the Windows Firewall is enabled in Windows 2000/XP. 4. Click Submit. WD SHARESPACE NETWORK STORAGE MANAGER: ADVANCED MODE - 113 USER MANUAL...
- Page 119 The Automated tab on the Update page provides information about the current firmware version and connects to the WD website for automatic downloading of the latest firmware. 1. Click the Update button on the System tab home page. WD SHARESPACE NETWORK STORAGE MANAGER: ADVANCED MODE - 114 USER MANUAL...
- Page 120 WD SHARESPACE USER MANUAL 2. Click Check For New Firmware. 3. Click Download if new firmware is available. When the download is finished, the following page displays: 4. Click Upgrade. Wait for the update process to complete. NETWORK STORAGE MANAGER: ADVANCED MODE - 115...
- Page 121 6. Click Submit. 7. After your firmware has been updated, the device will reboot. The web user interface redirects to the System Status page after the update is completed. WD SHARESPACE support.wdc.com for firmware NETWORK STORAGE MANAGER: ADVANCED MODE - 116...
- Page 122 System Information page after the update is completed. Note: If the IP address of your unit has changed, you will need to use WD Discovery Tool to discover it again. WD SHARESPACE NETWORK STORAGE MANAGER: ADVANCED MODE - 117 USER MANUAL...
- Page 123 WD SHARESPACE USER MANUAL Configuration The Configuration button on the System tab home page enables you to save or restore system configuration settings or revert to factory default settings. To back up the current system configuration settings: 1. On the Configuration page, click Save Current Configuration.
- Page 124 Important: Save the current configuration prior to restoring the factory default settings. Performing a factory default reset will erase all settings in the WD ShareSpace. System configuration will reset the device to default factory settings. All information and data will be lost. The LAN settings (including port settings) are not changed.
- Page 125 WD SHARESPACE USER MANUAL Advanced The Advanced button on the System tab home page enables you to configure the system for root access, SSL certificate/key, power saving, and LED control. You can also set the extend Span mode and enable HDD standby mode.
- Page 126 It will extend an existing Span automatically when you add a new drive and reboot the system. Manual allows you to choose when to add the new drive after boot up. 2. Click Submit. WD SHARESPACE NETWORK STORAGE MANAGER: ADVANCED MODE - 121 USER MANUAL...
- Page 127 A UPS (uninterruptable power supply) device can be connected to one of the USB ports to shut down the ShareSpace in the event of a power failure. You must connect the UPS device to the WD ShareSpace before setting up the UPS service. Note: Go to support.wdc.com...
- Page 128 The Shutdown/Reboot button on the System tab home page allows you to reboot or shut down the system. To shut down the WD ShareSpace: 1. Click the Shutdown/Reboot button on the System tab home page. 2. On the Shutdown/Reboot page, click Shutdown.
-
Page 129: Network Tab
To reboot the WD ShareSpace: 1. Click the Shutdown/Reboot button on the System tab home page. 2. On the Shutdown/Reboot page, click Reboot. 3. Click OK. Network Tab The Network tab provides access to the following configuration options: • •... - Page 130 Universal Plug and Play (UPnP) is a set of computer network protocols that simplifies the implementation of networks in the home by allowing devices to connect seamlessly. • File Transfer Protocol (FTP) is a network protocol used to transfer data from WD SHARESPACE NETWORK STORAGE MANAGER: ADVANCED MODE - 125 USER MANUAL...
- Page 131 • URL scheme used to indicate a secure HTTP connection. It is syntactically identical to the http:// scheme normally used for accessing resources using HTTP. WD SHARESPACE is a communications protocol for the transfer HTTPS NETWORK STORAGE MANAGER: ADVANCED MODE - 126...
- Page 132 8000 and 10000 for each service. To access data via FTP: You can access data in a shared folder on WD ShareSpace with a widely used FTP client software program. An FTP client software program must be installed on the computer you are using to access the device, and FTP service must be enabled on the WD ShareSpace (see “To enable other network services:”...
- Page 133 WD SHARESPACE USER MANUAL Internet (WAN), but this requires custom router configuration and is recommended only for advanced users. Workgroup The Workgroup button on the Network tab home page allows you to set up the network storage device as a workgroup or a domain member. The default setting is Workgroup.
- Page 134 WD ShareSpace. (See “Folder Share Permissions” on page 156.) Note: You can enable ADS to automatically update the WD ShareSpace. Contact WD Tech Support for more information on this procedure. WD SHARESPACE...
- Page 135 Remote Access WD ShareSpace comes with MioNet enabled by default. The Remote Access button on the Network tab home page allows you to control the MioNet service on the storage device. If MioNet is not already installed on the client computer, follow the instructions under “MioNet Remote Access”...
-
Page 136: Storage Tab
USB drives connected to the system. The Storage tab provides the following configuration options: • Disk Manager • Volumes & RAID Management • Folder Shares • USB Shares • Quota • Downloads WD SHARESPACE NETWORK STORAGE MANAGER: ADVANCED MODE - 131 USER MANUAL... - Page 137 If the hard drive is not part of an existing volume, the Safely Remove Disk appears on the right side of the Disk Management table and allows you to safely remove the drive. WD SHARESPACE icon appears on the right side NETWORK STORAGE MANAGER: ADVANCED MODE - 132...
- Page 138 Note: If the volume RAID type is Span and there are new disks in the system, the Extend icon appears on the side of the Manage Volume table. WD SHARESPACE NETWORK STORAGE MANAGER: ADVANCED MODE - 133 USER MANUAL...
- Page 139 To modify the volume: 1. Click the Manage Volume tab. 2. Click the Modify icon next to the volume you want to modify. The Volume & Raid Management page appears. WD SHARESPACE NETWORK STORAGE MANAGER: ADVANCED MODE - 134 USER MANUAL...
- Page 140 4 Drives- 1 Volume 4 Drives - 2 Mirror Mode Available RAID options span span, stripe, mirror span, stripe, RAID 5 span, stripe, RAID 5, 2 mirrors, RAID 10 span, stripe, mirror NETWORK STORAGE MANAGER: ADVANCED MODE - 135 WD SHARESPACE USER MANUAL...
- Page 141 Management page. The default RAID configuration is Span for two disks and Raid 5 for four disks. WARNING! Changing the RAID configuration causes all volumes and data to be lost. WD SHARESPACE NETWORK STORAGE MANAGER: ADVANCED MODE - 136 USER MANUAL...
- Page 142 • Two Mirror — Two Mirror mode is available when four drives are installed in the WD ShareSpace. In this mode, two independent RAID 1 volumes are created. • Span (Spanned) — combines drives into a linear fashion to create one large logical volume.
- Page 143 If the volume RAID type is JBOD, and there are new disks in the system, the Extend icon appears on the side of the Volume Management table. 3. Click Submit. WD SHARESPACE NETWORK STORAGE MANAGER: ADVANCED MODE - 138 USER MANUAL...
- Page 144 Folder Shares Shares are folders that can be used to organize and store files on your WD ShareSpace. They can be shared with everyone (public) or with selected users on your network (private). The device comes preconfigured with three shares: •...
- Page 145 WD SHARESPACE USER MANUAL The Folder Shares button on the Storage tab home page provides access to a list of available shares. USB share naming corresponds to the following configuration: usb-<port number>share<partition number> To create a share: 1. Click the Add icon to display the following: 2.
- Page 146 4. Click a file sharing protocol next to Services. The WD ShareSpace supports the following file sharing services (protocols): • CIFS (Common Internet File System) - Allows access to share files via the CIFS protocol. The access control for CIFS is set as share-based. This means that a user must enter a valid account and password for accessing the share, and users can only access the shares to which they have been granted access rights (Read Only or Full Access).
- Page 147 The USB Shares button provides three tabs—USB Disk, USB to WD ShareSpace Backup, and WD ShareSpace to USB Backup. Use these tabs to format a USB drive, remove a USB drive, and perform backup operations from a USB drive to the WD ShareSpace and vice-versa.
- Page 148 To format a USB drive: 1. Connect a USB drive to the device. Note: The WD ShareSpace supports USB flash disk and external USB drives; USB optical drives (CD/DVD combo or DVD dual/multi drive) are not supported. 2. On the USB Disk page, click the Format icon dialog box warns that all data will be erased.
- Page 149 Use the USB to ShareSpace Backup tab to set a destination share for a different USB drive backup. To set a destination share name for the USB drive to WD ShareSpace backup: 1. On the USB Shares page, click the USB to WD ShareSpace Backup tab.
- Page 150 WD SHARESPACE USER MANUAL WD ShareSpace to USB Backup Use the WD ShareSpace to USB Backup tab to set a source share for this backup method. To set a source share name for WD ShareSpace to USB drive backup: 1. On the USB Shares page, click the WD ShareSpace to USB Backup tab.
- Page 151 1. Select the volume you want to modify, and then click the Modify icon 2. Click Enable next to Quota Service to enable disk quota service. 3. Specify the grace period after which no additional drive space is provided. 4. Click Submit. WD SHARESPACE NETWORK STORAGE MANAGER: ADVANCED MODE - 146 USER MANUAL...
- Page 152 WD SHARESPACE USER MANUAL DataVolume User Quota (or ExtendVolume User Quota) The DataVolume User Quota (ExtendVolume User Quota) tab provides user quota information details and allows administrators to modify the user quota setting if two or more volumes are available.
- Page 153 Downloads target share and changing the Downloader login password. This login provides non-administrator users with a method to download files directly to the WD ShareSpace. For more information on how to use the Downloader utility, refer to “Download Manager: Downloader” on page 164.
-
Page 154: Media Tab
3. Re-enter the password in the Confirm Password field. 4. Click Submit. Media Tab The Media tab provides the Media Server and iTunes buttons. Note The Media Server and iTunes ® servers only work on the LAN. NETWORK STORAGE MANAGER: ADVANCED MODE - 149 WD SHARESPACE USER MANUAL... - Page 155 When the iTunes Server is enabled in the WD ShareSpace’s Network Storage Manager, you or anyone connected to the WD ShareSpace can use iTunes to play music files stored on it. The iTune Server creates a virtual music library on the device and treats it as an iTunes repository, making it possible for music files to stream from the WD ShareSpace to Windows or Mac computers running iTunes.
- Page 156 1. Select an option in the Check for new music every list. 2. Click Submit. To stream audio in iTunes: 1. Make sure that the iTunes Server is enabled in the WD ShareSpace’s Network Storage Manager. 2. Click WDShareSpace under the Shared section of the left pane. If you have copied music to the /Public/Shared Music folder and it is in a format supported by iTunes, it should be listed in the right pane.
-
Page 157: Users Tab
The audio file is streamed in iTunes and audio files from the WD ShareSpace are displayed under Shared. Note: Both the Media Server and the iTunes server only work on the LAN. Users Tab The Users tab provides access to the following configuration options: •... - Page 158 Access Control list management. To create a new user account: With this feature, you can create user accounts on the WD ShareSpace and further customize these accounts with privilege levels. 1. On the Users page on the Users tab, click the Add icon 2.
- Page 159 To delete an existing user account: 1. On the Users page on the Users tab, click the Delete icon account you want to delete. 2. Click OK. WD SHARESPACE next to the user NETWORK STORAGE MANAGER: ADVANCED MODE - 154 USER MANUAL...
- Page 160 WD SHARESPACE USER MANUAL Groups The Groups button on the Users tab home page enables the administrator to create, edit, and delete a group from Access Control list management. To create a group: 1. On the Groups page on the Users tab, click the Add icon 2.
- Page 161 1. Select a user or group on the Folder Shares Permissions page, and then click the Edit icon 2. Click Enable next to Public Access to allow everyone to access to the share. 3. Select an access option. NETWORK STORAGE MANAGER: ADVANCED MODE - 156 WD SHARESPACE USER MANUAL...
- Page 162 8. Click Submit. Note: Public shares can be accessed using the administrator name and password as well as a guest name and password. The guest name and password are both “guest.” WD SHARESPACE NETWORK STORAGE MANAGER: ADVANCED MODE - 157 USER MANUAL...
- Page 163 4. In the Not Assigned Users list, select the users to whom you want to grant full access, read only permission, or no access to the share. 5. Click the >> button. WD SHARESPACE icon next to that NETWORK STORAGE MANAGER: ADVANCED MODE - 158...
- Page 164 WD SHARESPACE USER MANUAL 6. In the Not Assigned Groups list, select the local groups to which you want to grant full access, read only permission, or no access to the share. 7. Click the >> button. 8. Click Submit.
-
Page 165: Status Tab
IP address, volume usage, and volume RAID type if RAID is functioning properly. If RAID is not healthy, the RAID/Volume Usage field displays “failed.” WD SHARESPACE NETWORK STORAGE MANAGER: ADVANCED MODE - 160 USER MANUAL... - Page 166 • Volume failed or does not exist • Volume space is full or close to 100% • Unsafe removal of a USB mass storage device • Resync volume failed WD SHARESPACE NETWORK STORAGE MANAGER: ADVANCED MODE - 161 USER MANUAL...
- Page 167 Information—An event that describes the successful operation of an application, driver, or service. CIFS The CIFS (Common Internet File System) tab displays logs of file and services requested on the device for connections that use this protocol. WD SHARESPACE NETWORK STORAGE MANAGER: ADVANCED MODE - 162 USER MANUAL...
- Page 168 1. On the Settings tab, click Show log entries in reverse order to display the most recent entries at the top. 2. Enter the number of entries you want to appear on the System, CIFS, and FTP logs. WD SHARESPACE NETWORK STORAGE MANAGER: ADVANCED MODE - 163 USER MANUAL...
-
Page 169: Download Manager: Downloader
Use Downloader to download files to the default share folder in the WD ShareSpace. If you choose not to use the default share folder, see “To set the destination share name for the Downloader:”... -
Page 170: Downloader Features
Download faster with instantaneous “start” • Download multiple files from the Internet simultaneously • Automatically store files to a user-defined destination folder in WD ShareSpace • Automatically store your partially downloaded files in the database to resume downloading at any time •... - Page 171 4. If you want to enter a new name for the file, enter a new name in the Save As field. icon. DOWNLOAD MANAGER: DOWNLOADER - 166 WD SHARESPACE USER MANUAL...
- Page 172 To delete a download task: 1. Select a task in the Tasks table. 2. Click the Delete icon to delete the download task 3. Click OK, and then click OK again. 4. Click Submit. WD SHARESPACE USER MANUAL DOWNLOAD MANAGER: DOWNLOADER - 167...
- Page 173 WD SHARESPACE USER MANUAL To change the order of the download queue: 1. Use the arrow buttons to change the order of download tasks or to make a task conditional on a previous task. 2. Select a task in the Tasks table, and then click Move Up or Move Down 3.
- Page 174 4. Set up the proxy in the Proxy field to download files if your network environment does not allow making direct connections to an external network. 5. Click Enable next to Schedule to enable scheduled downloading time. The page expands: WD SHARESPACE USER MANUAL DOWNLOAD MANAGER: DOWNLOADER - 169...
- Page 175 6. Select rows, columns, or individual days and times during which downloading is allowed. Selections display in yellow. 7. Click Submit. Note: In the example above a schedule displays because Schedule was enabled. Specify the desired schedule and click Submit. WD SHARESPACE USER MANUAL DOWNLOAD MANAGER: DOWNLOADER - 170...
-
Page 176: Ctorrent Tab
(seeders) or have only part of the file. Note: If you wish to configure your router to forward CTorrent traffic to your WD ShareSpace, the CTorrent client uses TCP ports 2106 through 2706. - Page 177 • How much still needs to be downloaded (Incomplete & Downloading/Uploading (Hash-Checking data), (Unable to Write to (Connecting to Peers), (Complete and (Queued). icon at the end of the torrent’s row. DOWNLOAD MANAGER: DOWNLOADER - 172 WD SHARESPACE USER MANUAL...
- Page 178 2. Click the Peers tab to view information about the peers who are sharing torrent files with you and the percentage of the torrent they possess. icon at the end of the torrent’s row. icon at the end of the torrent’s row. DOWNLOAD MANAGER: DOWNLOADER - 173 WD SHARESPACE USER MANUAL...
- Page 179 WD SHARESPACE USER MANUAL To create a task: Before adding a torrent, first locate it on the Internet and save the *.torrent file to your computer. 1. On the Tasks tab, click the icon. The following page displays: 2. Browse your computer to locate the torrent file you saved from a torrent tracker on the Internet.
- Page 180 (d) In Seed Number, enter the number of peers who have downloaded the entire file that will trigger an automatic stop. (e) In Seeding Time, enter how much longer after you have the entire file the download should stop. 4. Click Submit. WD SHARESPACE USER MANUAL DOWNLOAD MANAGER: DOWNLOADER - 175...
- Page 181 WD SHARESPACE USER MANUAL Arrangement The Arrangement button on the CTorrent tab enables you to prioritize your downloads. The position of a torrent in the list determines its priority. 1. Click Arrangement on the CTorrent tab to display the following: 2.
-
Page 182: Replacing A Drive
Replacing a Drive WD ShareSpace is a limited user-serviceable product which allows replacement of any or all internal hard drives in the enclosure. Important: The WD ShareSpace enclosure is designed to support only WD Caviar® Green™ hard drive assemblies. Visit search the knowledge base article 2569 for detailed instructions on obtaining a replacement drive for this product. - Page 183 (a) Pull on the center of the mounting rails handle and move the assembly from side to side to disengage the side latches. Carefully slide the drive out 1 inch from its bay. WD SHARESPACE USER MANUAL REPLACING A DRIVE - 178...
- Page 184 9. Install the new drive into the drive carrier. (a) Insert the new drive into the drive carrier. (b) Flex the left and right-side rail and insert the pins into the drive’s mounting holes. WD SHARESPACE USER MANUAL REPLACING A DRIVE - 179...
- Page 185 14. Once the rebuild is complete, the power LED will change from flashing green to steady green. 15. Connect the interface cable and set up the new drive for RAID configuration (for related instructions, refer to “Manage RAID” on page 136). WD SHARESPACE USER MANUAL REPLACING A DRIVE - 180...
- Page 186 WD SHARESPACE USER MANUAL 16. If the faulty drive is within the warranty period, contact WD Technical Support for instructions on returning the drive. Important: Do not disassemble the internal drive. Return the entire internal drive intact to WD. REPLACING A DRIVE - 181...
-
Page 187: Resetting
Troubleshooting For any issue, first ensure that you are using the latest firmware for WD ShareSpace. The latest firmware includes the latest network and SATA disk drivers. See “Update (Firmware)” on page 114 for instructions. First Steps Checklist • AC power available at the wall outlet? •... -
Page 188: Hardware Diagnostic Testing
To reset the system to factory default settings: Performing a factory default reset using the WD ShareSpace’s Network Storage Manager erases all settings, shares, and data files in the WD ShareSpace. All information and data is lost. For detailed instructions, see “To restore the device to factory defaults:”... - Page 189 Yes, but only data stored on the first partition of a USB drive connected to the front port is backed up to the WD ShareSpace. WD ShareSpace’s Network Storage Manager does not appear when I click Configure in WD Discovery.
- Page 190 Do not rename or delete Shared Music if you want to use the iTunes server. You must recreate or rename the /Public/Shared Music share if it has been deleted or the name has been changed. WD SHARESPACE USER MANUAL and search the knowledge base...
- Page 191 1. Click Start>Run. 2. Type \\WDShareSpace, and then click OK (if the device name was changed, type \\yournewdevicename). 3. The WD ShareSpace directory appears (Public, Configuration, and Download folders). Double-click the Configuration folder. 4. Double-click index.htmf The configuration login page appears.
- Page 192 Exceeded the threshold (Overheated) Degrees HDD SMART events HDD [1,2,3,4] HDD SMART OK HDD [1,2,3,4] HDD SMART fail Volume events Volume [1,2] Volume [1,2] RAID volume in normal mode WD SHARESPACE USER MANUAL Event Critical Warning value Version Degrees TROUBLESHOOTING - 187...
- Page 193 USB [1,2,3] USB drive insertion USB [1,2,3] USB drive safely removed USB [1,2,3] USB drive unsafely removed USB [1,2,3] USB drive format OK WD SHARESPACE USER MANUAL Event Critical Warning value Progress Speed (Mbps: 1000/...
- Page 194 Other events Volume [1,2] Volume extend failed Volume [1,2] Volume resync failed * A fan failed event is issued when the device temperature is greater or equal to 40°C (104°F). WD SHARESPACE USER MANUAL Event Critical Warning value TROUBLESHOOTING - 189...
-
Page 195: Glossary
WD SHARESPACE USER MANUAL Glossary CIFS: Common Internet File System. The recommended file sharing protocol for Windows platform allows users to access shares through My Network Places. Mac OS X or later also supports the CIFS protocol. See also Protocol. - Page 196 Hub: In a network, a device joining communication lines at a central location, providing a common connection to all devices on the network. Identity LED: Indicates which WD ShareSpace in the network is currently being accessed via WD Discovery. Interface: A hardware or software protocol to manage the exchange of data between a device and a computer;...
- Page 197 WD SHARESPACE USER MANUAL MioNet: WD remote computer access service. Adding MioNet to your home or work computer allows you secure and instant access from any PC in the world back to your computer. You can use your applications and access and share files on your computer or storage device from anywhere.
- Page 198 WD SHARESPACE USER MANUAL RAID 0: RAID protocol in which data is striped across multiple hard drives, enabling the accelerated reading and recording of data by combining the work of two or more drives to increase performance. See also Striping.
- Page 199 This feature backs up your data to the WD ShareSpace so you can restore your data in the event that a computer’s hard drive crashes.
-
Page 200: Appendix
WD SHARESPACE USER MANUAL Appendix Regulatory Compliance FCC Class B Information This device has been tested and found to comply with the limits of a Class B digital device, pursuant to Part 15 of the FCC Rules. These limits are designed to provide reasonable protection against harmful interference in a residential installation. -
Page 201: Environmental Compliance (China)
WD SHARESPACE USER MANUAL Environmental Compliance (China) Warranty Information Obtaining Service WD values your business and always attempts to provide you the very best of service. If this Product requires maintenance, either contact the dealer from whom you originally purchased the Product or visit our product support website at support.wdc.com... -
Page 202: Gnu General Public License ("Gpl")
This warranty gives you specific legal rights, and you may also have other rights which vary from state to state. GNU General Public License (“GPL”) Firmware incorporated into WD ShareSpace includes third party copyrighted software licensed under the GPL (“GPL Software”). In accordance with the GPL: 1) the source code /download/gpl for the GPL Software may be obtained at support.wdc.com... -
Page 203: Index
FTP access general system setup getting started glossary GNU general public license GPL software group account assign access rights create hardware connections HDD standby ICES/NMB-003 compliance icons, C-Torrent indicator lights (LEDs) installation WD SHARESPACE USER MANUAL Index – 198... - Page 204 LAN submenu laptop backup LEDs limited warranty logs settings system Macintosh access WD ShareSpace install WD Anywhere Backup Macintosh Leopard manage RAID configure options manage volumes Media media devices iTunes storage types supported...
- Page 205 UPS service USB hard drive disconnect format USB sharing USB shares user account assign privilege create 101, delete modify users folder share permissions folder shares groups USB shares Using volumes delete manage modify WD SHARESPACE USER MANUAL Index – 200...
- Page 206 WD Discovery buttons Browse Network Shares Configure Create Desktop Shortcut Map Network Drives Turn On/OFF Identify LED WD service WD ShareSpace configuration WD TV Live HD Media Player Windows configure MioNet install WD Anywhere Backup Windows Media Player workgroups WD SHARESPACE USER MANUAL Index –...
- Page 207 WD. WD reserves the right to change specifications at any time without notice. Western Digital, WD, the WD logo, Caviar, and MioNet are registered trademarks in the U.S. and other countries; and ShareSpace and WD Discovery are trademarks of Western Digital Technologies, Inc. Other marks may be mentioned herein that belong to other companies.
Need help?
Do you have a question about the WD ShareSpace and is the answer not in the manual?
Questions and answers