Advertisement
Advertisement
Table of Contents

Related Manuals for Sovol SV01


Summary of Contents for Sovol SV01
- Page 1 SV01 Guide Book To make Top-quality 3d printer V.2.0En...
- Page 2 Notes Select the correct input voltage to mach your local mains (220V or 110V). Not use the printer any way other than described here in order to avoid personal injury or property damage. Do not place the printer near any heat source or ammable or explosive objects. We suggest placing it in a well-ventilated, low-dust enviroment.
- Page 3 Index Index Preface Printer Parts This Guide is designed for Sovol users to start their printing journey. Box Contens We still recommend that please read this guide even if Assembly you are familiar with the 3d Printing technology, as there are lots of important information about the sovol Cable Connection for you get a better 3d experience.
-
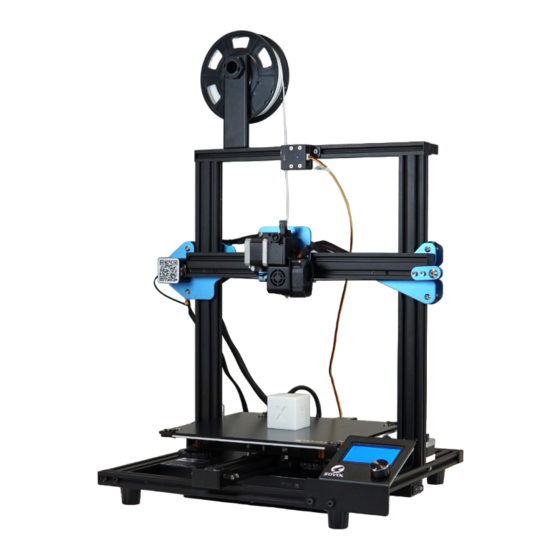
Page 4: Printer Parts
Printer Parts X Axis Motor Main control box Hot bed TF Card and Usb Display screen Button knob Nozzle kit Extrusion kit Filament holder Filament sensor Couplers Y Axis Motor Foot pad Z Axis Motors Power switch Leveling nut... - Page 5 Box Contens Gantry Base with hot bed Filament holder Display Screen Usb cable Z Axis switch limit plate Screws, T-Nuts and extra nozzle Micro SD card and Reader Power cable Filament (200gr.) Pliers Spatula Tool set Nozzle cleaner (0.4mm)
-
Page 6: Assembly Steps
Assembly Steps 1-2 Remove the parts from the box. Note that the base and gantry are connected at the factory. If possible, perform this operation with the help of another. Remove any tape and padding from the parts. Inspect the parts to make sure they were not Front damaged in shipment. -
Page 7: Assembly - Step
Assembly - Step 3 Install the lament spool holder. Secured in the screw hole of the lament holder with M4x8 (2) and M4 T-Nut (2). Loosen the T-nuts by hand and turn them so they will t inside the grooves on the frames. - Page 8 Assembly - Steps 4-5 Install the lament sensor. M4x8 + T-NUTS (2 Units The plate with the lament sensor is installed in the upper rear part of the frame. The correct direction is indicated by an arrow on the sensor housing. Fixing to the frame is similar to the method used previously.
- Page 9 Assembly - Step 6 Install the Z limit switch This device sets the starting height of the Z axis, which is responsible for the up and down movement of the print head. It is placed next to the left Z stepper motor and xed to the edge of the vertical frame using the included T-nuts.
-
Page 10: Cable Connection
Cable Connection Make connections The cables are provided with labels, observe them and the type of connector for proper identi cation. Make the connections being careful not to bend the connector pins. The display board has three identi ed inputs. Connect the Exp1 and Exp2 cables in their corresponding place leaving the Exp3 input empty.. - Page 11 Quality Adjustments Sovol printers are pre-assembled at the factory, however, to obtain the best print quality, some adjustments must be made. Eccentric nut adjustments. In each movement group there are some wheels provided with eccentric nuts. You must adjust them to get enough rmness and smooth movement at the same time.
-
Page 12: Screen Information
Screen Information Not Printing (Sovol ready) Menu Sub Menu Explanation Moving X, Y, Z axis Move Axis or Extruder by imputing Auto Home Return to Zero Close motors and move X, Y, Z Disable Prepare Steppers axis by hands Preheat hotend, bed or both... -
Page 13: Bed Leveling
Bed Leveling 1.Prepare > Auto Home Run the sequence to level 2.Prepare > Disable Steppers 1. Auto Home - The nozzle will move to the 3.Prepare > Preheat PLA > Preheat PLA Bed zero point on the XYZ axes. 2. Disable Steppers - The motors are released to allow manual movement. -
Page 14: Loading Filament
Loading Filament METHOD 1 METHOD 2 Prepare > Preheat PLA > Preheat PLA End Control > Temperature > Nozzle > 200° Prepare > Preheat ABS > Preheat ABS End Heat the nozzle Method 1: Use the printer's Preheat presets to heat Pla or Abs temperature according to the temperature range of the lament you are going to use. -
Page 15: Software Installation
Ultimaker Open Cura and add a New Printer Choose Creality Cr-10 as the base pro le and change the name to Sovol Sv01. Adjust the size Enter 280mm, 240mm and 300mm as the printer size for X, Y and Z. -
Page 16: Preparing To Print
Preparing to Print Load a model in Cura xyz-cube.stl On the SD card you will nd a calibration cube so you can perform an initial test. Choose settings Cura has a menu with basic print settings. If you want advanced settings, click Custom. -
Page 17: Conection Diagram
Conection Diagram NEW UPGRADED SILENT BOARD With TMC2208 Driver For Sovol SV01... - Page 18 BLTouch device assembly Watch the linked videos for a detailed guide. SOVOL VIDEO youtu.be/BTCXNLIzrz8 Download Firmware On our website you will nd an updated Firmware for BLTouch, pay attention to download the correct version.
-
Page 19: After Sales Service
After-Sales Service Service 1.The printer can be returned within seven days, 15 days replacement, one-year warranty, lifetime maintenance. Every machine is assembled and tested by our expert staff before departing our facilities. Replacement requirement 1. The appearance of the product is intact, without damage, cracks, deformation, etc.; 2.
Need help?
Do you have a question about the SV01 and is the answer not in the manual?
Questions and answers