Table of Contents
Advertisement
Advertisement
Table of Contents

Related Manuals for LDG Z-11Pro


Summary of Contents for LDG Z-11Pro
- Page 1 Z-11Pro Automatic Antenna Tuner Manual Version 1.1 LDG Electronics 1445 Parran Road, PO Box 48 St. Leonard MD 20685-2903 USA Phone: 410-586-2177 Fax: 410-586-8475 ldg@ldgelectronics.com www.ldgelectronics.com Copyright © LDG Electronics 2006. All rights reserved.
-
Page 2: Table Of Contents
Introduction Jumpstart, or “Real Hams Don’t Read Manuals!” Specifications An Important Word About Power Levels Getting To Know Your Z-11Pro Installation Installing An Internal Battery Overview and Setup Firmware Version Readout EEPROM Reset Tuning Advanced Operation Application Notes Mobile Operation... -
Page 3: Introduction
2. Connect your 50 Ohm antenna coax lead to the "Ant" jack on the back of your Z- 11Pro. 3. Connect your Z-11Pro to a source of 8 - 16 volts DC @ 250mA via the 2.5 by 5.5 mm power jack on the back (center positive). -
Page 4: Specifications
• An Important Word About Power Levels The Z-11Pro is rated at 125 watts maximum power input at most. Many ham transmitters and transceivers, and virtually all amplifiers, output well over 125 watts. Power levels significantly exceeding specifications will definitely damage or destroy your Z-11Pro. If your tuner fails during overload, it could damage your transmitter or transceiver. -
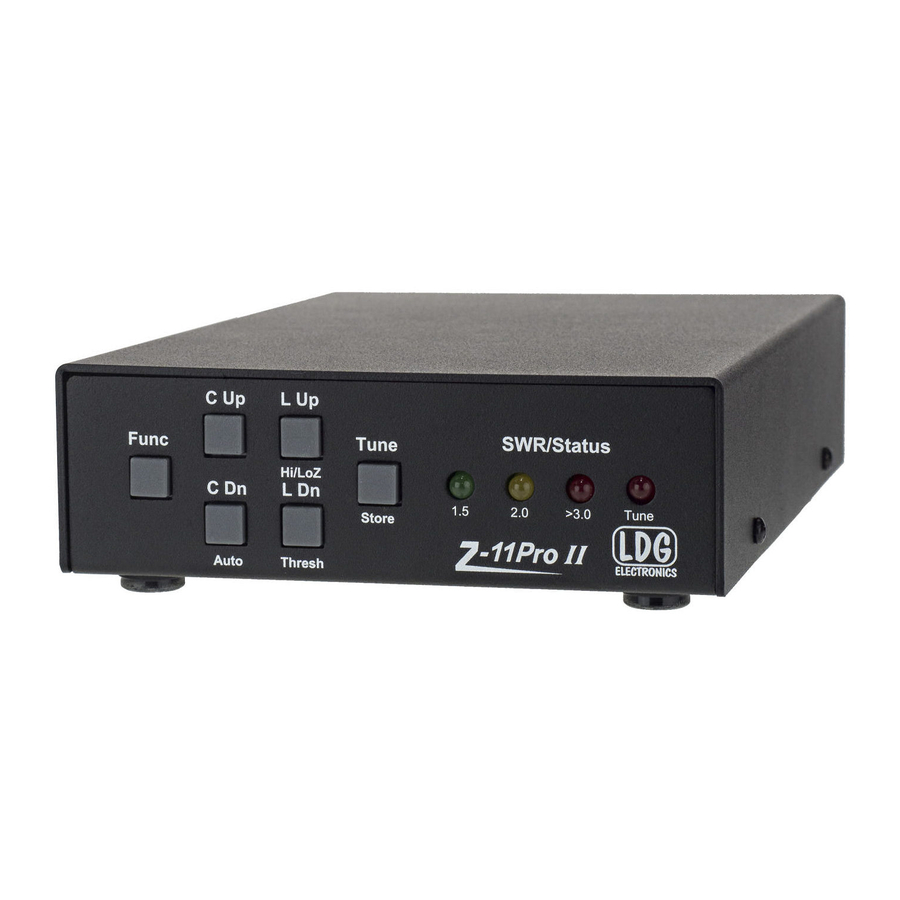
Page 5: Getting To Know Your Z-11Pro
>3.0: Red Tune: Red Your Z-11Pro has no power switch. It automatically powers up whenever RF is present or a button is pressed, and after tuning, automatically enters a “deep sleep” state in which it draws only 25 microamps, effectively off. The tuner will automatically "wake up" the next time you start a tuning cycle, a button is pressed or when an automatic tuning cycle is needed. -
Page 6: Installation
Ground connector (wing nut) Installation Your Z-11Pro tuner is intended for indoor use only; it is not water resistant. If you use it outdoors (Field Day, for example) you must protect it from rain. The Z-11Pro is designed for use with coax-fed antennas. -
Page 7: Installing An Internal Battery
2.5x5.5mm coaxial cable (center positive). If your radio is powered by 12 VDC, you can use the same power supply for the Z-11Pro, providing the power supply can source the extra 300 mA required by the tuner during a tuning cycle. Note that the Yaesu interface cable does not power the radio. - Page 8 3, 4, 6 or 8 cells. To install a battery or battery pack inside, disconnect your Z-11Pro. Open the case by removing the four screws (two on each side) and carefully lifting the top clear. You'll find room inside for the battery or battery pack on top of the relays;...
- Page 9 Replace the cover, being careful not to pinch or short the wires. You can use your Z-11Pro on external power even when batteries are installed, but the external power supply will not charge the batteries. You will need to remove any rechargeable batteries from the Z-11Pro and charge them in an external charger when needed.
-
Page 10: Overview And Setup
LEDs. Tuning Modes: Your Z-11Pro features two distinct tuning modes: Auto and Semi. In Auto mode, a tuning cycle will automatically begin whenever the SWR exceeds a threshold value; the default SWR threshold is 2.0, but you can set it to any SWR value between 1.5 and 3.0 (see below). -
Page 11: Firmware Version Readout
High/Low Impedance Toggle: You can manually set your Z-11Pro for Hi-Z or Lo-Z antennas. Press and release the Func button, then press and release the L Up button. Each such button sequence will toggle between High and Low. The Yellow LED indicates Low, the Red >3.0 LED High. Pressing L Up while holding Func will show the present setting. - Page 12 Desktop Antenna Switch, you can instantly connect up to four separate antennas with the press of a button. Your Z-11Pro will search it's 3-D memory bank for stored settings for each antenna and for the present frequency, and reset to them in less than 0.1 seconds. Working together, your Z- 11Pro and DTS-4 Intelligent Antenna Switch makes switching and matching up to four antennas automatic and virtually instantaneous.
- Page 13 Release the Tune button; a Semi-Auto tuning cycle will begin. The Tune LED will light and you will hear the relays in your Z-11Pro as they switch in and out seeking a match; they make a pretty loud buzzing noise. The tuning cycle will end in a few seconds with the LEDs indicating the final match.
-
Page 14: Advanced Operation
LEDs blink: the inner LEDs indicate the high limit, outer LEDs low. Frankly, you won't use these manual adjustments much. Your Z-11Pro is very, very good at finding a match. These functions are included only to provide you with the maximum utility and flexibility. - Page 15 Tune (Medium press) Cycle All LEDs Flash Bypass: 3 flashes Bypass/Restore Tune (Short press) Restore: 1 flash Example: 2.3 Firmware Version Func + C Up + L Up Readout (Together) Func + C Dn + Tune Memory Reset (Together) Z-11Pro Command Reference...
-
Page 16: Application Notes
You can observe the progress of the match on your rig's SWR meter or on the Z-11Pro's LEDs (not while driving; keep your eyes on the road!). When the reading stops changing, the tuner has finished tuning. Most of the time this will happen very quickly as the Z-11Pro tunes from memory in a fraction of a second. -
Page 17: Theory Of Operation
, but a little background will help you understand what your Z-11Pro is doing, and how it does it. In simple DC circuits, the wire resists the current flow, converting some of it into heat. The relationship between voltage, current and resistance is described by the elegant and well-known “Ohm’s Law”, named for Georg Simon Ohm of Germany, who first discovered it in 1826. - Page 18 Simple tuners use variable capacitors and inductors; the operator adjusts them by hand while observing reflected power on the SWR meter until a minimum SWR is reached. Your LDG Z-11Pro automates this process.
-
Page 19: The Ldg Z-11Pro
The capacitors are connected to ground with the inductor relays. Another relay switches the entire capacitor bank to the input or output side of the inductor. This switching allows the Z-11Pro to automatically handle loads that are greater than 50 ohms (high setting) and less than 50 (low setting). -
Page 20: A Word About Tuning Etiquette
Be sure to use a vacant frequency to tune. With today’s crowded ham bands, this is often difficult. However, do your best to avoid interfering with other hams as you tune. Your Z-11Pro’s very short tuning cycle, often only a fraction of a second, minimizes the impact of your tuning transmissions.
Need help?
Do you have a question about the Z-11Pro and is the answer not in the manual?
Questions and answers