Table of Contents
Advertisement
Available languages
Available languages
Advertisement
Table of Contents

Related Manuals for Nivel System NL400


Summary of Contents for Nivel System NL400
- Page 2 Thank you for purchasing a Nivel System NL400 / NL400G laser level. To best use the purchased instrument, please read the instructions carefully and put in a convenient spot so that in the future you will be able to use it.
- Page 3 (laser line - point up and down). The device can also "draw" a laser line (scan function) – thanks to it it's possible to stop the beam at a given distance. NL400 / NL400G models can be controlled from the device control panel or remotely, with remote control.
- Page 4 A short-circuit may cause a fire. Pay attention to not to short-circuit the battery while storing the device. Protection against shock When transporting the instrument it should be protected against shocks. Strong shocks can cause measurements errors. The user of this instrument should follow the instructions contained in this manual and remember to periodically check the correctness of its working.
-
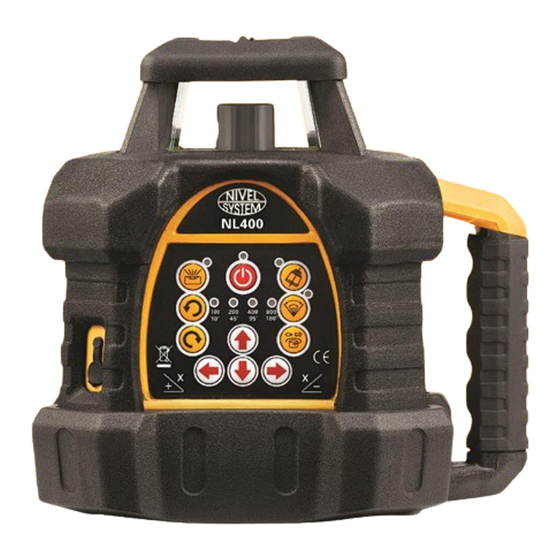
Page 5: Control Panel
If it's necessary to replace the battery - battery compartment should be unscrewed with a screwdriver. Replacement batteries can be purchased from an authorized distributor. Use levelers NL400 / NL400G with care, protect from moisture. Never put a wet instrument to the transport box (wait until dry). - Page 6 - available Head spin speeds: 100-200-400-800 rpm. Each press switches rotation speed. 6) Scan function button - available angles of beam display: 10°-45°-95°-180°. Each press will switch the beam display angle. 7) Manual / Automatic mode button - Changes the instrument leveling from automatic to manual mode 8) clockwise head rotation switch button - When the head does not rotate, press the button to scan in desired direction 9) Counter-clockwise head rotation switch button...
-
Page 7: Principle Of Operation
"drawn" line. Depending on your needs, switch the direction of rotation of the head (clockwise or counter-clockwise). The inclination of laser plane NL400 allows you to incline the laser plane in one or two directions Press to set instrument in manual mode. - Page 8 Working with the vertical plane NL400 / NL400G can set horizontal or vertical beam. If you work with a vertical laser beam you must set the laser level as in the picture beside. After switching on the laser level the device will level by itself –...
- Page 9 1. Set the laser centered between the walls distanced from each other of 30 m. Set the instrument in the X or Y direction. 2. Mark the position of the laser beam on both walls. 3. Turn off the instrument and move it near to the of one of the walls (1 to 2 meters). Do not change the orientation of the axes.
- Page 10 Laser sensor RD600 Digital display laser detector area l evel„zero” LED grade indicator lbubble keypad magnet unit (mm, cm, cal) On/Off / Beeper volume deadband resolution / LED On/Off Display numeric / text display grade indication arrows on grade indicator low battery grade indication arrows accuracy (1 / 2 / 5 mm)
- Page 11 ACCESSORIES RD400 - laser sensor RD600 DIGITAL - laser sensor (digital) NL-BR400 - bracket of RD400 Tripod adapter (0-90°) NL-BR600 - bracket of RD600 Rechargeable battery pack CH-1 - charger YR - laser shelf TR-R, TR-G - laser targets GL-R, GL-G - laser glasses Laser case Remote controller SJJ1 - tripod...
-
Page 12: Terms And Conditions Of Warranty
Court with jurisdiction over the Warrantor’s registered office. 5. When the warranty services provided by the service centre are needed, please do not hesitate to contact your seller or a Nivel System service centre directly e-mail: serwis@tpi.com.pl... - Page 13 NL400/NL400G technical specification Laser red beam (NL400), green beam (NL400G) Light source laser diode, class II 635 nm (NL400), 515 nm (NL400G), <1mW ±1mm/10m Accuracy ±1mm/1,5m Accuracy of laser plummet ±5° Self-leveling range ±8% Inclination (X and Y axis) Work range (diameter)
- Page 14 Dziękujemy za zakupienie niwelatora laserowego firmy Nivel System model NL400/ML400G Aby móc jak najlepiej wykorzystać zakupiony instrument, prosimy uważnie przeczytać instrukcję i położyć w dogodnym miejscu, żeby w przyszłości móc z niej skorzystać.
-
Page 15: Środki Ostrożności
Wielozadaniowe niwelatory laserowe to samopoziomujące lasery budowlane, stosowane do wyznaczania wysokości przy pomiarach budowlanych. Model NL400 / NL400G wykorzystuje wiązkę widzialnego światła (NL400 – czerwona wiązka, NL400G – zielona wiązka) i może być stosowany zarówno przy pracach wewnątrz budynku jak i na zewnątrz. Urządzenie zasilane jest akumulatorków,... - Page 16 Możliwość eksplozji. Nigdy nie używaj niwelatora w pobliżu łatwopalnych gazów i płynów. Zwarcie baterii może być przyczyną pożaru. Zwracaj uwagę, żeby podczas przechowywania nie doszło do zwarcia baterii Ochrona instrumentu przed wstrząsami Podczas transportu należy zabezpieczyć instrument przed wstrząsami (transportuj sprzęt w kufrze).
-
Page 17: Panel Sterowania
Jeżeli jest potrzeba wymiany akumulatorków - komora akumulatorków powinna być rozkręcona. Zastępcze akumulatorki można nabyć u autoryzowanego dystrybutora. Używaj niwelatorów NL400/NL400G z odpowiednią ostrożnością, chroń od zawilgocenia. Nigdy nie wkładaj mokrego instrumentu do kufra transportowego (zaczekaj aż obeschnie). PANEL STEROWANIA... - Page 18 - dostępne szybkości wirowania głowicy: 100-200-400-800 obr/min. Każdorazowe przyciśnięcie spowoduje przestawienie prędkości wirowania. 6) Przyciska skanowania kierunkowego - dostępne kąty wyświetlania wiązki: 10°-45°-95°-180°. Każdorazowe przyciśnięcie spowoduje przestawienie kąta wyświetlanej wiązki. 7) Przycisk trybu ręcznego/automatycznego - zmienia poziomowania z trybu automatycznego na ręczny 8) Przełącznik obrotów głowicy w kierunku przeciwnym do „zegara”...
-
Page 19: Zasada Działania
będzie zwiększanie „rysowanej” linii. W zależności od potrzeby, przełącz kierunki obracania głowicy (zgodnie lub przeciwnie do ruchu wskazówek zegara). Pochylenie powierzchni laserowej Sprzęt umożliwia pochylanie powierzchni w jednym lub w obu kierunkach. Naciśnij przycisk co spowoduje przejście urządzenia w tryb ręczny. Aby ustawić... - Page 20 Wyznaczanie spadków Ustaw niwelator na statywie. Ustaw niwelator w osi, którą chcesz pochylać i włącz niwelator. Pionownik laserowy (dolny) wskaże pierwszy punkt osi, na drugim końcu ustaw łatę laserową z czujnikiem - wyzeruj położenie (czujnika i łaty). W zależności od żądanej wartości spadku przesuń...
- Page 21 Sprawdzenie błędu stożka Sprawdzenie to wykonaj po wykonaniu kalibracji płaszczyzny poziomej. 1. Ustaw laser pośrodku między odległymi od siebie o 30 m ścianami. Ustaw instrument w kierunku X lub Y. 2. Zaznacz na obydwu ścianach położenie wiązki lasera. 3. Wyłącz instrument i przesuń go w pobliże jednej ze ścian (1 do 2 m). Nie zmieniaj orientacji osi.
- Page 22 CZUJNIK LASEROWY RD600 Digital wyświetlacz detektor wiązki laserowej poziom „zero” sygnalizator LED libelka Moduł sterowania magnesy (mocowanie) zmiana jednostki pracy (mm, cm, cal) włącznie i wyłączanie zasilania / sygnalizatora dżwiękowego zmiana trybu pracy (dokładność) / włączenie/wyłączenie sygnalizatorów LED Wyświetlacz wskazania różnicy wysokości wskazania przewyższenia (powyżej „zera”) wskazania przewyższenia (poziom...
- Page 23 AKCESORIA RD400 - czujnik laserowy RD600 DIGITAL - czujnik laserowy (cyfrowy) NL-BR400 - uchwyt czujnika RD400 Adapter na statyw NL-BR600 - uchwyt czujnika RD600 (0-90°) Komplet akumulatorków CH-1 - ładowarka YR - półka laserowa TR-R, TR-G - tarczki laserowe GL-R, GL-G - okulary laserowe Waliza transportowa Pilot zdalnego sterowania LS-24 - łata laserowa (2,4m)
-
Page 24: Warunki Gwarancji
Gwaranta. W przypadku potrzeby skorzystania z usług serwisu gwarancyjnego prosimy o kontakt ze sprzedawcą lub bezpośrednio z serwisem Nivel System e-mail: serwis@tpi.com ... - Page 25 Specyfikacja NL400/NL400G wiązka czerwona (NL400), wiązka zielona (NL400G) Laser Źródło światła dioda laserowa, klasa II 635 nm (NL400), 515 nm (NL400G), <1mW Dokładność ±1mm/10m Dokładność pionownika ±1mm/1,5m ±5° Zakres samo-poziomowania Wyznaczanie spadków (oś X i Y) ±8% Zasięg pracy (średnica) 500 m (z czujnikiem) Prędkość...
- Page 26 Rotating laser level Trade mark Nivel System Model NL400/NL400G Serial number The date of the check Instrument checked and calibrated Calibration technician EC declaration of conformity We declare that products Nivel System NL400, NL400G conform to: EN 61010-1:2010, EN 60825-1:2014...
- Page 27 WARNING: The device contains a rechargeable nickel-hydrogen batteries which must be recycled and should be disposed in accordance with the requirements...
Need help?
Do you have a question about the NL400 and is the answer not in the manual?
Questions and answers