Table of Contents
Advertisement
Advertisement
Table of Contents

Related Manuals for CareCo Minimus MS01097


Summary of Contents for CareCo Minimus MS01097
- Page 1 M S 0 1 0 9 7 P R O D U C T C O D E : User Manual...
-
Page 2: Table Of Contents
CONTENTS 1. SAFETY GUIDELINES 2. SAFETY NOTICE 3. PARTS INTRODUCTION 4. FOLDING EXPAND/FOLD THE SCOOTER 5. BAGGAGE HANDLE ON THE SCOOTER 6. OPERATION 6.1 Control panel 6.2 How to operate your scooter 6.3 How to set Freewheel mode 7. BATTERY CHARGING AND CARE 7.1 Charging the battery 7.2 Battery 8. -
Page 3: Safety Guidelines
NOTE: This product meets IPX4 classification (IEC 60529). Maximum user weight: 115 kg; Classified in Class A (EN12184) The scooter seat passed the ignition test (EN1021-1, -2 , SO7176-16) Address: CareCo UK Limited , Hubert Road, Brentwood, Essex, CM14 4JE Model: Minimus / MS01097 Maximum occupant mass: 250 lbs / 133kg... - Page 4 1. SAFETY GUIDELINES Please carefully read this owner’s manual before using the scooter. Improper use of the scooter could result in harm, injury or traffic accidents. Therefore for maximum pleasure while using the scooter please read this owner’s manual. • This owner’s manual includes operation instructions for every aspect of the scooter, assembly instructions, as well as instructions for how to deal with possible accidents.
- Page 5 1. SAFETY GUIDELINES This manual includes a copy of repair and maintenance record chart and warranty • information. Please keep it in a safe place or in the scooter. If someone else uses the scooter, please make sure that you provide them with the •...
-
Page 6: Safety Notice
2. SAFETY NOTICE MANDATORY! Do not operate your new Scooter for the first time without completely reading and understanding this owner’s manual and the Consumer Safety Guide. Your Scooter is a state-of-the-art life-enhancement device designed to increase mobility. We provide an extensive variety of products to best fit the individual needs of the Scooter user. - Page 7 2.SAFETY NOTICE PERFORM THE FOLLOWING INSPECTIONS PRIOR TO USING YOUR SCOOTER Check the condition of the tires. Make sure they are not damaged or excessively • worn. Check all electrical connections. Make sure they are tight and not corroded. Check all harness connections. Make sure they are secured properly. •...
- Page 8 2. SAFETY NOTICE The Scooter is only to be used by one person at a time Do not carry passengers on your Scooter. (including children) Do not use this Scooter to carry or haul goods The maximum weight can be carried, please refer to “MAX LOAD WEIGHT” in “9.
- Page 9 2. SAFETY NOTICE About Mobile Phones and other electrical equipment • Do not use a mobile phone or other wireless communication devices while driving. • Always switch off the scooter and remove the ignition key before using a mobile phone. •...
- Page 10 2. SAFETY NOTICE Starting and Driving 1. Make sure the seat is installed properly. 2. Make sure the tiller has been secured properly. 3. Fold down the armrests so you can rest your arms on them. 4. Turn the power switch to “ON”. If necessary, turn on the headlights. 5.
- Page 11 Motor Vehicle Transport CareCo’s recommend that you do not remain seated in your scooter while traveling in a motor vehicle. The scooter should be stowed in the trunk of a car or in the back of a truck or van with the batteries removed and properly secured. In addition, all removable scooter parts, including the armrests, seat, and shroud should be removed and/or properly secured during motor vehicle transport.
- Page 12 Lift/Elevation Products If you will be transporting your scooter during travel, you may find it necessary to use a vehicle-mounted lift system or elevation product to aid in transportation. CareCo recommends that you closely review the warnings, instructions, specifications, and safety information set firth by the manufacturer of the lift/elevation product before using that product.
- Page 13 2. SAFETY NOTICE LABELLING 1. WARNING EMI LABEL ………………………………………..........2. FREEWHEEL LABEL ………………………………….………..........3. TILLER DUMPING WARNING LABEL ............4. PINCH WARNING LABEL ................... 5. THE SCOOTER IS NOT FOR USE AS A SEAT IN MOTOR VEHICLE ... 6.CHARGING VOLTAGE LABEL ………………………..........
- Page 14 2. SAFETY NOTICE This portion of the content will provide the user with basic information that describes the problems with EMI, known sources of EMI, protective measures either to lessen the possibility or exposure or to minimize the degree of exposure, and suggested action should unexpected or erratic movement occur.
-
Page 15: Parts Introduction
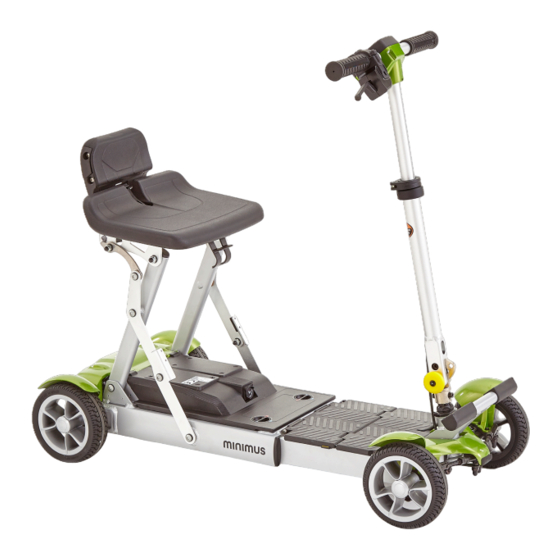
3. PARTS INTRODUCTION PARTS DESCRIPTION Control Panel Seat Rear Reflector Speed/Slow/Down Charger Socket Cover Freewheel mode Slide Lever Front Footrest Seat Tiller Swivel Knob Switch speed button... -
Page 16: Folding Expand/Fold The Scooter
4. FOLDING UP/OUT THE SCOOTER 1. Backrest step description. 2. Pull the yellow knob back to the rear support bar 3. Push the support rod forward to make the bottom smooth, press the pedal. 4. Pull the seat yellow push back, lift up placement. - Page 17 4. FOLDING UP/OUT THE SCOOTER 5. Push the seat back. (Folding up the scooter part 3) 6. Push up the pedal, position the pedal plate forward. (Folding up the scooter part 2) 7. Use slide lever down for suitable location. (Folding up the scooter part 4) 8.
- Page 18 4. FOLDING UP/OUT THE SCOOTER 9. Complete. 10. Pull the yellow knob back to the rear support bar. (Folding up the scooter part 1) 11. Complete.
-
Page 19: Baggage Handle On The Scooter
5. BAGGAGE HANDLE ON THE SCOOTER How to use baggage handle 1. Push the luggage buckle to the right to allow the luggage handle to move easily. 2. Pull the luggage handle to the top. 3. The trunk buckle and the bottom of the handle will automatically fasten, complete. NOTE: The restore steps will return in order. -
Page 20: Operation
6. OPERATION 6.1 CONTROL PANEL (Occupant and assistant can operate) 1. Battery Level Indicator 2. Speed Lever 3. Forward / Reverse Selector PROHIBITED! Do not expose the tiller console to moisture. In the event that the tiller console does become exposed to moisture, do not attempt to operate your Scooter until the tiller console has dried thoroughly. - Page 21 6. OPERATION DO NOT operate the scooter if it is behaving abnormally or erratically Speed Dial (occupant and assistant can operating) The image of the hare represents the fastest speed setting. • The image of the tortoise represents the slowest speed setting. •...
- Page 22 6. OPERATION Battery Indicator • When the power switch is turned on the battery indicator will light up with show colour squares the remaining battery power. The “green” means full power, the “red” means off power. • The remaining power indicated by the battery indicator will vary by the actual driving time incurred and how you drive.
-
Page 23: How To Set Freewheel Mode
6. OPERATION How To Set Freewheel Mode (Only the assistant can operate) Whenever you need or want to push your Scooter for short distances, you can put it in freewheel mode. 1. Locate the manual freewheel lever at the top right of the rear section. 2. - Page 24 6. OPERATION 6.3 TRANSPORTING AND LONG-TERM STORAGE THE SCOOTER Assembling the Scooter No tools are required to disassemble or assemble your scooter. Place the freewheel mode lever in the drive position. 2. Set the rear section in the up position and make sure the hook for the front section is connected to the axle of the rear section.
-
Page 25: Battery Charging And Care
7. BATTERY CHARGING AND CARE 7.1 CHARGING THE BATTERY Follow the procedure below step by step: Turn the power switch to (OFF) 2. Connect the charger’s power cord into the power outlet. 3. Open the charging socket cap on the battery pack. Then connect the charger’s round plug to the charging socket. -
Page 26: Battery
7. BATTERY CHARGING AND CARE 7.2 BATTERY Do not expose the battery to temperatures below 10°C or above 50°C when • charging or storing the scooter. Under the above temperature range can cause the battery either to freeze or over-heat. This will damage the batteries and shorten their life. - Page 27 7. BATTERY CHARGING AND CARE Change the battery Rotate the knob to un-lock position. 2. Open the battery cover. 3. Follow up diagram to connect / disconnect battery...
- Page 28 7. BATTERY CHARGING AND CARE PROHIBITED! Removal of grounding prong can create electrical hazard. If necessary, properly install an approved 3-pronged adapter to an electrical outlet having 2-pronged plug access. PROHIBITED! Never use an extension cord to plug in your battery charger. Plug the charger directly into a properly wired standard electrical outlet.
- Page 29 7. BATTERY CHARGING AND CARE WARNING! If the battery charger is equipped with cooling slots, then do not attempt to insert objects through these slots. WARNING! Be aware that the battery charger case may become hot during charging. Avoid skin contact and do not place on surfaces that may be affected by heat WARNING! If your battery charger has not been tested and approved for outdoor use, then do not expose it to adverse or extreme weather...
- Page 30 7. BATTERY CHARGING AND CARE Cleaning the battery If the batteries are contaminated by water, battery acid, dust or other substances, they will discharge quickly. The batteries supplied with the Minimus scooter are sealed and as such are maintenance free with no risk of battery leakage. Please follow the steps below to clean the battery.
-
Page 31: Inspection And Maintenance
8. INSPECTION AND MAINTENANCE 8.1 INSPECTION Clean the scooter with a damp cloth and dust down approximately once a week to • preserve the appearance of the scooter. Adjust the tiller height and return to the original position and swivel the seat once a •... -
Page 32: Storage
8. INSPECTION AND MAINTENANCE Tires The condition of the tires depends on how you drive and use your scooter. Inspecting tire tread • Please check the tread groove regularly. Replace the tires when the tread groove is • less than 0.5 mm. ATTENTION! 1. -
Page 33: Trouble Shooting And Specification
9. TROUBLE SHOOTING AND SPECIFICATION TROUBLE SHOOTING Symptom Remedy The scooter will not switch on • Try recharging the battery • Check the fuse and circuit breaker in the scooter The scooter switches on, but the scooter will not Ensure there is enough power in the batteries. •... - Page 34 9. TROUBLE SHOOTING AND SPECIFICATION SPECIFICATION Model Reference Minimus / MS01097 Scooter Size (L×W×H) 33.5” x 17” x 33.5” / 850 x 420 x 750 mm Total Weight with Battery 17.8 kg Battery Weight 1.85 kg Tow handle Weight 0.4 kg Front Wheel 165 x 50 mm, 6.5”x2pcs Rear Wheel...
- Page 35 9. TROUBLE SHOOTING AND SPECIFICATION Address: CareCo UK Limited , Hubert Road, Brentwood, Essex, CM14 4JE Model: Minimus Maximum occupant mass: 250 lbs / 133kg Disclosure information in manufacturer specification sheets per ISO 7176-15:1996 Standard Min. Max. Standard Min. Max.
-
Page 36: Battery Charger And Battery
10. BATTERY CHARGER AND BATTERY Item Specification Descriptions Remark Model Number LES-2401PF Cell NCR18650PF Cell:2900mAh 7S-27A Configuration 7S4P Capacity 11600mAh(Typ) Nominal Voltage 25.2V Charge Max Voltage 29.4V-0.15V Discharge Min Voltage 19.80V±0.5V Each cell2.8V Charge Current <7A Discharge Current <30A °C Temperature Charge 10~+45... - Page 37 10. BATTERY CHARGER AND BATTERY ELECTRICAL PERFORMANCE Input voltage and frequency Test items Minimum value Average value Input voltage 90Vac 100~240Vac 264Vac Input frequency 47Hz 50/60Hz 63Hz Input maximum current Input average voltage, Input maximum current: 1.5A Maximum inrush current Input average voltage, output maximum load (cold start 25 °C) condition Maximum inrush current: 70A No-load power consumption / Full load efficiency...
- Page 38 10. BATTERY CHARGER AND BATTERY Test items Output voltage Output current Indicator status No-load voltage 27.0~27.8V Steady green Load current 1.85~2.15A Steady Red Maximum charging 29.0~29.8v 600mA Steady Red voltage Turn lamp current 400 600mA Red to green Protective function Over voltage protection Short circuit protection Temperature...
-
Page 39: Diagram
11. DIAGRAM C01-301-00101 FRONT FRAME ASS’Y C01-301-01500 REAR FRAME ASS’Y C02-301-00500 TILLER ASS’Y C08-301-0075C SHROUD ASS’Y C08-301-00100 COVER, HAND BAR C09-301-00900 ELECTRONIC ASS’Y C05-301-00300 FRONT TIRE C06-301-00101 REAR TIRE C07-301-00400 SEAT ASS’Y... -
Page 40: Warranty
This warranty only covers failures due to defects in materials or workmanship which occur during normal use and does not cover damage that occurs in shipment or failures which are caused by products not supplied by CareCo or failures resulting from accident, misuse, abuse, neglect, mishandling, misapplication, alteration, modification, commercial use by anyone other than an authorised dealer, or damage that is attributable to the acts of God. - Page 41 NOTES...
- Page 42 NOTES...
- Page 43 NOTES...
Need help?
Do you have a question about the Minimus MS01097 and is the answer not in the manual?
Questions and answers
How much does it cost for a new rubber foot support cover? (No7 in the diagram)
when closing up the tiller gets stuck and wont move into the shut position its about 3ins short