Table of Contents
Advertisement
Quick Links
Instruction Manual
This instruction manual is intended to be a guide when operating the Impulse3.0 Extreme Seam welder.
To ensure optimal performance from your welder, please follow the recommendations and specifications
precisely.
For more technical information regarding this machine call our Resolution Center at 1-855-888-WELD or
email service@weldmaster.com.
You can also subscribe to Miller Weldmaster Insiders to stay updated on tech tips, machine maintenance
updates, and more at www.weldmaster.com/insiders.
Page 1
Advertisement
Table of Contents

Related Manuals for Miller Weldmaster Impulse 3.0 Extreme


Summary of Contents for Miller Weldmaster Impulse 3.0 Extreme
- Page 1 For more technical information regarding this machine call our Resolution Center at 1-855-888-WELD or email service@weldmaster.com. You can also subscribe to Miller Weldmaster Insiders to stay updated on tech tips, machine maintenance updates, and more at www.weldmaster.com/insiders. Page 1...
-
Page 2: Table Of Contents
Instruction Manual Table of Contents Chapter 1: Intended Use Page 3 Chapter 2: Explanation of Warnings Pages 4-5 Chapter 3: Electrical and Air Requirements Page 6 Chapter 4: Principles of Heat Sealing Page 7 Chapter 5: Definition of Controls Pages 8-17 Chapter 6: Safety Precautions Pages 18-19 Chapter 7: General Description... -
Page 3: Chapter 1: Intended Use
Instruction Manual Intended Use The Impulse Extreme is a Thermal Impulse machine intended to heat-seal weldable thermal plastics such as: •Vinyl (PVC) laminated and coated fabrics •Vinyl (PVC) and Polyurethane (PU) films •Polyurethane (PU) and Polypropylene (PP) coated fabric •Polyethylene (PE) •Thermoplastic rubber (TPR) film and fabrics •Non-woven Polyester and Polypropylene •Various Fusing Tapes... -
Page 4: Chapter 2: Explanation Of Warnings
Instruction Manual Explanation of Warnings There are several different warning symbols placed on the Miller Weldmaster Impulse 3.0. The symbols are to alert the operator of potentially hazardous areas on the machine. Familiarize your- self with their placement and meaning. - Page 5 Instruction Manual Explanation of Warnings Warning: Keep Hands Clear The“Warning: Keep Hands Clear” sticker is placed on the Heater Assembly. To prevent any pinching or burns, be aware of the location of your hands at all times. Warning: High Temperature Air The “Warning: High Temperature Air”...
-
Page 6: Chapter 3: Electrical And Air Requirements
•40 Amperes - Single phase - 230 Volts Shop Air Supply The Miller Weldmaster Impulse Extreme includes an In-Shop Air Supply Valve that allows quick connects and disconnects to your shop air supply. Due to the number of different style airline connectors, a male quick-connect is not included. -
Page 7: Chapter 4: Principles Of Heat Sealing
Instruction Manual Principals of Heat Sealing Heat: The heat required for the welding operation is created electrically by two heating elements located on each sealing bar. Time: The amount of time the heat and pressure is applied to the fabric or film. This time allows the heat to penetrate into the fabric or film and then cool. -
Page 8: Chapter 5: Definition Of Controls
Instruction Manual Definition of Controls Operator Control : System banner bar notifies the user of the ma- chines current process as well as any alarms that may be present. This will display many different phrases so the operator knows what process the machine is currently in. - Page 9 Instruction Manual Definition of Controls Function Button This allows the operator to control what mode the machine is set to. There are 4 modes to choose from as follows: Weld: welding mode for overlap welding. F/w: Fold and weld. This creates a fold from a flat hem to a 2.5” pocket, then positions the seam for welding.
- Page 10 Instruction Manual Definition of Controls Recipe Management Screen This is where we can add edit and manage all the recipes we have stored on the machine. The – and + Buttons are to change the recipe up and down to choose the desired set recipe. By pushing the “-“...
- Page 11 Instruction Manual Definition of Controls Operator Configuration Screen Purge: This button allows us to purge the water pump manually. The main reason for this is to be used after a water tank flush and fill. This allows us to make sure all the air is removed from the water pump prior to trying the welding cycle so we do not get a low water flow alarm.
- Page 12 Instruction Manual Definition of Controls Function Button This allows the operator to control what mode the machine is set to. There are 4 modes to choose from as follows: Weld: welding mode for overlap welding. F/w: Fold and weld. This creates a fold from a flat hem to a 2.5” pocket, then positions the seam for welding.
- Page 13 Instruction Manual Definition of Controls Recipe Management Screen This is where we can add edit and manage all the recipes we have stored on the machine. The – and + Buttons are to change the recipe up and down to choose the desired set recipe. By pushing the “-“...
- Page 14 Instruction Manual Definition of Controls Operator Configuration Screen Purge: This button allows us to purge the water pump manually. The main reason for this is to be used after a water tank flush and fill. This allows us to make sure all the air is removed from the water pump prior to trying the welding cycle so we do not get a low water flow alarm.
- Page 15 Instruction Manual Definition of Controls Production Status Screen Cycles: This is the number of time the weld bar has went to the fully down or welding position. Reset: This button allows us to reset the #of cycles counter. This is useful when performing maintenance or routine preventative maintenance.
- Page 16 Instruction Manual Definition of Controls Maintenance Screen Screen: Pressing the Maintenance Button will bring up a screen to enter in a user name and password. The appropriate password must be entered in order to gain access to the main- tenance screens. Please check with your supervisor for the password.
- Page 17 Instruction Manual Definition of Controls 3 Way switch : Three way switch on side of machine is for Lasers lights and lasers. This switch is on the right side of the machine. In the laser position the lasers are on. The off position turn them off.
-
Page 18: Chapter 6: Safety Precautions
Instruction Manual Safety Precautions NOTE: For the safe and correct use of the machine, it is necessary to read through these precautions carefully before use. 1. All the users who operate this machine should have this user’s manual in hand, and should keep it in an accessible location after reading for future reference. - Page 19 Instruction Manual Safety Precautions Safety Precautions before Use 1. Before starting up the machine, please check it carefully and guarantee that there are no foreign matters under the sealing area. If any unusual conditions are found during operation, immediately press the Emergency Stop Switch and then check for abnormal conditions. 2.
-
Page 20: Chapter 7: General Description
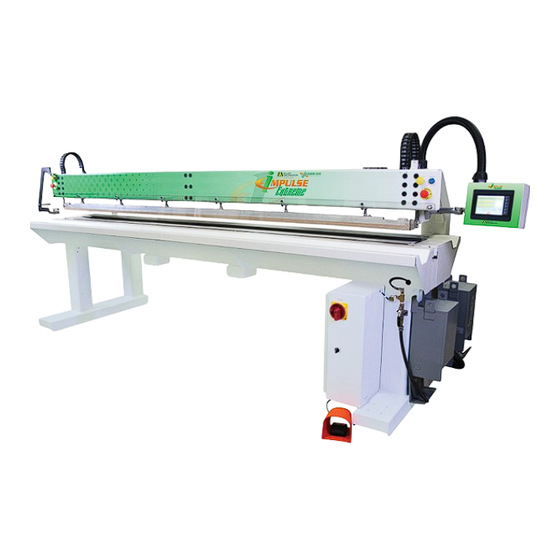
Instruction Manual General Description The Impulse Extreme sealing machines are pneumatic instantaneously-heating double-sided sealing machines that are applicable to the heat sealing of fabrics and films in a variety of industries. They are horizontal sealing machines with a cylinder acting as the closing force source. -
Page 21: Chapter 8: Technical Specifications
Instruction Manual Technical Specifications Type Designation: Impulse Extreme Sealing Machine Technical Specification: Impulse Extreme Sealing Machine •Type: Impulse Extreme sealing machine •Rated Voltage: 220v, 50/60hz •Rated Power: 8000 W •General Air Pressure: 120psi (8.3bar) •Max. sealing length: 118in (3000mm) •External Dimensions: 140in X 48in X 70in (3500mm X 1200mm X 1800mm) •Electrical Document Number: IE-0109-1200 (The documentation number is the serial number of the machine. -
Page 22: Chapter 9: Transportation Specs And Storage
Transportation Transporting Within a Production Facility Due to the weight of the Miller Weldmaster machines, the manufacturer requires a forklift or tow motor to be used. The forks are to be inserted below the bottom frame along the center of gravity. Lift slowly to insure proper placement of forks. -
Page 23: Chapter 10: Maintenance
Instruction Manual 10.0 Maintenance 1. Before using the machine the Teflon tape of the seaming area must be inspected. The sealing surface of the Teflon must be free of debris. The Teflon should not be cut, warn through, or have holes which may expose the heating element. - Page 24 Instruction Manual 10.0 Maintenance 4. Install band clamps on each end of sealing bar being worked on. The clamps will install over the insulator block and are used to compress the springs in the tension blocks. Tighten the bolt snugly against the tension block.
- Page 25 Instruction Manual 10.0 Maintenance Replacement of Outside Layer of Teflon Tape 1. Remove the Teflon tape for the sealing bar by peeling the tape off. The tape is held on by adhesive on each edge of the tape. 2. Once the Teflon tape has been remove, adhesive may remain on the heat sealing bars.
- Page 26 Instruction Manual 10.0 Maintenance Replacement of Silicone Strip 1. Remove the silicone strip from the sealing bar. With the silicone strip remove, inspect the groove in the sealing bar to insure the groove is free of debris. (fig.09) 2. Install the silicone strip by starting at one end of the sealing bar.
-
Page 27: Chapter 11: Operation
Distilled water must be used to insure the water is free of minerals and contaminants. For proper lubrication one gallon of Miller Weldmaster part number IECOOL should be used with one tank of distilled water (coolant tank holds 21 gallons or 80 liters of coolant). For replacement lubricant please contact Miller Weldmaster. - Page 28 Instruction Manual 11.0 Operation Fabric Folding System Operation 1. Before using the Folding system of the Impulse Extreme machine the desired pocket size must be selected. The machine is capable of doing a flat hem to a 2 5/8” (65mm) Pocket. To adjust the pocket size use the Hem Pocket size control knob on the operator end of the machine.
- Page 29 Instruction Manual 11.0 Operation Edging The Edging function is for the application of a weldable zip- per to the edge of your panel. This option utilizes a special guide for the application of the zipper to maintain a straight and even seam. (fig.07) 1.
- Page 30 Instruction Manual 11.0 Operation Overlap Guide Overlap Guides are used to help aid in the process of doing a standard overlap weld on the Impulse Extreme. (fig.13) 1. Change the seam type to the Weld function on the HMI Touch Screen. 2.
- Page 31 Instruction Manual NOTES:_________________________________________________________________ _______________________________________________________________________ _______________________________________________________________________ _______________________________________________________________________ _______________________________________________________________________ _______________________________________________________________________ _______________________________________________________________________ _______________________________________________________________________ _______________________________________________________________________ ______________________________________________________________________ _______________________________________________________________________ _______________________________________________________________________ _______________________________________________________________________ _______________________________________________________________________ _______________________________________________________________________ _______________________________________________________________________ Page 31 NOTES...
- Page 32 Instruction Manual NOTES:_________________________________________________________________ _______________________________________________________________________ _______________________________________________________________________ _______________________________________________________________________ _______________________________________________________________________ _______________________________________________________________________ _______________________________________________________________________ _______________________________________________________________________ _______________________________________________________________________ ______________________________________________________________________ _______________________________________________________________________ _______________________________________________________________________ _______________________________________________________________________ _______________________________________________________________________ _______________________________________________________________________ _______________________________________________________________________ NOTES Page 32...
- Page 33 Instruction Manual NOTES:_________________________________________________________________ _______________________________________________________________________ _______________________________________________________________________ _______________________________________________________________________ _______________________________________________________________________ _______________________________________________________________________ _______________________________________________________________________ _______________________________________________________________________ _______________________________________________________________________ ______________________________________________________________________ _______________________________________________________________________ _______________________________________________________________________ _______________________________________________________________________ _______________________________________________________________________ _______________________________________________________________________ _______________________________________________________________________ Page 33 NOTES...
Need help?
Do you have a question about the Impulse 3.0 Extreme and is the answer not in the manual?
Questions and answers