Advertisement
Advertisement
Table of Contents

Subscribe to Our Youtube Channel
Related Manuals for Mighty Clean MC1800


Summary of Contents for Mighty Clean MC1800
- Page 1 MC1800 English Electric High-Pressure Washer - Operator’s Manual Before operating this product, please read this manual thoroughly and retain it for future reference. 1-866-902-9690 www.MightyCleanUSA.com...
- Page 2 Do not return product to place of purchase. If you have any questions, call our toll- free hotline. 1-866-902-9690 www.MightyCleanUSA.com...
-
Page 3: Table Of Contents
TABLE OF CONTENTS Important Safety Instructions....................1 Safety Features…………………..……...................4 Parts List and Diagram......................5 Assembly and Operation Instructions..................6 Machine Assembly....................6 Operation Instruction....................8 Cleaning Detergents Dispenser................10 Shut Down and Storage......................13 Cleaning and Maintenance....................14 Troubleshooting........................15 Technical Data........................19 Warranty..........................20 IMPORTANT SAFETY INSTRUCTIONS Before each use, please read all of the safety precautions. Please pay particular attention to all sections with the following symbols. - Page 4 IMPORTANT SAFETY INSTRUCTIONS WARNING Risk of Injury Injection Hazard • Product can cause serious injury if the spray penetrates the skin. • Do not point the gun at anyone or any part of the body. In case of penetration, seek medical aid immediately.
- Page 5 IMPORTANT SAFETY INSTRUCTIONS 8. Always wear safety glasses or goggles when operating or performing maintenance. 9. Always move switch on product to “Off” position before connecting or disconnecting cord to electrical outlets. 10.Always turn water supply on before turning pressure washer on unless draining for storage. Running pump dry causes serious damage.
-
Page 6: Safety Features
SAFETY FEATURES TOTAL STOP SYSTEM The pressure washer is equipped with a total stop system (TSS) that will sense when the trigger on the handle is depressed or released. It will open the power circuit to the motor, and cause the pressure washer motor to stop. -
Page 7: Parts List And Diagram
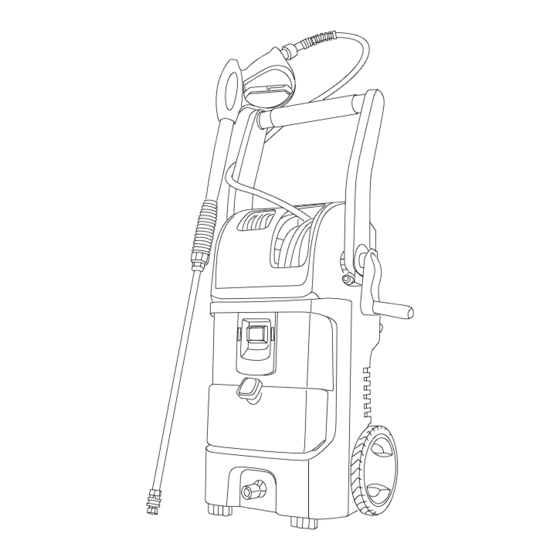
PARTS LIST AND DIAGRAMS Item No. Quantity Part Name Ground Fault Circuit Interrupter (GFCI) High-pressure Hose Hand Crank Detergent Tank Quick-connect Wand Trigger Handle Spray Tips Quick-connect Coupling Inlet Adaptor Water Filter Screen Tip Cleaning Needle Water filter comes pre-attached on the water inlet, located on the front of the pressure washer. -
Page 8: Assembly And Operation Instructions
ASSEMBLY AND OPERATION INSTRUCTIONS Surface Preparation Before starting any cleaning task, it is important to inspect the area for objects that could create a hazard. Remove any objects from the work area that could be tripped over, such as toys or outdoor furniture. - Page 9 ASSEMBLY AND OPERATION INSTRUCTIONS Attach high-pressure hose from hose reel to the gun wand trigger handle, hand tighten until two parts are locked. Recommendation for spray tip usage: Yellow To clean larger areas (e.g. drive way) White For delicate cleaning and detailing (e.g.
-
Page 10: Operation Instruction
ASSEMBLY AND OPERATION INSTRUCTIONS Remove and discard the cap on the Attach garden hose quick-connect coupling to garden hose, hand tighten until two parts are washer’s water inlet and check the water locked. Connect to inlet adaptor and ensure it filter pre-attached inside the water inlet. - Page 11 ASSEMBLY AND OPERATION INSTRUCTIONS Make sure the On/Off switch is on the “Off” Completely unwind power cord by pulling position before plugging in the pressure and plug the Ground Fault Circuit Interrupter washer, press the switch with mark “O” to (GFCI) into a power outlet.
-
Page 12: Cleaning Detergents Dispenser
ASSEMBLY AND OPERATION INSTRUCTIONS CAUTION Make sure spray tip and wand is well locked. Do not move the spray tip while trigger is depressed. CAUTION If painted surfaces are peeling or chipping, use extreme caution as pressure washer may remove the loose paint from the surface. - Page 13 ASSEMBLY AND OPERATION INSTRUCTIONS 1 Engage trigger safety lock. 2 Attach the low-pressure spray tip (black) for soap or detergent application. Detergent application will only work with low-pressure spray tip. 3 Lift up to remove the cap of detergent tank, fill tank with detergent or soap and replace the cap.
- Page 14 ASSEMBLY AND OPERATION INSTRUCTIONS CAUTION Fail to follow detergent clean procedure will cause the dispensing system to become clogged. Damage may occur to painted surface if chemical is allowed to dry on surface. Wash and rinse a small section at a time. Avoid working on hot surfaces or in direct sunlight. Never Use: •...
-
Page 15: Shut Down And Storage
SHUT DOWN AND STORAGE 1 (If you are not using detergent, go directly to Step 2.) When you have finished using the detergent dispensing system, fill detergent tank with clean water to rinse the system clean. Depress the trigger for one minute at low-pressure so that all detergents remaining in system are thoroughly flushed out. -
Page 16: Cleaning And Maintenance
CLEANING AND MAINTENANCE Water Filter Screen The pressure washer is equipped with a water filter screen to protect the pump. If the screen is not kept clean, the flow of water to the pressure washer will be restricted and the pump may be damaged. 1. -
Page 17: Troubleshooting
TROUBLESHOOTING Disconnect the pressure washer from the power source before making any repairs. Symptom Cause Solution Motor will not start. On/Off switch is in the “Off” Turn switch to the “On” (-) (O) position. position. GFCI is not plugged in. Plug in GFCI. - Page 18 TROUBLESHOOTING Symptom Cause Solution Washer does not reach Pump is sucking air. Check that hoses and high-pressure. fittings are airtight. Turn off washer, and purge pump by squeezing trigger handle until a steady flow of water emerges through the spray tip.
- Page 19 TROUBLESHOOTING Symptom Cause Solution Detergent is not working. Filter on detergent suction Run warm water through filter tube is clogged. to remove build-up. Damaged or clogged Remove obstruction or detergent suction tube. replace detergent suction tube. Nozzle is in high-pressure Use low-pressure (black) tip.
- Page 20 TROUBLESHOOTING Symptom Cause Solution Water leaks from pump (up Water seals are damaged or Call the Toll-Free Hotline: to 10 drops per minute is worn. 1-866-902-9690 permissible). Oil is dripping. Oil seals are damaged or Call the Toll-Free Hotline: worn. 1-866-902-9690 Motor buzzes but fails to run.
-
Page 21: Technical Data
TECHNICAL DATA Power Source Requirement: 120 V / 60 Hz Rated Current: 13 AMP Max. Pressure: 1800 PSI Max. Flow Rate: 1.6 GPM Electrical Cord: 35’ High-pressure Hose: 23’ Inlet Water: Cold Tap Water, Max. 104 F / 40°C Detergent Injection Rate: 3~12% English 19... -
Page 22: Warranty
2. Send in proof-of-purchase and serial number (if applicable) to confirm warranty coverage. 3. If service or a warranty evaluation is requested, Mighty Clean USA will provide an RGA number that should be used in all communications with Mighty Clean USA and is required to be indicated on the product itself and on the outside of the box. - Page 23 For the full line of Mighty Clean tools, replacement parts and accessories visit www.ForceToolsUSA.com If you have any questions, call our toll- free hotline 1-866-902-9690 www.MightyCleanUSA.com Manufactured by SUMEC 3939 Royal Dr. NW Suite 234 Kennesaw, GA 30144 Rev 201502 MC1800...
Need help?
Do you have a question about the MC1800 and is the answer not in the manual?
Questions and answers