Orion Atlas EQ-G Instruction Manual
Equatorial mount
Hide thumbs
Also See for Atlas EQ-G:
- Manual (27 pages) ,
- Instruction manual (20 pages) ,
- Instruction manual (12 pages)
Advertisement
Quick Links
instruction Manual
orion atlas
Providing Exceptional Consumer Optical Products Since 1975
All Rights Reserved. No part of this product instruction or any of its contents may be reproduced, copied, modified or adapted,
without the prior written consent of Orion Telescopes & Binoculars.
Equatorial Mount
#24338
Copyright © 2014 Orion Telescopes & Binoculars
EQ-G
™
Customer Support:
www.OrionTelescopes.com/contactus
Corporate Offices:
89 Hangar Way, Watsonville CA 95076 - USA
IN 279 Rev. E 06/14
Advertisement

Related Manuals for Orion Atlas EQ-G


Summary of Contents for Orion Atlas EQ-G
- Page 1 Copyright © 2014 Orion Telescopes & Binoculars All Rights Reserved. No part of this product instruction or any of its contents may be reproduced, copied, modified or adapted, without the prior written consent of Orion Telescopes & Binoculars. IN 279 Rev. E 06/14...
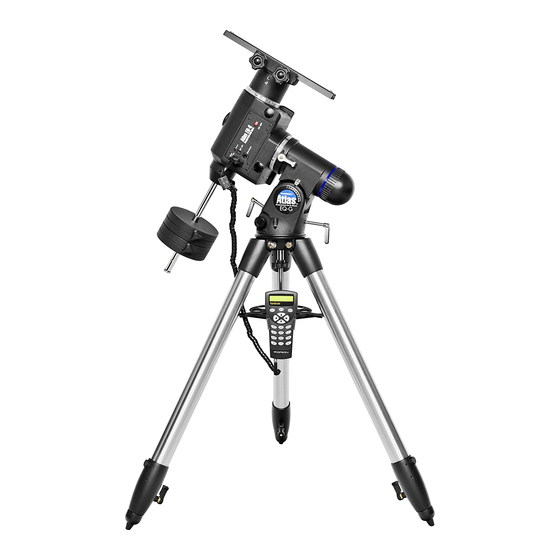
- Page 2 Latitude scale Counterweight shaft Latitude adjustment L-bolts Bubble level Counterweights Center support shaft (hidden) Counterweight lock knobs (reverse) Accessory tray/spreader “Toe-saver” GoTo hand controller GoTo hand controller cable Tripod leg Leg lock levers (3) Figure 1. The Atlas EQ-G mount...
-
Page 3: Table Of Contents
4. Installing a Telescope on the Mount ..5 returned to Orion for warranty repair, having the proper pack- aging will ensure that your mount will survive the journey 5. -
Page 4: Assembly
Azimuth adjustment knobs Figure 3. Installing the tripod leg spreader, which doubles as an eyepiece/accessory tray. Bracket Align gap with post Strap with hook-and- loop fastener Post Figure 2. a) Loosen the azimuth adjustment knobs to create at Figure 4. The hand controller bracket should be fastened to a least a ½”... -
Page 5: Installing A Telescope On The Mount
Tube ring the Mount attachment screw The Atlas EQ-G mount is designed to hold a telescope pay- load of up to 40 lbs. For heavier telescopes, the mount may not provide sufficient stability for steady viewing or imaging. Flat washer Before installing a telescope, be sure that: •... -
Page 6: Balancing The Telescope
(i.e., hori- adjustment knobs (2) L-bolts zontal). Figure 8. The R.A. and Dec axes of the Atlas EQ-G and related 2. Now loosen the counterweight lock knob and slide the parts. weight(s) along the shaft until it exactly counterbalances you have found the correct balance point using the above the telescope. - Page 7 Little Dipper (in Ursa Minor) N.C.P. Big Dipper (in Ursa Major) Polaris Cassiopeia Figure 9. For northern hemisphere viewers, you can find the pole star, Polaris, by extending an imaginary line from the Big Dipper’s “pointer stars,” as shown. Polaris lies within 1 degree of the North Celestial Pole (NCP).
- Page 8 Polar Alignment Using the Polar Scope back to the cross. Then you will re-center the object on the 1. Set up the Atlas EQ-G mount. It is recommended to load cross as in Step 2 using the latitude adjustment L-bolt and the mount with the counterweights and telescope (in that azimuth adjustment knobs.
- Page 9 To do this, release The Atlas EQ-G requires a 12V DC power supply (tip posi- the R.A. clutch and rotate the main telescope around the tive) capable of producing continuous current of 2 amps.
-
Page 10: The Synscan Goto Hand Controller
7. the synscan Goto Hand controller The Atlas EQ-G mount equipped with the SynScan GoTo hand controller (Figure 13) provides easy, computerized location of thousands of night sky objects such as planets, nebulae, star clusters, galaxies, and more for viewing through Display your telescope. -
Page 11: Technical Specifications
Figure 14. The Atlas EQ-G mount’s drive panel • Reorient or relocate the receiving antenna. 8. technical specifications •... - Page 12 Warranty This Orion product is warranted against defects in materials or workmanship for a period of one year from the date of purchase. This warranty is for the benefit of the original retail purchaser only. During this war- ranty period Orion Telescopes &...
Need help?
Do you have a question about the Atlas EQ-G and is the answer not in the manual?
Questions and answers