Advertisement
Quick Links
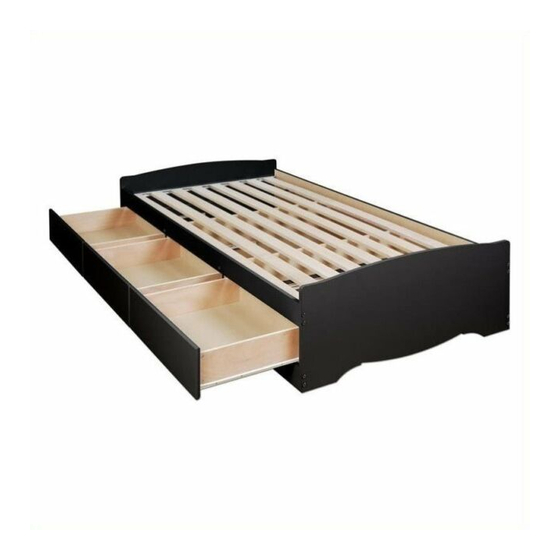
Drawer Assembly Instructions -
Supplement to Product Assembly
Mode d'assemblage de tiroir -
Supplément à l'Assemblée de produit
Each Drawer requires the following pieces
and hardware
Chaque tiroir exige les morceaux et le
matériel suivants
Drawer Front
Devant du tiroir
Drawer Back
Arrière du tiroir
Drawer Bottom - 1/8" thick
Fond du tiroir - 1/8" épais
1.
Insert cams into drawer sides
Insérez les ferrures dans des côtés de tiroir
Insert cams in the unlocked position, with the opening facing
toward the hole for the connecting bolt.
Insérez les ferrures dans la position déverrouillée, de façon
à ce que l'overture soit face au trou de la vis d'assemblage.
3.
Attach Drawer Glides
Attachez les glissements de tiroir
Left Side
Côté gauche
Note wheel location
Notez l'endroit de roue
© 2007-02-16
Left & Right Glide
for Drawer Side
Glissement de tiroir
gauche et droit pour
le côté de tiroir
RM-0469
Drawer Slide Screw
Vis pour glissement
de tiroir
12mm Zinc Cam (4)
Ferrure en zinc 12mm
RM-0502
Left Drawer Side
Côté gauche du tiroir
2.
Screw green twister dowels into drawer front
Vissez les goujons de torsion vert dans des
devant du tiroir
Green Twister Dowel
Goujon de torsion vert
4.
Attach Drawer Back
Attachez les arrière du tiroir
Right Side
Côté droit
#8 - 1½" Screws
Vis no.8 - 1½"
Green Twister Dowel (4)
Goujon de torsion vert
RM-0501
Nail (4)
Drawer Slide Screw (4)
Vis pour glissement de tiroir
Clou
RM-0074
RM-0022
Right Drawer Side
Côté droit du tiroir
LB-0573 Page 1 of/de 2
#8 - 1½" Screws (4)
Vis no.8 - 1½"
RM-0504
Advertisement

Related Manuals for Prepac BT-4100-2K


Summary of Contents for Prepac BT-4100-2K
- Page 1 Drawer Assembly Instructions - Supplement to Product Assembly Mode d'assemblage de tiroir - Supplément à l'Assemblée de produit 12mm Zinc Cam (4) Green Twister Dowel (4) #8 - 1½” Screws (4) Each Drawer requires the following pieces Ferrure en zinc 12mm Goujon de torsion vert Vis no.8 - 1½”...
- Page 2 Tighten cams Attach Drawer Front Serrez les ferrures Insérez le fond de tiroir Titus Unlocked Déverrouillé Locked Verrouillé Use the flat head screwdriver and turn cams to the RIGHT almost 180 degrees until tight. Utilizer le tournevis principal plat et serrez les ferrures en tournant vers LA DROITE jusqu’a 180 degrés.
- Page 3 Twin Platform Storage Bed Assembly Instructions Model # BT-4100-2K For the following collections: Broadway, Chelsea, Everett, Manhattan, This product is shipped in Monterey, Montego,Sonoma 2 cartons 1 of 2 2 of 2 Make sure you have both cartons. CALL US FIRST...
- Page 4 Hardware Identification Bed Hardware JRN Nut JCB Connector T Spacer Drawer Slide Screw (24) (24) (12) (50) RM-0312 RM-0310 bronze (cherry / espresso) RM-0628 RM-0074 RM-0311 chrome (white / maple) RM-0314 black Allen Key RM-0313 Drawer Slides for Bed LEFT Slide (3) RIGHT Slide (3) Drawer Hardware 1 LEFT Drawer Slide per Drawer (Total = 3)
-
Page 5: Table Of Contents
Bed Parts Nylon Strap Wooden Slats (1) Lower Stabilizer Upper Stabilizer Inner Gables (2) Side Panel Outer Gables (2) BF-1000 ST-4123 black ST-4122 black SG-4102 black GA-4111 black GA-4112 black ST-4922 cherry SG-4902 cherry ST-4923 cherry GA-4911 cherry GA-4912 cherry SG-4702 maple ST-4723 maple ST-4722 maple... - Page 6 STEP 1 Estimated Time: 10 minutes These instructions show the Twin Bed assembled with the drawers facing to the right. IMPORTANT Both outer gables are identical. After the bed is assembled it can be positioned to face right or left. Attach metal U-channels to each outer gable using drawer slide screws Drawer...
-
Page 7: Outer Gables
STEP 3 Estimated Time: 10 minutes Attach drawer glides to “T” spacers on outer gables as shown in the photo Position the Drawer Glides with: A) The wheel at the finished side B) The wheel on the unfinished bottom Finished Side Bottom Use 14th hole... - Page 8 STEP 4 Estimated Time: 5 minutes Insert JRN nuts into the holes on each end of the inner gables. The holes are drilled through. You can insert them from either side. Insert the nut as shown, so that the hole lines up with the hole on the edge of the gable.
- Page 9 STEP 5 Estimated Time: 5 minutes Insert JRN nuts into the holes on each end of: The side (B3) The upper stabilizer (B5) The lower stabilizer (B4) Page 7 of 20...
-
Page 10: Inner Gables
STEP 6 Estimated Time: 10 minutes Attach “T” spacers and drawer glides to Inner Gables 4” Bottom Attach “T” spacers to ONE side of each inner gable with drawer slide screws Drawer Slide Screw Attach drawer glides to “T” spacers on IMPORTANT: inner gables. -
Page 11: Side Panel
STEP 7 Estimated Time: 5 minutes Using JCB connectors, and the Allen Key provided, attach the side panel (B3) to both inner gables. The finished edge should be facing up. Finished edge Side Panel Connector If you have any difficulty tightening the JCB connector, use a screwdriver to adjust the JRN nut to make sure the hole is facing the opening for the connector Page 9 of 20... -
Page 12: Lower Stabilizer
STEP 8 Estimated Time: 5 minutes Using JCB connectors, and the Allen Key provided, attach the lower stabilizer (B4) to both inner gables BELOW the drawer slide Finished edge IMPORTANT Identifying the Lower Stabilizer The screw hole is at the top, close to the finished edge Page 10 of 20... -
Page 13: Upper Stabilizer
STEP 9 Estimated Time: 5 minutes Using JCB connectors, attach the upper stabilizer (B5) to both inner gables. Upper Stabilizer The screw hole is closest to the lower, unfinished edge Unfinished Edge Page 11 of 20... - Page 14 STEP 10 Estimated Time: 10 minutes Attach one outer gable to stabilizers with JCB connectors Outer Gable Page 12 of 20...
- Page 15 STEP 11 Estimated Time: 5 minutes Unfold the wooden slats and spread them out across the inner stabilizers The nylon strip should be on the bottom Slide the slats into the metal U-channel (B7) on the outer gable On each end of the u-channel there is a metal divider.
- Page 16 STEP 12 Estimated Time: 10 minutes Attach second outer gable to stabilizers with JCB connectors Secure the gable in place with connectors, but don’t fully tighten Ensure the slats are set inside the U-channel and that they haven’t pulled out of the first outer gable. Firmly tighten the connectors Page 14 of 20...
- Page 17 Drawer Parts Identification Drawer Front (3) Left Drawer Side (3) Drawer Bottom (3) Drawer Back (3) Right Drawer Side (3) DF-4102 black DS-0415-L DB-4101 DK-4101 DS-0415-R DF-4902 cherry Plywood unfinished unfinished Plywood DF-4702 maple DF-4002 white Page 15 of 20...
- Page 18 STEP 13 Estimated Time: 5 minutes PER DRAWER Insert cams into drawer sides Left Drawer Side Right Drawer Side Make sure arrow faces toward hole for twister dowel Screw green twister dowels into drawer fronts Page 16 of 20...
- Page 19 Attach drawer sides to drawer back with 1½” Hi Lo screws 1½” Hi Lo Screws Attach drawer front and tighten cams using a flat head screwdriver Right Drawer Side Left Drawer Side Locked Locked Unlocked Unlocked Turn 210° Turn 210° Page 17 of 20...
- Page 20 Turn drawer upside down and slide drawer bottom into grooves Secure the drawer bottom to the drawer back with nails Use 5 nails per drawer Page 18 of 20...
- Page 21 Attach drawer slides to left and right drawer sides using drawer slide screws Right Drawer Side Drawer Slide Screws Left Drawer Side Drawer Slide Screws Page 19 of 20...
- Page 22 STEP 14 Estimated Time: 2 minutes Insert drawers Note: When drawers are installed correctly, you will not be able to remove them without first lifting up the drawer front. Furniture Care Q&A How do I clean your products? We recommend that you simply wipe your products with a clean, damp cloth and then dry immediately with another clean cloth to maximize the life span and look of your unit Can I paint or varnish your products? Our products are made from durable composite woods with a laminate finish and therefore should not be painted...
Need help?
Do you have a question about the BT-4100-2K and is the answer not in the manual?
Questions and answers