Table of Contents
Advertisement
Available languages
Available languages
Quick Links
Advertisement
Chapters
Table of Contents

Related Manuals for Occhio Sento faro Series


Summary of Contents for Occhio Sento faro Series
- Page 1 Sento body faro Montageanleitung Mounting instructions track...
- Page 3 Sento body faro Montageanleitung flat track...
-
Page 5: Table Of Contents
Inhalt Sicherheitshinweise Produktbeschreibung Montage body Wechsel Karbongriff/ Fixierring Anhang Informationen Technische Daten... -
Page 6: Sicherheitshinweise
Sicherheitshinweise Lesen Sie die Montage-/Gebrauchs- Allgemeine Sicherheitshinweise anweisung sorgfältig durch, bevor Sie die Leuchte installieren. Beach- ten Sie die Sicherheitshinweise in dieser Anleitung genau und Bewah- Die Montage von Elektrokompo- ren Sie die Anleitung auf. nenten darf nur von qualifiziertem Fachpersonal durchgeführt werden. -
Page 7: Produktbeschreibung
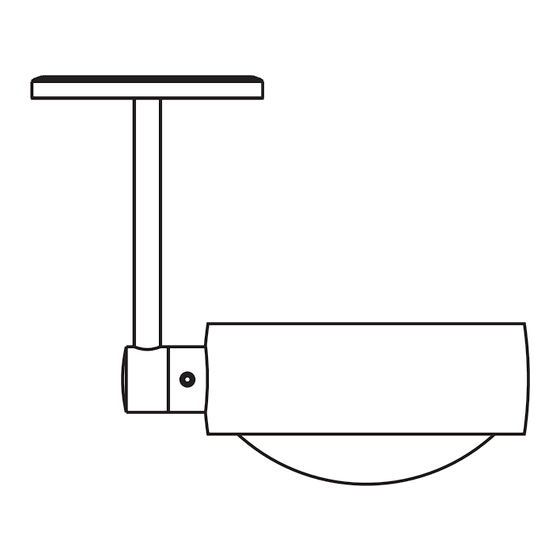
Produktbeschreibung Modulares LED-Kopf-Körper-System up-Version ermöglicht freie Kombination verschie- dener Oberflächen von head, body und LED Deckenleuchte mit hoher base inkl. Vorschaltgerät (Konverter) für Montage base. Head für Konfiguration und Wartungs- auf fester Decke, Anschluß an 230V. zwecke abnehmbar, LED wechselbar. Heads mit einseitigem oder beidseiti- Extern dimmbar per Phasenabschnitt- gem Lichtaustritt erhältlich, Lichtleistung... -
Page 9: Montage Body
Montage body Sento faro up für feste Decke Sento faro flat für Hohlraum-/Einputzdose Sento faro track für 1- oder 3-Phasenschiene... - Page 11 Sento faro up 230V AC Netzanschlussleitung Montageplatte Occhio Konverter body mit Montageplatte Karbongriff Fixierring (optional) Cover...
- Page 12 Installation Netzkabel auf 5cm ablängen und Enden abisolieren. 230V AC Netzanschlussleitung 5 cm Montageplatte über den Stromauslass an Decke setzen und so drehen, dass die Langlöcher die gewünschte Ausrich- tung haben. Positionen der Bohrlöcher anzeichnen. Auf den Verlauf von Stromleitungen achten! Zwei Löcher ø...
- Page 13 Sento faro up Klappe in der Mitte des Konverters öffnen. Konverter bündig in die Montageplatte einrasten. Dabei die Enden der Netzleitung durch die Öffnung des Konverters führen. Click! Kabelenden der Netzleitung nach Sche- Anschluss einzeln ma an die Klemmen des Konverters anschließen.
- Page 14 Installation Klappe des Konverters schließen. Click! Cover entgegen dem Uhrzeigersinn lösen und auf dem Leuchtenarm hängen lassen. Schutzfolie noch nicht entfernen!
- Page 15 Sento faro up Stecker des Leuchtenkörpers in die Buchse des Konverters stecken. Click! Kabel in die Aussparung des Konverters legen – nicht einklemmen! Leuchtenkörper mit mitgelieferten Schrauben (Inbus) auf beide Abstands- halter der Montageplatte schrauben. Dabei darauf achten, dass die Rast- nasen des Leuchtenkörpers (siehe Detail) bündig auf den Abstandshaltern aufliegen.
- Page 16 Installation Schutzfolien entfernen Cover vorsichtig über den Leuchtenarm Click! führen. Im Uhrzeigersinn drehen und arretieren. Der body ist nun fertig montiert. Montage head: Siehe Anleitung head.
- Page 19 Sento faro flat 230V AC Netzanschlussleitung Externer Konverter* Hohlraumdose (bauseitig) Occhio Kabel* Montageplatte body mit Montageplatte Karbongriff Fixierring Cover * Externer LED Konverter (Gleichspannungsquelle) 48V DC, min.30 W...
- Page 20 Installation Externen Occhio Konverter an- schließen: Konverter fachgerecht an die Netzlei- Externer tung anschließen. Occhio Buchse des LED-Anschlusskabels Konverter durch die Hohlraum-/Einputzdose nach außen führen. 230V AC Netzanschluss- leitung Konverter eines Fremdherstellers anschließen (siehe Beiblatt zum Konverter): Konverter Konverter nach Schema an die Netzlei- (Fremdhersteller) tung anschließen.
- Page 21 Sento faro flat Montageplatte an die Hohlraumdose schrauben. Dabei die Buchse des LED-Anschlusskabels durch die Öffnung führen. Darauf achten, dass die Schrauben bündig mit der Montageplatte abschlie- ßen. Cover entgegen dem Uhrzeigersinn lösen und auf dem Leuchtenarm hängen lassen.
- Page 22 Installation Stecker des bodies mit der Buchse des LED-Anschlusskabels verbinden. Kabel mit Steckverbindung in den Hohl- raum zurückführen. Leuchtenkörper mit mitgelieferten Schrauben (Inbus) auf die Montageplat- te schrauben.
- Page 23 Sento faro flat Schutzfolien entfernen. Cover vorsichtig über den Leuchtenarm führen. Click! Im Uhrzeigersinn drehen und arretieren. Der body ist nun fertig montiert. Montage head: Siehe Anleitung head.
- Page 24 Installation...
- Page 25 Sento faro track EUTRAC-kompatible 1- oder 3-Phasen Stromschiene (230 V) 1- oder 3-Phasen Track-Adapter Gehäuse mit cover...
- Page 26 Installation Cover kräftig nach unten ziehen (wird durch Clips gehalten). Track-Adapter am Gehäuse um 90° drehen. Achtung! Vor der Montage alle stromführenden Leitungen vom Stromnetz trennen!
- Page 27 Sento faro track Strahler an der gewünschten Stelle in die Schiene einsetzen. Unbeschrifteten Knebel um 90° im Uhr- zeigersinn schließen. Hiermit wird der Track-Adapter an den neutralen Leiter angeschlossen. Endposition des Knebels: parallel zur Schiene...
- Page 28 Installation Einstellen auf Phase 1 Einstellknebel um 90° im Uhrzeigersinn drehen. Der Track-Adapter ist nun an Phase 1 angeschlossen. Einstellen auf Phase 2 (nur 3- Phasen Track-Adapter) Einstellknebel um 90° gegen den Uhrzeigersinn drehen. Der Track-Adapter ist nun an Phase 2 angeschlossen.
- Page 29 Sento faro track Gehäuse um 90° wie gewünscht nach links oder rechts schwenken. Ausrichtung: Parallel zur Stromschiene. Cover bündig zurückschieben (wird durch Clips gehalten). Schutzfolie von Gehäuse entfernen. Der body ist nun fertig montiert. Montage head: Siehe Anleitung head.
-
Page 30: Wechsel Karbongriff/Fixierring
Wechsel Karbongriff/Fixierring Karbongriff abnehmen Karbongriff nach vorne abziehen. Click! Karbongriff montieren Ausrichtung wie abgebildet. Click! Karbongriff aufstecken. Der body ist nun fertig montiert. Montage head: Siehe Anleitung head. Fixierring (optional) Ausrichtung wie abgebildet. Click! Vor Montage Madenschraube lösen. Fixierring aufstecken und ggf. mit Sechskantschlüssel gegen Verdrehen sichern. -
Page 31: Anhang
Anhang... - Page 32 Pflegehinweise Leuch te nur in abgekühltem Zu stand reinigen! Zur Reinigung der Leuchte ein trocke- nes Mikrofasertuch oder das Occhio Reinigungsmittel verwenden. Info & Kontakt Weitere Fragen beantwortet gerne Ihr Occhio Fachhändler www.occhio.de info@occhio.de...
-
Page 33: Technische Daten
30W pro 26W head Vorschaltgerät up/track Version: integriert über im Kopf integrierten »touchless Sensor« oder: Dimmung up/track Version: per Phasenabschnittdimmer (Liste kompatibler Dimmer: www.occhio.de/dim) flat Version: mit geeignetem Vorschaltgerät Material Leuchte: Aluminium, Stahl verchromt, lackiert oder eloxiert, Kunststoff inserts: Glas, optischer Kunststoff... - Page 35 Sento body faro Mounting instructions flat track...
- Page 37 Contents Safety precautions Product description Assembling the body Changing the carbon rod/ fixing ring Appendix Information Technical data...
-
Page 38: Safety Precautions
Safety precautions Read through the mounting/use General safety precautions instructions carefully before install- ing the luminaire. Follow the safety precautions in these instructions closely and keep the instructions in The assembly and installation of a safe place. electrical components must be car- ried out only by qualified personnel. -
Page 39: Product Description
Product description Thanks to the modular LED head/body up version system, it is possible to combine a head, body and base each with different LED ceiling-mounted luminaire with high base incl. power supply unit (converter) surfaces. The head can be taken off for configura- for mounting on a solid ceiling;... -
Page 41: Assembling The Body
Assembling the body Sento faro up for solid ceilings Sento faro flat for hollow ceiling/plastering box Sento faro track for 1- or 3-phase bus bar... - Page 43 Sento faro up 230 V AC mains cable Mounting plate Occhio converter Body with mounting plate Carbon rod Fixing ring (optional) Cover...
- Page 44 Installation Cut the mains cable to a length of 5 cm and strip the insulation from the ends. 230 V AC mains cable 5 cm Place the mounting plate over the power outlet and against the ceiling, and turn it until the elongated holes are aligned as required.
- Page 45 Sento faro up Open the flap in the centre of the converter. Lock the converter into the mounting plate so that it is fitted flush. At the same time, guide the ends of the mains cable through the converter opening. Click! Connect the ends of the mains cable to Connected separately...
- Page 46 Installation Close the flap of the converter. Click! Undo the cover by turning it anti-clock- wise and let it hang on the luminaire stem. Do not remove the protective film yet.
- Page 47 Sento faro up Insert the plug of the luminaire body into the socket of the converter. Click! Lay the cable in the recess of the con- verter. Do not trap the cable. Screw the luminaire body onto the two spacers of the mounting plate using the screws (Allen) provided.
- Page 48 Installation Removing the protective film Carefully guide the cover over the Click! luminaire stem. Turn clockwise and lock in place. The body is now fully assembled. To assemble the head: See "Assembling the head".
- Page 51 Sento faro flat 230 V AC mains cable External converter* Hollow ceiling box (provided and fitted by customer) Occhio cable* Mounting plate Body with mounting plate Carbon rod Fixing ring Cover * External LED converter (DC voltage source) 48 V DC, min. 30 W...
- Page 52 Installation To connect an external Occhio converter: Correctly connect the converter to the External mains cable. Occhio Guide the socket of the LED connection converter cable to the outside through the hollow ceiling/plastering box. 230 V AC mains cable Connecting a converter from an...
- Page 53 Sento faro flat Screw the mounting plate to the hollow ceiling box. As you do so, guide the socket of the LED connection cable through the opening. Ensure that the screws finish flush with the mounting plate. Undo the cover by turning it anti-clock- wise and let it hang on the luminaire stem.
- Page 54 Installation Connect the plug of the body to the socket of the LED connection cable. Guide the cable with the plug connec- tion back into the hollow ceiling box. Screw the luminaire body onto the mounting plate using the screws (Allen) provided.
- Page 55 Sento faro flat Remove the protective film. Carefully guide the cover over the luminaire stem. Click! Turn clockwise and lock in place. The body is now fully assembled. To assemble the head: See "Assembling the head".
- Page 56 Installation...
- Page 57 Sento faro track EUTRAC-compatible 1- or 3-phase bus bar (230 V) 1- or 3-phase track adapter Housing with cover...
- Page 58 Installation Firmly pull the cover downwards (is held in place by clips). Turn the track adapter on the housing 90°. Caution: Before fitting, disconnect all current- carrying lines from the mains supply.
- Page 59 Sento faro track Fit the spotlight into the track at the desired position. Lock the blank toggle by turning it 90° clockwise. This connects the track adapter to the neutral wire. Final position of the toggle: Parallel to the track...
- Page 60 Installation Phase 1 adjustment Turn the adjusting toggle 90° clockwise. The track adapter is now connected to phase 1. Phase 2 adjustment (3-phase track adapter only) Turn the adjusting toggle 90° anticlockwise. The track adapter is now connected to phase 2. Phase 3 adjustment (3-phase track adapter only) Pull out the adjusting toggle.
- Page 61 Sento faro track Swivel the housing 90° to the left or right as required. Orientation: Parallel to the bus bar. Push the cover back on so it is flush (it is held in place by clips). Remove the protective film from the housing.
-
Page 62: Changing The Carbon Rod/Fixing Ring
Changing the carbon rod/fixing ring Removing the carbon rod Pull the carbon rod off forwards. Click! Fitting the carbon rod Orientation as illustrated. Click! Fit the carbon rod. The body is now fully assembled. To assemble the head: See "Assembling the head". -
Page 63: Appendix
Appendix... -
Page 64: Information
Care instructions Always allow the luminaire to cool down before cleaning. To clean the luminaire, use a dry microfi- bre cloth or the Occhio cleaning agent. Information & contact Your Occhio specialist retailer will gladly answer any other questions www.occhio.de... -
Page 65: Technical Data
Technical data – luminaire Product designation Occhio Sento faro up version Head dia. 123 mm, base dia. 88 mm, H 29 mm Head dia. 123 mm, base dia. 88 mm, H 8 mm track version Head dia. 123 mm, for 1- or 3-phase bus bar... - Page 68 Occhio GmbH Wiener Platz 7 81667 München Fon +49-89-44 77 86 30 Fax +49-89-44 77 86 39 info @ occhio.de www.occhio.de...
Need help?
Do you have a question about the Sento faro Series and is the answer not in the manual?
Questions and answers