Table of Contents
Advertisement
Quick Links
weinor PergoTex II/ PergoTex II LED
Instructions for assembly
Pergola awning with electric drive
Please read these instructions and observe their content and warnings before commencing any
installation work. This information is important for the installation and the proper use of the
material.
Follow the specified installation steps precisely and observe the details and
recommendations.
Only trained personnel may put the constructions into operation.
PergoTex II/ PergoTex II LED
Instructions for assembly
We reserve the right to make technical changes
ENGLISH
Version 9
05.10.2017
Item number
118697-0000
Page 1/66
Advertisement
Table of Contents

Related Manuals for weinor PergoTex II


Summary of Contents for weinor PergoTex II
- Page 1 PergoTex II/ PergoTex II LED Instructions for assembly Pergola awning with electric drive ENGLISH Please read these instructions and observe their content and warnings before commencing any installation work. This information is important for the installation and the proper use of the material.
-
Page 2: Table Of Contents
3.1 Details on adhesives and sealing compound ..............10 4 Product description ....................11 4.1 Schematic diagram of the weinor PergoTex II Basic/ LED ..........11 4.2 Schematic diagram of the weinor PergoTex II/ LED ............12 5 Wall installation ......................13 5.1 Installation of the wall gap sealing profile ................ - Page 3 14 Handover certificate ....................62 15 Declaration of performance ..................63 16 GB EU Declaration of Conformity weinor PergoTex II ........... 64 17 GB EU Declaration of Conformity weinor PergoTex II LED ........65 PergoTex II/ PergoTex II LED Instructions for assembly Version 9 05.10.2017...
-
Page 4: Details On Instructions For Assembly
The weinor PergoTex II has been approved for export and Germany. CE mark We, weinor GmbH & Co. KG, hereby expressly confirm that the weinor PergoTex II complies with the fundamental requirements and other relevant stipulations of the EN standards. -
Page 5: Depiction
Mounting the wall gap sealing profile Determine position Prepare and drill holes PergoTex II/ PergoTex II LED Instructions for assembly Version 9 05.10.2017 We reserve the right to make technical changes Item number... -
Page 6: Safety Instructions
In accordance with VDE 100 safety regulations, electrical work may only be carried out by an electrically skilled person. The installation instructions accompanying the supplied electrical equipment must be observed. PergoTex II/ PergoTex II LED Instructions for assembly Version 9 05.10.2017... -
Page 7: Transportation
The note on the packaging about which way up the construction should be placed must be noted. Lifting with ropes If the weinor PergoTex II needs to be raised to a higher level using ropes, the weinor PergoTex II must be •... -
Page 8: Electrical Connection
2.11 Crushing and cutting zones If the weinor PergoTex II is installed at a height of less than 2.5 metres above areas accessed by people, the weinor PergoTex II may only be operated using a key switch with all moving parts in sight. -
Page 9: Handover
Detailed instruction II on the safe and proper operation of the weinor PergoTex II must be given. If this is not adhered to and the weinor PergoTex II is operated incorrectly, damage or accidents could result. -
Page 10: Fixing Materials
Fixing materials The table below contains an overview of the installation materials you will need foro installation of the weinor roof and where you can obtain them: Material Available Alternative supplier Contact through weinor Standard parts Screws for fixing to the wall... -
Page 11: Product Description
Product description Schematic diagram of the weinor PergoTex II Basic/ LED Figure 1: Schematic diagram of the weinor PergoTex II Basic/ LED Transom 45x60 mm Wall bracket LED spotlight Fabric Transom 80x60 mm Side channel PergoTex II/ PergoTex II LED... -
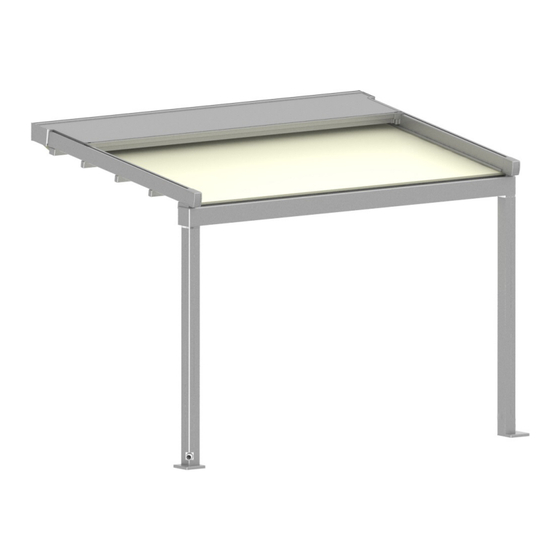
Page 12: Schematic Diagram Of The Weinor Pergotex Ii/ Led
Schematic diagram of the weinor PergoTex II/ LED Figure 2: Schematic diagram of the weinor PergoTex II/ LED Post Transom 80x60 mm Guttering Wall bracket Post plate Safety shield with guttering safety shield LED spotlight Fabric Transom 45x60 mm Side channel... -
Page 13: Wall Installation
Unevenness and slopes on the on-site circuit points Any unevenness and slopes on the on-site circuit points must be levelled out on-site. This is essential to ensure that the weinor PergoTex II is installed correctly. Possible resources / fixings for levelling out unevenness: •... - Page 14 • Hold the wall gap sealing profile and drilled holes firmly against the wall and tighten the corresponding attachment screws. PergoTex II/ PergoTex II LED Instructions for assembly Version 9 05.10.2017 We reserve the right to make technical changes Item number...
-
Page 15: Installation Of Post And Guttering
When cutting, you must ensure that the side of the post with the holes that have been pre-drilled in the factory for the "post connection" is not cut off. Fig. 4: Determining the length of posts PergoTex II/ PergoTex II LED Instructions for assembly Version 9 05.10.2017... -
Page 16: Standard Configuration: Mounting Post With Post Plate
Standard configuration: mounting post with post plate • Different post plates are available for the weinor PergoTex II: "Post plate large outside post", "Post plate small outside post", "post plate large centre post/ wall" and "post plate small centre post/ wall". In this document, only the "post plate large outside post"... - Page 17 3. Screw the post plate (3) with post (4) with two washers 13 (5) and two hex socket head screws M12x40 (6) to the adaptor plate (1). PergoTex II/ PergoTex II LED Instructions for assembly Version 9 05.10.2017 We reserve the right to make technical changes...
-
Page 18: Option: Setting Posts In Concrete
Note: Only when the weinor PergoTex II has been completely installed and aligned can the posts be set in concrete in the foundations. -
Page 19: Installation Of Post And Guttering
"connection post guttering centre/ wall" in constructions with central posts: "Post to guttering connection centre/ wall“ PergoTex II/ PergoTex II LED Instructions for assembly Version 9 05.10.2017 We reserve the right to make technical changes Item number 118697-0000... - Page 20 If the guttering is not very wide, it can be assembled with the post lying on its side and then erected. PergoTex II/ PergoTex II LED Instructions for assembly Version 9 05.10.2017 We reserve the right to make technical changes...
-
Page 21: Installation Of The Side Channels
1. Bolt cover plate for guttering“ (1) to the outside side channel (3) with 1 socket head cap screw M5x12 (2). PergoTex II/ PergoTex II LED Instructions for assembly Version 9 05.10.2017 We reserve the right to make technical changes... - Page 22 (4) (see Detail B). Detail A Wall gap sealing profile Side channel Detail B PergoTex II/ PergoTex II LED Instructions for assembly Version 9 05.10.2017 We reserve the right to make technical changes Item number 118697-0000...
- Page 23 M10x30 (5) is projecting 6.5 mm over the outer edge of the guttering (3) (see Detail A). Detail A PergoTex II/ PergoTex II LED Instructions for assembly Version 9 05.10.2017 We reserve the right to make technical changes...
-
Page 24: Installation Of The Guttering Safety Shield
(6). Consequently, the socket head cap screws M8x20 (5) are only tightened when the complete safety shield has been mounted. PergoTex II/ PergoTex II LED Instructions for assembly Version 9 05.10.2017 We reserve the right to make technical changes... -
Page 25: Alignment Of Side Channels
Align the side channels so that they are parallel and positioned vertically to the guttering and the wall gap sealing profile. If necessary, shift side channels as shown in fig. 6. Figure 5: Alignment of weinor PergoTex II Slightly loosen the socket head cap screws M5x16... -
Page 26: Installation Of Octagonal Shaft And Drive
(1) and mount the octagonal shaft holder on the bearing side (4) to the tube. Bearing side Octagonal shaft holder Drive side bearing side (4) PergoTex II/ PergoTex II LED Instructions for assembly Version 9 05.10.2017 We reserve the right to make technical changes Item number... - Page 27 (9) to the rest of the octagonal shaft (8) with 4 self-tapping screws 4.2x16 (10) Detail C (Detail C). PergoTex II/ PergoTex II LED Instructions for assembly Version 9 05.10.2017 We reserve the right to make technical changes Item number...
-
Page 28: Installation Of The Safety Shield Retaining Profile
Note: weinor If the PergoTex II is equipped with a third side channel in the centre, the retention profile safety shield (1) is delivered in two sections. The surge point is sealed from above with the "retention profile safety shield cover"... -
Page 29: Installation Of The Safety Shield Support Profile
Safety shield reinforcement safety shield with reinforcement on the package insert. profile 100x40 mm Wall gap sealing profile PergoTex II/ PergoTex II LED Instructions for assembly Version 9 05.10.2017 We reserve the right to make technical changes Item number... -
Page 30: Installation Of The Safety Shield Profiles
"safety shield guttering". According to the width of the unit, screw 1 to 2 drilling screws 3.9x13 into the pre- drilled hole(s). PergoTex II/ PergoTex II LED Instructions for assembly Version 9 05.10.2017 We reserve the right to make technical changes... - Page 31 2. Adhere one angle bracket 40x20x2 mm forwards with the 40 mm side to the safety shield or the "safety shield guttering" using adhesive strips. PergoTex II/ PergoTex II LED Instructions for assembly Version 9 05.10.2017 We reserve the right to make technical changes...
-
Page 32: Installation Of Fabric Package With Transoms
6. Put "cover caps for transoms" (4) on both sides of each of the transoms. PergoTex II/ PergoTex II LED Instructions for assembly Version 9 05.10.2017 We reserve the right to make technical changes... - Page 33 (lead entry into transom) is turned outwards. If this is not the case water may accumulate inside the transom. PergoTex II/ PergoTex II LED Instructions for assembly Version 9 05.10.2017 We reserve the right to make technical changes...
- Page 34 Loosen screws M10x16 (4) on the transom fixation. Shift transom fixation (see fig. 7). Tighten screws M10x16 (4) once again. Figure 7: Alignment of the fabric PergoTex II/ PergoTex II LED Instructions for assembly Version 9 05.10.2017 We reserve the right to make technical changes...
-
Page 35: Functional Check
Physical injury Performing functional checks is not without its risks. The following steps must be taken: When ascending the weinor PergoTex II for the first time, its working range and the area below it must be kept clear. A visual inspection of the fixing material and brackets must be performed after the weinor PergoTex II has been ascended for the first time. -
Page 36: Installation Of Wall Sealing Gap Fabric
Velcro fastener connection (3) to the wall gap sealing profile (4) and secure with the other part of the Velcro fastener connection. PergoTex II/ PergoTex II LED Instructions for assembly Version 9 05.10.2017 We reserve the right to make technical changes... -
Page 37: Installation Of Water Drain Outside Post
4. Insert downspout into the clamp (1) (Detail B). Adhesive Adhesive point on drain point on pipe outlet bend PergoTex II/ PergoTex II LED Instructions for assembly Version 9 05.10.2017 We reserve the right to make technical changes Item number 118697-0000 Page 37/66... - Page 38 If the clip profile is seated too loosely, bend it incrementally until the firm seating of the clip profile is ensured. PergoTex II/ PergoTex II LED Instructions for assembly Version 9 05.10.2017 We reserve the right to make technical changes...
-
Page 39: Installation Of The Water Drain Post Centre/ Wall
1. Clip the prepared "clip profile post centre/ wall" (1) onto the post (2). 2. Attach seal (3) to pipe bend (4) or insert into the drainage bore of the clip profile. PergoTex II/ PergoTex II LED Instructions for assembly Version 9 05.10.2017... -
Page 40: Optional) Installation Of Vertitex Guide Rails On Posts
(4) with 2 self tapping screws 3.9x13 (2) and 2 washers 4.3 (3). Detail A PergoTex II/ PergoTex II LED Instructions for assembly Version 9 05.10.2017 We reserve the right to make technical changes... -
Page 41: Installation Of The "Guttering Cover Cap
This facilitates the lead routing for the Vertitex through the chambers of the guttering for example. PergoTex II/ PergoTex II LED Instructions for assembly Version 9 05.10.2017 We reserve the right to make technical changes... -
Page 42: Installation Of The "Wall Cap Sealing Profile Cover Plate" And " Wall Gap Sealingprofile Cover Cap
"safety shield retaining profile" (2) and bolt from above with 2 socket head cap screws M5x10 (3) and 2 washers 5.3 (4). PergoTex II/ PergoTex II LED Instructions for assembly Version 9 05.10.2017 We reserve the right to make technical changes... -
Page 43: Installation Of The "Wall Gap Sealing Profile Top Section
3. Seal to the house wall. Note: weinor If the PergoTex II is equipped with a third side channel in the centre, the retention profile safety shield (1) is delivered in two sections. The surge point is sealed from above with the "retention profile safety shield cover"... -
Page 44: Multi-Section Unit
(1) and bolt with 2 grub screws M5x6 (3). Groove in the wall gap sealing profile for the fixing slider PergoTex II/ PergoTex II LED Instructions for assembly Version 9 05.10.2017 We reserve the right to make technical changes... -
Page 45: Gutter Coupling
(see Chapter 5.2.4). Right guttering section Apply adhesive/ jointing compound to the "guttering coupling" from below PergoTex II/ PergoTex II LED Instructions for assembly Version 9 05.10.2017 We reserve the right to make technical changes Item number... - Page 46 M8 x 40 (3) from below. Note: Secure the guttering and post against falling until the side channels have been mounted. PergoTex II/ PergoTex II LED Instructions for assembly Version 9 05.10.2017 We reserve the right to make technical changes...
-
Page 47: Installation Of The Side Channels For A Multi-Section Unit
(4). With constructions with a projection of more than 3 m all the other coupling panels must also be sealed accordingly. Detail A PergoTex II/ PergoTex II LED Instructions for assembly Version 9 05.10.2017 We reserve the right to make technical changes... -
Page 48: Installation Of The "Safety Shield Retaining Profile Cover
"safety shield retaining profile cover" (4). • Bolt with 2 drilling screws 3.9x13 Torx (5). PergoTex II/ PergoTex II LED Instructions for assembly Version 9 05.10.2017 We reserve the right to make technical changes Item number... -
Page 49: Special Installation Cases
M8 (5) from the front. Detail A View as seen from above • All further mounting steps can be found in the weinor PergoTex II Chapters. PergoTex II/ PergoTex II LED Instructions for assembly Version 9 05.10.2017 We reserve the right to make technical changes... -
Page 50: Roof Installation
The "safety shield retaining profile" can be swivelled when the construction has been mounted to the roof (see Detail B). • All further mounting steps can be found in the weinor PergoTex II Chapters. Detail B PergoTex II/ PergoTex II LED Instructions for assembly Version 9 05.10.2017... -
Page 51: Installation Of The Weinor Pergotex Ii Basic/ Led
Drill holes Ø 8.4 mm into the wall gap sealing profile according to the structural conditions. Observe the dimensions of the long slots in the respective angle bracket. • All further mounting steps can be found in the weinor PergoTex II Chapters. Fig. 8: weinor PergoTex II Basic/ LED Angle bracket... -
Page 52: Electrical Connection
The drive end positions are now regulated. Check that the drive is switched off 1. After the installation of the weinor PergoTex II, check the accurate switching off of the drive. To do so, 3 times run in and ascend to the first transom. -
Page 53: Programming The Somfy Radio
Press the channel on which the light should be taught and teach the light. • Tilt the receiver box on the wall gap sealing profile upwards again (see Chapter Receiver box with LED lighting). PergoTex II/ PergoTex II LED Instructions for assembly Version 9 05.10.2017... -
Page 54: Circuit Diagrams For Connection Of The Adjustment Kit
2 = L brown 3 = not allocated 3 = not allocated PE = Earthing PE = Earthing Figure 9: Circuit diagram weinor PergoTex II with BiConnect without LED Wall connection Power supply *Connect adjustment kit with service lead here... - Page 55 2 = L1 black 3 = L2 brown 3 = L2 brown PE = Earthing PE = Earthing Figure 11: Circuit diagram weinor PergoTex II for conventional design without LED Wall connection Power supply *Connect adjustment kit here LED transom LED transom Commutator to move "UP"...
- Page 56 2 = L brown 3 = not allocated 3 = not allocated PE = Earthing PE = Earthing Figure 13: Circuit diagram weinor PergoTex II for Somfy without LED Wall connection Power supply ** Disconnect light remote-receiver from power supply voltage...
-
Page 57: Cassita Ii With Hirschmann Connection Assembly
Hirschmann connection assembly 2. Mount steel cable tie with countersunk self-tapping screw 4.2x9,5 in the screw groove of the wall gap sealing profile and secure the motor lead. PergoTex II/ PergoTex II LED Instructions for assembly Version 9 05.10.2017 We reserve the right to make technical changes... -
Page 58: Weinor Pergotex Ii Led Lighting
PergoTex II LED lighting 10.1 Safety instructions on LED lamps IMPORTANT Damage to LED spotlights Improper installation and wiring can result in the LED lamps being damaged. To ensure the proper functioning of the soft-start feature - which means full brightness is reached gradually - never connect the LED lighting device when energised. -
Page 59: Fault Analysis
• Clip bar of cover cap for • Press the clip bar together transom is too loose slightly PergoTex II/ PergoTex II LED Instructions for assembly Version 9 05.10.2017 We reserve the right to make technical changes Item number 118697-0000... - Page 60 Red lamp lights up in the • LED spotlight defective • Replace LED spotlight LED spotlight PergoTex II/ PergoTex II LED Instructions for assembly Version 9 05.10.2017 We reserve the right to make technical changes Item number 118697-0000...
-
Page 61: Handover
The instructions must be retained by the customer and passed on to the new owner if ownership of the weinor PergoTex II is passed to a third party. After noting the on-site structural conditions and completing assembly, the installation firm is to inform the end-user whether the wind resistance class given by the manufacturer was achieved after installing the awning. -
Page 62: Handover Certificate
____________________________________________________________________________________________ ____________________________________________________________________________________________ ____________________________________________________________________________________________ *If the customer decides against a formal acceptance of the weinor PergoTex II and begins operating it, the weinor PergoTex II will be deemed to have been accepted The customer has been duly The weinor PergoTex II may be used under the following conditions:... -
Page 63: Declaration Of Performance
Declaration of performance Products: weinor PergoTex II, Textile patio roof Types: Pergola awning weinor GmbH & Co. KG Designed for use in acc. with DIN EN 13561 "Awnings - Performance and safety requirements; German version: 2009-01" Manufacturer: weinor GmbH & Co. KG Mathias-Brüggen-Straße 110... -
Page 64: Eu Declaration Of Conformity Weinor Pergotex Ii
Fabricant Chargé de la documentation Produkt | Produkttyp | Baujahr weinor PergoTex II | Pergola-Markise mit Motorantrieb Product | Producttype | Bouwjaar weinor PergoTex II | Pergola-zonwering met motoraandrijving ab | vanaf | Product | Product type | Year weinor PergoTex II | Pergola awning with motor drive... -
Page 65: Eu Declaration Of Conformity Weinor Pergotex Ii Led
Produkt | Produkttyp | Baujahr weinor PergoTex II LED | Pergola-Markise mit Motorantrieb und integrierter LED Beleuchtung ab | Product | Producttype | Bouwjaar weinor PergoTex II LED | Pergola-zonwering met motoraandrijving vanaf | en geïntegreerde ledverlichting from | à partir de |... - Page 66 GmbH & Co. KG Mathias-Brüggen-Straße 110 50829 Cologne (Germany) www.weinor.com Hotline: +49(0)221/5 97 09-214 Fax: +49(0)221/5 97 09-898 PergoTex II/ PergoTex II LED Instructions for assembly Version 9 05.10.2017 We reserve the right to make technical changes Item number...
Need help?
Do you have a question about the PergoTex II and is the answer not in the manual?
Questions and answers