
Related Manuals for Trakm8 T8


Summary of Contents for Trakm8 T8
- Page 1 The AA Ltd AA Signs Division Installation Documentation Ford Transit Page 1 of 27 Company Confidential Version 1.0...
- Page 2 Overview The Signs division of The AA Ltd require Trakm8 to provide a telematics solution that will monitor, collate and stream data including: CANbus data to show fuel usage Beacons– input zero to monitor when the beacons are operational Green/red switch enclosure – input 1 and input 2 to monitor when sign(s) deployed and collected...
- Page 3 Trakm8 Install Ford Transit Hardware for Ford Transit Hardware required for Ford Transit • Trakm8 T8 • Premium Wiring Loom • GPS Antenna • Fuse Kit (2 x Holder + 1 Amp and 2 Amp fuse) • T-Piece • T-Piece Bracket •...
- Page 4 Trakm8 Install Ford Transit Hardware for Ford Transit Hardware required for Ford Transit • Push button enclosure - GREEN (Deployed) - RED (Collected) • Single LED Driver Feedback Module • Buzzer • 1K Resistor Page 4 of 27 Version 1.0...
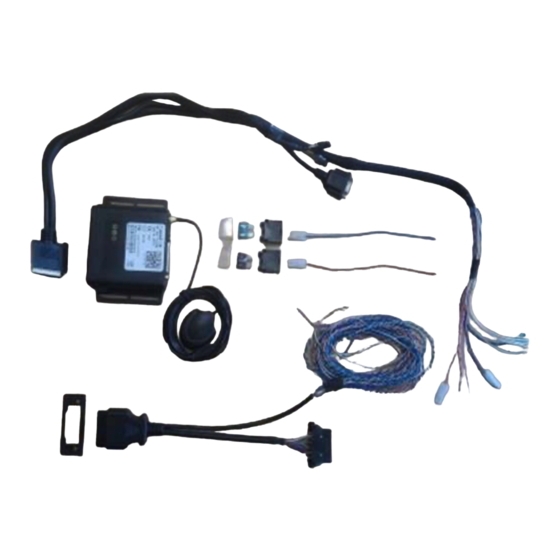
- Page 5 Trakm8 CANbus (T-Piece) Install Complete kit (Pre-installation) This image shows the wires required for installation (Also see wiring notes on page 26) • = Live (12volts on vehicle) • Blue = Ignition on vehicle • Black = Earth to a chassis bolt on vehicle •...
- Page 6 Trakm8 Install Ford Transit Purpose Of Information The purpose of this information is to provide a guide and specification for the installation of the TrakM8 telematics unit into a Ford Transit. This instruction is specific to the Ford Transit. Page 6 of 27 Version 1.0...
- Page 7 Trakm8 Install Ford Transit Overview The key points are: • Buzzer • Main TCU location mounted under glove box behind clocks. • Power pick up points in loom under glove box behind clocks. • Driver Feedback Module in front of clocks •...
- Page 8 Trakm8 Install Ford Transit Secure the Driver Feedback Display • The Driver Feedback Module (DFM) is located onto the left hand side of the driver instrument console as shown. • Thoroughly clean the surface and adhere the DFM to the surface with the adhesive pad supplied.
- Page 9 Trakm8 Install Ford Transit Connect the DFM to the Trakm8 Unit • Attach DFM Molex connectors to the corresponding female Molex connectors the T8 main loom: BLACK/WHITE to BLACK/WHITE BLACK/BROWN to BLACK/BROWN • Neatly store any excess cable alongside the unit.
- Page 10 Trakm8 Install Ford Transit Locate the vehicle OBD socket • Remove the lower dash panel by carefully releasing from the metal clips • Remove the original OBD connecter by removing 2 philips screws. Page 10 of 27 Version 1.0 The AA Signs– Company Confidential...
- Page 11 Trakm8 Install Ford Transit CANbus Pick Up • Cut the T-Piece extension cable to the required length and then identify the green/white and blue/white twisted pair of wires on both the T-Piece and the extension cable and solder accordingly: Blue/White to Blue/White Green/White to Green/White •...
- Page 12 Trakm8 Install Ford Transit Attach the T-Piece to the vehicle OBD socket • Connect the vehicle OBD socket into the T-Piece as shown. • Ensure that the OBD socket locates firmly into the T-Piece and provide additional security with a cable tie •...
- Page 13 • Attach the T-Piece bracket to the Trakm8 OBD socket. Ensure that the plug locates firmly and securely into the bracket. • Locate the Trakm8 OBD socket in the original OBD position. • Secure the bracket in place with the 2 original screws.
- Page 14 Trakm8 Install Ford Transit Removal of dash panels • Remove two philips screws from front of glove box. • Use a trim tool to remove four clips that hold in glove box, then you can unplug cigarette lighter and remove completely.
- Page 15 Trakm8 Install Ford Transit GPS Antenna Mounting • GPS Antenna is to be located on top of the heater vent located right hand side behind glove box. • Secure in place using double sided tape. • Run cable neatly to main T8 location.
- Page 16 • Cut and remove the 2 pin molex connector from the buzzer. Insulate all Buzzer BLACK to T8 connections WHITE/ORANGE T8 RED Buzzer WHITE to T8 RED WHITE/ORANGE (POSITIVE) (POSITIVE) • Solder the connections and insulate firstly with self amalgamating tape then cover with PVC tape.
- Page 17 Trakm8 Install Ford Transit Buzzer Mounting • The buzzer is secured within the driver side glove box. • Secure in place with double sided tape. • Place a small piece of PVC insulation tape across the top of the buzzer hole.
- Page 18 COLLECTED) = GREEN to T8 GREY RED and GREEN switch • GREEN AND RED Positive SWITCH POSITIVE = RED to T8 RED • Solder the connections and insulate firstly with self amalgamating tape then T8 Grey T8 Blue/White T8 Red cover with PVC tape.
- Page 19 Trakm8 Install Ford Transit Pushbutton Enclosure Mounting • Use a trim tool to carefully remove the headlight switch cluster. • The pushbutton enclosure is positioned facing the driver as shown. • Thoroughly clean the surface and adhere the pushbutton enclosure to the surface with the adhesive pad supplied.
- Page 20 BEACONS RED to T8 PURPLE (Input 0) • Extend the beacons wire to the T8 at the front of the vehicle. Page 20 of 27 Version 1.0 The AA Signs– Company Confidential...
- Page 21 Trakm8 Install Ford Transit Beacon Cable route • Remove the A pillar side trim and disconnect the speaker connector shown. • Drop the extended wire from the beacons pickup into the cab area and feed along the headlining to the A pillar.
- Page 22 Ignition = GREY/RED Positive = Red permanent wire on Trakm8 loom = 2 Amp Fuse The ignition feed is located in the loom that runs behind the top of the clocks. Positive...
- Page 23 Trakm8 Install Ford Transit Power Pick Up Connections 12Volt Positive = Red permanent wire on TM8 loom True Ignition = Blue ignition wire on TM8 loom Ignition = 12Volts on engine running and 0Volts on phase 2 ignition engine off. If it is not...
- Page 24 Trakm8 Install Ford Transit Earth/Negative Connection Negative = Black earth wire on Trakm8 loom • Connect the earth/negative wire (Black) of the Trakm8 loom to a purple/black wire going to a 10mm bolt to chassis. Page 24 of 27 Version 1.0...
- Page 25 Trakm8 Install Ford Transit Main Trakm8 unit location • The main Trakm8 TCU is located in the driver side glove box as shown with the label facing towards you. • Secure the unit with 2 self tapping screws. • Mount the unit EXACTLY as shown.
- Page 26 Trakm8 Install Ford Transit Wiring Notes • All wires not used on the T8 loom are to be cut to different lengths (staggered and not touching) and then wrapped using electrical insulation tape • All soldered connections are also required to be...
- Page 27 Commissioning and Completion of Installation • Before contacting Trakm8 to commission the unit start the engine. When the unit has powered up and 3 green trills (GPRS) and 3 green flashes (GPS) have been observed, operate the beacons and pushbuttons to generate an events.
Need help?
Do you have a question about the T8 and is the answer not in the manual?
Questions and answers