Table of Contents
Advertisement
Quick Links
Advertisement
Table of Contents

Related Manuals for DAF DAVIE XDc II

Summary of Contents for DAF DAVIE XDc II
- Page 1 DAVIE XDc II User Manual for Runtime 5.3.0 For Laptops with new VCI only...
-
Page 3: Table Of Contents
WLAN RF exposure ......................3-6 Operation......................4-1 Power-up ........................... 4-1 Start-up and Exit ........................ 4-1 Administrator Login on a newly delivered or installed DAVIE XDc II ......... 4-1 User Login ......................... 4-8 Touchscreen (optional) ...................... 4-9 Use of the Screens ......................4-10 Logout.......................... - Page 4 DAVIE XDc II Contents 6.5.4 Documents ......................... 6-9 6.5.5 Test Plan ..........................6-10 6.5.6 ECU Installation Variants ....................6-11 6.5.7 Direct Test Selection Screen....................6-11 Use of illustrations ......................6-11 6.6.1 Index page.......................... 6-12 6.6.2 Explanation of buttons on the screen ................. 6-13 Guided Diagnosis ....................7-1...
- Page 5 Wireless Communication recovery ..................11-8 11.5 Fault Report to Local helpdesk ..................11-9 Care and Maintenance ..................12-1 12.1 Visual check of the DAVIE XDc II components ..............12-1 12.2 Cleaning the components ....................12-1 12.2.1 Cleaning the laptop......................12-1 12.2.2...
- Page 6 DAVIE XDc II Contents © 200706...
- Page 7 © 200706 DAF Trucks N.V., Eindhoven, the Netherlands In the interest of continuing product development, DAF reserves the right to change specification or equipment at any time without notice. No part of this publication may be reproduced and/or published by printing, photocopying, microfilming or by any other means without the manufacturer's prior permission in writing.
-
Page 9: Safety Notices
DAVIE XDc II Safety Notices SAFETY NOTICES Severe injury or damage may result if unqualified persons attempt to work on the equipment or if the safety notices are disregarded. The safety notices in this operating manual and on the products have the... -
Page 10: Important Safety Notices
Please read the operating and safety instructions which are delivered with the laptop. WARNING If the power cable or DAVIE XDc II is damaged, you must not use the DAVIE XDc II until a qualified specialist has tested and, if necessary, repaired the equipment. - Page 11 Use the DAVIE XDc II only as described in the operating manual. Use only the manufacturer's recommended attachments. WARNING The DAVIE XDc II is a safety class 1 device and is equipped with a safety tested power cable. It may only be connected to systems with equipment grounding conductors (TN systems) and grounding sockets.
- Page 12 DAVIE XDc II Safety Notices © 200706...
-
Page 13: General Information
Likewise, the contents of the dialog screens shown here may differ slightly from those displayed on the screen depending on the version. Safety Instructions Pay attention to the safety instructions for the DAVIE XDc II. They are listed after the table of contents. ©... -
Page 14: Designated Use
DAVIE XDc II will present any risk to property or health and safety. Associated Documents... -
Page 15: Ec Declaration Of Conformity
DAVIE XDc II General Information EC Declaration of Conformity © 200706... -
Page 16: Technical Data
NiMH 4,8V/1100mAh Buffered time Between 20 and 60 sec or no buffering Communication For communication by wire to the DAVIE XDc II Wireless LAN For wireless communication to the DAVIE XDc II via a (internal) wireless network card according 802.11b and 802.11g ©... - Page 17 DAVIE XDc II General Information WLAN module VCI Used WLAN-Module: Frequency Range: WiPort from Lantronix Inc. Type of Transmission: 802.11b/g = 2400 – 2483.5 MHz Transfer Rate: Direct Sequence Spread Spectrum 1/5.5/11 Mbps for 802.11b mode Number of Channels: 6/36/54 Mbps for 802.11g mode 802.11b mode (2400-2483.5 MHz) = 11...
- Page 18 DAVIE XDc II General Information © 200706...
-
Page 19: Components
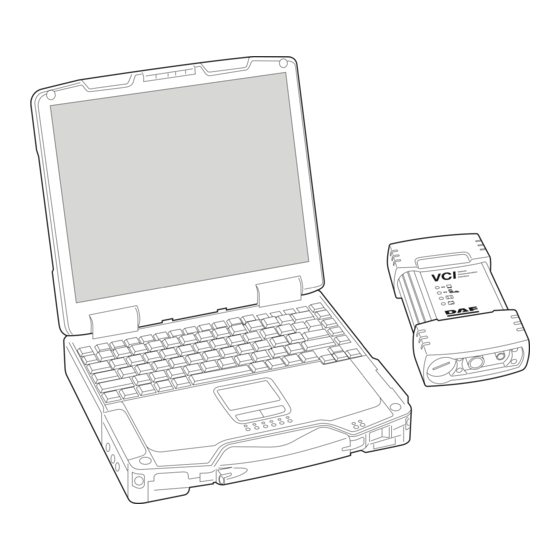
DAVIE XDc II Vehicle Communication Interface (VCI). • VCI Configuration Manager program to set-up the wireless communication between the DAVIE XDc II and the DAVIE XDc II Vehicle Communication Interface (VCI). Figure 3-1 DAVIE XDc II Panasonic CF-19 with VCI DAVIE XDc II Laptop See originally documentation which is delivered with the laptop. -
Page 20: Davie Xdc Ii Software
Components DAVIE XDc II Software For optimal functioning of the DAVIE XDc II, three CD's must be installed. The Runtime, Application and Parts Rapido Subset are needed to operate with the DAVIE XDc II. These CD's are already installed at delivery. - Page 21 DAVIE XDc II Components Figure 3-2 VCI Complete view Figure 3-3 VCI View of the top side of the housing 1. Battery plug 2. Vehicle Diagnostic Cable Connector 3. USB-Connector NOTE Wireless communication is not possible when the USB cable is connected to the VCI.
-
Page 22: Led Status
DAVIE XDc II Components 3.4.1 Led Status Figure 3-4 VCI Front view LED Yellow LED: DAVIE XDc Communication Communication Slow flashing: WLAN-Mode changing Adhoc <--> Infrastructure No communication Blue LED: Vehicle communication Communication Off: No vehicle communication Green LED: VCI Internal status... -
Page 23: Vci Battery
DAVIE XDc II Components NOTE Temperature monitoring is implemented in the VCI. This protects the VCI against damage from overheating. When a critical temperature is reached, the user is warned by a fast flashing red LED. If the user does not react and the temperature rises over the limit value, the VCI is switched off. -
Page 24: Wlan Rf Exposure
DAVIE XDc II Components 3.4.3 WLAN RF exposure This device complies with the FCC RF (radio frequency) Exposure Requirements set forth for an uncontrolled/general population environment. A separation distance of 20 cm between the transmitting antenna and the human body must be assured during normal operating conditions. -
Page 25: Operation
When the DAVIE XDc II is started for the first time the Login button at the right hand margin of the screen and the version information of the Runtime, Application and Parts Rapido Subset is displayed in the upper parts of the screen. - Page 26 DAVIE XDc II Operation Figure 4-2 Start screen before Login To start up the DAVIE XDc II, the DAVIE XDc II Administrator must proceed as follows: 1. Press the "Login" button (see Figure 4-2). 2. The screen in Figure 4-3 is displayed. Under "User ID", enter "ADMIN" and press the "Return button"...
- Page 27 DAVIE XDc II laptop. Press "OK" to continue. Figure 4-4 "Insert dealership code" 6. DAVIE XDc II will terminate the function and return to the start screen. The label of the "Login" button has changed to "Logout" and a new button "Administration"...
- Page 28 DAVIE XDc II Operation Figure 4-5 Start screen after 1st login 7. In the start screen, press the "Administration" button to access the administration menu. 8. Select "Passwords" (see Figure 4-6). Figure 4-6 Administration screen: select function "Passwords" © 200706...
- Page 29 Depending on the different user levels "Senior Technician" and "Master Technician" only those test procedures to which the specific technician level has access to will be displayed by the DAVIE XDc II and implemented by the technician. The Senior Technician can only readout in- and outputs and diagnose. The Master Technician has also the rights to program the ECU's.
- Page 30 DAVIE XDc II Operation Figure 4-8 Keyboard 10.Enter the User Level of "Senior Technician" or "Master Technician" and usernames including the passwords. 11. When all required users are entered, exit the function by pressing the "Back / <" button to return to the "Administration" screen.
- Page 31 Figure 4-10 Keyboard: Dealership Identifier 14.The final basic setting, which could be implemented before starting to work with the DAVIE XDc II, is to change the "Initial graphic", the displayed graphic in the start screen. Use the "Forward / >" button to go step by step through all available "Initial Graphics".
-
Page 32: User Login
User Login Figure 4-11 Start screen: Administrator Login The DAVIE XDc II is ready for use when the system start screen is displayed. The "Help" function can be selected in all modes and provides information on operation and on the functions of the individual navigation buttons. -
Page 33: Touchscreen (Optional)
NOTE The screen reacts to all touch. When using the DAVIE XDc II, make sure it can not be touched unintentionally by any equipment or people. Do not use any other objects than your finger or delivered touch pen to operate the screen. -
Page 34: Use Of The Screens
NOTE If the DAVIE XDc II is not used for a time, the screensaver could be activated. This is a Windows XP setting. As soon as you press the screen near the upper left edge (so as not to unintentionally launch any screen functions), the screen activated last is displayed. - Page 35 In some screens, there is only a single selection of lines possible so, if you select one line, a previously selected line will be automatically deselected. Otherwise, the DAVIE XDc II offers you the option of selecting or deselecting multiple options. Select or deselect all the options you want and confirm it by pressing the "Forward / >"...
-
Page 36: Logout
DAVIE XDc II Operation While the hourglass is displayed, you cannot make any entries. Wait until the pointer returns to the form of an arrow. Buttons (6) Each screen contains different buttons. You can select various functions with these buttons. -
Page 37: How To Switch Wired Or Wireless Communication
DAVIE XDc II, radio and USB communication. Normally the VCI communicates with the DAVIE XDc II by Wireless-LAN radio communication. The safest way to change the communication is to close the DAVIE XDc II program and connect or disconnect the USB-cable. - Page 38 DAVIE XDc II Operation © 4-14 200706...
-
Page 39: Vehicle Identification
DAVIE XDc II Vehicle Identification VEHICLE IDENTIFICATION The DAVIE XDc II has two options for identifying a vehicle and the used systems. • Automatic vehicle identification • Manual vehicle identification The automatic vehicle identification from the truck chassis number and the "Parts Rapido Subset"... -
Page 40: Automatic Identification
Automatic Identification Automatic vehicle identification can be done by the DAVIE XDc II if the truck is equipped with an ECU which stores the necessary data. Another way of automatic vehicle identification is to enter the "chassis number"... - Page 41 DAVIE XDc II Vehicle Identification Figure 5-2 Automatic identification by "Parts Rapido Subset" database © 200706...
-
Page 42: Manual Identification
DAVIE XDc II Vehicle Identification Manual Identification If the chassis number could not be found in the Parts Rapido Subset database, the following message box will appear. It is possible to switch to manual selection by selecting the "Manual" button or to return to the start screen by selecting the "Exit"... - Page 43 DAVIE XDc II Vehicle Identification Figure 5-4 Manual system selection 2. Select one of the listed variants based on the DAF Mainframe or Parts Rapido online, Helpdesk or other similar information. Figure 5-5 Manual system variant selection The selection is marked with a bar. Confirm the selection with the "Forward / >"button.
- Page 44 DAVIE XDc II Vehicle Identification Figure 5-6 System selection, Go to "Installation variants" 3. If more systems need to be selected, use the "Go to" button and select "ECU Installation Variants". The already chosen system installation variants are displayed. Figure 5-7 Overview: manual selection 4.
-
Page 45: Deselect Ecu Installation Variant
Vehicle Identification Deselect ECU Installation Variant After the automatic or manual variant selection is finished, DAVIE XDc II displays the Direct Test or Guided Diagnosis screen. If a system needs to be deselected, use the "Go to" button and select "ECU Installation Variants". - Page 46 DAVIE XDc II Vehicle Identification © 200706...
-
Page 47: Direct Testing
DAVIE XDc II Direct Testing DIRECT TESTING Overview This functionality is primarily used to interrogate and erase ECU fault memory and utilize various in- and outputs, dependant on the relevant test procedures selected. The function "Direct Testing" must also be used for programming and calibrating. -
Page 48: Vehicle Identification
Vehicle Identification Whichever diagnostic function is selected in the Start screen (Direct Testing, Guided Diagnosis), DAVIE XDc II will attempt to identify the vehicle and the system variants automatically by using the chassis number and the Parts Rapido Subset database in the DAVIE XDc II. - Page 49 DAVIE XDc II Direct Testing Figure 6-3 Direct Test: procedure selection To start a selected test procedure, the "Forward / >" button must be activated. If there is no test procedure available, a message will appear. By selecting a procedure with sub-procedures, a sequence of the procedures will be started.
-
Page 50: Executing Test Procedures
DAVIE XDc II Direct Testing Executing test procedures After activating the "Forward / >" button, the selected test procedure will be executed. Figure 6-4 Example of test procedure screen 01 For the functionality of the navigation bar, refer to the explanation of the navigation bar in this chapter. - Page 51 DAVIE XDc II Direct Testing Figure 6-5 Example of test procedure screen 02 NOTE Use the "OK, Not OK or unknown" button to exit the test; otherwise the test is not closed. Do not use the "back / <" button to exit the test.
-
Page 52: Navigation Bar
DAVIE XDc II Direct Testing Figure 6-6 Example of a block diagram Navigation bar By pressing the "Navigation Bar" buttons, the user can quickly navigate to various parts of the program. The buttons "Go To" and "Help" contain Windows type "pull up" menus which are screen sensitive and whose contents change according to the screen currently being displayed. -
Page 53: Go To Button
DAVIE XDc II Direct Testing Go To button During "Direct Testing", various options are available to the user in the pop up menu of the "Go to" button. The contents of the "Go To" menu is dependent on the actual screen. Some examples are listed below:... -
Page 54: Exit
Direct Testing 6.5.1 EXIT This option exits the current test, ends the diagnostic session, and displays the DAVIE XDc II start screen Figure 6-1. Figure 6-9 Warning : Exit operation mode 6.5.2 Health Check The option "Health Check" is only displayed within the "Go To" button in the "ECU Installation Variants"... -
Page 55: Documents
DAVIE XDc II Direct Testing 6.5.4 Documents During testing, various documents can be displayed, such as drawings for connectors, wiring diagrams or even instruction sheets. These documents are "linked" to the system at relevant points during testing. For example, if a test is being performed on a connector, a schematic of this connector, showing the various pin connections, could be viewed. -
Page 56: Test Plan
The option "Test plan" is available during a diagnostic session. This plan is organized by the DAVIE XDc II to provide useful information guiding the user to a correct diagnosis as quickly as possible. The "Test plan" and the results will be saved into the log file. -
Page 57: Ecu Installation Variants
Figure 6-12 Selection of block diagram button in "Direct Test" By pressing the corresponding button, "Adobe Acrobat©" will start up separate of the DAVIE XDc II program. An index page could appear before the illustrations are displayed. ©... -
Page 58: Index Page
DAVIE XDc II Direct Testing 6.6.1 Index page In the index page the chassis number can be selected for the appropriate illustrations. Figure 6-13 Example of an "Index Page" All blue items have a link to illustrations. Figure 6-14 Example of a "Block diagram"... -
Page 59: Explanation Of Buttons On The Screen
DAVIE XDc II Direct Testing 6.6.2 Explanation of buttons on the screen The buttons can be divided in two categories: 1. Actions on one document concerning zoom functions 2. Actions between documents Actions between documents Green round arrows at the bottom of the screen: With this buttons the previous document can be entered in the list of documents which were already open. - Page 60 DAVIE XDc II Direct Testing © 6-14 200706...
-
Page 61: Guided Diagnosis
DAVIE XDc II Guided Diagnosis GUIDED DIAGNOSIS Principle op of Guided Diagnosis Guided Diagnosis is primarily used to determine (point out) the possibly defective elements (components). Where the function "Direct Testing" has to be used for programming, calibrating or to directly test specific components, "Guided Diagnosis"... -
Page 62: Starting Guided Diagnosis
Vehicle Identification Whichever diagnostic function is selected in the Start screen (Direct Testing, Guided Diagnosis), DAVIE XDc II will attempt to identify the vehicle and the system variants automatically by using the chassis number and the Parts Rapido Subset database in the DAVIE XDc II. -
Page 63: Guided Entry
DAVIE XDc II Guided Diagnosis Guided Entry There two different main methods to build a test plan to solve the problem on the truck. Guided entry with: • Fault codes (present in the ECU Fault Memory) • Symptom (deviant behaviour of the truck) Select the entry you want to use and it turns press the "Forward / >"... -
Page 64: Health Check
DAVIE XDc II Guided Diagnosis Figure 7-3 Health Check 7.5.1 Health Check The "Health Check" reads out all present Fault codes from the ECU fault memory for all selected Systems, which are available on the vehicle. When the ECU is being read out a "<==" will be displayed in blue colour on the screen. -
Page 65: Guided Entry With A Symptom
DAVIE XDc II Guided Diagnosis Guided entry with a Symptom This "Symptom Based" method uses the selected symptom to determine which elements (components) are suspected to be defective. Figure 7-4 Symptom selection based on repair group or observation When "Symptom Based" the first option is chosen, a list of "Vehicle function based symptom"... - Page 66 DAVIE XDc II Guided Diagnosis Figure 7-5 Systems with Symptoms for Guided Diagnosis When the group of choice is selected the list will unfold to an overview of “Symptoms” or “Symptom groups”. Figure 7-6 Select Symptom The "Forward / >" button will appear at the bottom of the screen. Now it is possible to add the selected symptom to the “Test plan”.
-
Page 67: Test Plan
DAVIE XDc II Guided Diagnosis Test plan 7.7.1 Test plan Overview All detected faults or selected symptoms are displayed on this screen Select the (grouped) fault or symptom you want to solve. Figure 7-7 Test plan Overview after "Health Check"... -
Page 68: Building A Test Plan Based On Fault Codes And Symptoms
DAVIE XDc II Guided Diagnosis Once the selection is made, press the "Forward/ >" button. Guided will be configured to set up the tests. Figure 7-9 Configuration of Guided Diagnosis 7.7.2 Building a Test plan based on Fault codes and Symptoms This method uses not only the read out Fault codes but also extra selected Symptoms to determine which elements are suspected to be defective. -
Page 69: Test Plan Screen Lay Out
DAVIE XDc II Guided Diagnosis Figure 7-10 Select Symptom Report 7.7.3 Test plan screen lay out Figure 7-11 Test plan © 200706... -
Page 70: Executing Tests
DAVIE XDc II Guided Diagnosis The screen is divided in two sections: • The upper half displays the Suspected Elements Which elements are suspected is purely based on the read out Fault codes and selected Symptoms. The elements are sorted on the level of suspicion;... -
Page 71: Direct Test
DAVIE XDc II Guided Diagnosis NOTE It is very important for Guided Diagnosis that the answers and implicitly at the end of the test is corresponding with the vehicle behaviour. Incorrect answers will lead to a different suspected element. 7.7.4.1... -
Page 72: Measurement Test
DAVIE XDc II Guided Diagnosis Figure 7-14 Test to research presence of Symptom 7.7.4.3 Measurement Test When a measurement test is proposed, Guided Diagnosis would like to have more information on the status of wiring and components. In most cases it would be a test to determine the voltage on a connection. -
Page 73: Function Component Selection
DAVIE XDc II Guided Diagnosis 7.7.5 Function Component selection With Guided Diagnosis it is also possible to test a component individually or to select a test which is linked to other components then the currently listed in the Test plan. Adding extra information, into the reasoning mechanism, may be useful to guide you quicker to the defect. - Page 74 DAVIE XDc II Guided Diagnosis Figure 7-17 List of linked components From this list any component can be selected. After selecting a component, by pressing the "Forward / >" button in the bottom right of the screen, the User Test plan is added to the Test plan screen.
-
Page 75: Extra Options
DAVIE XDc II Guided Diagnosis If there is only one test available for the selected component the user Test plan is started directly after continuing from the component selection screen. Figure 7-19 Test plan including user Test plan Extra options 7.8.1... -
Page 76: Deselecting Systems
DAVIE XDc II Guided Diagnosis Figure 7-20 Fault memory content This screen displays the currently present Fault codes. Equal to Direct Testing every Fault code is represent with a Fault code number and text. 7.8.2 Deselecting Systems In order to leave one or more Systems out of the Test plan, deselect those Systems before performing the Health Check. -
Page 77: Suspend Session
DAVIE XDc II Guided Diagnosis Figure 7-21 Deselected Variant By touching the variant names, it is possible to deselect and reselect Systems and variants from the list. " A selected System is marked by a black bar and / or "... - Page 78 DAVIE XDc II Guided Diagnosis Figure 7-22 Select Suspend When selecting suspend, a screen will be displayed with the options: • Pause: This will stop the work only temporarily, and it will not be possible to do anything else, until the pause is ended.
- Page 79 DAVIE XDc II Guided Diagnosis To continue with a previously suspended session, it is required to select the option "Diagnosis Job" from the "Go to" menu in the ECU installation variants screen. Figure 7-24 Select Diagnosis Job When selecting "Diagnosis Job", a screen with the diagnostic jobs will appear.
- Page 80 Figure 7-26 Connect DAVIE XD to the correct vehicle After connecting the DAVIE XDc II to the vehicle, via the VCI, and pressing "OK" in this screen, Guided Diagnosis will continue reasoning from the latest Test plan screen, where Guided Diagnosis was suspended.
-
Page 81: Quitting Guided Diagnosis
DAVIE XDc II Guided Diagnosis Quitting Guided Diagnosis When Guided Diagnosis is finished, it is possible to end it by selecting "Exit" from the "Go to" pop-up menu in any screen. When exiting, a screen will appear to inform that is possible to reset the Fault codes from the units. - Page 82 DAVIE XDc II Guided Diagnosis © 7-22 200706...
-
Page 83: Administration
DAVIE XDc II Administration ADMINISTRATION Overview Administration groups together basic set-up functions for the DAVIE XDc II. To access all Administration settings, you must login as administrator. The following Administration functions are available for the administrator: • "Install update": Installation of update 1st language. - Page 84 DAVIE XDc II Administration Figure 8-1 Start screen after login as the administrator Choose this button in the start screen, the DAVIE XDc II will offer a list of accessible functions (see Figure 8-2). Administrator Master Senior Technician Technician Install Update...
-
Page 85: Select Function
Select any function with the selection bar. This calls up a screen in which you can edit the function. In the top right-hand information window, the DAVIE XDc II equipment number and the dealership code are displayed automatically as soon as it has been entered. -
Page 86: Install Update
CD's or you can update via the Dealernet. 8.4.1 Install update of a new Runtime CD: For the update of the DAVIE XDc II application, a separate instruction will be send along with the Runtime update CD. 8.4.2 Install update of a new delivered Application CD: 1. - Page 87 7. Remove the CD from the drive. NOTE You can only load CDs that are no older than the period of validity set by DAF. CDs older than that will be rejected. Any second language that was previously installed will be deleted during an update.
-
Page 88: Install A Second Language
DAVIE XDc II Administration 8.4.3 Install a second language By selecting "Install update", you can also initiate the installation of a second language with the same version as the first language. This is only necessary if a second language is to be used on the same DAVIE XDc II. -
Page 89: Install Update Of A New Parts Rapido Subset Cd
Figure 8-8 Confirm for Parts Rapido Subset installation 3. Press "OK" to install the selected update. 4. The Parts Rapido Subset will be installed on the DAVIE XDc II. A progress indicator allows you to track the installation process. As soon as it is finished, the DAVIE XDc II jumps to the start screen. -
Page 90: Install Update From Parts Rapido Online
1. Copy the unzipped files to the media (do not use a space in the folder name). 2. Insert the media you want to use in the DAVIE XDc II. 3. Select the function "Install update". 4. If the files have not been copied to the root of the media a screen pops up. -
Page 91: Dealership Identifier
DAVIE XDc II Administration Dealership identifier The DAVIE XDc II could be assigned your with a dealership identifier to easily identify the DAVIE XDc II. When the function has been selected with the selection bar, an alphanumeric keyboard appears on screen. Use the "SH" button to switch between a keyboard with upper case and special characters or with lower case characters and numbers. -
Page 92: Version Information
DAVIE XDc II Administration Figure 8-11 Select "Initial Graphic" Version information When you select the "Version information" function in the function list, the screen displays version information about the installed Runtime, Application and Parts Rapido Subset. © 8-10 200706... -
Page 93: Contents Of Application Data
NOTE This function is only available when logged in as administrator. In the "Passwords" screen, users of the DAVIE XDc II system and passwords can be added and changed. All entered users are displayed with their hidden passwords and user levels. -
Page 94: Log Files
Depending on the different user levels "Senior Technician" and "Master Technician" only those test procedures to which the specific technician level has access will be displayed by the DAVIE XDc II and implemented by the technician. Only the Administrator has the right to the Password settings. - Page 95 DAVIE XDc II Administration Figure 8-14 Example of the "Windows Explorer screen" Figure 8-15 Example of the "Content of a logfile" © 200706 8-13...
-
Page 96: Helpdesk Log Files
The 'Helpdesk Log files' equal as the "Logfiles" but saved in the English language. NOTE These files are very valuable for the Helpdesk. If the DAVIE XDc II generates an error, please send the corresponding "Helpdesk Log Files" to the Helpdesk. 8.13 Vehicle test Files This function works like "Log Files"... -
Page 97: Vci Configuration Manager
The tray icon is similar to the VCI symbol on the front side of the housing and is shown in the system tray. The tray icon displays the status of the VCI connection. The standard functionality connection status between DAVIE XDc II and VCI: - White: Disconnected - Blue:... - Page 98 DAVIE XDc II VCI Configuration Manager Figure 9-2 VCI Tray Icon double left click Single click right With a click on the VCI tray icon with the right mouse button a context menu is displayed with the following sections: •...
-
Page 99: Start Up The Vci Configuration Manager Program
VCI Configuration Manager Start up the VCI Configuration Manager Program First close the DAVIE XDc II application before start up the VCI Configuration Manager with the shortcut in the Windows Start menu or double-click the VCI Tray Icon in the System Tray. - Page 100 VCI is connected by USB. Tester Firmware Version This shows the version of the VCI firmware which is installed on the DAVIE XDc II. Tester Software Bundle This shows the version of the VCI Software which is installed on the DAVIE XDc II.
-
Page 101: Basic Setup
The firmware version may only differ from the DAVIE XDc II and VCI right after a VCI software update on the DAVIE XDc II. The firmware on the VCI will be updated when the DAVIE XDc II application is started next time. This update takes approximately one minute time. -
Page 102: Advanced Setup
NOTE The "Advanced Setup" only configures the VCI settings. Configuration of the DAVIE XDc II must be set using programs provided by Windows or the manufacturer of your WLAN network adapter hardware. Therefore only use the Advanced Setup when you have knowledge about Windows XP and wireless network settings. - Page 103 DAVIE XDc II VCI Configuration Manager First connect the USB cable between the VCI and the DAVIE XDc II and connect the VCI with the Vehicle Diagnostic Cable to the vehicle before selecting the "Advanced Setup" screen. Figure 9-7 Advanced Setup screen...
- Page 104 DAVIE XDc II VCI Configuration Manager Wireless Network Security Security None: No encryption: no security. WEP: Wired Equivalent Privacy: basic security WPA: Wi-Fi Protected Access: high security (only available in infrastructure networks). Authentication WEP: Open / None: no authentication / Shared: shared key authentication (not recommended as it offers a security vulnerability).
-
Page 105: Common Settings
DAVIE XDc II VCI Configuration Manager ARP Cache (sec.) Address Resolution Protocol Cache expiration time: TCP Parameter, onlyused by Network Administrators. TCP Keepalive Time (sec) TCP Parameter, only used by Network Administrators. Connection Management Enabled: Connection Management is active. Two profiles ("Preferred"/"Alternative") are supported. - Page 106 VCI Configuration Manager Only the language for the user interface of the Configuration Manager can be selected independent of the connection of the VCI to the DAVIE XDc II. All other settings are only available with USB connection. Figure 9-8 Common Settings screen...
- Page 107 DAVIE XDc II VCI Configuration Manager Buffer Time Time the built-in battery buffers VCI during the vehicle ignition is switched off. The buffer time for ignition status handling can be chosen between 20 and 60 seconds in steps of one second. The default setting is 20 seconds.
- Page 108 DAVIE XDc II VCI Configuration Manager © 9-12 200706...
-
Page 109: Help
Buttons 10.2 Start Help The "Help" button appears on every screen on the DAVIE XDc II. It is always in he same place on the navigation bar. Press it if you need more information about a screen or a button. -
Page 110: Help Overview
DAVIE XDc II Help 10.3 Help Overview The "Help overview" dialog box appears when you start "Help" mode. It contains a list of one or more topics for which a brief explanation is available. A selection bar highlights the current topic. -
Page 111: Help On Topics
DAVIE XDc II Help 10.4 Help on Topics The help text will be displayed when you open a topic. This explains the options you have in the current screen. There you can see what you can do in the screen and the links to other screens. -
Page 112: Help On The Selected Button
Help on the selected button You can get help for any button in any screen. Press any button while the DAVIE XDc II is in "Help" mode and a brief explanation of the button's meaning and use will appear on the screen. Close the "Help overview"... -
Page 113: Troubleshooting
Helpdesk. 11.1 Classification Any problems that the DAVIE XDc II may have can be classified into the following groups: • Problems related to ambient influences: ambient temperature, (extreme) humidity, dust, soot, grease, sparking, power supply, transformers, large electric motors, two-way radio equipment and vibration. -
Page 114: Computer Hardware
To solve this problem, use the original documentation which is delivered with the laptop. WARNING If the power cable or DAVIE XDc II is damaged, you must not use the cable until a qualified specialist has tested and, if necessary, repaired the equipment. WARNING The power cable must not be laid over tables, benches or cabinets. -
Page 115: Touchscreen (Optional)
DAVIE XDc II Troubleshooting WARNING DAVIE XDc II is a safety class 1 device and is equipped with a safety tested power cable. It may only be connected to systems with equipment grounding conductors (TN systems) and grounding sockets. WARNING To reduce the risk of electric shock, do not use on wet surfaces or expose to rain. -
Page 116: Cd Incompatible With Base-Cd
Solution: Place CD in DVD drive CD is damaged. Solution: Insert an undamaged DAVIE XDc II CD into the DVD drive and try again. DVD drive not initialized. Solution: Check if the drive is inserted correctly. Files are not copied to the location on the Floppy, CD-R or USB-stick where DAVIE XDc II expects them. -
Page 117: Problems With Vehicle Communication Interface (Vci)
DAVIE XDc II Troubleshooting Figure 11-3 Error Message Application Data Solution: - Install latest DAVIE XDc II Application and Parts Rapido Subset CD - If the problem still exists, contact the local helpdesk and send a "Helpdesk Log File" 11.4 Problems with Vehicle Communication Interface (VCI) 11.4.1... -
Page 118: Vci Configuration Manager Self-Test Error List
NOTE For the wireless communication test, the USB connection has to be removed and a working WLAN-profile on the DAVIE XDc II and the matching settings on VCI are assumed. Refer to chapter "VCI Configuration manager". Before using the "VCI Configuration Manager" to carry out the self-test for the Vehicle Communication Interface, close the DAVIE XDc II program. - Page 119 DAVIE XDc II Troubleshooting Test Item Value Meaning Action FLASH No action needed Not OK Contact the local helpdesk K-Line No action needed Transceiver Not OK Contact the local helpdesk L-Line No action needed Transceiver Not OK Contact the local...
-
Page 120: Wireless Communication Recovery
Troubleshooting 11.4.3 Wireless Communication recovery The DAVIE XDc II communicates with the ECU's installed in the truck via the truck side "Diagnostic Connector" by using a special communication interface, called the Vehicle Communication Interface (VCI). The VCI switches the input channel automatically to the required data line (K-line, L-line) or CAN-bus of the truck side "Diagnostic Connector". -
Page 121: Fault Report To Local Helpdesk
DAVIE XDc II Troubleshooting 11.5 Fault Report to Local helpdesk If you cannot fix or resolve the problem, please contact the Helpdesk by phone or by e-mail. Describe the fault characteristics (message, etc.) as precisely as possible, when it occurred and what you were doing when it occurred, what you have... - Page 122 DAVIE XDc II Troubleshooting © 11-10 200706...
-
Page 123: Care And Maintenance
CARE AND MAINTENANCE 12.1 Visual check of the DAVIE XDc II components Regularly carry out a visual check of all DAVIE XDc II components. Check all parts for damage (e.g. cracks, etc.) and dirt contamination. CAUTION Regularly check all cables for damage. -
Page 124: Batteries
If it is necessary to replace the VCI battery because the battery is faulty, then follow the procedure below: 1. Disconnect the VCI from the vehicle and DAVIE XDc II. 2. Remove the battery plug by turning the plug counter clockwise with a big screwdriver. - Page 125 DAVIE XDc II Care and Maintenance 5. Install the battery plug. The battery enclosure cap must be screwed tightly. This can be best realised by using a big screw driver. Disposal procedure: • Faulty and worn out batteries must be disposed in accordance with the currently applicable national regulations.
- Page 126 DAVIE XDc II Care and Maintenance © 12-4 200706...
Need help?
Do you have a question about the DAVIE XDc II and is the answer not in the manual?
Questions and answers