Table of Contents
Advertisement
Advertisement
Table of Contents

Summary of Contents for Surgiquest AirSeal iFS
- Page 1 Instructions for use...
- Page 2 Users of SURGIQUEST products should not hesitate to point out to us any er- rors or unclarities in this manual. Copyright © SURGIQUEST, Inc.
- Page 3 Symbols Follow instruc- tions for use Serial number Stop Start (white image on a blue background) Date of manufac- Consult instruc- ture (YYYY- Home Reset key tions for use MMDD) Not made with Use by date Caution Menu natural rubber (YYYY-MMDD) latex Electrostatic sen-...
-
Page 5: Table Of Contents
Table of contents Important User Notes ................................. 3 Safety Information................................4 Hazards......................................4 Device Purpose..................................7 Device-inherent Dangers ............................... 7 Initial Device Startup ................................12 Device Setup and Connection............................... 12 Gas Connection..................................13 4.2.1 Connecting a Gas Cylinder..............................14 4.2.2 Connecting to Central Gas Supply............................ - Page 6 AirSeal® iFS Warranty ................................. 52 Test Log....................................53 16.1 Test Log......................................53 16.2 Return Form ....................................54 Index ....................................55...
-
Page 7: Important User Notes
Important User Notes Important User Notes Read the instructions for use carefully and become familiar with the operation and function of the device and the accessories before use during surgical proce- dures. Non-observance of the instructions listed in this manual can lead •... -
Page 8: Safety Information
Intended use The SurgiQuest AirSeal® iFS System is intended for use in diagnostic and/or ther- apeutic endoscopic procedures to distend a cavity by filling it with gas, to estab- lish and maintain a path of entry for endoscopic instruments and to evacuate surgical smoke. - Page 9 Safety Information WARNING! Technique and procedures Only the physician can evaluate the clinical factors involved with each patient and determine if the use of this device is indicated. The physician must deter- mine the specific technique and procedure that will accomplish the desired clin- ical effect.
- Page 10 Safety Information WARNING! Sterile mediums and accessories Always work exclusively with sterile substances and mediums, sterile fluids, and sterile accessories if so indicated. WARNING! Replacement device and accessories In case the device or any of the accessories fail during surgery, a replacement de- vice and replacement accessories should be kept within close proximity to be able to finish the operation with the replacement components.
-
Page 11: Device Purpose
Device Purpose Device Purpose The SurgiQuest AirSeal® iFS System is intended for use in diagnostic and/or ther- Intended use apeutic endoscopic procedures to distend a cavity by filling it with gas, to estab- lish and maintain a path of entry for endoscopic instruments and to evacuate surgical smoke. - Page 12 Device Purpose WARNING! Contamination Do not use device and/or accessories if signs of contamination are detected. Make sure the device or/and accessories can no longer be operated until a qual- ified service technician conducts the appropriate tests and repairs. WARNING! Fatigue symptoms When there is a high level of CO consumption, you should make sure to supply...
- Page 13 Device Purpose 60601-2-18 for endoscopic devices and IEC 60601-1 / EN 60601-1 for electrical medical devices. All configurations have to comply with IEC 60601-1 / EN 60601- 1 specifications. Whoever connects additional equipment to signal output or sig- nal input is considered the system configurator and as such is responsible for complying with requirements of the standard IEC 60601-1 / EN 60601-1.
- Page 14 Device Purpose WARNING! Lowest flow and pressure Depending on age and health condition of the patient, the smallest possible flow and pressure for establishing the pneumoperitoneum or pneumorectum should be selected. It is not recommended to exceed insufflation pressures of 15mmHg in colo-rectal procedures.
- Page 15 Device Purpose CAUTION! Electrical interference This device was tested for electrical safety and electromechanical compatibility. However, if you detect or suspect such interference, please follow these sugges- tions: • Move this, the other or both devices to a different location •...
-
Page 16: Initial Device Startup
Initial Device Startup Initial Device Startup The operation of the device AirSeal® iFS is reserved for medical staff with the rel- evant professional qualifications trained to use the device. Delivery inspection Always check all parts and accessories of the device immediately after receiving the shipment. -
Page 17: Gas Connection
Initial Device Startup CAUTION! Ventilation of the device Avoid device overheating. Ensure free air circulation especially to the bottom and rear of the device (rear panel distance of at least 10 cm). CAUTION! Position the device in such a way that it is easy to operate and switch off. CAUTION! Place the device outside the sterile field. -
Page 18: Connecting A Gas Cylinder
Initial Device Startup nection or connect to centralized CO gas supply. 4.2.1 Connecting a Gas Cylinder CAUTION! Always use a high-pressure hose to connect gas cylinder and device. The gas cylinder must be in a vertical position. The gas bottle pressure may not exceed 80 bar/1160 psi. -
Page 19: Gas Consumption Display
Initial Device Startup 1. Attach the high-pressure hose to the gas connection 2. Fasten the high-pressure hose with the nut 3. Tighten the nut 4. Power on device 5. Select MENU 6. Select Gas supply and choose HOUSE GAS Mode in menu NOTE! The default gas settings are selected at the factory and should be changed as necessary by the user. - Page 20 Initial Device Startup House gas supply pressure OK House gas supply pressure too low...
-
Page 21: Operating The Device
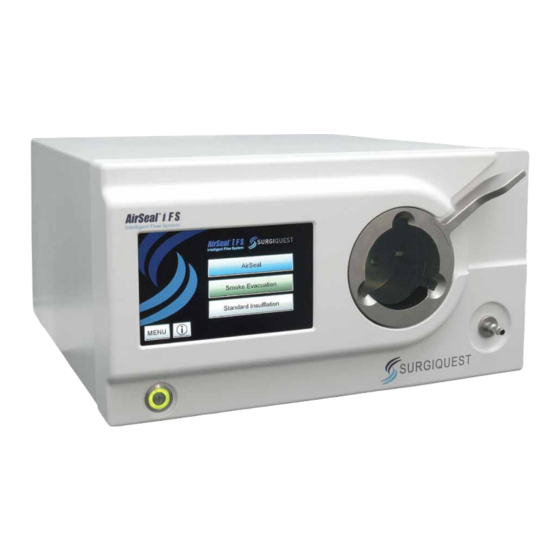
Operating the Device Operating the Device Device Front Familiarize yourself with the control and function elements at the front of the de- vice. Fig. 5-1 Front of the Device ON/OFF switch Touch screen display Receptacle for AirSeal and Smoke Evacuation Modes Lever for locking tube set in place Insufflation tube connection for Standard Insufflation Mode... -
Page 22: Display
Operating the Device Display Fig. 5-4 Display Nominal gas flow rate level 1 Actual flow rate display Nominal gas flow rate level 2 (10) Nominal gas flow rate level 3 Decreasing nominal pressure Actual pressure display (11) Nominal pressure display (12) (13) Increasing nominal pressure... -
Page 23: Selecting Operating Mode
Tri-lumen tube • Tri-lumen tube only for use with AirSeal® Access Port Filter Single Lumen Adapter SurgiQuest Single Lumen AirSeal® Single Lumen Adapter Adapter • Short section of tube for use with a Veress needle or conventional cannula with the Tri-... -
Page 24: Starting/Stopping Insufflation
Operating the Device SurgiQuest AirSeal® Blunt Tip Obturator (hereafter referred to as Blunt Tip Obtu- rator) SurgiQuest AirSeal® Cannula (hereafter referred to as AirSeal® Cannula) AirSeal® Cannula and Low Profile Obturator with Blade- less Optical Tip (hereafter referred to as AirSeal® Access... -
Page 25: Power Device Off
Operating the Device 5.5.4 Power Device Off Use the ON/OFF button to turn the device off. CAUTION! Disconnection from the power supply is only guaranteed if the mains plug is pulled from the mains wall socket. -
Page 26: Using And Controlling The Airseal® Ifs In Its Different Modes
Using and Controlling the AirSeal® iFS in its Different Modes Using and Controlling the AirSeal® iFS in its Different Modes The device can be used with three different insufflation operating modes (see 5.5.2 "Insufflation Tube Sets"): 1. AirSeal Mode: Insufflation with Tri-Lumen Filtered Tube Set and AirSeal® Ac- cess Port. -
Page 27: Initial Insufflation
Using and Controlling the AirSeal® iFS in its Different Modes • Blunt obturator with suture anchor Fig. 6-2 AirSeal® Blunt Obturator with Suture Tie Down Blunt obturator Cannula Manifold plug Spring anchor • cannula and Low Profile Obturator with Bladeless Optical Tip Fig. - Page 28 Using and Controlling the AirSeal® iFS in its Different Modes 2. At the conclusion of the initial self test, insert the Tri-Lumen Filtered Tube Set and AirSeal Mode will automatically launch. Alternatively, press the AirSeal Mode key to select this operating mode. Inserting the Tri-Lumen Filtered Tube Set •...
- Page 29 Using and Controlling the AirSeal® iFS in its Different Modes seconds. Increasing the nominal pressure to > 15 mmHg: Status line depicts the message: Safety threshold: Pressure >15 mmHg! This is where the recommended range for intra-abdominal and colorectal pressure ends. Release the key for 2 seconds, then pressure can be increased above 15 mmHg.
-
Page 30: Smoke Evacuation Mode
Using and Controlling the AirSeal® iFS in its Different Modes Initial Insufflation with AirSeal® Access Port • Remove the manifold plug from the bullseye manifold on the AirSeal® Access Port. Connect the Tri-Lumen Tubing connector to AirSeal’s bullseye manifold by turning the Tube Set and tighten. •... - Page 31 Using and Controlling the AirSeal® iFS in its Different Modes sterile technician. • Connect the Luer lock connector of the clear tube to the conventional can- nula. Open the inflow valve/stopcock. • Follow prompts on iFS. When instructed, connect the Luer lock connector of the blue tube to a different conventional cannula to activate smoke evacu- ation.
-
Page 32: Standard Insufflation Mode
Using and Controlling the AirSeal® iFS in its Different Modes to a second cannula and open the stopcock. NOTE! For the safety of the patient, it is advised to start intra-abdominal insufflation with a Veress needle and at the lowest flow rate (level 1, key (1)). Exchange the Veress needle with a conventional cannula once the nominal pressure is reached and the initial insufflation phase ends. - Page 33 Using and Controlling the AirSeal® iFS in its Different Modes ble during insufflation or while insufflation is stopped. Setting nominal flow: The device features three different flow level rates that can be adjusted in the user menu (see chapter 8 "User Menu" for additional information). The facto- ry defaults are: Level 1 ->...
- Page 34 Using and Controlling the AirSeal® iFS in its Different Modes WARNING! Backflow Body secretions or contaminated gas may backflow into the device through the insufflation tube if • a filter is not used, • the actual pressure is higher than the nominal pressure or •...
-
Page 35: Safety Functions
Safety Functions Safety Functions General Safety Functions The device is equipped with an automatic venting system. Venting system When the insufflator detects that the nominal pressure was exceeded by more than 3 mmHg for longer than 3 seconds, it automatically activates the venting system. -
Page 36: Safety Functions In Airseal Mode
Safety Functions Safety Functions in AirSeal Mode Stop insufflation / System calibration The pressure is reduced slowly before the system comes to a complete stop when stopping AirSeal® insufflation. When procedure is completed, AirSeal Mode will undergo a final calibration prior to shut down. -
Page 37: User Menu
User Menu User Menu While insufflation is stopped, press the MENU key (Fig. A) to open the user menu (Fig B). Fig. B Fig. A Device parameters can be changed in the user menu. The following pages pro- vide an overview as well as a detail description. Access to the service menu is restricted to trained and authorized service person- Access to the service menu nel. -
Page 38: Setting First Nominal Pressure
User Menu Setting First Nominal Pressure In the user menu, tap the Starting Pressure key to access the setting. Select the desired Starting Pressure for the currently selected insufflation mode. Press the º or » keys to increase or decrease the nominal pressure. Insufflation operating mode Factory setting Range AirSeal Mode... -
Page 39: Setting Audible Occlusion Signal
User Menu Setting Audible Occlusion Signal In the user menu, tap the Audio/Display key to access the audible occlusion sig- nal selection. The audible signal which comes with the occlusion alert can be switched off. The alert message remains nevertheless. Setting Gas Supply In the user menu, tap the Gas Supply key to access the gas supply selection. -
Page 40: Care And Maintenance
Authorized trained personnel Only a SurgiQuest technician may perform repairs, adjustments, or alterations on the device or accessories and use the service menu. Any violation will void the manufacturer's warranty. -
Page 41: Resetting The Fuse (Only For 2 Pole Breaker)
Care and Maintenance individuals to perform repairs, adjustments, or alterations on the device or acces- sories/peripherals. Ask the service technician for a certificate after he or she has inspected the unit Certification or performed any service tasks. This certificate lists the type and scope of the ser- vice as well as the date and name of the servicing company together with the sig- nature of the service technician. - Page 42 Care and Maintenance 1. Switch device off. 2. Disconnect device from power supply. For this, pull the mains plug from the mains socket. 3. Remove the power connection cable from mains socket. 4. The fuse holder is located next to the mains socket. 5.
-
Page 43: Annual Inspection
Annual Inspection Annual Inspection Each test conducted should be documented with date and signature on the test Measured values and tolerances log. The following measuring tools and resources were used by the manufacturer to determine the listed measurements and tolerances: Manometer Range 0-100 mmHg, error class ±... -
Page 44: Pressure Sensor Test
Annual Inspection nector). 7. Stop insufflation: Press the STOP key. The following values are displayed: Actual pressure 0 mmHg Gas consumption > 0.0 l 8. Press the RESET key. Gas consumption 0.0 l The basic function check of the device is complete. 10.3 Pressure Sensor Test 1. -
Page 45: Max. Device Pressure Test
Annual Inspection (for 5 seconds) and the display depicts Overpressure. 4. Reduce the pressure. The warning ends when the pressure falls below 19 mmHg (nominal pressure plus 4 mmHg). 10.5 Max. Device Pressure Test 1. Select the Standard Insufflation Mode as the operating mode. 2. -
Page 46: Electromagnetic Compatibility
Electromagnetic Compatibility Electromagnetic Compatibility Precautionary measures Medical devices are subject to special safety and protective measures concerning electromagnetic compatibility (hereafter abbreviated as EMC). This device is to be used only for the purposes described in the manual and has to be installed, set up, and operated in compliance with the EMC notes and in- structions. - Page 47 Electromagnetic Compatibility 11.3 Guidelines and Manufacturer's Statement - Electromagnetic In- terference Immunity The insufflator AirSeal® iFS is intended for use in an electromagnetic environ- ment as described below. The user/operator of the insufflator should make sure the device is operated within such an environment. Electromagnetic interfer- IEC 60601 test level Compliance Levels...
- Page 48 Electromagnetic Compatibility Note 1: The higher frequency range applies at 80 MHz and 800 MHz. Note 2: These guidelines are probably not realizable in all cases. Electromagnetic propagation is affected by absorption and reflection of buildings, objects and persons. Field strengths from fixed transmitters, such as base stations for radio (cellular/ cordless) telephones and land mobile radios, amateur radio, AM and FM radio broadcast and TV broadcast cannot be predicted theoretically with accuracy.
-
Page 49: Guidance And Manufacturer's Declaration - Electromagnetic Immunity
Electromagnetic Compatibility accessories and cables. 11.4 Guidance and manufacturer's declaration - electromagnetic emissions The AirSeal® iFS is intended for use in an environment as described below. The user/operator of the insufflator should make sure the device is operated within such an environment. Emissions test Compliance Electromagnetic environment - guid-... -
Page 50: Informational, Warning And Error Messages
Informational, Warning and Error Messages Informational, Warning and Error Messages Status line display Information for users displayed in the status display are depicted only temporar- ily and disappear again after a few seconds. Informational, warning and error messages Depending on the type of message, windows with green, yellow, and red frames are depicted. - Page 51 Informational, Warning and Error Messages Error message Cause Remedy Venting valve error! Restart the device. Valve malfunction. Restart the device. If the error occurs If the error occurs again call service! again, call service! Electronic error! Restart the device. If Malfunctions in the electronic system.
- Page 52 Informational, Warning and Error Messages Overpressure! The actual pressure is 3 mmHg above Determine the cause for exceeding the the nominal pressure for longer than 5 nominal pressure. Check the electronic seconds. displays of the device if overpressure exists for a longer period of time. Overpressure! Venting active! The actual pressure is above the nomi- Determine the cause for exceeding the...
-
Page 53: Technical Data
Technical Data Technical Data Model AirSeal® iFS Supply frequency range [Hz] 50 Hz/60 Hz Mains voltage range EU: 230 V US: 100 V - 120 V Fuse designation for 2 pole breaker (see chapter 9.4) 2 pole breaker, 10 A, 240 VAC (see chapter 13.1 for characteristic) Fuse designation for inlet with fuse drawer (see chapter 2xT 10 A, 250 VAC, UL-recognized 9.5) -
Page 54: Characteristics Of Circuit Breaker
Technical Data 2. See DIN EN 60 3. Acc. to 93/42/EEC 4. Formerly "repetition accuracy" - describes the reproducibility of a measurement ("internal precision") 5. Degree of match between displayed (actual) and correct (nominal) value; typical info "x% Full Scale" 13.1 Characteristics of circuit breaker Effect of ambient temperature... -
Page 55: Accessories
Accessories Accessories Cart/Valve Accessories IFS-VALVE1 Switching valve w/hoses & mounting bracket IFS-TOWER1 Pin Index Yoke mounted valve w/hoses iFS-HGSV iFS house gas switching valve AS-iCART iFS Cart w/bottle racks (E size) AS-iCART-V iFS Cart w/bottle racks (E size) & Valve1 AS-iCART-V2 iFS Cart w/bottle racks (E size) &... -
Page 56: Airseal® Ifs Warranty
SurgiQuest, Inc., ex- pressed or implied, including the implied warranties of merchantability and fit- ness for a particular purpose. In no event shall SurgiQuest, Inc. be liable for any breach of warranty in any amount exceeding the purchase price of the product. -
Page 57: Test Log
Test Log Test Log 16.1 Test Log Date Results Comment Signature... -
Page 58: Return Form
Test Log 16.2 Return Form Please fill out and include this form when returning the device: Name of owner: Sales partner: Address of person returning unit: Street: ZIP/Postal code: City: Country: IMPORTANT! Serial number (see identification plate): Device REF: Description of defect or requested service: Contact Signature Date... -
Page 59: Index
Index Index Access to the service menu 33 Authorized trained personnel 36, 36 Care and maintenance 4 Certification 37 Contamination 4, 31 Contraindications 7 Delivery inspection 12 ESD (Electrostatic Discharge) precautionary measures 42 Exclusion of liability 4 Federal Law 4 Fluid level HIGH 32 Fluid level LOW 32 Gas supply displays 15... - Page 60 W55-186- EN AA...
Need help?
Do you have a question about the AirSeal iFS and is the answer not in the manual?
Questions and answers