Planmeca Proline XC User Manual
Hide thumbs
Also See for Proline XC:
- User manual (30 pages) ,
- Installation manual (52 pages) ,
- Technical manual (258 pages)
Table of Contents
Advertisement
Advertisement
Table of Contents

Related Manuals for Planmeca Proline XC


Summary of Contents for Planmeca Proline XC
- Page 1 user's manual...
-
Page 3: Table Of Contents
13.1 Help message ......................46 13.2 Error codes ........................46 CLEANING .....................50 SERVICE ......................50 DISPOSAL OF THE UNIT ................51 TECHNICAL SPECIFICATIONS ..............52 USER’S STATEMENT FOR PLANMECA PROLINE XC PANORAMIC X-RAY 54 18.1 Definition of measurement criteria ................55 User’s Manual Planmeca Proline XC... - Page 4 IEC364 - equipment is used according to the operating instructions Planmeca pursues a policy of continual product development. Although every effort is made to produce up-to-date product documentation this publication should not be re- garded as an infallible guide to current specifications. We reserve the right to make changes without prior notice.
-
Page 5: Introduction
INTRODUCTION 1 INTRODUCTION The Planmeca Proline XC X-ray unit uses panoramic and cephalometric techniques to produce X-ray images diagnosis dentomaxillofacial anatomy. The unit is allowed to be used only under supervision of a dental health care professional. This manual describes how to operate the Planmeca Proline XC Panoramic X-ray unit. -
Page 6: Symbols
(Standard IEC 601-1). X-ray device. Electrostatic sensitive device (Standard IEC 60417). X-ray source assembly, emitting (Standard IEC 60417). Separate collection for electrical and electronic equipment according Directive 2002/96/EC (WEEE). 2 Planmeca Proline XC Panoramic X-ray User's manual... -
Page 7: Warnings And Precautions
NOTE Portable and mobile RF communications equipment can affect Planmeca Proline XC X- ray unit. CAUTION The remote exposure control, Autoprint and Admark film marking systems are connected to the X-ray units Planet connectors. Do NOT connect any other devices to the Planet con- nectors. -
Page 8: Checklist - Before Using The Unit
Make sure that the film and screen are the right type for the technique you plan to use. • Make sure that the intensifying screen is free of dust and is not scratched or damaged. • Never leave the cassette open. 4 Planmeca Proline XC Panoramic X-ray User's manual... -
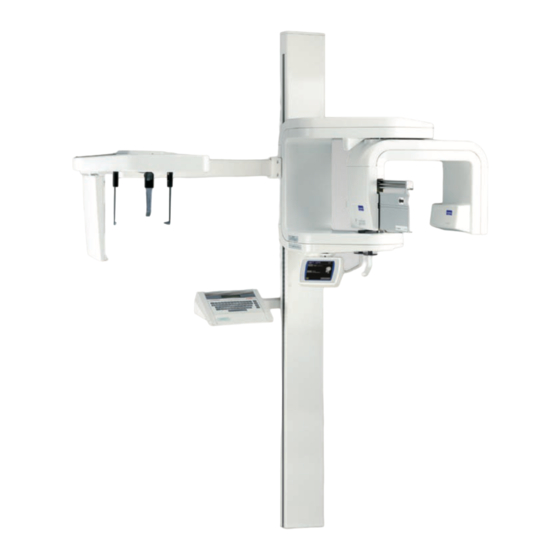
Page 9: Proline Xc Panoramic X-Ray - Main Parts
PROLINE XC PANORAMIC X-RAY - MAIN PARTS 5 PROLINE XC PANORAMIC X-RAY - MAIN PARTS General view of the X-ray Column Rotating unit Temple supports Vertical carriage Cassette Cephalostat CM carriage (PAN/CEPH X-ray unit) Cassette drive assembly Patient positioning mechanism... - Page 10 PROLINE XC PANORAMIC X-RAY - MAIN PARTS Remote exposure switch Exposure button When you take an exposure you must press and hold down the exposure button for the whole duration of the exposure. If you remove your finger from the exposure...
- Page 11 PROLINE XC PANORAMIC X-RAY - MAIN PARTS Patient supports Chin rest Chin support Disposable bite piece Emergency stop button The emergency stop button is located on the underside of the vertical carriage. Press the button to stop the vertical carriage movement in an emergency.
-
Page 12: Switching The Unit On
For information on what the error codes mean see section “13.2 Error codes” on page 46. 8 Planmeca Proline XC Panoramic X-ray User's manual... -
Page 13: Graphic User Interface
To select the panoramic exposure program touch the Prog. field on the main display. The main display is the display that is shown when the unit is switched on. Dose Area Product (DAP) Planmeca Proline XC Panoramic X-ray User's manual... - Page 14 Adult. When you select the child setting the width and height of the exposed area will be slightly reduced. 7.1.2 Selecting kilovolt and milliampere values Touch the kV/mA field on the main display. 10 Planmeca Proline XC Panoramic X-ray User's manual...
- Page 15 You can program the quick button values for each exposure program, i.e. panoramic, sinus and TMJ exposure programs. Confirm the selection and return to the main display by touching OK. Planmeca Proline XC Panoramic X-ray User's manual...
- Page 16 When the AEC function is activated it automatically selects the kV and mA starting values based on the patient and jaw size for optimal exposure. Selecting the right patient and jaw size will assist in the AEC operation. 12 Planmeca Proline XC Panoramic X-ray User's manual...
- Page 17 Set the optical density by touching the arrows. The default value is 0. Touch OK to confirm your selection. NOTE If the optical density is not selected the previously selected density will be used. Planmeca Proline XC Panoramic X-ray User's manual...
- Page 18 5. Increase the mA value manually by 4 mA from the calibration value. Take another exposure. The AEC function should now adjust the exposure values downwards. 14 Planmeca Proline XC Panoramic X-ray User's manual...
- Page 19 One unit corresponds to 1 mA or 2 kV, i.e. the maximum increase of the exposure parameter for example for child exposure can be 3 mA and 6 kV or 2 mA and 2 kV. Planmeca Proline XC Panoramic X-ray User's manual...
- Page 20 Selected sector - Deselected sector - to be exposed no exposure Confirm the selection and return to the main display by touching OK. 16 Planmeca Proline XC Panoramic X-ray User's manual...
- Page 21 Select the correct jaw shape and size for the patient to be X-rayed by tapping the corresponding icon. Jaw size: Narrow Average Wide Jaw shape: V-shaped Normal Square Confirm the selection and return to the main display by touching OK. Planmeca Proline XC Panoramic X-ray User's manual...
-
Page 22: Selecting Temporomandibular Joint (Tmj) Exposure Program
TMJ exposure program the main display will be shown again. NOTE The exposure program Ceph will appear on the list in case the X-ray unit is equipped with Cephalostat. 18 Planmeca Proline XC Panoramic X-ray User's manual... - Page 23 X-rayed according to the build of the patient. The exposure values for TMJ exposures are given in section “10 TEMPOROMANDIBULAR JOINT EXPOSURE” on page 36. Confirm the selection and return to the main display by touching OK. Planmeca Proline XC Panoramic X-ray User's manual...
-
Page 24: Selecting Sinus Exposure Program
The exposure program Ceph will appear on the list in case the X-ray unit is equipped with Cephalostat. When you have selected the sinus exposure program the main display will be shown again. 20 Planmeca Proline XC Panoramic X-ray User's manual... - Page 25 X-rayed according to the build of the patient. The exposure values for sinus exposures are given in section “11 SINUS EXPOSURE PROGRAM” on page Confirm the selection and return to the main display by touching OK. Planmeca Proline XC Panoramic X-ray User's manual...
-
Page 26: User Preference Settings
To enter the list of the User settings, first touch the i field. The following display appears. Touch the arrow to scroll up and down the list. To return to the main display, touch OK. 22 Planmeca Proline XC Panoramic X-ray User's manual... - Page 27 Make your selection (days, months and years) by using the arrows and confirm by touching the Next field. Touch the OK field to exit the clock setting mode when you have finished setting the time. Planmeca Proline XC Panoramic X-ray User's manual...
- Page 28 (kV, mA, time). In case the patient does not cover the whole exposure field (e.g. Ceph exposure), the real radiation dose is lower. 24 Planmeca Proline XC Panoramic X-ray User's manual...
- Page 29 Confirm your selection by touching OK. 7.4.4 Select language Select Select language on the User preference settings to set the desired language of the Graphic user interface (GUI). Confirm your selection by touching OK. Planmeca Proline XC Panoramic X-ray User's manual...
- Page 30 Touch Cancel if you do not wish to take an exposure using the stored settings. The unit will return to the normal mode. 26 Planmeca Proline XC Panoramic X-ray User's manual...
- Page 31 The following display appears. The exposure serial number can be marked to the film. Touch the Mode field to select either the ADA or ISO/ FDI orientation. Adjust the intensity by touching the intensity arrows. Planmeca Proline XC Panoramic X-ray User's manual...
-
Page 32: Loading The Cassette
With the regular cassette position the film so that it touches the bottom edge. Film The film must be on the intensifying screen. Film Film Autoprint cassette 28 Planmeca Proline XC Panoramic X-ray User's manual... - Page 33 Slide the cassette into the cassette carriage. Make sure that you insert the cassette in the direction of the arrow marked on the door and that the cassette is Cassette pushed completely into the cassette carriage. Planmeca Proline XC Panoramic X-ray User's manual...
-
Page 34: Preparing The Patient
“dummy run” function for training and demonstration purposes. For example, you might want to demonstrate the C-arm movements before taking exposures of children or nervous patients. NOTE Disable the function after the demonstration. 30 Planmeca Proline XC Panoramic X-ray User's manual... -
Page 35: Panoramic Exposure
Select the panoramic program, see section “7.1 Selecting panoramic exposure program” on page 9. If the patient is a child or a very small adult select the child mode by touching the Patient size field. Planmeca Proline XC Panoramic X-ray User's manual... - Page 36 Touch the temple support field on the main display to open the temple supports if they are not already open. Open Open Guide the patient to the unit so that they are facing the chin rest. 32 Planmeca Proline XC Panoramic X-ray User's manual...
- Page 37 If the lights go out before you Frankfort plane light have positioned the patient touch either arrow a second time to switch the lights on again. Focal trough light Planmeca Proline XC Panoramic X-ray User's manual...
- Page 38 Focal trough light a reference if you need to retake the exposure. 34 Planmeca Proline XC Panoramic X-ray User's manual...
- Page 39 This is not necessary if the cassette carriage is set to return to the loading position automatically. Remove the cassette from the cassette carriage and process the film. Planmeca Proline XC Panoramic X-ray User's manual...
-
Page 40: Temporomandibular Joint Exposure
This procedure will produce open and closed views of the left and right temporomandibular joints (TMJ) with the Planmeca Proline XC panoramic X-ray unit. Closed Closed Open views... - Page 41 Stand behind the patient and check that the patient’s shoulders are level and the neck muscles relaxed. Make sure the patient’s back is straight. Planmeca Proline XC Panoramic X-ray User's manual...
- Page 42 80 mm +8 mm 85 mm +4 mm 90 mm 0 mm 95 mm -4 mm 100 mm -8 mm 105 mm -12 mm 110 mm -16 mm 38 Planmeca Proline XC Panoramic X-ray User's manual...
-
Page 43: Second Exposure - Jaw Open
Reduce the kV value by 2kV for the open jaw exposure. Refer to exposure table on page 36. Touch the Ready field to drive the cassette carriage to the ready position so that the open jaw exposure can be taken. Planmeca Proline XC Panoramic X-ray User's manual... - Page 44 This is not necessary if the cassette carriage is set to return to the ready position automatically. Remove the cassette from the unit and process the film. 40 Planmeca Proline XC Panoramic X-ray User's manual...
-
Page 45: Sinus Exposure Program
Based on Kodak Ektavision film and Kodak Ektavision screen PATIENT kV VALUE mA VALUE Child up to 6 years Child 7 - 12 years Adult female or small male Adult male Large adult male a. Use the CHILD MODE. Planmeca Proline XC Panoramic X-ray User's manual... - Page 46 Midsagittal plane light Position the patient’s head so that the midsagittal plane coincides with the midsagittal light beam. Make sure that the patient is looking straight ahead as the 42 Planmeca Proline XC Panoramic X-ray User's manual...
- Page 47 Touch the Entry field to drive the rotating assembly to the entry position and the cassette carriage to the loading position. This is not necessary if the cassette carriage is set to return to the loading position automatically. Planmeca Proline XC Panoramic X-ray User's manual...
- Page 48 SINUS EXPOSURE PROGRAM Remove the cassette from the unit and process the film. 44 Planmeca Proline XC Panoramic X-ray User's manual...
-
Page 49: Panoramic Scale
PLANMECA PANORAMIC SCALE measuring vertical features that appear on panoramic radiographs taken with a PLANMECA X-ray units. The scale is useful when carrying out dental procedures such as: - root canal therapy; the scale can be used to take direct measurements of the root canal - the preparation of the root canal for root post anchoring;... -
Page 50: Troubleshooting
60 kV and 4 mA and one exposure with values 80 kV and 12 mA. If the error reappears after this, please contact your service technician. 46 Planmeca Proline XC Panoramic X-ray User's manual... - Page 51 Turn off the unit first for 30 seconds, try again without the patient and the film cassette. If the error is still present, please contact your service technician. Planmeca Proline XC Panoramic X-ray User's manual...
- Page 52 Er 65 The radiation reaching the AEC sensor is too high. If the cassette is in the cassette carriage and the patient is positioned when this error occurs, contact your service technician. 48 Planmeca Proline XC Panoramic X-ray User's manual...
- Page 53 Keyboard processor stack overflow. Turn off the unit first for 30 seconds. If the error is still present, please contact your service technician. Er 99 Error code generation error. Turn off the unit first for 30 seconds. If the error is still present, please contact your service technician. Planmeca Proline XC Panoramic X-ray User's manual...
-
Page 54: Cleaning
PLANMECA service technician once a year or after every 10,000 exposures if this is sooner. Please refer to the Planmeca Proline XC Panoramic X-ray technical manual for complete servicing information. 50 Planmeca Proline XC Panoramic X-ray... -
Page 55: Disposal Of The Unit
The risks involved and the necessary precautions must be taken into account when handling waste products. Disposal of Planmeca Proline XC Panoramic X-ray unit X = action, (X) = action in cases where processing is available Hazardous Waste... -
Page 56: Technical Specifications
16FF 500 VAC at 100 -132 V~ Maximum continuous heat dissipation < 250W Electrical classification Class Type Mechanical data Weight Panoramic: 108 kg / 238 lbs Pan/ceph: 126 kg / 278 lbs Dimensions (HxDxW) 2200x930x890 mm, 86.6x36.6x35 inch 52 Planmeca Proline XC Panoramic X-ray User's manual... - Page 57 -10°C to +50°C (film-based X-ray) 0°C to +50°C (Dimax3 digital X-ray system) Humidity 25% - 75% Manufacturer PLANMECA Oy, Asentajankatu 6, 00880 Helsinki, FINLAND phone: +358 20 7795 500 fax: +358 20 7795 555 OPTIMUM SPACE REQUIREMENTS: X-RAY Planmeca Proline XC panoramic 1535mm...
-
Page 58: User's Statement For Planmeca Proline Xc Panoramic X-Ray
USER’S STATEMENT FOR PLANMECA PROLINE XC PANORAMIC X-RAY 18 USER’S STATEMENT FOR PLANMECA PROLINE XC PANORAMIC X-RAY Radiation leakage technique factors The maximum-rated peak tube potential is 80 kVp and the maximum rated continuous tube cur- rent is 12mA for the maximum-rated peak tube voltage. -
Page 59: Definition Of Measurement Criteria
USER’S STATEMENT FOR PLANMECA PROLINE XC PANORAMIC X-RAY 18.1 Definition of measurement criteria Exposure time The beginning and end points of the exposure time are defined at 70% of the peak radiation waveform measured with a calibrated X-ray monitor. Peak tube potential Is defined as the measured high voltage mean value measured with a calibrated non-invasive kVp meter. - Page 60 USER’S STATEMENT FOR PLANMECA PROLINE XC PANORAMIC X-RAY Anode heating/cooling curve of the X-ray tube TIME (min.) Single load rating of X-ray tube EXPOSURE TIME (s) Target material of the X-ray tube Tungsten anode Reference axis to which the target angle and the focal spot characteristics of the X-ray tube refer 90°...
- Page 61 USER’S STATEMENT FOR PLANMECA PROLINE XC PANORAMIC X-RAY Target angle with respect to the reference axis 5° Filtration in terms of quality equivalent filtration of the X-ray tube Inherent filtration at least 0.8 Al/50 kV according to IEC 522/1976 Emission & filament characteristics of the X-ray tube...
- Page 62 USER’S STATEMENT FOR PLANMECA PROLINE XC PANORAMIC X-RAY X-ray tube assembly heating/cooling curve Heating curves Cooling curve Maximum continuous heat dissipation of the x-ray tube assembly 6 kJ/min. Reference axis to which the target angle and the focal spot characteristics of the tube head assembly refer 7¡...
- Page 63 USER’S STATEMENT FOR PLANMECA PROLINE XC PANORAMIC X-RAY Dimensions of the tube head assembly (WxHxD) 245 mm x 275 mm x 135 mm Weight of the tube head assembly 10.4 kg without collimator assembly 11.3 kg with collimator assembly Values of loading factors concerning leakage radiation...
- Page 64 USER’S STATEMENT FOR PLANMECA PROLINE XC PANORAMIC X-RAY 60 Planmeca Proline XC Panoramic X-ray User's manual...
- Page 66 Planmeca Oy | Asentajankatu 6 | 00880 Helsinki | Finland tel. +358 20 7795 500 | fax +358 20 7795 555 | sales@planmeca.com | www.planmeca.com...
Need help?
Do you have a question about the Proline XC and is the answer not in the manual?
Questions and answers