
Related Manuals for National Instruments MON-10496


Summary of Contents for National Instruments MON-10496
- Page 1 USER GUIDE MON-10496 Wireless Monitoring Gateway MON-10496 Note Read the MON-10496 Safety, Environmental, and Regulatory Information document on ni.com/manuals before installing.
-
Page 2: Table Of Contents
Battery Replacement and Disposal..................16 Where to Go Next........................17 Product Certifications and Declarations................. 17 Worldwide Support and Services.................... 17 Related Documentation The following documents contain information about the MON-10496. To view them, go to ni.com/manuals. • MON-10496 Safety, Environmental, and Regulatory Information •... -
Page 3: Unpacking
• 5 mm to 9 mm diameter power cable with a smooth, round jacket and individual conductors up to 12 AWG that comply with your local electrical code • RJ45 connector MON-10496 User Guide | © National Instruments | 3... -
Page 4: Safety
Renvoyez les modèles endommagés à NI pour réparation. Caution The protection provided by the MON-10496 can be impaired if it is used in a manner not described in the user documentation. Attention La protection apportée par le MON-10496 risque d'être endommagée s'il... -
Page 5: Emc Notices
Attention Avant d'ouvrir le MON-10496 pour l'entretien, vous devez couper l'alimentation externe de l'appareil et utiliser le boîtier de disjoncteur externe pour supprimer complètement l'alimentation secteur. Caution All wiring must be insulated for the highest voltage used. Attention Tout le câblage doit être isolé pour la plus haute tension utilisée. -
Page 6: Parts Diagrams
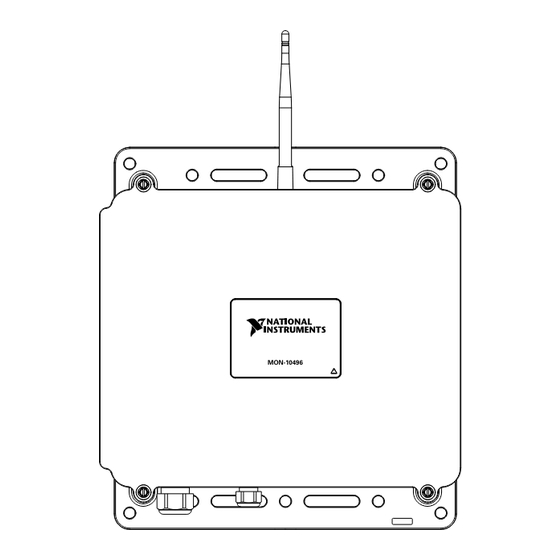
Parts Diagrams Exterior Parts Diagram MON-10496 1. Antenna 4. M16 gland for Ethernet cable 2. Mounting flanges 5. PG16 gland for power cable 3. Captive screws 6. Door 6 | ni.com | MON-10496 User Guide... -
Page 7: Interior Parts Diagram
2. Ethernet port 4. Door pocket for desiccant pack Internal Real-Time Clock (RTC) The system clock of the MON-10496 gets the date and time from the internal RTC at startup. This synchronization provides timestamp data to the device. Real-Time Clock (RTC) Battery The MON-10496 contains an RTC battery, which is a lithium cell battery that stores the system clock information when the MON-10496 is powered off. -
Page 8: Opening And Closing The Door
Tighten the four captive screws on the door of the device to 1.3 N · m (11.5 lb · in.). Mounting The MON-10496 must be mounted upright to a rigid surface such as a wall, panel, strut channel, or metal post. For installations that may experience vibration, NI recommends using a thread locking compound or lock nuts. -
Page 9: Installing The Antenna And Boot
Place nuts onto the bolts and tighten to secure them. Installing the Antenna and Boot Notice Never apply power or operate the MON-10496 without the antenna installed. Doing so may damage the device. MON-10496 User Guide | © National Instruments | 9... -
Page 10: Connecting
Wiring Guidelines Adhere to the following guidelines when wiring the MON-10496. Caution Before opening the MON-10496 for service, you must turn off the external power to the device and use the external breaker box to completely remove mains power. 10 | ni.com | MON-10496 User Guide... -
Page 11: Connecting The Ethernet Cable
Notice Refer to the MON-10496 Specifications on ni.com/manuals to make sure that any devices you connect to the MON-10496 are compatible. Connecting the Ethernet Cable Figure 3. CAT5e Ethernet Port Pinout Table 1. Signal Descriptions Fast Ethernet Signal... -
Page 12: Connecting Power And Ground
• (Optional) 19 mm gland dome nut tightening tool (SEALCON part number S-1900-WR) Complete the following steps to connect an Ethernet cable to the MON-10496. Note The RJ45 connector will not fit through the gland, so you must first pass the Ethernet cable without the connector attached through the gland then terminate the connector to the cable. - Page 13 Complete the following steps to connect power and ground. Confirm that the external power to the MON-10496 has been turned off. Install the PG16 gland on the device enclosure. You may use the gland provided by NI or your own gland. Check the MON-10496 Specifications on ni.com/manuals for the required gland specifications.
-
Page 14: Using The Desiccant Kit
IEC 60721-3-3, 3K4 or greater), you must use a desiccant pack from the desiccant kit (part number 787006-10) to meet the humidity specifications. Replace the desiccant kit after two years of use. Notice Do not put a load on the device door while it is open. 14 | ni.com | MON-10496 User Guide... -
Page 15: Network Connection
Tighten the four captive screws on the door of the device to 1.3 N · m (11.5 lb · in.). Network Connection The first time you power up the MON-10496, it attempts to initiate a DHCP network connection. If the MON-10496 cannot initiate a DHCP connection, it connects to the network with a link-local IP address with the form . -
Page 16: Troubleshooting Network Communication
Troubleshooting Network Communication If the MON-10496 does not connect to NI InsightCM with a status of Online, try the following troubleshooting tips: • Check the Ethernet cable connections on the MON-10496, server, and router. • If you have network firewalls or other security software enabled, try temporarily turning them off. -
Page 17: Where To Go Next
Where to Go Next After you have finished mounting and connecting your MON-10496 wireless monitoring gateway, finish setting up your system by doing the following. • Install your MON-10467 wireless vibration measurement device(s) and/or MON-10411 wireless vibration sensor(s). Refer to the following documentation on ni.com/manuals... - Page 18 NI trademarks. Other product and company names mentioned herein are trademarks or trade names of their respective companies. For patents covering NI products/technology, refer to the appropriate location: Help»Patents in your software, the file on your media, or the National Instruments Patent Notice at . You can find patents.txt ni.com/patents...
Need help?
Do you have a question about the MON-10496 and is the answer not in the manual?
Questions and answers