
Related Manuals for Nexto Di NEXTO NPS-10


Summary of Contents for Nexto Di NEXTO NPS-10
- Page 1 Copyright © 2019 by NextoDI Co., Ltd. NEXTO PHOTO STORAGE Portable Backup Storage for Professionals USER MANUAL V1.0 NEXTO DI www.nextodi.com...
- Page 2 INTRODUCTION INTRO Thank you for purchasing the NEXTO PHOTO STORAGE (NPS-10). The NPS-10 allows camera and camcorder users to save data from their memory cards to a hard drive(or SSD) without the use of a computer. The performance of the NPS-10 has been optimized so that data transfers from a memory card to the NPS-10 more quickly than to other storage devices.
-
Page 3: Table Of Contents
CONTENTS 01. CONTENTS 02. DEVICE DIAGRAM 03. PRODUCT DESCRIPTION 04. SYMBOLS USED IN THIS DOCUMENT 05. IMPORTANT SAFETY INFORMATION 06. INSTALLATION OF HARD DRIVE (OR SSD) 07. CHARGING THE RECHARGEABLE BATTERY 08. NPS-10 INTERFACE 08.1 TURNING THE NPS-10 ON/OFF 08.2 KEY OPERATION 08.3 THE LED INDICATOR 08.4 THE LCD DISPLAY 9. - Page 4 CONTENTS 12. VIDEO/PHOTO PREVIEW 12.1. BROWSE FOLDERS 12.2. SHOW VIDEO 12.3. IMAGE PREVIEW 12.4. DELETE THE BACKUP DATA 12.5. PREVIEW FROM AN EXTERNAL DEVICE 13 USING A USB EXTERNAL DRIVE 13.1. SELECTING TYPE OF USB DRIVE 14. MAKING A SECONDARY COPY (SYNC) 15.
-
Page 5: Contents
01 Contents of the NEXTO PHOTO STORAGE ① Main storage unit (without hard disk drive): Three different types depending on the supported memory cards. Add hard drive or SSD according to the direction on Chap. 6. ② Shock protective rubber case ③... -
Page 6: Device Diagram
02 Device Diagram ① CF / CFast / XQD Slot: Depending on product type (CF, CFast, XQD). ② Fixing hole: Tripod compatible size. 1/4-20UNC ③ SD1 Slot: A slot for connecting SDHC/SDXC Card ④ SD2 Slot: A slot for connecting SDHC/SDXC Card ⑤... -
Page 7: Product Description
03 Product Description The NEXTO PHOTO STORAGE (hereinafter NPS-10) offers sufficient space for the installation of a 2.5” Serial ATA(SATA) hard disk drive or SSD (not included in the delivery) and includes a Li-Poly rechargeable battery. The NPS-10 provides the following functions: 3.1. - Page 8 03 Product Description 3.6. Video & Photo preview The NPS-10 can display photo and video taken with digital cameras/camcorders on a color TFT LCD. The NPS-10 provides a “best effort” preview of the video & photo clip. For details on Photo Preview, see chapter “12.
- Page 9 03 Product Description 3.12. Firmware upgrade In the case of any additional improved or new functions, new firmware will be updated. For details on updates of F/W, see chapter “17. Setup Functions”. 3.13. Language selection The NPS-10 supports various languages. You can select a language from the menu of the NPS-10.
-
Page 10: Symbols Used In This Document
04 Symbols Used in This Document WARNING The flash icon in a triangle indicates warning for personal injury hazards such as electric shock. CAUTION An exclamation mark in a triangle indicates important instructions in this operating manual which must be observed. -
Page 11: Important Safety Information
05 Important Safety Information CAUTION In case of any damage due to failure to observe these operating instructions, the warranty is voided. NextoDI does not assume liability for consequential damages. Nor do we assume liability for damage to property or personal injury caused by improper use or failure to observe the safety instructions. - Page 12 05 Important Safety Information CAUTION The product must not get damp or wet. This product is not a toy. It contains fragile and swallowable glass parts, small parts, and a rechargeable battery. Any use other than that described above may damage the product. Read these operating instructions thoroughly and carefully.
-
Page 13: Installation Of Hard Drive (Or Ssd)
06 Installation of Hard Drive (or SSD) You can install the hard drive (or SSD) directly on your own. The NPS-10 accepts 2.5-inch SATA hard drive (or SSD) used for laptop computer. The maximum allowable capacity of the internal drive is 32TB. And the thickness of the internal drive should be less than 7.2mm. -
Page 14: Charging The Rechargeable Battery
07 Charging the Rechargeable Battery The NPS-10 can be charged via USB Type-C slot using the USB Type-C cable included in the box. You can charge it by connecting to a USB charger(output current capacity 5V 2A or more), USB Battery pack(output current capacity 2A or more) or a USB terminal of the computer as shown below. - Page 15 07 Charging the Rechargeable Battery It takes approximately 3 hours to charge the built-in battery. The remaining battery power level can be checked with the battery power indicator on the top right of the LCD. 70~100% 30~70% 5~30% 5% 미만 84~120 min.
- Page 16 07 Charging the Rechargeable Battery REFERENCE • The NPS-10 is charged only when the power is off, or when connected to a computer and used as an external storage device. • Please use a USB charger and a USB battery pack with output current capacity of 5V 2A or more.
-
Page 17: Nps-10 Interface
08 NPS-10 Interface 08.1_Turning the NPS-10 on/off Press the control key on the right side of the device for a few seconds in order to turn the NPS-10 on. The power up logo and firmware version will be shown on the LCD. When you see the logo on the LCD screen, release the key. -
Page 18: Key Operation
08 NPS-10 Interface 08.2_Key operation The NPS-10 is operated by a single control button which can be used in five different ways. The display shows you the “S” (Short) or “L” (Long) symbol as a means to invoke the desired function. Symbols Operation (Short Press) -
Page 19: The Led Indicator
08 NPS-10 Interface 08.3_The LED indicator ❶ ❶ ① Power & Charge LED Indicates battery is being charged. Green Indicates “power on”. Orange Indicates “power on” and charging (ex. Computer connection) ② Internal drive activity indication LED - Blinking red indicates that the data transfer is occurring. -
Page 20: The Lcd Display
08 NPS-10 Interface 08.4_The LCD Display ① Remaining capacity of the internal hard drive. A capacity check will be performed automatically during power on. If an external hard drive is connected to the NPS-10, the capacity of external hard drive will be displayed next to the capacity of the internal hard drive. -
Page 21: Formatting The Hard Drive (Or Ssd)
09 Formatting the Hard Drive (or SSD) The hard drive (or SSD) installed in the NPS-10 requires to be self-formatted. The NPS-10 only supports the self-formatted file system by its own hard drive management feature. CAUTION • Please back up all data to an extra hard drive before formatting the NPS-10’s internal hard drive or USB external hard drive. - Page 22 09 Formatting the Hard Drive (or SSD) Move the button up or down to select volume label of the drive, then press the control key shortly[S]. Confirm the selection by pushing the control key upward. You can cancel the operation by pressing and holding the control key.
-
Page 23: Connecting The Memory Card
10 C onnecting the Memory Card 10.1_Connecting a memory card into the built-in slot Many types of the memory cards can be backed up on the NPS-10 either by connecting the cards directly into the applicable slots or by using the USB card reader through the USB3.0 Host port on the bottom side of the NPS-10. -
Page 24: Connecting The Memory Card By Using Usb Card Reader
10 C onnecting the Memory Card 10.2_Connecting the memory card by using USB card reader Connect the USB card reader that supports memory cards such as XQD, CF to the “USB3.0 Host” slot located at the bottom of the device. The USB card reader is powered by the internal battery of the NPS-10 so that it is possible to connect without having a separate adaptor or any other external power sources. -
Page 25: Data Backup (Copy) And Verify
11 Data Backup (Copy) and Verify 11.1_Copy process When you insert the memory card to the NPS-10, it can detect and back up the contents of the memory card automatically. Please refer to chapter “10. Connecting the memory card” for more details on memory card detection. The NPS-10 supports the Sequential copy function that sequentially backs up memory cards when inserting multiple memory cards. - Page 26 11 Data Backup (Copy) and Verify 11.1_Copy process (5) When all the operations are completed, the results are displayed on the LCD. Press the control key briefly to see the details. (6) You can see the name of the backup folder and the copy speed of each card.
-
Page 27: Parsing The Memory Card
11 Data Backup (Copy) and Verify 11.2_Parsing the memory card The data on the memory card is compared with the data stored on the NPS-10 to determine whether it is new data or already stored data. According to the comparison result, the NPS-10 operates as follows:... -
Page 28: Copy & Verify
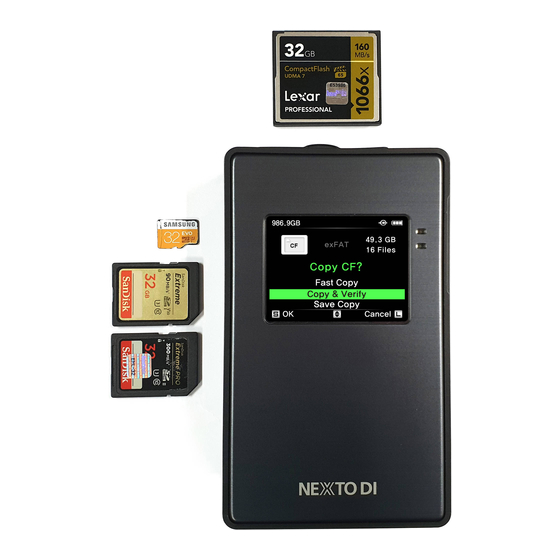
11 Data Backup (Copy) and Verify 11.3_Copy / Verity 11.3.1 Copy (1) If the memory card contains new data When a new memory card is inserted, the NPS-10 shows three kinds of copy menu as the left picture. Choose the copy you want using the up/down key selection. - Page 29 11 Data Backup (Copy) and Verify 11.3_Copy / Verity 11.3.2 Select the verify optins When you re-insert a memory card that has been already backed up once, the name of the folder saved in the internal drive will appear on display and you are able to choose one of the two verification options using up/down key selection.
-
Page 30: Status
11 Data Backup (Copy) and Verify 11.4_Status ① Total number of files in the memory card versus the number of copied files. ② Amount of data copied. ③ Elapsed time. -
Page 31: Indication Of Results
11 Data Backup (Copy) and Verify 11.5_Indication of Results Displays the copy and verification results of all memory cards. Press control key briefly to see the details. You can see the name of the backup folder and the copy speed of each card. REFERENCE •... -
Page 32: Error Display
11 Data Backup (Copy) and Verify 11.6_Error Display When the error occurs during the backup, the error message is displayed and the NPS-10 will automatically turn off. For the reminding of user, the NPS-10 displays the previous operational status at the next power up. -
Page 33: Video/Photo Preview
12 V ideo/Photo Preview 12.1_Browse Folders You can check the contents stored in the internal hard drive (or SSD) or the external drive or memory card with the function of Browse Folders. Press the control key once at the “XCopy Ready” mode to activate the menu. -
Page 34: Show Video
12 Video/Photo Preview 12.2_Show Video If you press “Show Video”, thumbnails of the video are displayed as the example on the left. Unsupported video files are shown with an [X] mark. Video clips are selected for preview by using an up/down push of the control key. Press the control key briefly to select a clip. -
Page 35: Image Preview
12 Video/Photo Preview 12.3_Image Preview If you press “Show Image”, thumbnails of the image are displayed as the example on the left. Unsupported image files are shown with an [X] mark. Image clips are selected for preview by using an up/down push of the control key. Press the control key briefly to select a clip. -
Page 36: Delete The Backup Data
12 Video/Photo Preview 12.4_Delete the backup data You can delete the folder you select. Be careful. Deleted folders cannot be restored. Move the control key up or down to choose the “Delete This Folder” option and press the key shortly. -
Page 37: Preview From An External Device
12 Video/Photo Preview 12.5_Preview from an external device The NPS-10 supports the preview of video files and the playing of audio files stored on a USB external drive. In addition, the NPS-10 supports the preview of video and the playing of audio files that are stored on memory cards. Please refer to “10. Connecting the Memory Card”... -
Page 38: Using A Usb External Drive
13 Using a USB external drive 13.1_Selecting type of USB drive The NPS-10 can be connected to USB external drive through the USB 3.0 interface (USB 3.0 Host slot) so that it is possible to copy from USB card reader or SYNC to USB hard drive. The NPS-10 prompts you for select the USB drive type whenever you connect a new USB device to the USB host slot. -
Page 39: Making A Secondary Copy (Sync)
14 Making a Secondary Copy (Sync) The “Sync” function synchronizes data between the [NPS10] folder of the NPS-10 and the [NPS10] folder of an USB hard drive connected to the “USB3.0 Host” connector via the USB 3.0 cable. This function compares the folders stored in the [NPS10] folder of the NPS- 10 with the [NPS10] folder of an USB hard drive. - Page 40 14 Making a Secondary Copy (Sync) (1) Sync function If there isn’t any problem with the connected USB external drive, it will show two copy options as the picture show on the left. Move the control key up or down to choose the copy option you prefer.
-
Page 41: Using The Nps-10 As An Usb External Drive
15 Connction to Computer 15.1_Connection to computer The NPS-10 can be connected to your computer for use as an external hard drive. REFERENCE • Windows 8 / 7 / VISTA(Service Pack 1) and MAC OS 10.6.6 and Linux 2.4.18 and later can fully access exFAT file systems. -
Page 42: Browsing The Contents Of Your Hard Drive
15 Connction to Computer 15.2_Browsing the contents of your hard drive • Back up data is stored in the " NPS10 " and subfolders is created automatically. The log file is stored in the subfolder of " NPSLOG ". • For each memory card backup, the NPS-10 creates a date-coded folder automatically. -
Page 43: Disconnecting The Nps-10 From Your Computer
15 Connction to Computer 15.3_Disconnecting the NPS-10 from Your Computer (1) For Windows Right click the Storage device icon in the System Tray (lower right corner of your screen) and select “Safely Remove Hardware” or “Unplug” or “Eject Hardware”. Then disconnect the cable from the NPS-10 and your computer. (2) For MAC Drag and drop the NEXTODI icon in the trash. -
Page 44: Device Management
16 Device Management 16.1_Drive Info This is the function of Device management of the NPS-10’s internal hard drive (or SSD), USB external drive and memory cards. Select “Device Management” from the main menu. Move the control key up or down to choose the target device. -
Page 45: Self Test
16 Device Management 16.2_Self Test Built-in test utility is for detecting physical errors on the target device. This function does not fix errors. If an error is detected during the self-test, consult your authorized NEXTODI dealer. Select the “Self Test” sub-menu from the “Device Management”... - Page 46 16 Device Management 16.2_Self Test Error found during quick test. Further use of the NPS-10 may result in loss of backup data. Consult your authorized NEXTODI dealer for service. CAUTION • The NPS-10 buzzer—repeating every 3 seconds--indicates the completion of the test. The power does not turn off automatically at the completion of the test.
- Page 47 16 Device Management 16.2_Self Test (2) Full test The full test will take several hours. It will read all the sectors in the selected drive to discover if any bad sectors exist. The full test is in progress. This process will take about 2~3 hours.
-
Page 48: Delete Tmp Folder
16 Device Management 16.3_Delete TMP folder If the TMP folder exists inside the [NPS10] folder, then the number of TMP folders will appear on the LCD. Press the control key briefly [S] to delete the TMP folders. Deleting the TMP folders. The TMP folder has been deleted successfully. -
Page 49: Setup Functions
17 Setup Functions 17.1_Auto Power Off Move the control key up or down to choose “Setup” function then press the key shortly. Select the “Auto Power Off” at the set up menu. You can choose the time interval of the auto power off as 30, 40, 50, 60 and 90 seconds by pressing the control key shortly. -
Page 50: Sound
17 Setup Functions 17.2_Sound You can set sound on/off, the buzzer sound to tell the backup succeed/failed & other operative conditions. -
Page 51: Folder Rename
17 Setup Functions 17.3_Folder Rename The name of the folder is determined by the shooting date (e.g., 20160301.000.123456). At the “Set Up” menu, the user can select the “Folder Rename” menu as ON, and then can change the folder name to begin with A1~J9. User can choose the folder name before back up. -
Page 52: Language Setting
17 Setup Functions 17.4_Language setting The user can select the preferred language using this function. Select “Language” sub-menu from the main menu. Select the desired language using the up/down key function. Press the key briefly to set the language as the default. -
Page 53: Firmware Update
17 Setup Functions 17.5_Firmware Update The NPS-10 provides you with update of the new version of firmware through memory cards or internal hard drive (or SSD). Move the control key up or down to choose the option you want and press the key shortly. If valid firmware is found at the specified location, the NPS- 10 indicates a “FW File Found”... - Page 54 17 Setup functions 17.5_Firmware Update Firmware upgrade completed. The NPS-10 turns off automatically. If a valid firmware file is not contained in the specified device, the NPS-10 will indicate an error. Please try again from the beginning after downloading firmware again.
-
Page 55: Troubleshooting Tips
18 Troubleshooting Tips 18.1. If the power of the NPS-10 cannot be turned off : In the event of a hardware or software malfunction, press the control key for at least 8 seconds. This will turn the power off safely so that the data stored in the NPS-10 will not be lost or altered. -
Page 56: Battery Disposal
19 Battery Disposal Batteries/rechargeable batteries containing harmful substances are marked with the following symbols: Cd=cadmium, Hg=mercury, Pb=lead. You can return batteries/ rechargeable batteries free of charge to any authorized disposal station in your area, in our stores or in any other store where batteries/rechargeable batteries are sold. Do not dispose of used batteries in the household trash. -
Page 57: Technical Specifications
20 Technical Specifications 20.1_Technical Specifications Model name NEXTO PHOTO STORAGE Model number NPS-10 TYPE 1 : CF (Type 1), SD (UHS-II) x 2, microSD x 1 Memory suppoprt TYPE 2 : CFast (2.0), SD (UHS-II) x 2, microSD x 1 TYPE 3 : XQD &... - Page 60 NextoDI co.,Ltd For more inquires www.nextodi.com/support +82-70-4762-1986...
Need help?
Do you have a question about the NEXTO NPS-10 and is the answer not in the manual?
Questions and answers