Advertisement
Advertisement
Table of Contents

Related Manuals for Tidel TACC-IIa


Summary of Contents for Tidel TACC-IIa
- Page 1 TACC-IIa Problem Identifi cation By Component...
-
Page 2: General Information
Whenever a power reset is performed, all LED’s should illuminate momentarily (LED test). Always have the Serial number of the unit readily available when performing service, contacting the Tidel Help Desk for assistance, placing parts orders or when requesting warranty information/processing. Serial Number information A91-XXXXX... - Page 3 IN-XXXXX TACC-IIa built for overseas applications (Thailand) SA-XXXXX TACC-IIa redesign for Sentinel cabinet design. Production began late 2006. The Control Panel Chassis size increased to be interchangeable with Sentinel, TACC-V and TACC-III cabinets (This Control Panel is not interchangeable with earlier units).
-
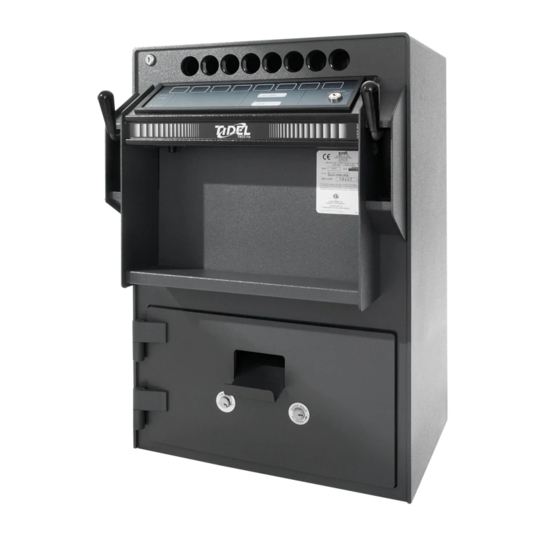
Page 4: Control Panel
If no response is indicated when the vend button is pressed, (the LED’s do not re- spond), the unit does not “see” the button. The “STACKER FULL” LED is not used by the TACC-IIa. Door timer or Alternate Vend timer will not start ... -
Page 5: Static Discharge
If the Ribbon Cable is connected to the Control Panel upside down, no components will be dam- aged, but no LED’s will illuminate and no button will work. Static Discharge Static discharge can cause damage to components on the TACC-IIa Insure grounds from the Control Panel to cabinet are present on unit. Control Panel... - Page 6 Doors Sprung Door The door tends to push outward. Customers usually report they have to push in on the door to turn the door bolt key. Fold a piece of paper as many times as possible, then place it between door and door frame on the hinge side.
- Page 7 Fuse The fuse is located under the Control Panel, next to the serial # sticker. All TACC units use a 1 amp slow-blow fuse. Common areas to check: Fuse Holder cracked or broken. Fuse holder wires frayed or broken from twisting fuse holder. ...
- Page 8 The Keyswitch is a restricted keyway. Replacement keys cannot be made locally. The key code must be supplied to Tidel and only then can Tidel supply replacement keys. The Instant Access Keyswitch wiring is connected to the COMMON and NORMALLY OPEN termi- nals of the Keyswitch.
- Page 9 The Keyswitch is a restricted keyway. Replacement keys cannot be made locally. The key code must be supplied to Tidel and only then can Tidel supply replacement keys. Note: Replacement keys can be made from an existing key but de-coding fees will apply.
- Page 10 The Door Bolt Lock is a restricted keyway. Replacement keys cannot be made locally. The key code must be supplied to Tidel and only then can Tidel supply replacement keys. Note: Replacement keys can be made from an existing key but de-coding fees will apply.
- Page 11 Magazine Tubes or rolls of coins jammed in the magazine can usually be dislodged from the bottom of the magazine by performing the following: With the door open, attempt to vend from the jammed column. When the cradle is in the ½ way position, remove AC power from the unit. From the bottom of the magazine, insert a ruler (or equivalent), into the column to dislodge the tube.
- Page 12 PCB, Main The Main PCB controls all functions of the TACC-IIa. The Main PCB houses the Service Diagnostic Switch and the SW1 switch box (A92 and later se- rial numbers). The Service Diagnostic Switch is useful in confi rming diagnosis of problems.
- Page 13 PCB, Motor Controller: Only TACC-IIa’s with serial numbers beginning with A91 were equipped with Motor Controller PCB’s. In 1992, Motor Controller PCB’s were eliminated from the TACC product line. The Motr Controller PCB controls the motor and vending functions. The vending function of a TACC is performed by the following: The vend motor drives the cradle back and forth to dispense tubes from the magazine.
-
Page 14: Power Supply
Power Supply TACC-IIa units with serial #’s beginning with A91, had Power Supplies mounted on the maga- zine assembly, covering the Main PCB. All other TACC-IIa units had the Power supplies mounted to the top of the cabinet. The Power Supplies are auto ranging and can be connected to 120vac or 240vac circuit without modifi... -
Page 15: Power Supply Adjustment
Power Supply Adjustment WARNING: Read the following completely BEFORE attempting to adjust the +5vdc voltage. Measure voltage at terminal J12 on the Main PCB when making adjustments to the +5vdc. When adjusting the +5vdc, the measurement at terminal J12 on the Main PCB must be between +5.00~+5.10 vdc when the adjustment is fi... -
Page 16: Door Sensor
Sensors Door Sensor The Door Sensor is located inside the unit, on the left side of the door frame. Units with a serial # beginning with A91 have a different Door Sensor than all other TACC units. Refer to the parts price list. When the door locking bar engages the Door Sensor the DOOR light will be off. - Page 17 Solenoid (Door) The Door Solenoid is operated by +12vdc. Typically, when the solenoid energizes, a faint mechanical noise can be heard (the plunger be- ing pulled into solenoid). After the door opening delay time has expired, the DOOR light will illuminate on the Control Panel.
- Page 18 Vending Components (Motors, Cradles and Timing Disks) The gear on the Vend Motor shaft engages the gear on the Cradle to rotate the Cradles for Vending operations. A Timing Disk is attached to the end of the Cradle post, which rotates through (2) Cradle Position Sensors.
Need help?
Do you have a question about the TACC-IIa and is the answer not in the manual?
Questions and answers