Table of Contents
Advertisement
Advertisement
Table of Contents

Related Manuals for Ironton 61587


Summary of Contents for Ironton 61587
- Page 1 Breaker Hammer Kit with Cart Owner’s Manual WARNING: Read carefully and understand all ASSEMBLY AND OPERATION INSTRUCTIONS before operating. Failure to follow the safety rules and other basic safety precautions may result in serious personal injury. Item #61587 READ & SAVE THESE INSTRUCTIONS...
- Page 2 Thank you very much for choosing an Ironton™ product! For future reference, please complete the owner’s record below: Serial Number/Lot Date Code: ________________________________ Purchase Date: ____________________________________________ Save the receipt, warranty, and this manual. It is important that you read the entire manual to become familiar with this product before you begin using it.
-
Page 3: Table Of Contents
Table of Contents Intended Use ............................4 Packaging Contents ..........................4 Technical Specifications ........................4 Important Safety Information ....................... 4 Specific Operation Warnings ....................... 6 Grounding .............................. 6 Extension Cords ............................ 8 Main Parts of Breaker Hammer Kit with Cart ..................9 Assembly Instructions ........................ -
Page 4: Intended Use
Intended Use The Ironton Breaker Hammer Kit with Cart contains all of the accessories needed for rapid breaking and chipping of concrete and masonry blocks. Packaging Contents Hammer Kit Mobile Cart Grease Owner’s Manual 2 Chisels... - Page 5 Cluttered, wet, or dark work areas can result in injury. Using the product in confined work areas may put you dangerously close to cutting tools and rotating parts. Do not use the product where there is a risk of causing a fire or an explosion; e.g., in the presence of flammable liquids, gases, or dust.
-
Page 6: Specific Operation Warnings
the power switch is dangerous and must be repaired by an authorized service representative before using. Disconnect the power/air supply from the product and place the switch in the locked or off position before making any adjustments, changing accessories, or storing the tool. Such preventive safety measures reduce the risk of starting the tool accidentally. - Page 7 grounding plug. The plug MUST be plugged into a matching receptacle that is properly installed and grounded in accordance with ALL local codes and ordinances. DO NOT MODIFY THE PROVIDED PLUG. If it will not fit the receptacle, have the proper receptacle installed by a qualified electrician.
-
Page 8: Extension Cords
Extension Cords ⚠WARNING USE A PROPER EXTENSION CORD. Make sure your extension cord is in good condition. When using an extension cord, be sure to use one heavy enough to carry the current your product will draw. An undersized cord will cause a drop in line voltage, resulting in loss of power and cause overheating. -
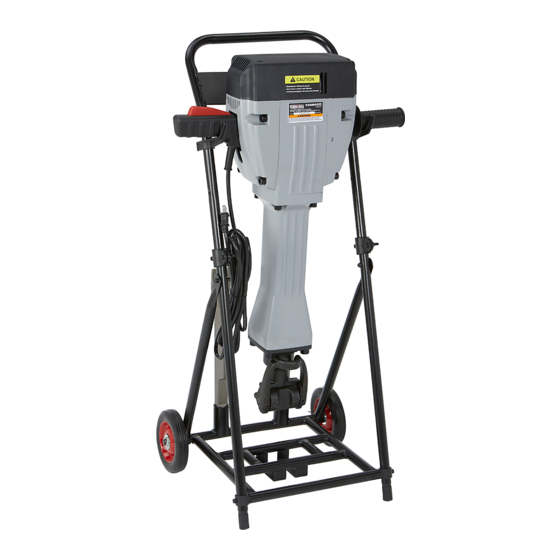
Page 9: Main Parts Of Breaker Hammer Kit With Cart
Main Parts of Breaker Hammer Kit with Cart Subassembly Gear Box Aluminum Head Handle Switch Chisel Mobile Cart Page 9 of 24... -
Page 10: Assembly Instructions
Assembly Instructions ⚠WARNING Unplug the demolition hammer. Always wear gloves when changing accessories. Skin may become exposed to extreme heat during operation. If the chisel doesn’t slide in easily, apply grease to the loading end of it. Assembling the Bit without a Shoulder (with groove) 1. - Page 11 Assembling a Bit with a Shoulder 1. Extend lock part 2 to a 210° position. Insert bit 1 into holder 3. 2. Extend lock part 2 to a 180° position and lock the bit. Note: The shoulder position should be between lock part 2 and holder 3. 3.
-
Page 12: Before Each Use
3. Slide the hand holder (1) to the main poles (2) and attach the side poles (3) to the clamp piece (16). Before Each Use ⚠WARNING Be sure the bit is secured in place before operation. When drilling or screwing into walls, ceilings, etc., make sure beforehand that you will not damage any hidden electric cables. - Page 13 Do not point the hammer at anyone in the area when operating. The bit could fly out and seriously injure someone. Burn hazard. Do not touch the bit or parts close to the bit immediately after operation; they will be extremely hot.
- Page 14 2. Disassemble the aluminum head, cylinder, and piston. 3. Clean the inside of aluminum head. It must be free of metal chips and granular dust. Also, clean the piston and the cylinder. Note on Cleaning: Clean both the inside and outside of the cylinder, especially the inside. It must be free of metal chips and granular dust.
- Page 15 4. Using the oil bottle (#108), fill the aluminum head with grease. Make sure the aluminum head inside is clean before filling. Note: There are 4 grooves in the aluminum head. Fill all 4 grooves with .53 oz. of grease, for a total of 2.12 oz.
-
Page 16: After Each Use
Tighten the 4 inner Hex head screws being careful not to forget the spring washer. If tightening the screws with an electric or pneumatic driver, check the torque of the screw with a 12mm wrench (not included) to make sure it’s tightened properly. If necessary, put glue on the screw and screw it in. -
Page 17: Troubleshooting
Maintain the demolition hammer by adopting a program of conscientious repair and maintenance in accordance with the following recommended procedures. It is recommended that the general condition of any tool be examined before it is used. Keep your tool in good repair Keep handles dry, clean, and free from oil and grease. -
Page 18: Hammer Parts Diagram
Hammer Parts Diagram Page 18 of 24... -
Page 19: Hammer Parts List
Hammer Parts List Reference Part Description Quantity Housing Assembly Side Cover Hex Socket Bolt M10×35 Ø10 Flat Washer Brush Cap Carbon Brush Brush Holder Insulation Washer Cap Rubber Fan Cover Ø6×Ø10.5 Flat Washer Hex Socket Bolt M6×20 Ø32 Urethane Washer Ball Bearing Ball Bearing 6201 2Rs C3 Stator Assembly... - Page 20 Reference Part Description Quantity Connecting Rod Assembly Piston Pin Y-Type Sealing Ring Ø45.7×Ø55.2×7 Piston O-Ring Ø46×Ø5.3 O-Ring Ø82×Ø2 Hex Socket Bolt M10×45 (12.9) Aluminum Housing Washer Protective Support for Urethane Ring Big Urethane Ring Mouth Locking Ring Small Urethane Ring Shank Sleeve Y-Type Sealing Ring Ø46.2xØ33x6 O-Ring Ø78×Ø3...
-
Page 21: Cart Parts Diagram
Reference Part Description Quantity Lock Lever Cart Parts Diagram Page 21 of 24... -
Page 22: Cart Parts List
Cart Parts List Reference Part Description Quantity Hand Holder Main Pole Side Pole Bottom Support Connecting Plastic feet Powder Piece Hex .Socket Bolt M6×50 Φ16 Flat Washer Split Pin Φ3×37 Wheel Hex Socket Bolt M6×25 Hex Socket Bolt M6×30 M6 Anti-Loosing Nut Lifting Shelf Clamp Piece Replacement Parts... -
Page 23: Limited Warranty
Northern Tool and Equipment Company, Inc. ("We'' or ''Us'') warrants to the original purchaser only (''You'' or ''Your'') that the Ironton product purchased will be free from material defects in both materials and workmanship, normal wear and tear excepted, for a period of one year from date of purchase. - Page 24 Distributed by: Northern Tool & Equipment Company, Inc. Burnsville, Minnesota 55306 www.northerntool.com Made in China Page 24 of 24...
Need help?
Do you have a question about the 61587 and is the answer not in the manual?
Questions and answers
I need to purchase a handle for an iron ton 61587 electric jack hammer. Who do I need to talk to?