Advertisement
Quick Links
TM
SKU: 649523
ADULT BATTERY INSTALLATION REQUIRED
CONTENTS
A. 1 Helicopter
B. 1 Remote Control
A.
Illustrations are for reference only. Styles may vary from actual contents.
CAUTION: KEEP FINGERS AWAY
FROM SPINNING PROPELLERS
QUICK START
NOTE: Please read all instructions before use and keep this manual for future reference.
1) Install 6 "AA" (LR6) batteries in the remote control.
2) Charge the helicopter's battery for 40-50 minutes.
3) Turn on the helicopter.
4) Turn on the remote control to pair with helicopter.
5) Calibrate sensor by holding LANDING and TAKE OFF buttons at the same time until the green light ashes.
6) Use the buttons and turn the remote control left or right to y your helicopter in an open, indoor area.
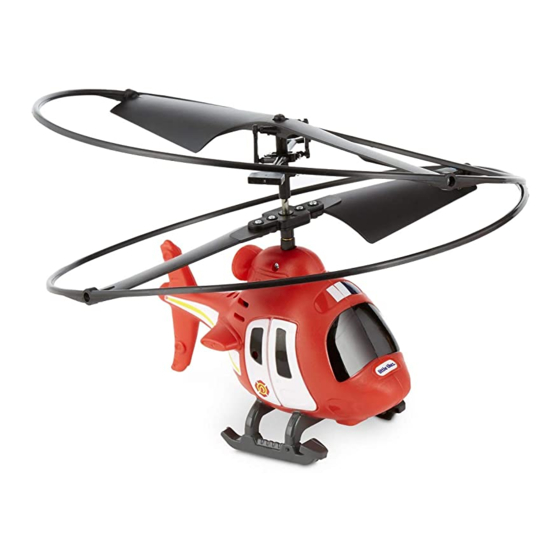
STABILIZER
PROTECTIVE RINGS
STABILIZER LINKAGE
SKID
POWER INDICATOR
LANDING
CHARGING PLUG
AGES 3+ YEARS
Before beginning, an adult must install fresh alkaline batteries. Here's how:
ADULT SUPERVISION REQUIRED
1. Using a Phillips screwdriver (not included), remove the screw and battery compartment cover
located on the back of the remote control.
2. Install six (6) fresh 1.5V AA (LR6) alkaline batteries (not included), making sure the (+) and (-)
ends face the proper direction as indicated inside the battery compartment.
3. Replace the compartment cover and tighten the screw.
B.
1
ROTOR BLADES
Take out the charging cable from the
side of the remote control.
POWER
SWITCH
3
SENSOR
CHARGING
SOCKET
TAKE OFF
Turn ON (I / ) the remote control. The light on
the remote will ash in red. It will turn green
when it is fully charged. Unplug the charging
POWER SWITCH
cable and replace the cord in the unit.
BATTERY INSTALLATION
6 x AA Batteries
CHARGING THE HELICOPTER
2
O
Turn the helicopter OFF (O/ ) and insert the cable
into the charging station under the helicopter.
I = ON
O = OFF
O
NOTE: If the power indicator on the remote
O
control is alternating between green and
red, then the battery power is low. Follow
the instructions under "Battery Installation"
to replace the batteries.
PAIRING HELICOPTER AND REMOTE CONTROL
Before beginning, the helicopter and remote control will need to be paired. Here's how:
1
O
Turn the helicopter on (I). The lights on
the front will ash.
CALIBRATE SENSOR
If playing for the rst time or if it hasn't been played for a long period of time, the sensor will need to be calibrated.
1
After turning on, place the remote control
on a at surface near the helicopter.
FLYING LESSONS
O
HELPFUL FLYING TIPS
• If the helicopter crashes, switch the remote control and the helicopter to the OFF positions. Carefully check
that no damage was done to the helicopter in the crash before turning the unit on again.
• For best results, use the helicopter away from bright lights to ensure the receiver can detect the remote
control.
• Do not cover the sensor on the helicopter.
• Keep the remote control within 15 feet (5 meters) of the helicopter to avoid loss of reception.
EMERGENCY STOP:
If the helicopter crashes, press and hold the
LANDING button, or press the LANDING and
TAKE OFF buttons at the same time to stop the
propellers. Turn the helicopter and remote
control o . Examine the helicopter for any
damage before switching it on and ying again.
1
3 FEET
Place the helicopter on a at surface and stand three feet away with the
remote control at an upward position in front of you.
2
O
Turn the remote control on (I / ).
The light on the front will begin to ash.
Once it is paired, it will stop ashing.
2
PRES AND HOLD
Hold down the LANDING and TAKE OFF
buttons until the green light ashes. Release
the buttons and the light will stop ashing.
Advertisement

Related Manuals for Little Tikes YouDrive Rescue Chopper


Summary of Contents for Little Tikes YouDrive Rescue Chopper
- Page 1 PAIRING HELICOPTER AND REMOTE CONTROL Before beginning, the helicopter and remote control will need to be paired. Here’s how: BATTERY INSTALLATION AGES 3+ YEARS Before beginning, an adult must install fresh alkaline batteries. Here’s how: ADULT SUPERVISION REQUIRED 1. Using a Phillips screwdriver (not included), remove the screw and battery compartment cover SKU: 649523 ADULT BATTERY INSTALLATION REQUIRED located on the back of the remote control.
- Page 2 Take them to a designated recycling facility. The Little Tikes Company makes fun, high quality toys. We warrant to the original purchaser that this product is free of defects in materials or workmanship for one year * from the date of purchase (dated sales receipt is Please keep this manual as it contains important information.
Need help?
Do you have a question about the YouDrive Rescue Chopper and is the answer not in the manual?
Questions and answers