
Related Manuals for Little Tikes FOAMO


Summary of Contents for Little Tikes FOAMO
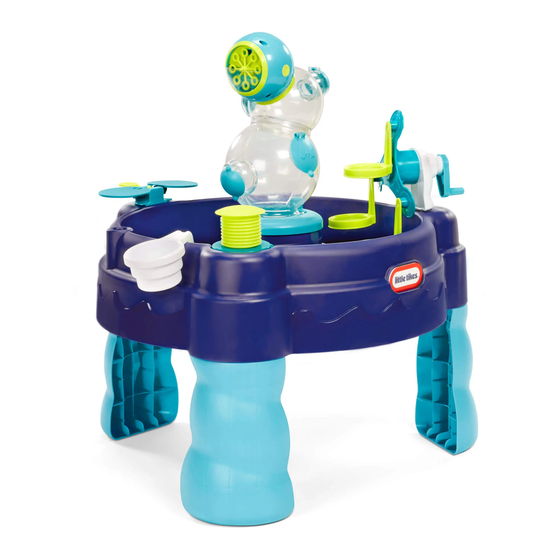
- Page 1 FOAMO™ 3-in-1 Water Table ASSEMBLY INSTRUCTIONS #656033M8X1 #656033M8 Adult assembly required. Approx. assembly time: min. Look for video of assembly at littletikes.com/videoinstructions XIM656033 - 5/21...
- Page 2 © Thank you for choosing the Little Tikes FOAMO™ 3-in-1 Water Table . We strive to provide a durable, easy-to-assemble toy thats made to last, giving your child years of imaginative, engaging fun! Really important information you should know! • Read through all the instructions first.
- Page 3 The Little Tikes Company makes fun, high quality toys. We warrant to the original purchaser that this product is free of defects in materials or workmanship for one year * from the date of purchase (dated sales receipt is required...
- Page 4 BEFORE you begin assembly, make sure you have all the parts listed below. Some packages of hardware may have extras pieces. Questions? We’re here to help. Little Tikes customer service team at 1-800- 321-0183. Shown actual size Tools Required (not included) "...
- Page 5 Ready...batteries first! 1.5V D/LR20 Tool required (not included) 1.5V D/LR20 Battery installation MUST be completed by an adult: 1. Using a Phillips screwdriver (not included) remove the screws and battery compartment cover (1) located on the foam maker (C). 2. Install two (2) fresh D alkaline batteries (not included), making sure the (+) and (-) ends face the proper direction as indicated inside the battery compartment.
- Page 6 Pull the drain plug...all the way! First insert the drain plug (part J) into opening on table top (part A) Push drain plug through the opening. Next, flip table over. Work the plug around the opening, pulling only the plug edge through. Recommended (not included) The plug edge...
- Page 7 Get foamin’! Bottom foam maker part is keyed to fit into table. First, turn the table upside down. FOR CORRECT POSITIONING: align notches in the foam maker (part C) to the notches in the table. Align the On/ Off button to the circular indent in the table.
- Page 8 Pop in the legs Insert table legs (part B) into table top (part A), snap into place. Place on flat surface before you push legs in Match the towers together...and turn Insert top foam tower (part E) onto the bottom foam tower (part D) - these parts are keyed to fit together.
- Page 9 Line it up and SNAP! First, align notches in lower table top base (part A) to notches in the bottom foam tower. Then, snap foam tower into opening on table. Bottom foam tower part is keyed to fit into table. Press down to fit into table.
- Page 10 Match the bubble blower next! Insert the bubble blower (part F) onto the foam tower - these parts are keyed to fit together. Align notches WAIT! You installed the batteries- right? Spinning bubble wands should be positioned on top...
- Page 11 This step is so easy! Insert the clapper (part H) into the table. Ferris wheel fun! Insert (3) ferris wheel cups (part L) into ferris wheel (part K). Last step. Get ready to splash! Place assembled ferris wheel and bubble maker (part G) into the table base. Bubble Maker Assembled...
- Page 12 Press again to with water to below the small turn OFF. bubble. • Add 3 tbsp. (1 oz.) of “bubble bath”. water • Fill the FOAMO™ 3-in-1 Water Table with water. The table holds approximately 4 gallons (15.14 litres) of water.
- Page 13 3-en-1 INSTRUCTIONS DE MONTAGE Montage par un adulte requis. Durée de montage approximative : 30 min. Merci d’avoir choisi l’ensemble Table à eau FOAMO™ 3-en-1 de Little Tikes © . Nous sommes déterminés à fournir un jouet durable et facile à...
- Page 14 • Ne tentez pas de recharger des piles non 2. Installez deux (2) piles alcalines D neuves (non rechargeables. fournies), en veillant à ce que les pôles (+) et (-) soient • Les piles rechargeables doivent être retirées du jouet orientés dans le bon sens, comme indiqué...
- Page 15 Little Tikes aux États-Unis et dans d’autres pays. Tous les logos, noms, caractères, similitudes, images, s’emboîter. slogans et apparence d’ e mballage sont la propriété de Little Tikes. Merci de conserver cette adresse et cet emballage car ils contiennent des informations importantes. Le contenu, y compris les spécifications •...
- Page 16 ¿Tiene preguntas? Estamos aquí para ayudarlo. recargable frecuentemente es inferior a la de una Llame a nuestro equipo de servicio al cliente de batería alcalina nueva. Por lo tanto, se recomienda la Little Tikes al 1-800-321-0183. utilización de baterías alcalinas en lugar de baterías...
- Page 17 2. Presione firmemente en su lugar (la tapa de la batería Herramientas necesarias (no incluidas): debe estar hacia arriba). destornillador de estrella y alicates. 3. Asegure el generador de espuma con (4) tornillos de Piezas 3/4" (1.9 cm) en las (4) ubicaciones. IMPORTANTE: dé...
- Page 18 Impreso en E.U.A. oder in der Nähe von Treppen, Bergen oder Abhängen. © The Little Tikes Company, una compañía de MGA Entertainment. LITTLE TIKES® es una marca registrada de Little Tikes en EE.UU. y otros países. Todos los logotipos, nombres, personajes, •...
- Page 19 © The Little Tikes® Company, ein Unternehmen von MGA Entertainment. LITTLE TIKES® ist ein Markenzeichen 3. Batteriefachabdeckung wieder anbringen und mit den Schrauben von Little Tikes in den USA und anderen Ländern. Alle Logos, Namen, Gestalten, Abbilder, Images, Slogans befestigen.
- Page 20 Kilka wskazówek przed rozpoczęciem! • Do montażu stołu wodnego 3-in-1 FOAMO™ potrzebny jest śrubokręt krzyżakowy, szczypce (brak w zestawie). • PRZED rozpoczęciem montażu upewnij się, że masz wszystkie - Montując śruby, upewnij się, że są dobrze dokręcone, ale NIE wymienione poniżej części.
- Page 21 © The Little Tikes® Company należy do koncernu MGA Entertainment. LITTLE TIKES® jest znakiem towarowym Hierdoor kan het product onstabiel worden. Little Tikes w Stanach Zjednoczonych i innych krajach. Wszystkie logo, nazwy, znaki, wizerunki, obrazy, hasła i • Alleen bestemd voor gebruik met de bijgeleverde accessoires.
- Page 22 Gedrukt in V.s.a. 1. Plaats eerst de afvoerplug (onderdeel J) in de opening op de speeltafel © The Little Tikes Company, onderdeel van MGA Entertainment. LITTLE TIKES® is een handelsmerk van Little Tikes in (onderdeel A). Duw de afvoerplug door de opening.
- Page 23 • Le batterie ricaricabili devono essere ricaricate da una persona adulta. • Per assemblare il tavolo acquatico 3-in-1 Foamo™ saranno necessari un • I terminali di alimentazione non vanno messi in corto circuito. cacciavite Phillips e delle pinze (non incluse).
- Page 24 • Nunca encha com nada a não ser água limpa da torneira. A utilização © The Little Tikes Company, una società di MGA Entertainment. LITTLE TIKES® è un marchio di fabbrica di Little de outros líquidos pode ser prejudicial ou danificar a unidade. Nunca Tikes negli USA e altri Paesi.
- Page 25 • Perguntas? Nós estamos aqui para ajudar. Entre em contacto com o • Para apertar, rode o ventilador de bolhas no sentido dos ponteiros do serviço de apoio ao cliente da Little Tikes. relógio. As varinhas de bolhas rotativas devem ser posicionadas na •...
- Page 26 E-mail: klantenservice@mgae.com Empresso nos E.U.A. © The Little Tikes Company, uma companhia da MGA Entertainment. LITTLE TIKES® é uma marca comercial da Little Tikes nos EUA e em outros países. Todos os logotipos, nomes, identidades visuais, imagens, slogans e aparência das embalagens são de propriedade da Little Tikes.
Need help?
Do you have a question about the FOAMO and is the answer not in the manual?
Questions and answers