Table of Contents
Advertisement
Quick Links
Advertisement
Table of Contents

Related Manuals for Suunto t3


Summary of Contents for Suunto t3
- Page 2 Time mode Total of all training Logbook Shortcuts Backlight 2 sec Training / Speed and Distance mode Starts and stops the stopwatch Switches between the modes Shortcuts Enters and exits the Settings and other submodes Resets the stopwatch Switches between the modes Backlight...
-
Page 4: Table Of Contents
1. Getting started ... 4 1.1. Setting up Suunto t3 ... 5 1.2. Activity class (act class) ... 5 1.3. Suunto t3 at a glance ... 7 1.3.1. Time mode ... 9 1.3.2. Training mode ... 11 1.3.3. Speed and Distance mode ... 12 1.3.4. - Page 5 5.2. Water resistance ... 35 5.3. Changing the strap length ... 35 5.4. Replacing the battery ... 36 5.4.1. Replacing the battery of the Suunto t3 ... 37 5.4.2. Replacing the battery of the heart rate belt ... 38 6. Technical specifications ... 39 7.
-
Page 6: Getting Started
1. GETTING STARTED The buttons are named on the back of the device according to the functions they perform. However, in this user's guide the names are simplified as shown in the table below. Name on back of device + / lap Mode - / Light Alt / Back... -
Page 7: Setting Up Suunto T3
1.1. Setting up Suunto t3 When you press a button on your new Suunto t3 for the first time, you will be asked to define some basic settings. Use the UP and DOWN buttons to change the values, accept and move to the next item by pressing the ENTER button. - Page 8 physical activity increases, the device will automatically increase your activity class based on your recorded heart rate information. Your activity class will not be automatically decreased if, for example, you engage in less strenuous activity, but you should manually decrease your activity class if you think that it has decreased over time.
-
Page 9: Suunto T3 At A Glance
Activity description Endurance athlete (International level) 1.3. Suunto t3 at a glance Time mode Totals Logbook In Time mode you can: - view the time - go to log - go to Totals - go to Time settings - change shortcuts... - Page 10 NOTE * In order to connect your device to a PC, an optional Suunto PC POD and Suunto software are required. In any of the above modes, a long press of the ENTER button will take you to that mode's Settings menu.
-
Page 11: Time Mode
Here you can see the functionality of the buttons used in Time mode. This will help you get started with using the basic functions of your Suunto t3. Additionally, you will find options for the shortcut, which is in the bottom line of the display. - Page 12 GO TO LOGBOOK CHANGE SHORTCUT: - DAY - DATE - DUAL TIME - CONNECT TO PC (LONG PRESS) The light The light can be activated in any mode at any point by short pressing the DOWN button. If you want to use the light in Settings, Logbook or Totals, the light must be activated before entering them.
-
Page 13: Training Mode
1.3.2. Training mode Here you can see the basic functionality of the buttons used in Training mode as well as options for the shortcut, which is in the bottom line of the display. CHANGE SHORTCUT: - AVERAGE HEART RATE - TRAINING EFFECT - LAP / INTERVAL TIME AND DURATION - SPEED... -
Page 14: Speed And Distance Mode
1.3.3. Speed and Distance mode The Speed and Distance mode is available when you have paired an optional speed and distance POD with your Suunto t3. Here you can see the functionality of the buttons used in Speed and Distance mode. - Page 15 Time mode settings Symbol Setting Alarm Time Date Personal General Options Alarm: Alarm time: hour/min on/off Time: Dual time: hours/ minutes hours/ minutes/ seconds Date: year/ month/ day Weight Height Activity class Tones: Heart rate: Height: on/off bpm/ % cm/ft Max heart Date of birth rate...
- Page 16 Training mode settings Symbol Setting Heart rate zones Heart rate limits Intervals Pair a General Options Zone 1: Zone 2: Zone 3: upper % lower/ upper % upper % Heart Lower limit Upper rate limit limits: on/ Interval Interval 1: Interval 2: 1: on/off minutes/...
- Page 17 Speed and Distance mode settings Symbol Setting Autolap Speed Calibrate Pair a General Please refer to Section 2.2 Settings for more information on how to define the device's settings. Options Autolap: Distance on/off Limits: Lower Upper limit on/off limit Calibrate: Foot POD/ Bike POD Pair: heart rate belt / Foot POD / Bike POD / GPS POD Tones: Heart...
-
Page 18: Before Training
2.1. The heart rate transmitter belt and speed and distance PODs 2.1.1. Putting on the heart rate transmitter belt The heart rate transmitter belt is an integral part of Suunto t3's functionality, so it's important that you know how to wear it correctly. -
Page 19: Heart Rate Signal Troubleshooting
After switching to Training mode, Suunto t3 displays two bars while it is seeking the HR belt signal. Once the device has found the signals, your heart rate or speed and distance information will be displayed in the center of the screen. -
Page 20: Wireless Speed And Distance Pods
2.2. Settings Before you are able to make the most of your Suunto t3, it's worth taking some time to personalize it to suit your individual needs and preferences. If you have already defined the settings based on the information given in section 1, you can skip to section 3. -
Page 21: Personal Settings
Alarm settings In the Alarm menu, you can set the alarm on or off and set the alarm time. Accept the settings with a short press of the Enter button, which also moves you on to the next menu item. Time settings In the Time menu, you can set the time and dual time. -
Page 22: General Settings
NOTE See the table in Section 1.2, Activity class for information on activity class descriptions. General settings In the General menu, you can set the button tones on or off and choose the units and format the information is displayed in. Accept the settings with a short press of the Enter button. 2.2.2. - Page 23 After training, you can see how much of the session was spent in each zone. Each zone is a range of heart rates expressed as a percentage of your maximum heart rate (which is calculated based on the age you enter in the Personal settings menu). Accept the settings with a short press of the ENTER button, which also moves you on to the next menu item.
-
Page 24: Heart Rate Limit Settings
Lower limit By checking your average heart rate you can adjust your training intensity to make sure the session is as effective as possible. When the Limit alarm is on, Suunto t3 gives you an alarm when your heart Target... -
Page 25: Speed And Distance Mode Settings
Enter button, which also moves you on to the next menu item. Pair a POD settings In the Pair a POD menu, you can pair your Suunto t3 with your heart rate transmitter belt, Suunto PC POD, Suunto Foot POD, Suunto Bike POD or Suunto GPS POD. -
Page 26: Autolap Settings
Calibrate settings In the Calibrate menu, you can calibrate your Suunto Foot POD or Suunto Bike POD. An alternative way of calibrating your POD is to run or cycle a known distance, say 10 km, using the POD. If you do not reset the stopwatch after completing the distance, you can correct the distance shown, for example 9.6 km, from the settings. -
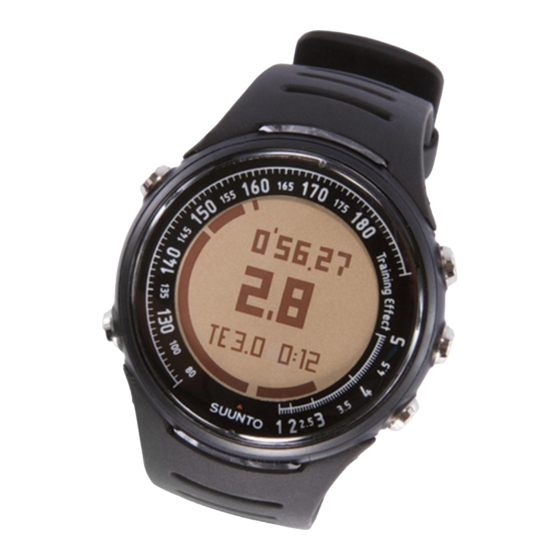
Page 27: Training Effect
See Section 2.2.1 Time mode settings for information on General settings. 2.3. Training Effect A unique feature of Suunto t3 is its ability to record and display Training Effect. Training Effect (TE) shows the effect of a workout on your aerobic fitness on a simple one-to-five scale. For the first time, you will know in real time how much your workout is really improving your fitness level. - Page 28 This gives you freedom from the zone alarms while still reaching the desired result. Suunto t3 shows the Training Effect in two ways. The lower right side of the display shows it as a graph. It can also be shown as a number in the center of the screen instead of the heart rate reading.
-
Page 29: Training
Firstbeat Technologies Ltd. 3. TRAINING Once you have your Suunto t3 set up as you like it, it's time to get out and start training. For detailed information on training and tips on how to maximize its effectiveness, download Suunto Training Guidebook from www.suunto.com/training. -
Page 30: Using Training Effect Targets
3.1. Using Training Effect targets You can increase the Training Effect target by long pressing the DOWN button while the Training Effect shortcut is displayed. This automatically updates the recommended duration of the session. 3.2. Training without set targets The stopwatch is activated by short pressing the START button in Training mode. It can be seen in the top row in Training mode. - Page 31 Pressing the UP button, when the stopwatch is running, stores the split time and displays it in the top row of the Suunto t3. It also displays the average heart rate and shows the lap time. After 3 seconds, the display jumps back to the stopwatch.
-
Page 32: Using The Speed And Distance Displays
If your peak heart rate in the most recent session exceeded the maximum heart rate defined in Personal Settings, Suunto t3 will ask if you want to update your maximum heart rate value after resetting the stopwatch. 3.3. Using the speed and distance displays While training, the Speed and Distance mode provides additional information to help you monitor and adjust your training. -
Page 33: After Training
4. AFTER TRAINING Once you have finished your training, your Suunto t3 can provide you with detailed information on your performance. In this section, we'll look at the Totals and Logbook functions, as well as Suunto's online training community, www.suunto.com/training. -
Page 34: Training Totals
4.2. Training Totals In addition to detailed information on your last 15 training sessions, Suunto t3 stores all the accumulated data recorded this week (Monday - Sunday), last week, and for the last 6 months. This information can be seen in the Totals submode, which is accessed by short pressing the UP button in Time mode. - Page 35 When in the Totals submode, use the UP and DOWN buttons to choose the period you wish the view. The ENTER and BACK buttons are used to view the different totals, for example Training Effect total, calorie consumption totals, and distance totals. The figure below shows how to navigate within the Totals menu.
-
Page 36: Suunto Training World
Your Suunto t3 is a precision instrument. By following a few common sense points, you can maximize the life of your device. If your Suunto t3 does require servicing, you should take it to your nearest Suunto representative. This section also describes the steps to follow when replacing the battery in both your Suunto t3 and the transmitter belt. -
Page 37: Water Resistance
• You can wipe your Suunto t3 clean with a cloth lightly moistened with warm water. If there are stubborn stains or marks, you can apply mild soap to the area. • Do not expose your Suunto t3 to strong chemicals, such as gasoline, cleaning solvents, acetone, alcohol, insect repellents, adhesives and paint, as they will damage the unit’s seals, case and... -
Page 38: Replacing The Battery
Make sure that the spring bars are positioned straight in the buckle. 5.4. Replacing the battery You can replace the battery in both the Suunto t3 and the heart rate transmitter belt. In this section we see how to do this. -
Page 39: Replacing The Battery Of The Suunto T3
Your Suunto t3 operates on a 3-Volt lithium cell, type: CR 2032. The life expectancy is approximately 12 months of operation with an average of 4 hours of training a week. The higher your average amount of training hours a week, the shorter the battery's life expectancy will be. -
Page 40: Replacing The Battery Of The Heart Rate Belt
The average expected battery life of the transmitter belt is 300 hours of use in ideal operating temperatures. If your Suunto t3 does not receive a signal when the transmitter belt is active, you might need to replace the battery. -
Page 41: Technical Specifications
Replacement covers are available with replacement batteries. NOTE Battery covers of the transmitter belt and Suunto t3 are not interchangeable. 6. TECHNICAL SPECIFICATIONS General. • Operating temperature: -20°C to +60°C/-5°F to +140°F •... -
Page 42: Intellectual Property
7. INTELLECTUAL PROPERTY 7.1. Copyright This publication and its contents are proprietary to Suunto Oy and are intended solely for the use of its clients to obtain knowledge and key information regarding the operation of Suunto t3 products. Its contents shall not be used or distributed for any other purpose and/or otherwise communicated,... -
Page 43: Trademark
US 11/432,380, US 11/181,836, US 11/169712, US 11/154,444, US 10/523,156, US 10/515,170 and EU Design 000528005-0001/000528005-0010. 8. DISCLAIMERS 8.1. User's responsibility This instrument is intended for recreational use only. Suunto t3 must not be used as a substitute for obtaining measurements that require professional or laboratory-quality precision. -
Page 44: Warnings
8.5. Limits of liability and ISO 9001 compliance If this product should fail due to defects in materials or workmanship, Suunto Oy will, at its sole option, repair or replace it with new or rebuilt parts, free of charge, for two (2) years from the date of its purchase. -
Page 45: After Sales Service
Suunto Oy and its subsidiaries shall in no event be liable for any incidental or consequential damages arising from the use of or inability to use the product. Suunto Oy and its subsidiaries do not assume any responsibility for losses or claims by third parties that may arise through the use of this device. -
Page 46: Fcc Compliance
Repairs should be made by authorized Suunto service personnel. Unauthorized repairs will void the warranty. Tested to comply with FCC standards. For home or office use. FCC WARNING: Changes or modifications not expressly approved by Suunto Oy could void your authority to operate this device under FCC regulations. -
Page 47: Disposal Of The Device
9. DISPOSAL OF THE DEVICE Please dispose of the device in an appropriate way, treating it as electronic waste. Do not throw it in the garbage. If you wish, you may return the device to your nearest Suunto representative.
Need help?
Do you have a question about the t3 and is the answer not in the manual?
Questions and answers