Table of Contents
Advertisement
Advertisement
Table of Contents

Related Manuals for Wellav CMP100


Summary of Contents for Wellav CMP100
- Page 1 CMP100 Common Media Platform User Guide V1.2-W...
- Page 2 CMP100 User Guide Revision History Date Version Description Author 24/8/2017 First Version 06/06/2018 Add new modules, new features and adjust management page 15/11/2018 Modify the product picture This guide contains some symbols to call your attention. The DANGER symbol calls your attention to a situation that, if ignored, may cause DANGER physical harm to the user.
- Page 3 CMP100 User Guide Safety Instructions Read these instructions Keep these instructions Follow all instructions Heed all warnings Do not use this unit near water. Only use a damp cloth to clean chassis Do not install near any heat sources such as radiators, heat registers, stoves, or other apparatus (including amplifiers) that produce heat ...
- Page 4 CMP100 User Guide SAFETY PRECAUTIONS There is always a danger present when using electronic equipment. Unexpected high voltages can be present at unusual locations in defective equipment and signal distribution systems. Become familiar with the equipment that you are working with and observe the following safety precautions.
-
Page 5: Table Of Contents
CMP100 User Guide Contents PART 1 CHASSIS OVERVIEW..............................1 ..................................... 1 1.1 P ANEL PART 2 INSTALLATION................................2 ................................2 2.1 R NSTALLATION ..............................2 2.2 AC P OWER ONNECTION PART3 WEBGUI..................................4 ................................ 4 3.1 W GUI O VERVIEW 3.1.1 Connecting to the Management Port··················································································································· 4 3.1.2 Logging into the Web GUI·····································································································································5... -
Page 6: Part 1 Chassis Overview
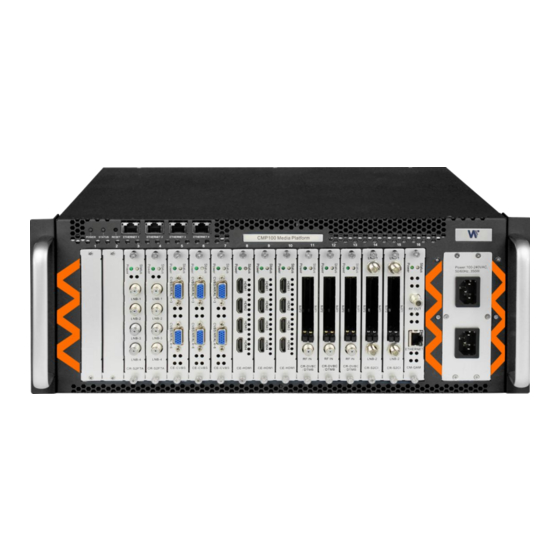
CMP is a brand new Common Media Platform dedicated to commercial market, using the latest commercial product design concept, with high density, high performance and high flexibility. By carrying different types of function module, CMP100 can support almost any commercial application with any combination of receiving, descrambling, encoding, multiplexing, and modulation in one device. -
Page 7: Part 2 Installation
Part 2 Installation 2.1 Rack Installation The CMP100 is designed to be mounted in a standard 19” rack. It takes 4RU of rack space. To install it into a rack, please use the following steps: 1. Determine the desired position in the rack for the CMP100. Make sure that the air intake on the top of the unit and the exhausts on the back of the unit will not be blocked. - Page 8 CMP100 User Guide When you take the equipment from a cold condition into a much warmer and humid condition, the equipment should be acclimated to the warm and humidity condition for at least 30 minutes. Powering up a non-acclimated unit may lead to shortcut or other damage to electronic components.
-
Page 9: Part3 Webgui
Check the physical connection by ping command. CMP100 possesses an embedded gigabit switch inside the chassis, you can use it as a switch with other devices together. The four network ports are used for both managing and streaming at the... -
Page 10: Logging Into The Web Gui
A good method of checking multicast output is to check the output via VLC on your control PC directly. If you want to connect a switch between CMP100 and PC or other devices, this switch should support IGMP V2 and IGMP snooping function. If the switch you used is not the correct configuration, it could cause some network issue. -
Page 11: System Setting
CMP100 User Guide We use only IE, Firefox and Chrome for testing procedures. If you use other browsers, like Microsoft Edge, you may encounter incomplete UI layouts, and configure setting in these browsers may lead to errors. Status>Device Information Device Information page shows the firmware version, software version, and hardware version of baseboard and each inserted module. - Page 12 CMP100 User Guide System Setting> Network In Network page you can assign a static IP address to CMP100’s baseboard. Click the Apply button in the right side to make the change take effect. Note to avoid IP confliction when you set baseboard IP address, the occupied IP section will be displayed in this page on the top blue area.
- Page 13 CMP100 User Guide System Setting> System In System page you can do upgrade, import or export configuration, import or export license (only baseboard), reboot the whole unit, restore to factory setting (only baseboard), export log and clear log (only baseboard).
-
Page 14: Tsoip Input
CMP100 User Guide 3.4 TSoIP Input Click the TSoIP Input on the top line to go into IP input page where you can see Status, Setting, Batch Setting and Service Configuration. TSoIP Input >Status In this page, you can check each channel Total Bit Rate, Effect Bit Rate, TS Analysis and Service List. - Page 15 CMP100 User Guide Service List Click the service name you can check the detail info of this service. TSoIP Input >Settings To make the configuration of IP input parameters, you can set the source IP address and port, protocol (UDP/RTP), the encap TS package, VLAN enable/disable, and TSIP Port. Click Apply to...
- Page 16 CMP100 User Guide TSoIP Input >Batch Setting To batch set the IP input parameters, you can check the parameter box to make the modification. Click Apply to make the setting take effect. TSoIP Input >Service Configuration...
- Page 17 CMP100 User Guide To set input source streaming out, you can make the configuration of the destination in this page. Multiplex or Bypass stream: You should click the channel line setting icon to make the whole stream multiplex or bypass out. Click the setting icon ( ), and then you will see the output module, check the module box, and then you can set the output channel of this stream.
-
Page 18: Tsoip Output
CMP100 User Guide After making output destination configuration, click Apply to make it take effect. The destination channel will be displayed in the channel/service line. And you can also click Clear Config to clear all of configuration. There is a channel scan button (... - Page 19 CMP100 User Guide Multicast output setting: You should fill the fit multicast IP addresses as output in the Destination IP Address box, please avoid IP confliction among baseboard, encoder modules (see encoder modules page) and other devices when you set multicast output.
- Page 20 CMP100 User Guide TSoIP Output >Service Configuration You can make a configuration for output services and TS. TS setting: Click TS line (the blue area) to make the modification of Original Network ID, TS ID and each Service ID, Service Name, and Service Provider.
-
Page 21: Admin
CMP100 User Guide 3.6 Admin Click Admin you can choose to go into Password setting page or Log Out. -
Page 22: Part 4 Module Configuration
CMP100 User Guide Part 4 Module Configuration 4.1 Receiver Descrambling Modules 4.1.1CR-DVBC/DTMB CR-DVBC/DTMB-00 is a 4-channel DVBC/DTMB receiving and descrambling module with 1 RF female connector and 2 CI slots. It can receive 4 RF channels signal simultaneously and support 2 CAM cards descrambling. - Page 23 CMP100 User Guide Click Service Info to check service information of all the inputs. You can check program details by clicking the program item. CR-DVBC/DTMB -00 >CI Status...
- Page 24 CMP100 User Guide CAM Max Bit Rate is from 48Mbps to 108Mbps which you can choose in pull-down list. CR-DVBC/DTMB -00 >Parameter Setting Parameter Setting of DVBC mode Name Range Frequency (KHz) 48000~862000 Symbol Rate(KBaud) 3000~7000 Parameter Setting of DTMB mode ...
-
Page 25: Cr-Dvbs2Ci
CMP100 User Guide CR-DVBC/DTMB -00 >Service Configuration In Descrambling Settings there are CAM1, CAM2, No Descrambling options. Click Apply or Clear Config button in the right side to make the change take effect or clear all configuration. CR-DVBC/DTMB -00 >System Operation In System Operation page you can change into DVBC Mode or DTMB Mode, Restart module, Factory Reset, and Log Export. - Page 26 CMP100 User Guide Module configuration is similar to CR-DVBC/DTMB-00. Status and CI pages refer to CR-DVBC/DTMB-00 module section. CR-DVBS2CI-00 >Parameter Setting Channel 1.1 and 1.2 both via LNB-1 share power each other, channel 2.1 and 2.2 both via LNB-2 share power each other.
-
Page 27: Cr-Dvbs2Fta
CMP100 User Guide 4.1.3 CR-DVBS2FTA CR-S2FTA is a 4/8-channel DVB-S/S2 receiving module with 4/8 RF connectors, it supports internal signal pass through from one tuner to the others. Module configuration is similar to CR-DVBS2CI-00. Please refer to CR-DVBC/DTMB-00 and CR-DVBS2CI-00 modules section. - Page 28 CMP100 User Guide CE-HDMI-00/01 >Status CE-HDMI-00/01 >Setting Click All Configurable Parameters to see all parameters you can modify and check what specific parameters you want to set and see. Click the Apply button in the right side to make the change take...
- Page 29 CMP100 User Guide Click Service Info in the line of Audio Encoding to set audio encoding. Name Range Name Range Video Type H264 , MPEG2 GOP Close Disable, Enable Video Bitrate (Kbps) 600~20000 PCR PID 32~8190 Video Mode CBR, VBR...
- Page 30 CMP100 User Guide 4x3_CutOff GOP Size 6~63 Audio Encoder Details Range Audio Encoder Details Range Encoding Type Audio Sampling Bitrate(KHz) MPEG1_Layer2 MPEG2_AAC MPEG4_AAC Audio Mode Dual Channel Audio PID 32~8190 Mono Stereo Encoding Bitrate(Kbps) 128~384 (AC3) Volume 64~384(MPEG1_Layer2) 32~384(MPEG2_AAC/ MPEG4_AAC) CE-HDMI-01 is similar to CE-HDMI-00, there are a few differences on parameter setting range.
- Page 31 CMP100 User Guide GOP Size PMT PID 1~99 32~8190 Video Resolution Program Name Auto , 1920×1080_60i , Length is 1~16 1920×1080_50i , 1920×1080_30p , 1920×1080_25p , 1080×720_60p , 1080×720_50p , 720×480_60i , 720×576_50i Profile HIGH Provider Name Length is 1~16...
- Page 32 CMP100 User Guide If you want to use IP output channel in the encoder module and baseboard TSoIP module at same time, you should avoid the multicast IP addresses confliction. If there are two same IP addresses enable meantime, all the multicast video will be affected.
- Page 33 CMP100 User Guide LOGO Parameter Range LOGO Parameter Range Position X 0~1920 (Dual) Position Y 0~1080 (Dual) Size width 0~1920 (Dual) Size Height 0~1080 (Dual) Subtitle setting: Subtitle Parameter Range LOGO Parameter Range Position Bottom/Top/Middle Size width 0~1920 (Dual)
-
Page 34: Ce-Cvbs
CMP100 User Guide Size Height Front 0~1080 (Dual) 0~100 QR Code setting: QR Code picture picking method is same to LOGO setting. LOGO Parameter Range LOGO Parameter Range Position X 0~1920 (Dual) Position Y 0~1080 (Dual) Size width 0~1920 (Dual) - Page 35 CMP100 User Guide Configuration is similar to CE-HDMI module. Please refer to that module section. CE-CVBS-00 >Settings Click All Configurable Parameters to see all parameters you can modify and check what specific parameters you want to set and see. Click the Apply button in the right side to make the change take...
- Page 36 CMP100 User Guide Click Service Info in the line of Audio Coding to set audio encoding. Name Range Name Range Video Type H264 , MPEG2 Service Name Length is 1~16 Video Bitrate (Kbps) 600~20000 Service Provider Length is 1~16 Name...
- Page 37 CMP100 User Guide 4x3_CutOff PMT PID 32~8190 Audio Encoder Details Range Audio Encoder Details Range Encoding Type MPEG1_Layer2 Audio Sampling Bitrate(KHz) Audio Mode (AC3) Audio PID Dual Channel/Mono/ 32~8190 Stereo Encoding Bitrate(Kbps) Volume Setting 64~384 0.00~8.00 CE-CVBS-01 /01A>Settings CE-CVBS-01 module has 8 channels with 2 DB15 connectors and CE-CVBS-01A module has 16 channels with 4 DB15 connectors.
-
Page 38: Modulation Output Modules
CMP100 User Guide Video Format PMT PID AUTO/NTSC/PAL 32~8190 Audio Encoder Details Range Audio Encoder Details Range Encoding Type MPEG1_Layer2/AAC/AC3 Audio Sampling Bit rate(KHz) Audio Mode (AC3) Stereo Audio PID 32~8190 Encoding Bitrate(Kbps) Volume (dB) 32~192 -20~20 Delay (ms) -2000~2000 CE-CVBS-01/01A >... - Page 39 CMP100 User Guide CM-QAM--00 >Setting Click the Apply button in the right side to make the change take effect. Name Range Name Range QAM Mode ANNEX A/ ANNEX B RF level 0~63 Bandwidth 6M, 7M, 8M Frequency (KHz) 47000~862000 Symbol Rate (KBaud)
-
Page 40: Cm-Dtmb
CMP100 User Guide Click plus icon of Descriptor and add the Cable Descriptor in. Then fill in the correct frequency and symbol rate and choose the correct constellation of the TS (frequency) and then click OK. (This operation should be set on Modulator module only) ... -
Page 41: Cm-Qama
CMP100 User Guide 4.3.3 CM-QAMB CM-QAMB module supports up to 16 non-adjacent or 4/8 adjacent frequencies modulating with 1 RF female connector for output. Operations please refer to CM-QAM-00 pages. 4.3.4 CM-OFDM CM-OFDM module supports up to 4/8 adjacent frequencies modulating with 1 RF female connector... -
Page 42: Part 5 Appendices
CMP100 User Guide Part 5 Appendices Appendix A - Abbreviations 8VSB Vestigial sideband modulation with 8 discrete amplitude levels 16VSB Vestigial sideband modulation with 16 discrete amplitude levels Advanced Audio Coding AC-3 Also known as Dolby Digital Asynchronous Serial Interface... - Page 43 CMP100 User Guide Input/output Kbps 1000 bit per second Logical Channel Number Low-Noise Block Local Oscillator Mbps 1,000,000 bits per second Modulation Error Ratio Management Information Base MPTS Multi-program Transport Stream Network Information Table OFDM Orthogonal Frequency-Division Multiplexing Program Association Table...
-
Page 44: Appendix B- Warranty
CMP100 User Guide Appendix B- Warranty We warrants this instrument against defects from any cause, except acts of God and abusive use, for a period of 1 (one) year from date of purchase. During this warranty period, we will correct any covered defects without charge.
Need help?
Do you have a question about the CMP100 and is the answer not in the manual?
Questions and answers