Table of Contents
Advertisement
Advertisement
Table of Contents

Related Manuals for SainSmart CR-10 Series


Summary of Contents for SainSmart CR-10 Series
- Page 1 CR-10 SERIES 3D PRINTER USER MANUAL...
- Page 2 PREFACE Dear consumers, Thank you for choosing SainSmart CR-10 series 3D printers. For your best experience, please read this instruction before operation. Our 3D team is always ready to provide you with assistance. Please contact us via e-mail ( support@sainsmart.com ) if you encounter any problem with the printer.
-
Page 3: Table Of Contents
CONTENTS Introduction Package Contents Assembly LCD Menu Loading Filament Bed Leveling Software Installation Preparing to Print Trouble-shooting After-Sales Services... -
Page 4: Introduction
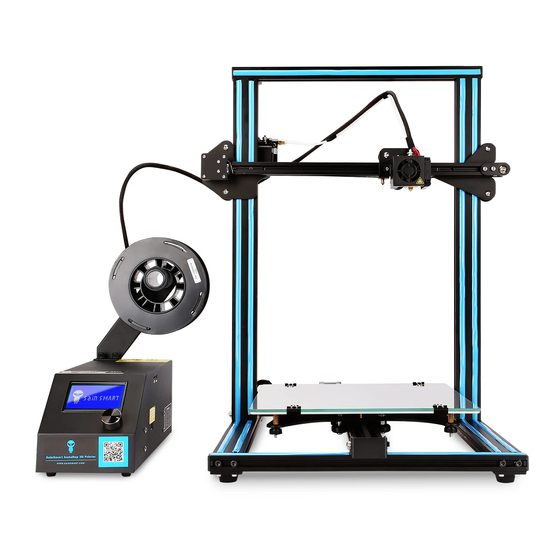
I. Introduction 1. Control Unit 2. Spool Holder 3. Nozzle Assembly 4. Gantry Frame 5. Print Surface 6. Base Frame 7. SD Slot and USB Port 8. Voltage Selection 9. Control Knob 10. Display 11. X - Motor 12. X Limit Switch 13. -
Page 5: Package Contents
II. Package Contents 3 Pre-built Main Parts Tool Kit What’s in the tool kit No. Image Name Qty No. Image Name SD Card and Spool Holder Card Reader w/ Nuts PTFE Tubing Spool Holder (spare part) Bracket Sample Nozzle Filament Cleaner (200g) Thumb... -
Page 6: Assembly
III. Assembly 1. Install the Gantry Frame Note: Make sure that the nut for profile has been turned by 90° before fastening the T-shaped fixing block. Screw in and fasten two Screw in and fasten two Install left sid T-Bracket, M5X25 Bolts M5X25 Bolts making sure T-Nuts are... - Page 7 2. Install the Spool Holder and Bracket Fix the Bracket with two thumb screws. Fix Spool Holder with Finished included Nuts. 3. Install the Decorative Trim Insert the decorative strip Cut off the excess material Decorative strip can be into the grooves, starting with the diagonal plier.
- Page 8 4. Wiring Extruder (E) Stepper X Stepper and Limit Switch Y Stepper and Limit Switch Z Stepper and Limit Switch Your 3D printer is now assembled! Connect the stepper motors according Connect the limit switches according to the to the yellow labels on the 6-pin (4-wire) yellow labels on the 3-pin (2-wire) side.
- Page 9 IV. Display Press: OK/Enter Sub Menu Rotate: Switch Option/Value Set nozzle temperature Current nozzle temperature Model Set hot bed temperature Current hot bed temperature Cooling fan speed Current location of the nozzle Print time Print progress Print speed Prompt message...
-
Page 10: Lcd Menu
LCD Menu Menu Sub Menu Explanation ↑Info screen↑ ↑Main↑ Return Disable Steppers Moving X/Y/Z axis manually Auto Home Return to Main menu Preheat PLA Prepare→ Preheat ABS Cool down Stop and cool down the nozzle Move Axis→ Moving X/Y/Z axis or Extruder by given value Heat the nozzle and the bed or change fan Temperature→... -
Page 11: Loading Filament
V. Loading Filament 1. Preheat Method 1 Method 2 2. Feeding Press and hold the extruder lever then insert 1.75mm filament through the small hole of the extruder. Continue feeding until you see filament come out the nozzle. Tip: Replacing the Filament Preheat the nozzle then pull out the existing filament. -
Page 12: Bed Leveling
VI. Bed Leveling 1. Prepare → Auto Home. Wait for the nozzle to move to the left/front of the platform. 2. Prepare → Disable Steppers 3. Move the front/left leveling screw of nozzle and adjust the platform height by turning the knob underneath the hot bed. -
Page 13: Software Installation
VII. Software Installation 1. Double click the Cura icon to install the Cura Slicing Software. 2. Start Cura 3.0.2 from the Start Menu. 3. Select Other → Creality CR-10 → Add Printer. -
Page 14: Preparing To Print
VIII. Preparing to Print 1. Slicing Connect the SD card to computer with reader. 1. Open file 2. Save to SD Card 2. Printing Insert the SD card Select “Print from SD” Select the file to print... -
Page 15: Trouble-Shooting
IX. Trouble shooting Start Print from SD Card File is Other files Any random identified work code Home Move Pass Origin Heat Bed Temperature Bed Heated? normal Heat Nozzle Nozzle Temperature Heated? normal Misaligned Print Spray E-Motor Feeding roller File is working? working? identified... - Page 16 1.Erase the SD Card SD-Card 2.Format the SD Card 3.Replaced the SD Card Rename the file with File Name alphabet and number 1.Move the model and restart the slicing Slice 2.Restore the model with Software 1.Reconnect the cables XYZ Motor 2.Replacement 1.Reconnect the cables Limit Switch...
-
Page 17: After-Sales Services
5. In case of any problem, you can find solutions in this user manual, or contact us via email (support@sainsmart.com). 6. We provide free remote technical support for every consumer during the service life of the product. - Page 18 www.sainsmart.com...
Need help?
Do you have a question about the CR-10 Series and is the answer not in the manual?
Questions and answers