
Related Manuals for Carestream DENTAL CS 8100 Series


Summary of Contents for Carestream DENTAL CS 8100 Series
- Page 1 Panoramic Modality User guide for CS 8100 Family Including CS 8100 CS 8100 Access CS 8100SC CS 8100SC Access...
- Page 2 Notice Congratulations on your purchase of the CS 8100 Family. Thank you for your confidence in our products and we will do all in our power to ensure your complete satisfaction. The Panoramic Modality User guide for CS 8100 Family provides information on complete or seg- mented tomographic digital panoramic X-ray image modalities.
-
Page 3: Table Of Contents
Contents Chapter 1 Conventions in this Guide..... . 1 Conventions in This Guide Chapter 2 Mobile Components......3 CS 8100 Overview General Functional Components . - Page 4 Chapter 6 Monthly ....... 39 Maintenance Annually ....... 39 Controlling the Image Quality .
-
Page 5: Conventions In This Guide
Conventions in This Guide Conventions in this Guide The following special messages emphasize information or indicate potential risk to personnel or equipment: WARNING: Warns you to avoid injury to yourself or others by following the safety instructions precisely. CAUTION: Alerts you to a condition that might cause serious damage. Important: Alerts you to a condition that might cause problems. - Page 6 Chapter 1 Conventions in This Guide...
-
Page 7: Mobile Components
CS 8100 Overview The CS 8100 Family includes: • CS 8100: the complete Panoramic Modality. • CS 8100 Access: the Panoramic Modality without the 2D+ radiological exam. • CS 8100SC: the complete Panoramic and Cephalometric Modalities. • CS 8100SC Access: the Panoramic Modality (without the 2D+ radiological exam modality) and the Cephalometric Modality (without the 26x24 FoV (Field of View)). -
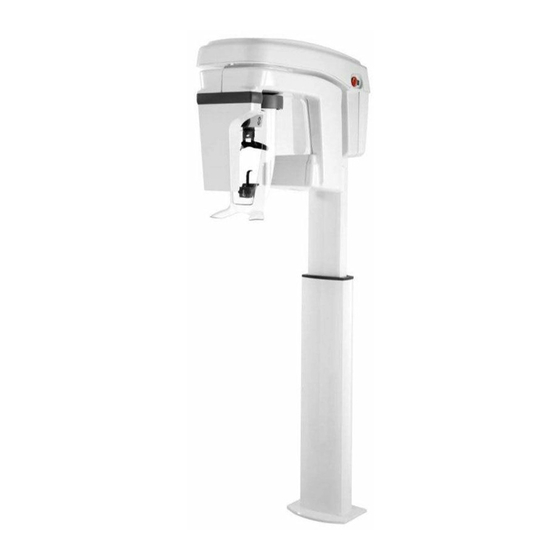
Page 8: General Functional Components
General Functional Components Figure 2 illustrates the general functional components of the unit. Figure 2 Unit Functional Components ON/OFF button Head and chin rest Emergency stop knob Digital panoramic sensor Unit rotative arm Unit head X-ray source assembly X-ray remote control Unit column PC hosting the imaging and the acquisition software Chapter 2 CS 8100 Overview... -
Page 9: Head And Chin Rest
Head and Chin Rest Figure 3 illustrates the functional components of the head and chin rest. Figure 3 Head and Chin Rest Functional Components Positioning Panel Bite block support Frontal head rest adjustment knob Chin rest Frontal head rest Hand grips Horizontal positioning indicators Vertical positioning indicators CS 8100 Family User guide_SM784_Ed05... -
Page 10: Positioning Accessories
Positioning Accessories The following accessories are used when positioning a patient. They are delivered with the CS 8100. Table 1 lists the positioning accessories. Table 1 Positioning Accessories Accessory Description Panoramic chin rest Sinus chin rest TMJ nose rest Standard bite block (x5) Frankfort guide bite block for panoramic (x3) Bite block for edentulous patients (x2) Single use sheaths for bite block (500 pcs box) -
Page 11: Positioning Panel
Positioning Panel The positioning panel is a console on the head and chin rest that enables you to correctly position and align a patient before you acquire an image. Figure 4 Unit Positioning Panel Height Adjustment buttons: Adjusts the height of the unit to the height of the patient. •... -
Page 12: X-Ray Remote Control Overview
X-Ray Remote Control Overview The X-ray remote control enables you to launch a radiological image acquisition via the exposure button from outside the X-ray room. You must press and hold the exposure button until the end of acquisition. Premature release of the exposure button interrupts the acquisition. -
Page 13: Computer System Requirements
Imaging Software Overview Computer System Requirements For the minimum computer system requirements and configuration for the Imaging Software, see the CS 8100 Family Safety, Regulatory and Technical Specifications User Guide. Important: It is MANDATORY to check that the computer system configuration is compatible with the computer system requirements for the CS 8100 software. -
Page 14: Panoramic Acquisition Interface Overview
Panoramic Acquisition Interface Overview The Panoramic Acquisition Interface provides you with panoramic image acquisition functions. Acquisition Interface Figure 6 Panoramic Information button: • Show versions ...: Identifies Software and Firmware versions. • Resetting Anatomy setting: Resets to the manufacturing parameter settings. •... -
Page 15: Program Pane
Program Pane The Program pane enables you to choose different radiological exams. The diagram in the Program pane represents a jaw, with the R side of the diagram corresponding to the right side of the patient. Figure 7 Program Pane Radiological exam options: Segmented panoramic acquisition: Click on the following areas of interest that you want to examine:... - Page 16 2D+ acquisition: Click to examine a selected area of interest in 2D+ slices that can be moved in the buccal/lingual direction across a jaw. You can select 7 areas of interest: Left premolar block Left canine block ncisor block Left molar block Right canine block Right premolar block Right molar block...
-
Page 17: Patient Pane
Patient Pane The Patient pane enables you to choose and select the different patient parameters. The selected parameters for a patient influences the image quality because: The default KV and mA exposure settings are set for the selected patient mode. •... -
Page 18: Parameter Pane
Parameter Pane The Parameter Pane enables you to choose exposure parameters for the radiological image acquisition. If the default parameter setting is not adapted to your patient type, you can manually adapt the parameter setting to the patient type and save this setting as the default setting. -
Page 19: Switching On The Unit
Getting Started Switching on the Unit Before switching on the unit, check that: • The installation of the unit is complete. • The computer is switched on. • The imaging software is not opened. You must switch on the computer and wait for it to Important: be ready for the connection before switching on the unit To switch on the unit, follow these steps:... -
Page 20: Firewall Or Network Settings
Firewall or Network Settings You will not be able to access the Acquisition Interface if you have not configured the firewall or network settings. To configure the firewall or network settings, follow these steps: 1. On your desktop, double-click to open the Imaging Software. -
Page 21: Accessing The Panoramic Acquisition Interface
Accessing the Panoramic Acquisition Interface To access the Panoramic Acquisition Interface, follow these steps: 1. On your desktop, double-click to open the Imaging Software. If the Windows Security Alert dialog box opens to Important: block the imaging software, you must configure the firewall or network settings. - Page 22 18 Chapter 4 Getting Started...
-
Page 23: Acquiring Images
Acquiring Images Acquiring a Panoramic, TMJ x2, or Sinus Image for the Adult and Pediatric Patient Before acquiring an image, check that you have: • Reset the unit rotative arm to the start position for patient to enter the unit. •... - Page 24 2. In the Acquisition Interface, click the Program button to access the Program pane. Click on one area of interest that you want to examine: • Panoramic: for example, • TMJ x2: • Sinus: 3. (Optional) If the default parameter setting is not adapted to your patient type, click the Parameter button: •...
- Page 25 5. Insert a hygienic barrier over the bite block. • If you are using the standard panoramic bite block, fit the hygienic barrier as shown in (C) and (D). • If you are using the Frankfort guide bite block for panoramic, use the required single use hygienic sheath.
- Page 26 Note: To acquire a bitewing segmented panoramic image: • Click • Select one or both area of interest • Position the patient in the Camper plane alignment (horizontal occlusion) as shown. Important: Do not use the Frankfort guide bite block when performing bitewing procedures.
-
Page 27: Preparing And Positioning The Adult And Pediatric Patient
Preparing and Positioning the Adult and Pediatric Patient To prepare and position the patient, follow these steps: 1. Ask the patient to remove all metal objects. 2. Ask the patient to wear a lead apron. Ensure that the apron lays flat across the patient’s shoulders. 3. - Page 28 4. Ask the patient to: • Stand up straight (do not position the feet slightly forward). • Grip both the lower handles of the head and chin rest. • Relax and lower the shoulders for full motion of the unit rotative arm. By correctly positioning the patient, you can reduce the spinal Note: column shadow that is transferred to the acquired image...
- Page 29 • If you are using the Frankfort guide bite block for panoramic, ask the patient to bite on the bite block (B) as shown. Important: If you are using the Frankfort guide bite block, make sure the patient bites on the complete block, and that the patient’s occlusal plane inclination follows the angle of the bite block.
-
Page 30: Launching The X-Ray
Launching the X-ray To launch the X-ray, follow these steps: 1. Leave the X-ray room and close the door. You must keep visual contact with the patient during acquisition. Important: To stop the acquisition, if there is any problem, release the exposure button of the remote control or press the red emergency stop button. -
Page 31: Acquiring A 2D+ Image For The Adult And Pediatric Patient
Acquiring a 2D+ Image for the Adult and Pediatric Patient Before acquiring an image, check that you have: • Reset the unit rotative arm to the start position for patient to enter the unit. • Selected the patient record. • Accessed the imaging window. - Page 32 3. Click on and click on the area of interest that you want to examine. Example: 4. (Optional) If the default parameter setting is not adapted to your patient type, click the Parameter button: • Select the appropriate parameters. • Click and select Memorize Anatomy setting to save the new parameter settings as the default settings.
-
Page 33: Preparing And Positioning The Adult And Pediatric Patient
• If you are using the Frankfort guide bite block for panoramic, use specially adapted single use hygienic sheaths. Make sure that you cover the bite block completely with the hygienic barrier. Important: You must cover the bite blocks with FDA-cleared protective sheaths that are available from distributors. - Page 34 Note: If the patient is too tall, tell the patient to sit on a stool. 4. Ask the patient to: • Stand up straight (do not position the feet slightly forward). • Grip both the lower handles of the head and chin rest. •...
- Page 35 Camper Plane positioning Frankfort Plane positioning • If you are using the Frankfort guide bite block for panoramic, ask the patient to bite on the bite block (B) as shown. Important: If you are using the Frankfort guide bite block for panoramic, make sure the patient bites on the complete block, and that the patient’s occlusal plane inclination follows the angle of the bite Carefully position the patient:...
- Page 36 • If you are using a standard bite block, turn the frontal head adjustment knob (D) and use the horizontal positioning indicators as visual aid to adjust the patient head (D ) for a Camper plane or Panoramic plane alignment. •...
-
Page 37: Launching The X-Ray
Launching the X-ray To launch the X-ray, follow these steps: 1. Leave the X-ray room and close the door. You must keep visual contact with the patient during acquisition. Important: To stop the acquisition, if there is any problem, release the exposure button of the remote control or press the red emergency stop button. -
Page 38: Acquiring A Tmj X4 Image For The Adult And Pediatric Patient
Acquiring a TMJ x4 Image for the Adult and Pediatric Patient Before acquiring an image, check that you have: • Reset the unit rotative arm to the start position for patient to enter the unit. • Selected the patient record. •... -
Page 39: Preparing And Positioning The Adult And Pediatric Patient
3. Click . The selected are of interest will highlight: 4. Double click appears for a TMJ x4 acquisition. 5. (Optional) If the default parameter setting is not adapted to your patient type, click the Parameter button: • Select the appropriate parameters. •... - Page 40 3. Ask the patient to enter the unit. On the Positioning panel, press and hold to raise the chin rest to the height of the patient. Note: If the patient is too tall, tell the patient to sit on a stool. 4.
-
Page 41: Launching The X-Ray
Launching the X-ray To launch the X-ray, follow these steps: 1. Tell the patient to remain still, eyes closed, and mouth closed. Leave the X-ray room and close the door. You must keep visual contact with the patient during acquisition. Important: To stop the acquisition, if there is any problem, release the exposure button of the remote control or press the red emergency stop button. -
Page 42: X-Ray Dose Emission Information
3. Tell the patient to stay in the same position but with mouth opened. Repeat Step 2 to acquire another image with the mouth opened. 4. Check the quality of the images. 5. Do the following when the acquisition is finished: •... -
Page 43: Monthly
Maintenance Perform the following maintenance activities on your CS 8100 and CS 8100 Access. IMPORTANT For information on cleaning and disinfecting, see the CS 8100 Family Safety, Regulatory and Technical Specification User Guide (SM785). (For information on carrying out maintenance activities on CS 8100SC and CS 8100SC Access, see the relevant Cephalometric Modality documentation). - Page 44 2. In the left pane, double-click Image Quality Tool. The Image Quality Control window is displayed. 3. Select the desired test and follow the on-screen instructions. 40 Chapter 6 Maintenance...
-
Page 45: Quick Troubleshooting
Troubleshooting Quick Troubleshooting Occasionally, malfunctions can occur during use in the event of an incorrect action. An error message is displayed on the popup on the Acquisition interface System Status Screen. The following table lists the information messages, their description and the action to take: IMPORTANT If an Error Code message is displayed, the malfunction persists or more serious conditions occur, contact a qualified... - Page 46 42 Chapter 7 Troubleshooting...
-
Page 47: Manufacturer's Address
Contact Information Manufacturer’s Address Carestream Health, Inc. 150 Verona Street Rochester, NY USA 14608 Authorized Representatives European Authorized Representative for CS 8100 and CS 8100 Access EC REP TROPHY 4, Rue F. Pelloutier, Croissy-Beaubourg 77435 Marne la Vallée Cedex 2, France European Authorized Representative for CS 8100SC and CS 8100SC Access EC REP Carestream Health France... - Page 48 Contact Information Chapter 8...
Need help?
Do you have a question about the CS 8100 Series and is the answer not in the manual?
Questions and answers