Table of Contents
Advertisement
Quick Links
Advertisement
Table of Contents

Related Manuals for PRÜFTECHNIK ROTALIGN Ultra iS


Summary of Contents for PRÜFTECHNIK ROTALIGN Ultra iS
- Page 1 ROTALIGN ® Ultra iS Operating handbook - Shaft alignment...
- Page 2 A user’s handbook Dear Customer, Welcome to the world of intelligent shaft alignment using ROTALIGN Ultra iS Shaft, another innovative product from PRÜFTECHNIK, the inventors of laser shaft alignment. This handbook sets out to help the instrument user work through the instrument with the required ease.
-
Page 3: Foreword
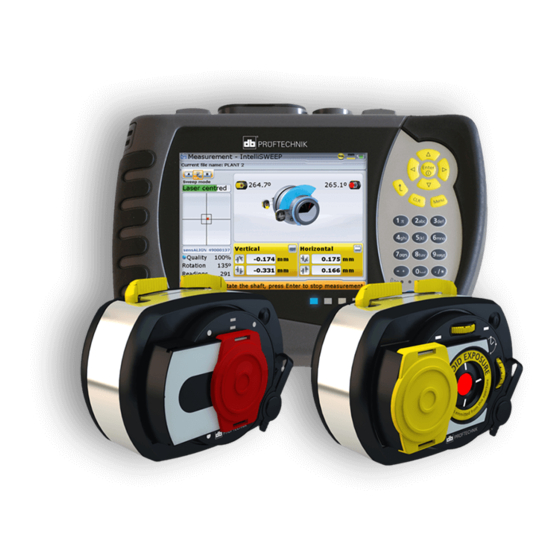
Foreword ROTALIGN Ultra iS is industry’s first intelligent alignment system. The system combines the features of the tested and proven ROTALIGN Ultra iS computer together with those of the next generation sensALIGN sensor and laser. ROTALIGN Ultra iS computer features a 5.7-inch (145 mm) colour TFT sunlight readable full VGA screen, a fast... -
Page 4: Table Of Contents
Chapter 1: ROTALIGN Ultra iS Shaft package ....... . . -
Page 5: Table Of Contents
7.1 Updating ROTALIGN Ultra firmware to higher version..........171 Chapter 8: ROTALIGN Ultra iS Shaft configuration ......177 8.1 Configuration ...................... -
Page 6: Chapter 1: Rotalign Ultra Is Shaft Package
ALI 40.000 is the ROTALIGN Ultra iS Advanced Shaft package. Standard Shaft package. For details of other available ROTALIGN Ultra iS stand-alone and add-on For details of other available ROTALIGN Ultra iS stand-alone and add-on packages, please contact your local PRÜFTECHNIK sales representative. - Page 7 PC/USB cable ALI 12.503 USB/peripheral devices cable ALI 12.651-I AC power supply/charger (universal) – for powering and charging ROTALIGN Ultra iS computer and rechargeable battery CAUTION: The universal mains adapter is supplied with plugs for the EU, US and UK. Care must exercised when changing the plugs.
- Page 8 ALI 2.172, ALI 2.173, ALI 2.174 and storage pouch — ALI 3.590-200 ALI 2.905 Lens cleaning cloth ALI 3.588 Tape measure mm/inch DOC 40.100.en ROTALIGN Ultra iS Shaft pocket guide DOC 40.200.en ROTALIGN Ultra iS Shaft operating instructions DOC 40.900.en ROTALIGN Ultra product catalog DOC 40.900.en ALI 2.113 SET...
- Page 9 ROTALIGN Ultra iS Shaft handbook ALI 13.700 CD ALIGNMENT CENTER CD ALI 4.741 ROTALIGN Ultra Advanced Shaft Firmware registration certificate (not shown) ALI 4.905 Vibration check probe ALI 4.451 USB memory stick 0 0739 1055 Allen key (2.5 mm) 0 0739 1055 ALI 4.905...
- Page 10 ROTALIGN Ultra iS Shaft package 1.1.1 Optional ROTALIGN Ultra iS components ALI 4.605 ROTALIGN Ultra iS disposable battery housing ALI 4.615 Desktop charging station for ROTALIGN Ultra iS rechargeable battery ALI 4.615 SET Desktop charging station set for ROTALIGN Ultra iS rechargeable battery includes: Desktop charging station ALI 4.615...
- Page 11 ROTALIGN Ultra iS Shaft handbook This page intentionally left blank...
-
Page 12: Chapter 2: System Description
Safety notes Chapter 2: System description 2.1 Safety notes ROTALIGN Ultra iS is to be used in industrial environments only for alignment of Note that the necessary turbine components, shafts, bores, measurement of straightness and flatness of application firmware different surfaces. It is dust proof and water resistant with a rating of IP 65. Although... - Page 13 ROTALIGN Ultra iS Shaft handbook 2.1.3 Laser safety The ROTALIGN Ultra iS system uses sensALIGN laser ALI 4.910. According to IEC 60825-1, sensALIGN laser is classified as a Class 2 laser product. The laser operates at 635 nm and has a maximum radiant power <1 mW. It complies with the FDA specifications 21 CFR 1040.10 and 1040.11 except for deviations pursuant to laser...
- Page 14 Component labelling 2.1.4 Component labelling The labelling diagram below represents both sensALIGN sensor and sensALIGN laser. The diagram shows the engraved symbols, markings and labels as they appear on the respective measurement head. The laser safety labels are affixed on the housing of sensALIGN laser at the positions shown in the diagram.
-
Page 15: Getting To Know The Rotalign Ultra Is Computer
The ROTALIGN Ultra iS computer has been developed to effectively handle both simple and complex shaft, bore and turbine diaphragm applications. The computer is also used to carry out straightness and flatness measurements. ROTALIGN Ultra iS has a customer-oriented user interface. It uses easy-to-follow icons and comprehensive on-screen menus and hint texts, that enable even first-time users to operate the... - Page 16 ROTALIGN Ultra iS computer ROTALIGN Ultra iS is built to rugged industrial standards of shock and water resistance. It contains a complete computer with a 5.7 inch (145 mm) color TFT full VGA display, oval-shaped function and data entry keys, 4-way navigation keys, an On/Off/Enter key, an up key, a clear key and a menu key.
- Page 17 Alternatively, use 6 standard ‘C’ size [IEC LR 14] batteries contained in the optional battery compartment ALI 4.605. If the ROTALIGN Ultra iS computer is not in use for extended periods of time, If the ROTALIGN Ultra iS computer is not in use for extended periods of time,...
- Page 18 ROTALIGN Ultra iS computer 2.2.4 Replacing batteries The rechargeable battery ALI 4.603 and the battery housing ALI 4.605 have identical shapes and are therefore replaceable. If batteries require removal, turn over the computer taking care not to damage the display and the hard keys. Undo the two screws by turning them counterclockwise a quarter of a turn.
- Page 19 ROTALIGN Ultra iS Shaft handbook 2.2.5 Mounting and dismounting the AC power supply/charger plug The AC power supply/charger ALI 12.651-I comes with three different regional plugs. The available plugs are for the Euro zone, the US, and the UK. When mounting or dismounting a plug, pay attention to the direction of the arrow on the plug just above the pins, and the arrow on the latching nipple on the charger housing.
- Page 20 ROTALIGN Ultra iS computer ROTALIGN Ultra iS top panel connectors USB host/slave port/ charger socket The red dot on the USB cable plug must match the red dot on the USB port Sensor socket USB host/charger socket Ensure correct sensALIGN The red dot on the charger sensor cable (ALI 4.921-2)
-
Page 21: Sensalign Laser Ali 4.910
Information regarding the battery status, the rotational angle, the temperature and the serial number of the sensALIGN laser are transmitted through the laser beam into sensALIGN sensor. This information is further relayed to ROTALIGN Ultra iS computer. sensALIGN laser ALI 4.910 is powered using sensALIGN rechargeable battery ALI 4.960 a 3.7 V 1.6 Ah Lithium Polymer rechargeable battery. - Page 22 sensALIGN rechargeable battery 2.3.1 sensALIGN rechargeable battery ALI 4.960 Both sensALIGN laser ALI 4.910 and sensALIGN sensor ALI 4.900 are powered using the sensALIGN rechargeable battery ALI 4.960. The battery is charged via the charger/ adapter socket using the sensALIGN charger/adapter ALI 4.651-I. If the battery capacity is greater than 50% [acceptable capacity for measurement], the battery status LED on both sensALIGN laser and sensor lights up green for 2 seconds on switching on.
- Page 23 ROTALIGN Ultra iS Shaft handbook To replace the rechargeable batteries, use the provided 2.5 mm allen key [0 0739 1055] to undo the two hex screws that affix the battery to either sensALIGN laser or sensor. Used batteries should be disposed of in an environmentally-sound manner!
- Page 24 sensALIGN sensor 2.4 sensALIGN sensor ALI 4.900 sensALIGN sensor contains two position detectors, which measure the exact position and inclination of the laser beam as the shafts are rotated. Integrated in the sensor is Bluetooth technology for wireless transmission of measurement data to ROTALIGN Ultra iS computer.
- Page 25 ROTALIGN Ultra iS Shaft handbook 2.4.1 Understanding the beam adjustment LEDs The four beam adjustment LEDs provide additional help when adjusting the laser beam position on sensALIGN sensor position detectors. The LEDs indicate the angle and position at which the laser beam enters the sensor. The LEDs blink either red or green depending on the angle at which the laser beam strikes the sensor.
-
Page 26: Handling Precautions
2.5.1 Storage Use the ROTALIGN Ultra iS Shaft case ALI 4.820 to transport ROTALIGN Ultra iS Shaft system and its related components. If the system is not used for an extended period, remove the related batteries from the components and store the components in a cool, dry and well-ventilated location. - Page 27 ROTALIGN Ultra iS Shaft handbook 2.5.4 Disposal Any waste electrical and electronics parts of the ROTALIGN Ultra iS Shaft system including memory sticks must be disposed of according to applicable safety and environmental regulations. Customers in member states of the European Union must adhere to the EU directive 2002/96/EC on waste electrical and electronic equipment (WEEE).
-
Page 28: Chapter 3: Getting Started With The Rotalign Ultra Is Shaft System
3.1 ROTALIGN Ultra iS Shaft system composition The system comprises: In addition to the shaft The proven ROTALIGN Ultra iS computer which is the core of the ROTALIGN Ultra alignment application, measurement platform. the ROTALIGN Ultra The intelligent sensALIGN sensor that uses intelliSWEEP –... - Page 29 ROTALIGN Ultra iS Shaft handbook 3.2.4 Press to switch on the ROTALIGN Ultra iS computer Press and hold the ‘On/Off/Enter’ key briefly. The opening screen below appears. The navigation keys are used to access available applications and options. The navigation direction is either upwards/downwards or sideways.
- Page 30 Getting started 3.2.6 Start measurement Access the measurement screen by pressing . Ensure laser beam dot is centred on the square target then rotate shafts. [Refer to section 4.11 for details on taking measurements.] The measurement mode used in this example is IntelliSWEEP.
- Page 31 ROTALIGN Ultra iS Shaft handbook 3.2.8 Context menu items A useful feature available in ROTALIGN Ultra iS computer is the availability of display screen related context menu items for each individual screen. Useful menu items that include accessing the program manager, turning the computer off and configuring the instrument can be accessed via the context menu that appears when pressed at any time.
- Page 32 Getting started 3.2.9 Global menu The ROTALIGN Ultra iS computer uses a global menu concept to shorten the steps to reach any required menu item. The global menu appears in the following two forms. › a configuration global menu that appears within the program manager ›...
-
Page 33: Tips And Tricks
ROTALIGN Ultra iS Shaft handbook 3.3 Tips and tricks 3.3.1 Program manager While in the program manager, the data entry keys are used to select the corresponding application icon in a numerically ascending order. This is possible only up to the tenth icon. - Page 34 Getting started Pressing either moves the view of the train to the right or left respectively. 3.3.3 Dimensions (set-up) When in set-up and units are set to Imperial system, entering a dimension as 11.3.8 corresponds to 11 3/8 in. Pressing while in set-up prompts the deletion of the selected machine.
- Page 35 ROTALIGN Ultra iS Shaft handbook 3.3.4 Measurement Pressing twice activates auto measurement. In auto measurement any of the three measurement modes – IntelliSWEEP, In auto measurement any of the three measurement modes – IntelliSWEEP, Multipoint or Static measurement is started directly by the appropriate action.
-
Page 36: Chapter 4: Shaft Alignment Application
Starting the application Chapter 4: Shaft alignment application 4.1 Starting the shaft alignment application Before the application can be started, a licence code must be entered in the Before the application can be started, a licence code must be entered in the licence manager. -
Page 37: Horizontal Machine Alignment – Preparing For The Alignment Procedure
ROTALIGN Ultra iS Shaft handbook With the icon highlighted, press to access the “Licence Manager” screen. Use to highlight ‘Shaft Alignment’, then press to proceed with entering the application licence code (registration key) in the editing box. After successful registration, a green check mark appears next to the application, and the application level appears as a suffix to the firmware version. -
Page 38: Check Soft Foot
Horizontal shaft alignment 4.2.3 Rigid couplings Rigid couplings must be loosened before measurement so that they do not distort the alignment condition. 4.2.4 Shaft play and coupling backlash Axial shaft play is detected and compensated for in alignment results (but affects machine operation). - Page 39 ROTALIGN Ultra iS Shaft handbook 4.4.1 Bracket mounting procedure To fit the compact chain brackets, refer to the diagram shown below and follow the instructions carefully. 1. Choose the shortest support posts which will still allow the laser beam to pass over or through the coupling.
-
Page 40: Mount Sensalign Laser And Sensor
Horizontal shaft alignment 4.5 Mount sensALIGN laser and sensor Clamping levers in the open position Mount sensALIGN laser on the support posts of the bracket fixed on the shaft of the left machine (usually reference machine), and sensALIGN sensor on the support posts of the bracket fixed on the shaft of the right machine (usually moveable machine) –... -
Page 41: Switch Rotalign Ultra Is On And Start Application
ROTALIGN Ultra iS Shaft handbook 4.6 Switch ROTALIGN Ultra iS on and start application Press and hold for a few seconds. The four laser adjustment and alignment condition LEDs light up. Shortly afterwards, the splash screen appears, followed by the program manager screen below. -
Page 42: Enter Machine Dimensions
Horizontal shaft alignment 4.7 Enter machine dimensions Machine information and dimensions are entered using the grey data entry keys. The required missing dimensions are entered directly. Use the navigation keys to highlight the dimension box and enter dimension by pressing the appropriate data entry keys. The editing box appears as soon as the first key is pressed. -
Page 43: Machine Properties
ROTALIGN Ultra iS Shaft handbook 4.7.1 Coupling diameter The coupling diameter can be obtained by measuring the circumference of the coupling and dividing the value by π (3.142). The default value is 100 mm (10” if set to US units). Should there be need to edit the value, highlight the value using the navigation keys. - Page 44 Horizontal shaft alignment Press to access machine properties. To select machine type, use the navigation keys to highlight the ‘Type’ box then press . Select type of machine from the drop down menu that appears using ß Confirm selection by pressing either The orientation of the machine may be changed using the ‘Toggle’...
- Page 45 ROTALIGN Ultra iS Shaft handbook To edit machine name, use to place cursor on the ‘Name’ box then enter the machine name directly using the data entry keys. The editing box appears as soon as the first key is pressed.
- Page 46 Horizontal shaft alignment Depending on the type of mounting, either the position or number needs to be edited. If the machine is mounted on feet or bearings, the number is edited by placing cursor using on the fixed points box. Press to highlight the numeral.
- Page 47 ROTALIGN Ultra iS Shaft handbook Thermal growth values can be entered only when the type of mounting is either machine feet or bearing or V-shaped support, and ‘Thermal growth’ enabled. To enter thermal growth values press while in the “Machine type” screen. The context menu appears.
- Page 48 Horizontal shaft alignment 4.9 Coupling properties Coupling properties are entered and edited in the same manner as for machine properties. Use the navigation keys to place cursor on the ‘Type’ or ‘Format’ box then press Select type of coupling or result format from the drop down menu that appears using Use the navigation keys to highlight the ‘targets enabled’...
- Page 49 ROTALIGN Ultra iS Shaft handbook Press to confirm selection. The coupling targets screen that follows appears. With the ‘Type’ box highlighted, pressing reveals a drop down menu with the available coupling targets formats. Select required format using either confirming selection by ß...
- Page 50 Horizontal shaft alignment Pressing while in “Coupling targets” screen reveals the context menu shown below. The displayed context menu items can be accessed directly by pressing the corresponding data entry key. The displayed menu items perform the following functions: › Reset all values – used to clear all entered coupling target values and to reset coupling format and dimension back to those used in the “Set-up”...
- Page 51 ROTALIGN Ultra iS Shaft handbook The context menu to the coupling type screen discussed previously has in addition to the menu item ‘Targets’, also ‘Tolerance’ and ‘Machine properties’. Press to display the system tolerance table. Alternatively, highlight ‘Tolerance’ using and confirm selection by pressing The menu item ‘Machine...
- Page 52 Horizontal shaft alignment The displayed menu items perform the following functions: › Tolerances list – used to display tolerance tables based on coupling type and preferred electrical frequency (50 or 60 Hz.) › View tolerance – displays the coupling tolerance details ›...
-
Page 53: Flipping Machines
ROTALIGN Ultra iS Shaft handbook 4.10 Flipping machines If machines are mounted such that access to the opposite side of the machines is restricted, and there is need to designate the right machine as stationary, then the flip function is used. - Page 54 Horizontal shaft alignment The hint reminds the user that the laser must always be mounted on the left The hint reminds the user that the laser must always be mounted on the left machine as viewed by the user and sensor to coupling center distance must be machine as viewed by the user and sensor to coupling center distance must be Note checked again.
-
Page 55: Laser Beam Adjustment
ROTALIGN Ultra iS Shaft handbook 4.11 Laser beam adjustment After entering all dimensions, proceed to adjust the laser beam such that it strikes the sensALIGN sensor lens perpendicular to the lens surface. 1. Slide the sensALIGN laser dust cap to expose the aperture. - Page 56 Horizontal shaft alignment...
-
Page 57: Taking Measurements
ROTALIGN Ultra iS Shaft handbook 4.12 Taking measurements With all four sensALIGN laser beam adjustment LED blinking green once every second – an indication that the laser beam has been correctly adjusted – press open the measurement screen. As sensALIGN sensor has not yet been initialized, the ‘Sensor error’... - Page 58 Horizontal shaft alignment After the scanning process is completed, any Bluetooth devices detected will be listed on the screen. sensALIGN sensors that have been detected are stored in the system and always appear in the sensor selection screen. Sensors may be deleted from the displayed list by pressing with the sensor highlighted.
- Page 59 ROTALIGN Ultra iS Shaft handbook Before proceeding with rotating shafts, ensure that the ‘Laser centered’ message [ ] appears in the adjustment window. The standard measurement mode is the Continuous Sweep mode. [IntelliSWEEP mode is the standard measurement mode in both Advanced and Expert Shaft levels.]...
- Page 60 Horizontal shaft alignment Rotate the shafts a full turn, or as far as possible. If the intelligent features Measurement quality is an are switched off, the intelligent feature based on measurement standard several measurement and deviation (SD) will be environmental criteria. The displayed if selected resulting quality is depicted under the measurement...
-
Page 61: A Taking Measurements Using The Sensalign Sensor And Laser Cable
To disconnect, grasp the ribbed collar of the plug on the sensALIGN sensor CAUTION and laser cable (ALI 4.921-2) and carefully pull it out of the ROTALIGN Ultra iS and laser cable (ALI 4.921-2) and carefully pull it out of the ROTALIGN Ultra iS computer sensor socket. -
Page 62: Results
The above display shows the measured alignment condition along with numerical values for the actual machine feet positions. With ROTALIGN Ultra iS, any one pair of feet can be designated as static. With ROTALIGN Ultra iS, any one pair of feet can be designated as static. - Page 63 ROTALIGN Ultra iS Shaft handbook Note that machine feet To designate any pair of feet are displayed in the fixed, place the blue vertical results screen only when cursor line on the feet pair the ‘Stationary machine’ using . Press box is checked in the to fix the selected pair of...
- Page 64 Horizontal shaft alignment 4.13.1.1 Results options The “Results options” screen below is accessed via the context menu item ‘More...’ followed by the sub-menu item ‘Options’. Note that these four Tolerances’ envelopes can options are related to the be activated or deactivated scaling of the machine from the drop down menu graphics.
- Page 65 ROTALIGN Ultra iS Shaft handbook 4.13.1.2 Results details The submenu item ‘Details’/’No details’ is used to display or hide results information at any highlighted machine foot pair. In this example, the results details of the right machine back foot pair are displayed marked blue.
- Page 66 The submenu item ‘Rotate view’ allows the user to view the machines, and subse- quently perform Move corrections from either side without having to change the orientation of ROTALIGN Ultra iS computer. This function is particularly helpful when the machines can be accessed from both sides.
- Page 67 ROTALIGN Ultra iS Shaft handbook Press to confirm changing the orientation of the machines. Results will now be displayed as currently viewed by the user. This is from the opposite side of the original position. The screen on the left above, shows the initial orientation as viewed by the user, while the screen on the right above shows the current orientation after the ‘Rotation view’...
-
Page 68: Align Machine
Horizontal shaft alignment 4.13.2 Sign convention The following sign convention is used in the evaluation of alignment results. With left machine stationary, gap is positive when open at top or side away from viewer. The viewer is considered to be standing in front of the machines as they appear on the display. - Page 69 ROTALIGN Ultra iS Shaft handbook 4.14.2a Move simulator As the name suggests, the Move simulator is used to simulate shim values and horizontal movement corrections that are required to correct the alignment condition. The simulator takes into account the shim thickness available and the amount by which the machines can be physically moved.
- Page 70 Horizontal shaft alignment Default ‘Move step’ value The activated tolerance envelopes are an assistance to determining the alignment condition of machines. Use the data entry keys to entire the desired movement step value, confirming entry ß by pressing The default ‘Move step’ value is 0.1 mm The default ‘Move step’...
- Page 71 ROTALIGN Ultra iS Shaft handbook In this example, an excellent alignment condition has been achieved by moving the front feet 0.40 mm (2x the movement step value) and the back feet 2.20 mm (10x the movement step value). Test shimming/movement values may be entered directly by highlighting feet pair to be shimmed/moved then confirming selection by pressing...
- Page 72 Horizontal shaft alignment The correction values displayed from the submenu item ‘Details’ match those obtained using the Move simulator. The Simulator options screen may be accessed via the Move simulator screen context menu item ‘More...’. Select ‘More...’ -> ‘Options’ then press to confirm selection.
- Page 73 ROTALIGN Ultra iS Shaft handbook 4.14.3 Horizontal and vertical live MOVE The alignment corrections involving shimming and the lateral positioning of the machines can be followed in a real-time interactive display. From the results screen, press . The context menu appears. Use to highlight ‘Move’.
- Page 74 ROTALIGN Ultra iS monitors both horizontal and vertical Live Move concurrently. ROTALIGN Ultra iS monitors both horizontal and vertical Live Move concurrently. If the results view is zoomed to the vertical view when the Move function is...
- Page 75 ROTALIGN Ultra iS Shaft handbook iv) Retighten and remeasure to verify shimming results and determine the exact alignment condition. 4.14.5 Lateral positioning With foot bolts loosened, move machine feet keeping an eye on the smiley on the display screen. ii) Note the following sign convention – Positive feet values indicate that the machine feet should be removed towards viewer, while negative feet values suggest the moving of machine feet away from viewer.
-
Page 76: Saving And Printing Measurement Files
Saving and printing 4.15 Saving and printing measurement files Before switching off the instrument, dimensions, measurements, results and all settings can be saved for analysis, future use or record purposes in the instrument’s non-volatile memory. Files can be set up and then saved with or without carrying out measurement. If a measurement file was saved during set-up, the results may be saved after measurement as follows. - Page 77 ROTALIGN Ultra iS Shaft handbook In this example, the measurement file ‘Drainage Pump D225’ has been saved in the folder ‘Common’. Parent folders are created in ‘User Accounts’ which is accessed through ‘Configuration’ within the program manager (see section 8.2).
- Page 78 Saving and printing 4.15.2 Saving report as a PDF a) Measurement files may be saved directly from the system as a PDF copy. ß b) While within the application, press repeatedly to open the machine configuration overview screen then press .
- Page 79 ROTALIGN Ultra iS Shaft handbook Note that the submenu items may be accessed directly by pressing the corresponding data entry key: Note that when using the data entry keys for direct access, ensure that the ROTALIGN Ultra iS computer is connected to...
- Page 80 Measurement files can be printed either direct from the results screen or from the shaft alignment overview screen. a) Connect the ROTALIGN Ultra iS computer to your printer using the USB/ peripheral devices cable ALI 12.503. Depending on your printer interface, you may require an A to B USB cable.
- Page 81 ROTALIGN Ultra iS Shaft handbook to switch In this example, the between the two panes. selected printer is ‘PDF to select Printer’. This option is the required report format used to save the report as and language. Item selected a PDF file. In this case, the...
- Page 82 Saving and printing f) Confirm selection using the “Print” screen context menu item ‘OK’. g) When ready, press to print report. If no report is printed, check the printer set-up described in section 8.1.5.
-
Page 83: Alignment Completion
After completion of an alignment measurement or job, press and hold down for a moment to switch ROTALIGN Ultra iS computer off. Alternatively one may use the global menu combination ‘Quit’/’Turn off device’. If the measurement file has not been saved, the following query appears: ‘Do you really want to turn off the system?’... -
Page 84: Chapter 5: Alignment Features
Measurement modes Chapter 5: Alignment features 5.1 Measurement modes ROTALIGN Ultra iS Shaft offers the following Shaft level dependent measurement modes: Continuous Sweep, IntelliSWEEP, Multipoint, Static (0,3,6,9), IntelliPOINT, IntelliPASS and Dial gauge measurement mode. The intelligent measurement modes IntelliSWEEP, IntelliPOINT and IntelliPASS are only IntelliSWEEP is discussed available in Advanced and Expert Shaft levels. - Page 85 ROTALIGN Ultra iS Shaft handbook The “Measurement mode” screen may also be used to set up the following measurement properties: Type of Sweep mode to be used – this can be either ‘IntelliSWEEP’ or the customary ‘SWEEP’ method. The duration in which readings are to be averaged – the longer the duration of the averaging, the higher the number of readings collected.
- Page 86 IntelliSWEEP features are available only if ROTALIGN Ultra Advanced Shaft IntelliSWEEP features are available only if ROTALIGN Ultra Advanced Shaft firmware has been installed and licenced in the ROTALIGN Ultra iS computer. This firmware has been installed and licenced in the ROTALIGN Ultra iS computer. This is done by acquiring the ROTALIGN Ultra Advanced Shaft firmware certificate...
- Page 87 ROTALIGN Ultra iS Shaft handbook With ‘Detailed quality’ highlighted, press to confirm selection. The “Measurement quality” screen opens. The screen displays all the factors and the respective weighting used to determine the measurement quality. Measurement quality In this example, when all...
- Page 88 Measurement modes While in the After centering the laser beam as described in section 4.10, press to take the “Measurement mode” first measurement point. Rotate shafts in their normal direction of operation from screen you may also set-up one measurement position to the next. Press to take measurement at each new the averaging duration position.
- Page 89 ROTALIGN Ultra iS Shaft handbook The navigation keys are used to position the laser unit on the display screen to correspond to the actual shaft position. Measurement may be stopped or finished using the context menu item “Stop measurement” Measurements must be taken in at least three positions over 90°, but more measure- ments over a wider angle is recommended.
- Page 90 Measurement modes The path traced by the laser beam as it passes the sensor is plotted on the detector display. Readings are taken in the middle sector of the detector surface. This is the section where laser position appears as green dots. Readings are not taken where laser position appears as yellow dots.
- Page 91 ROTALIGN Ultra iS Shaft handbook 5.1.4.2 IntelliPOINT IntelliPOINT is used in cases where the uncoupled shafts can be stopped at definite positions. It is also used in cases where the shafts are coupled but torsional play exists. This mode ensures that measurement points remain on the same rotational arc hence increasing accuracy.
- Page 92 Measurement modes Rotate the shaft supporting one of the measuring heads (say sensor) to the next position, then rotate the shaft supporting the other measuring head (say laser) until the needle rests in the central blue sector of the on-screen needle indicator. When the needle is in the blue sector, and value stabilization time has been attained, the ‘Take point’...
- Page 93 This mode is used to convert dial gauge readings into ROTALIGN Ultra iS Shaft values, hence verifying calculations and comparing measurement results with those obtained using ROTALIGN Ultra iS Shaft. It can also be used to convert ROTALIGN Ultra iS Shaft alignment results into the commensurate dial gauge readings.
- Page 94 Measurement modes 4. Press to confirm selection, then proceed to enter required axial and radial dimensions, and sag values using the data entry keys . In this method, enter the radius of the axial gauge from the shaft center. Here, we enter distance from the radial gauge to the coupling center.
- Page 95 . The next empty entry box is highlighted. You may use the navigation keys to cycle through the value entry boxes. 7. To view ROTALIGN Ultra iS Shaft gap and offset coupling values, press , then to highlight the context menu item ‘Stop’.
- Page 96 Measurement modes 9. Press to view foot results. Pressing reveals the results screen showing feet positions if the dimensions have already been entered. If dimensions are missing, the set-up screen prompting dimensions appears.
- Page 97 ROTALIGN Ultra iS Shaft handbook 5.1.5.2 Converting measurement table readings into dial gauge readings It is also possible to convert existing measurements from the measurement table into dial indicator readings for comparison and analysis. Access the “Measurement table” screen via the global menu [‘Measurement’ ->...
-
Page 98: Measurement Options
Measurement table Note that if a dial gauge In this example, the dial set-up already exists indicator readings for the within the measurement ‘rim and face positive’ table, dial indicator method for the given readings for any coupling results are highlighted measurement displayed. - Page 99 ROTALIGN Ultra iS Shaft handbook The measurement table is scrolled downwards, upwards and sideways using the navigation keys. The contents of the measurement table from left to right include the measurement position (indicated by nos. 1,2,3 ...), measurement mode (or live move) –...
- Page 100 Measurement table To remove a measurement from the average calculation, highlight the To remove a measurement from the average calculation, highlight the measurement using measurement using then press then press . The check mark next to . The check mark next to the measurement position disappears indicating that the measurement is not the measurement position disappears indicating that the measurement is not Note...
- Page 101 ROTALIGN Ultra iS Shaft handbook In this example, measurement no. 2 which has been highlighted and checked is to be assigned a label. 3. Press to confirm selection. A dialog window with predefined labels appears. If desired, customized labels may be defined using the ‘Edit label’...
- Page 102 Measurement table 5.2.3 Deleting measurent 1. With the measurement table displayed, use to highlight measurement to be deleted. 2. Press then use to highlight the context menu item ‘Delete measurement’. Highlighted measurements may also be deleted by pressing 3. Press to confirm selection.
- Page 103 ROTALIGN Ultra iS Shaft handbook 2. Press to confirm selection. The “History measurement labels” screen appears showing all labels used in the file. 3. To identify the measurement related to a particular label, use highlight the respective label, then press .
- Page 104 Raw data The measurement with the label ‘After changing user’ is measurement no. 1 (with check mark) on the measurement table. Use to horizontally scroll the measurement table. 5.2.5 Edit raw data To improve the quality of the alignment results, it may be necessary to edit measurement data that is suspect or was affected by external circumstances.
- Page 105 ROTALIGN Ultra iS Shaft handbook In this example, the selected ellipse view mode is a broken ellipse. The currently selected point is active ( bold dot), and deviates by 0.048 mm. The standard deviation SD is 0.030. Any measurement point that deviates severely from the other values can be deactivated from the measurement set.
- Page 106 Extend The ‘view mode’ allows raw data to be examined from three different views. The three views are: ellipse and corresponding points, plane points and broken ellipse. Use the navigation keys to highlight the desired view then confirm selection by pressing In the “Ellipse and points”...
- Page 107 The adjusted beam position is taken as the end point of displacement. 4. Continue measurement as before, rotating the shafts and pressing to take measurement at the desired positions. ROTALIGN Ultra iS Shaft program includes the displacement of beam readjust- ment in the alignment calculations.
- Page 108 This only. feature is available only in the Advanced and Expert ROTALIGN Ultra iS Shaft levels. IntelliEXTEND is available only in ‘IntelliSWEEP’ measurement mode. IntelliEXTEND is available only in ‘IntelliSWEEP’ measurement mode.
- Page 109 ROTALIGN Ultra iS Shaft handbook 4. With the laser beam centered, press then continue to rotate shafts to carry on with measurement. 5.2.8 XY View The XY View function is used to facilitate the centering of the laser beam on the two sensALIGN sensor detector planes before proceeding with measurement.
- Page 110 XY View sensALIGN sensor The “XY View” screen angular position displays an on-screen sensALIGN laser delta angle indicator angular position which shows the angular Delta angle value position difference between – 2 = 3 sensALIGN sensor and Delta angle on-screen sensALIGN laser.
- Page 111 ROTALIGN Ultra iS Shaft handbook If a sensor or laser with an older firmware version is connected to a ROTALIGN If a sensor or laser with an older firmware version is connected to a ROTALIGN Ultra iS computer running on the current ROTALIGN Ultra firmware version, a Ultra iS computer running on the current ROTALIGN Ultra firmware version, a...
- Page 112 Intelli laser position 3. Rotate the shafts through at least 90°, indicated by the rotational arc turning green, then press In this example, the rotational arc is green indicating that the rotation is > 90°. For this case, the advice to adjust the laser before proceeding with measurement appears on the screen.
- Page 113 ROTALIGN Ultra iS Shaft handbook This screen further reveals that the ‘Position to center’ submenu item is now active and may be selected. 5.2.10 Half function There are specific shaft alignment applications where the ‘half function’ is used to help ensure that the laser beam does not deviate away from the sensor detector during shaft rotation.
- Page 114 Half function 3. Use the navigation keys and highlight the ‘0’ half function icon then press to confirm selection. The current laser dot position assumes the X,Y value 0,0. Note that the position to where the sensor and laser should be rotated, is marked green [1].
- Page 115 ROTALIGN Ultra iS Shaft handbook 5. Use the navigation keys and highlight the ‘1/2’ half function icon, then press to confirm selection. Note that the documented 1/2 X and 1/2 Y values correspond to half the ∆X and ∆Y values recorded previously.
- Page 116 In surroundings where Setting averaging in the environmental vibration is “Measurement” screen high, a higher averaging duration is recommended. ROTALIGN Ultra iS has the capability to set ‘Auto’ averaging. In ‘Auto’ averaging, the system records measurements automatically only when the readings are stable.
- Page 117 ROTALIGN Ultra iS Shaft handbook Setting averaging in the “Measurement mode” screen If averaging is set via the XY view, press from the corresponding measurement screen and use the navigation keys to highlight ‘XY view’. Press to confirm selection. The XY view screen appears with the averaging box highlighted. Press...
- Page 118 Measurement options screen 5.2.11 Measurements options screen The “Measurement options” screen may be accessed via the “Measurement” screen context menu item ‘Measurement options. The context menu opens by pressing while in the “Measurement” screen. Use and highlight ‘Measurement options’. With ‘Measurement options’ highlighted, press to confirm selection.
-
Page 119: Measuring Vibration
ROTALIGN Ultra iS Shaft handbook 5.3 Measuring vibration The vibration measurement feature is available in Advanced and Using sensALIGN sensor only, it is now possible to measure any vibration that may Expert Shaft levels only. influence the alignment results. The vibration may be inherent in the machine train or a result of external influence. - Page 120 Environmental vibration As soon as measurement is completed, the vibration velocity measured in mm/s (or in/s) is displayed. When measurement has been completed, the “Vibration measurement” screen provides options to exit the measurement, describe the measurement and to carry out additional measurements.
- Page 121 ROTALIGN Ultra iS Shaft handbook The three buttons are also available as context menu items in the “Vibration measurement” screen. In addition to the three button functions, the context menu items also include the item ‘Delete’ which may be used to delete any unwanted vibration measurement.
- Page 122 Vibration check probe Exercise CAUTION when carrying out vibration measurement using the CAUTION vibration check probe. Transferring vibration measurement results via Bluetooth to ROTALIGN Ultra iS computer.
- Page 123 ROTALIGN Ultra iS Shaft handbook Page intentionally left blank...
-
Page 124: Set-Up Options
5.4.1 Machine type and fixation Please refer to “Machine properties in section 4.8 ROTALIGN Ultra iS Shaft provides the user with a feature to designate the type and fixation for both left and right machines. Use the navigation keys to highlight machine item boxes. - Page 125 ROTALIGN Ultra iS Shaft handbook For machines with V-shaped supports, the angle between support surfaces and foundation must be entered in order to calculate corrections. The respective angles are entered as follows: › From the dimension screen, use the navigation keys to highlight either of the Note that the support support angle boxes (left side or right side).
- Page 126 Special alignment options All alignment corrections are achieved solely by inserting and removing the proper combination of shims; corrections are indicated for each individual machine foot to yield the required horizontal and vertical displacement for the machine upon angled supports. These corrections correspond to the values in the results screen as shown below.
- Page 127 ROTALIGN Ultra iS Shaft handbook 5.4.4i Short flex Short flex is for most common types of “compact” flexible coupling. Coupling results may be displayed either as ‘Angle/Offset’ or ‘Gap/ Offset’. 5.4.4ii Single plane Single plane is for simple non-flexible couplings which are usually just two flanges...
- Page 128 Special alignment options 5.4.4iv Spacer shaft Spacer shaft is a coupling with two transmission planes and a spacer. Coupling results may be displayed in any one of the following formats: ‘Offset B/Offset A Gap A/Gap B’ ‘Angle α /Angle ß’ ‘Gap/Offset at left’...
- Page 129 RPM. (See suggested shaft alignment tolerances within the ‘Appendix’.) In ROTALIGN Ultra iS Shaft the ‘live’ tolerance function can be activated or deactivated from either the coupling properties window or the tolerances window. When the function is checked active, the alignment quality is indicated with the ‘smiley’...
- Page 130 Special alignment options The machine RPM may also be edited on the tolerances screen. Use the navigation keys to highlight the RPM value box then use the data entry keys to ß enter the desired value. Confirm entry by pressing either Alignment tolerances are divided into two quality ranges -’acceptable’...
- Page 131 ROTALIGN Ultra iS Shaft handbook In this example, the user defined tolerances are symmetrical. In symmetrical tolerances, the tolerance values for both planes are the same. Use the navigation keys to cycle through the value boxes, entering the tolerance values in the highlighted box using the data entry keys. Confirm entered value ß...
- Page 132 This is called the machine’s thermal growth. ROTALIGN Ultra iS Shaft may be used to calculate thermal growth compensation if no other values are available. Thermal growth is calculated from the material char- acteristics, expected temperature difference and height of the shaft centerline above the shim plane.
- Page 133 ROTALIGN Ultra iS Shaft handbook Press to access the thermal calculator screen. Proceed to select type of material using the drop down menu. Use the navigation keys to highlight the respective value boxes and enter directly, the ambient temperature, the machine running temperature and the distance from machine base (or shimming plane) to the shaft centerline using the data entry keys.
-
Page 134: Soft Foot
Soft foot should be checked before aligning the shafts, and this can be done quickly and conveniently with the aid of the ROTALIGN Ultra iS Shaft soft foot function. With the sensALIGN laser and sensor mounted on the shaft in the usual way, the system is able to sense any machine movement when the machine bolts are loosened individu- ally. - Page 135 ROTALIGN Ultra iS Shaft handbook 5.5.1 Checking and correcting soft foot conditions The three main types are parallel soft foot, angular soft foot, and induced soft foot. There are instances where the soft foot is a combination of two or more types.
- Page 136 Soft foot 5. Press to continue with soft foot measurement. [Proceed to step 9.] If however, the laser beam is not centered, press . The context bar appears. and highlight ‘XY view’. 6. Press to access the XY view screen.
- Page 137 ROTALIGN Ultra iS Shaft handbook 7. Use the position thumbwheels to center the laser beam. Use the top thumbwheel to move the beam up/down. The side thumbwheel is used to move the beam sideways. The laser beam should be adjusted such that the...
- Page 138 Soft foot 10. When the displayed value no longer rises, press to save measured value. The wrench (spanner) symbol disappears and the highlight springs to the next empty value box. Tighten the bolt. 11. Repeat steps 9 and 10 for each machine foot. You may use the navigation keys to highlight any foot to measure.
- Page 139 ROTALIGN Ultra iS Shaft handbook 12. To investigate the soft foot, press . The context menu appears. Use to highlight ‘Diagnose’. ROTALIGN Ultra iS Shaft presents the user with concise instructions on how to eliminate the prevailing soft foot. 13. Press to proceed.
- Page 140 Soft foot The wizard offers the relevant remedy instruc- tions for each different soft foot situation. 15. Follow the wizard instructions by highlighting ‘Next’ using the navigation keys then pressing until the diagnosis and correction is completed. The wizard screen indicates that squishy soft foot has been detected.
- Page 141 ROTALIGN Ultra iS Shaft handbook This page intentionally left blank...
-
Page 142: Chapter 6: Special Alignment Applications
Machine train Chapter 6: Special alignment applications This chapter deals with alignment of machines that require use of special procedures rather than those for the standard horizontal alignment. These special applications include: Machine trains (groups of up to 14 machines coupled together for Advanced/ Expert Shaft levels, and groups of up to 6 machines coupled together for Standard Shaft level) Cardan drive machines (a more comprehensive guide to cardan shaft alignment... - Page 143 ROTALIGN ® Ultra iS Shaft handbook After highlighting the required template, confirm selection by pressing 5. Multiple machine trains can also be configured from the set-up screen. Press The context menu appears. Use to highlight ‘Add left’ or ‘Add right’ depending on which end of the machine train a machine is to be added.
- Page 144 Machine train The yellow focus shows the machine train element on which the blue cursor is presently placed. 6.1.2 How to align machinery trains The following step-by-step approach is recommended for multiple element trains. 1. Measure alignment at each coupling 2.
- Page 145 ROTALIGN ® Ultra iS Shaft handbook 4. Adjust the laser beam as described in section 4.11. 5. Press then proceed to take measurement as described in section 4.12. While in the measurement screen, you may jump to the desired coupling to be measured by pressing and holding 6.
- Page 146 Machine train 6.1.4 Evaluating results 1. Press to view the alignment results at the individual couplings. The yellow focus shows the machine train element on which the blue cursor is presently placed. 2. To view the results at the next coupling, simply press and hold down to jump to the next coupling in the train.
- Page 147 Note that multiple element trains may also be measured using the ROTALIGN Ultra iS Expert platform application Multiple coupling. For details on this application you may contact your local PRÜFTECHNIK...
-
Page 148: Cardan Shaft Alignment
This section describes the alignment of cardan shafts using the cardan shaft bracket ROTALIGN Ultra iS Shaft Lite ALI 2.874 SETIS in conjunction with ROTALIGN Ultra iS. Cardan drives are installed provides five bracketing and operate with a large offset between the driver and the driven shaft. The spacer options with which cardan shaft is set at a minimum angle of usually 4°... - Page 149 ROTALIGN ® Ultra iS Shaft handbook Without the spacers, there would be no direct contact between the faceplate and the The coupling shown coupling surface surrounding the bolt holes – exactly the location where the faceplate previously has a raised and coupling are being joined.
- Page 150 Cardan drives 2. Slide the laser onto the posts until it rests on the distance plate (refer to figure 3b). Distance plate 3. Mark a set of target crosshairs on the shaft rotation centerline of the other machine coupling (if the flange has a center hole, a temporary target surface may be affixed to the hole).
- Page 151 ROTALIGN ® Ultra iS Shaft handbook As soon as a single dot position has been achieved, do not touch the laser position thumbwheels. 6.2.4. Adjusting the laser beam to machine’s rotational axis In this step, the laser holder assembly is adjusted on the bracket such that the laser holder rotational axis is colinear with the rotational axis of machine to be aligned (which could be a motor or a gearbox).
- Page 152 Cardan drives 6.2.5 Positioning laser and mounting sensor for measurement In this step, the laser is remounted on the underside of the laser holder while the sensor is mounted on the shaft of the machine to be aligned. 1. Switch off the laser and remove it from its holder. 2.
- Page 153 Ultra iS Shaft handbook 6.2.6 Set-up and measurement 1. With sensALIGN laser, sensor and ROTALIGN Ultra iS computer switched on, proceed to set up the machines (refer to sections 4.6 – 4.9). From the machine set-up screen, highlight the coupling, then press to access the “Coupling...
- Page 154 Cardan drives 6. With the laser beam centered, and the needle exactly at the center of the green sector, press to take the first measurement. 7. Rotate sensALIGN sensor to the next measurement position. 8. Turn the laser-side shaft and observe the on-screen needle indicator. The ‘Take point’...
- Page 155 ROTALIGN ® Ultra iS Shaft handbook Stop measurement by using to highlight ‘Stop’ then pressing confirm selection. 6.2.7 Evaluation and alignment Offset has no real influence in the alignment condition but any angularity at the rotational axes must be corrected. 1.
-
Page 156: Flanged Machines
flange. Angularity is corrected by inserting or removing shims between the flanges. ROTALIGN Ultra iS calculates the shimming thickness for each flange bolt. Offset is corrected by positioning the flange laterally. - Page 157 ROTALIGN ® Ultra iS Shaft handbook 6.3.2 Marking measurement positions 1. Mark a reference position on the coupling housing close to the shaft and in line with a convenient external reference or flange bolt. Likewise, mark a reference point on the shaft. 2.
- Page 158 1. Mount sensALIGN laser and sensALIGN sensor on either side of the coupling, ensuring that they are aligned exactly with the 0 or reference mark. 2. Switch ROTALIGN Ultra iS on, then start the shaft alignment application. When the dimensions screen appears, press twice to open the global menu.
- Page 159 ROTALIGN ® Ultra iS Shaft handbook 6. When entering machine dimensions, the flange geometry must be taken into account. Use the navigation keys to highlight the flange-mounted machine then press . A hint requesting the definition of the flange appears. Confirm by pressing .
- Page 160 Flanged machines face-mounted (standard) reverse-mounted shims 8. It may be necessary to edit the bolt coordinates. To do this, press while in the machine flange screen. The context menu appears. 9. Use the navigation keys to highlight ‘Bolts’ then press to confirm selection.
- Page 161 ROTALIGN ® Ultra iS Shaft handbook 6.3.4 Measure 1. After entering the required dimensions, press and proceed to center the laser beam. For vertically oriented machine trains, static measurement mode is selected For vertically oriented machine trains, static measurement mode is selected automatically.
- Page 162 Flanged machines 6.3.5 Results 1. Press to evaluate results. The results screen shows the coupling gap and coupling offset in the 0-6 and 3-9 directions. Offset corrections in the side and top view are also shown. In this example, the 0-6 correction indicates moving the flange by 0.13 mm towards 0:00 and by 0.11...
- Page 163 ROTALIGN ® Ultra iS Shaft handbook Flange correction details are displayed only when the cursor is on a movable Flange correction details are displayed only when the cursor is on a movable element. element. Note The flange corrections Press to cycle screen shows the shimming through the 0-6, 3-9 and corrections for each flange...
- Page 164 Flanged machines Good quality shims such as PERMABLOC, MYLAR and LAMIBLOC should be Good quality shims such as PERMABLOC, MYLAR and LAMIBLOC should be used. Contact your local PRÜFTECHNIK representative for details. used. Contact your local PRÜFTECHNIK representative for details. Note The Move simulator is 5.
- Page 165 ROTALIGN ® Ultra iS Shaft handbook If the Move function does not auto start, the beam is not centered. Use the If the Move function does not auto start, the beam is not centered. Use the “Move measurement” screen context menu item ‘XY view’ (see section 5.2.8) “Move measurement”...
-
Page 166: Flange-Mounted Horizontal Machines
1. Mount sensALIGN laser and sensor on the shaft. sensALIGN laser mounts on the left machine and sensALIGN sensor on the right. This arrangement is identical to the standard ROTALIGN Ultra iS screen display for horizontal machines. 2. Switch ROTALIGN Ultra iS on by pressing and holding for a few seconds. - Page 167 ROTALIGN ® Ultra iS Shaft handbook The screen opposite Configure the machines will appear only if the directly from this screen customization option as described in sections ‘Resume policy’ has 4.7 – 4.9. been set to ‘Resume files manually’. (See customiza- tion –...
- Page 168 Flanged machines 6.4.2 Flange geometry and dimensions 1. After configuring the machines, proceed to enter all necessary dimensions as described in section 4.7. 2. Edit the flange geometry by highlighting the flange-mounted machine then pressing . A hint requesting the definition of the flange appears. Confirm by pressing .
- Page 169 ROTALIGN ® Ultra iS Shaft handbook 6.4.3 Measure Since the flanged machines under consideration here are mounted horizontally, a wider choice of measurement methods are available. 1. Press and proceed to center the laser beam. The desired measurement method may be selected using the “Measurement screen” context menu item ‘Measurement mode’...
- Page 170 Flanged machines In this example, the horizontal offset value is 0.06 mm positive. The table on the right lists the calculated shim corrections. The interpreta- tion of the shim corrections has been described in section 6.3.5. The flange is depicted as viewed from the right machine toward the left. The bolts in the figure correspond to the bolts (or shimming positions) on the flange, with the top position corresponding to number “1”.
- Page 171 ROTALIGN ® Ultra iS Shaft handbook Jack bolts or other mechanical or hydraulic adjustment methods are recommended for best results. Tighten down the anchor bolts, then press to conclude the horizontal alignment procedure. 6.4.8 Final check Press and take another set of readings in order to confirm the alignment condition. Remove the components from the shaft before switching on the machine! Remove the components from the shaft before switching on the machine! WARNING...
-
Page 172: Chapter 7: Updating Rotalign Ultra Firmware
Firmware update Chapter 7: Updating ROTALIGN Ultra firmware 7.1 Updating ROTALIGN Ultra firmware to higher version Current ROTALIGN Ultra firmware updates are carried out with the use of the Current ROTALIGN Ultra firmware updates are carried out with the use of the approved PRÜFTECHNIK USB memory stick (aka jumpdrive) ALI 4.451. - Page 173 Note that this folder is empty but necessary. 1. Connect the ROTALIGN Ultra iS computer to the mains adapter/charger, or ensure that the rechargeable battery is fully charged. 2. Switch ROTALIGN Ultra iS computer on and wait for Program Manager screen to appear.
- Page 174 Firmware update 3. Attach the ‘short’ USB/peripheral devices cable ALI 12.503 to the ROTALIGN Ultra iS . 4. Insert the approved PRÜFTECHNIK memory stick ALI 4.451 into the ‘short’ USB cable. Approved memory stick inserted in the ‘short’ USB cable ALI 12.503 which is connected to the ROTALIGN Ultra iS computer.
- Page 175 ROTALIGN Ultra iS Shaft handbook Should the firmware on the memory stick be of the same version as that present on the instrument, the instrument beeps and the 4 LEDs will blink but no update action will take place. An update process is about to be started, therefore, pay special attention to the An update process is about to be started, therefore, pay special attention to the hints appearing on the display.
- Page 176 Firmware update 9. Press and hold down until the device resets. This is indicated with a beep and the blinking of the 4 LEDs. 10. After reset, the “Flashing firmware“screen appears again followed by the loading of the program manager. The update is now completed and the ‘short‘ USB cable may be disconnected from ROTALIGN Ultra.
- Page 177 ROTALIGN Ultra iS Shaft handbook Page intentionally left blank...
-
Page 178: Chapter 8: Rotalign Ultra Is Shaft Configuration
8.1 Configuration From the “Program Manager” screen use the navigation keys to highlight the icon ‘Configuration’. Press to reveal the items used to configure the ROTALIGN Ultra iS computer. The “Configuration” screen may also be used to access the following The “Configuration”... - Page 179 ROTALIGN Ultra iS Shaft handbook 8.1.1 Setting date and time Accessing this section allows you to set the current date and time, choose the proper time zone, and change the date and time presentation formats. Use the navigation keys to select item to be changed.
- Page 180 Configuration Use the navigation keys to move from one drop down menu to the next. When a drop down menu box is highlighted, press to display the available formats. Use to highlight the desired format, confirming selection by pressing either ß...
- Page 181 Accessing this section allows you to change the dimensions and temperature units, as well as the resolution of units of measurement used in ROTALIGN Ultra iS. In this case, resolution is defined as the measurement precision in two or three decimal places.
- Page 182 Configuration 8.1.4 Power management This section displays the current battery status, allows you to control the power management features of shutdown, hibernate (sleep mode), and standby. The following suspend modes are available: Duration to Suspend mode Duration to Duration to standby (Dim) hibernate shutdown...
- Page 183 ROTALIGN Ultra iS Shaft handbook 8.1.5 Printer set-up Accessing this section allows you to set-up printers and the printing configuration on ROTALIGN Ultra iS. The default printer is ‘PDF Select printer by pressing printer’. Using this printer ,while in the setting, measurenet files...
- Page 184 The screen is also used to enable or disenable the ROTALIGN Ultra iS computer Bluetooth capabilities. When in the Bluetooth options screen, press to reveal the context menu items, then use...
- Page 185 8.1.8 Device info Accessing this section allows you to see the current file space and operating memory statistics, the CPU data, the ROTALIGN Ultra iS serial number, and information about the core software used in the device. ‘Device information’ is accessed via either the ‘Application information’ icon or the ‘Application options’...
- Page 186 The ROTALIGN Ultra iS computer word completion feature comes equipped with a set of predefined words. The mechanism allows entry of user defined words.
- Page 187 ROTALIGN Ultra iS Shaft handbook Initially, there is no user defined dictionary. The ‘Word completion’ screen displays a predefined choice of words available for the automatic completion mechanism. The predefined words’ column is scrolled using while the user defined words’...
- Page 188 Configuration ß The new word is adopted within the user defined column by pressing either or using the context menu item ‘Accept changes’ which appears when the dialog box open. An additional editing facility is achieved using the dialog box menu bar items. The bar appears by pressing when the dialog box is open.
- Page 189 Options available include – ‘Never’, ‘Always’, and ‘Only when important’ Resume policy This option is useful for the resume functionality of ROTALIGN Ultra iS. The drop down menu reveals the following items: ‘Resume files manually’ – a new job is started by loading a default template ‘Always resume last file’...
- Page 190 files on any particular ROTALIGN Ultra iS computer. Attach an approved memory stick to the USB/peripheral devices cable ALI 12.503 (short USB cable) then connect the USB cable to the ROTALIGN Ultra iS computer USB port ( refer to figure below).
- Page 191 Attach the memory stick containing the backup file to the short USB cable ALI 12.503 then connect the USB cable to the ROTALIGN Ultra iS computer as described in the previous section 8.1.12. Select the “Configuration” screen icon ‘Restore user file’ then press to confirm selection.
-
Page 192: User Accounts
8.2 User accounts The ROTALIGN Ultra iS user accounts function enables multiple users to easily share a single device. Each user has a separate profile with unique settings and preferences, such as language and customization options (see sections 8.1.2 and 8.1.11 respec- tively). - Page 193 Administrator rights include the capability to add new user accounts and access all other user accounts and measurement files. To work with ROTALIGN Ultra iS computer as administrator requires the creation of an administrator password. From the “Program Manager” screen use the navigation keys to highlight the icon ‘User Accounts’.
- Page 194 Administrator login Confirm selection by pressing . A hint advising the absence of a password will appear on the screen. If the Administrator password had already been allocated, confirming selection opens the ‘Enter a password to login’ value box. ß and highlight ‘OK’...
- Page 195 ROTALIGN Ultra iS Shaft handbook After entering new password using the data entry keys, confirm entry by pressing ß . A new password editing box opens with the instruction to enter password ß again. Enter the password again then confirm entry by pressing .
- Page 196 Administrator login 8.2.2 Using administrator password Using ROTALIGN Ultra iS computer as an administrator always requires a password to log on. The computer may also The administrator login be configured so that screen always appears when individual accounts are the computer is turned on...
- Page 197 Confirm selection by pressing . With password now enabled, a password will be required to access the administrator profile every time ROTALIGN Ultra iS computer is switched on. If however, the administrator is the only user of the device or company policy does not see the necessity of an administrator login, then the login screen may be skipped, and the administrator profile accessed directly whenever the device is turned on.
- Page 198 ‘Disable at startup’, then press to confirm selection. A ‘No’ will appear on the item’s ‘Run at start-up’ column. On restarting ROTALIGN Ultra iS Computer, the administrator profile will be loaded automatically without prompting the administrator login.
-
Page 199: Creating Templates
ROTALIGN Ultra iS Shaft handbook 8.3 Creating templates A template is a file that serves as a pattern for alignment set-ups that are repeated frequently. Their main purpose is to save you time by not having to configure the same set-up many times. - Page 200 Templates Use the navigation keys to highlight ‘File’ / ‘Save as template’. Confirm selection by pressing .The “Save as template” window appears. Press to edit the name of the template in the editing box that opens. Press to confirm template name and save template The new template will now appear on the templates list.
-
Page 201: Deleting Created Templates From The Program Manager
ROTALIGN Ultra iS Shaft handbook 8.4 Deleting created templates from the program manager Press twice to open the global menu while in the Shaft Alignment application. Confirm selection by pressing . The “Template list” screen opens. Use to highlight the template to be deleted, then press to open the screen context menu. - Page 202 Upgrading firmware version The templates list is revealed when selection is confirmed by pressing . Use to highlight the template to be opened. You may open the template by pressing . The template could also be opened via the “Template list” screen context menu item ‘Open’.
-
Page 203: Available Applications And Options
ROTALIGN Ultra iS Shaft handbook With the context menu displayed, use to highlight the item ‘Delete’. Confirm selection by pressing . A message pops up requesting confirmation if the file should actually be deleted. Use to highlight ‘Yes’, then confirm selection by pressing . - Page 204 vi) Live Trend – used to monitor machine positional change vii) Vibration Acceptance Check – used to measure and evaluate the vibration level according to machine classification threshold viii) Hydropower – measure the alignment condition of a hydro turbines vi) Right angle check – used to measure perpendicularity. vii) Tolerance editor –...
-
Page 205: Upgrading From Standard Shaft To Advanced Shaft Version
To benefit from all the ROTALIGN Ultra iS intelligent features, which are available only in Advanced / Expert Shaft, it is necessary to upgrade from ROTALIGN Ultra iS Standard to Advanced version. For this upgrade, only the Advanced Shaft firmware registration certificate ALI 4.741 needs to be purchased. - Page 206 Standard Deviation Editable ellipse Thermal growth calculator Under- and over-constrained feet File and machine templates Vector tolerances History table Also included are the following ROTALIGN Ultra iS intelligent features: IntelliSWEEP IntelliEXTEND IntelliPOINT IntelliPASS Intelli laser position Monitoring environmental vibration Vibration Acceptance Check Live quality filter...
- Page 207 ROTALIGN Ultra iS Shaft handbook Page intentionally left blank...
-
Page 208: Appendix
Appendix Appendix Suggested shaft alignment tolerances [RPM] metric [mm] imperial [mils] Soft foot 0.06 Short “flexible” couplings Acceptable Excellent Acceptable Excellent Offset 0.19 0.09 1500 0.09 0.06 1800 3000 0.06 0.03 3600 6000 0.03 0.02 7200 Angularity 15.0 10.0 (coupling gap difference per 0.13 0.09 100 mm or 10”... - Page 209 ROTALIGN Ultra iS Shaft handbook [RPM] metric [mm] imperial [mils] Acceptable Excellent Acceptable Excellent Spacer shafts and membrane (disk) 0.25 0.15 couplings 1500 0.12 0.07 Offset (per 100 mm spacer 1800 length or per inch of 3000 0.07 0.04 spacer length)
-
Page 210: Rotalign Ultra Is Technical Data
Appendix ROTALIGN Ultra iS technical data ROTALIGN Ultra iS computer Intel XScale ® Processor 520 MHz Memory 64 MB RAM, 64 MB Internal Flash,1024 MB Compact Flash Memory Display Type: Transmissive (sunlight-readable) backlit TFT colour graphic display Resolution: Full VGA, 640 x 480 Pixel Dimensions: 5.7 inch (145 mm) diagonal... - Page 211 ROTALIGN Ultra iS Shaft handbook sensALIGN laser Type InGaAlP semiconductor laser Beam divergence 0.3 mrad Environmental protection IP 65 (dustproof and water jets resistant), shockproof Relative humidity 10% to 90% Beam power < 1mW Wavelength (typical) 635 nm (red, highly visible) Safety class and Class 2 according to IEC 608251-1;...
-
Page 212: Sensalign Sensor And Laser 'On/Off/Charge' Workflow
Appendix sensALIGN sensor and laser ‘ON/OFF/CHARGE’ workflow Action sensALIGN laser status sensALIGN sensor status With both laser and sensor OFF, press the ‘On/Off’ Laser turns ON Sensor turns push button briefly measurement is POSSIBLE Either laser or sensor connected to ROTALIGN Laser turns ON Sensor turns... -
Page 213: Declaration Of Conformity
ROTALIGN Ultra iS Shaft handbook Declaration of conformity... -
Page 214: Index
3-D format 40 ROTALIGN Ultra Advanced Shaft Firmware registration certificate 8 ALI 4.820 ROTALIGN Ultra iS case 5 Adjusting laser beam 24 ROTALIGN Ultra iS Shaft case 25 Administrator rights 192 ALI 4.900 Advanced Shaft level 83 sensALIGN sensor 5 Advanced Shaft 143 ALI 4.905... - Page 215 ROTALIGN Ultra iS Shaft handbook Coupling targets 49, 127 Coupling type Batteries cardan shafts 126 replacing 17 short flex 126 standard ‘C’ size 17 single plane 126 Battery compartment (optional) spacer shaft 127 ALI 4.60 16 Customization 40, 44, 188...
- Page 216 Index Expert LAMIBLOC shims 163 Language 179 Shaft level 83 Laser Expert Shaft 143 Extending measurement range 105 Class 2 12 Laser aperture 20 Laser end Extend 105 FDA specifications 12 Laser safety 12 File backup 189 Laser version check 109 Firmware registration certificate Latching nipple Advanced Shaft...
- Page 217 ROTALIGN Ultra iS Shaft handbook Measuring vibration 118 Memory stick ALI 4.451 78 Quality factors 86, 205 Mounting sensALIGN laser and sensor 39 Move simulator 65, 68, 163 Real-time values 59 options 71 Rechargeable battery Move step 68 ALI 4.603 17 ‘Move step’...
- Page 218 Upgrading Standard deviation 59, 87 Standard Shaft to Advanced Shaft 204 Static measurement 87 USB cable Storage ALI 12.503 173 ROTALIGN Ultra iS USB host/slave port 19 computer 25 USB/peripheral devices cable Support angle ALI 12.503 78 2-D 124 User account...
- Page 219 ROTALIGN Ultra iS Shaft handbook...
Need help?
Do you have a question about the ROTALIGN Ultra iS and is the answer not in the manual?
Questions and answers
Hi, I have the charger plugged in to the Rotalign Ultra iS and the red dots are together as mentioned in the manual but its not charing the unit. The light is not flashing and the batter is not getting charged. I dont know what to do with it .
The PRÜFTECHNIK ROTALIGN Ultra iS may not be charging despite the charger being plugged in and the red dots being aligned due to one of the following reasons:
1. Defective Battery – If the battery is faulty, it may not accept a charge. The manual advises against shipping defective batteries and suggests contacting a representative for further assistance.
2. Incorrect Charger – The battery should only be charged using the ALI 12.651-I charger. Using a different charger might prevent proper charging.
3. Battery Not Properly Connected – Ensure the battery is securely installed inside the computer.
4. Extended Period of Disuse – If the unit has not been used for a long time (a month or more), the battery may need to be removed and reinserted to reset the charging process.
5. Damaged Charging Port or Cable – Check if the charging port or cable is damaged, preventing proper connection.
If the issue persists, further troubleshooting or battery replacement may be needed.
This answer is automatically generated