
Related Manuals for Drive Torro


Summary of Contents for Drive Torro
- Page 1 Rollator Torro ROLLATOR – WALKING DEVICE – ROLLATOR – ROLLATOR Gebrauchsanweisung – Operating instructions – Manuel d’utilisation – Gebruiksaanwijzing...
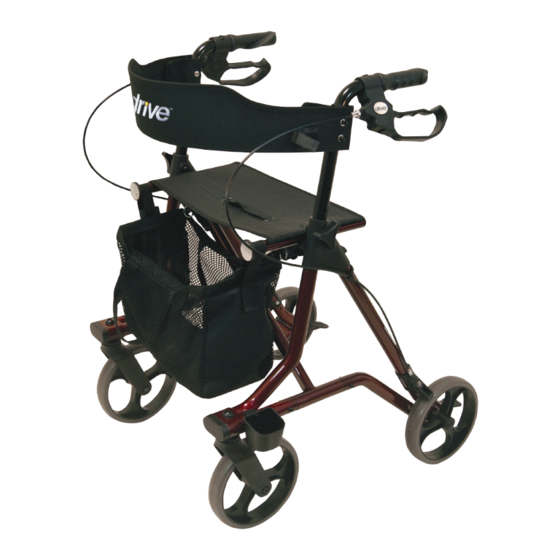
- Page 2 Teile des Rollator – Parts of walking device – Pièces du Rollator Onderdelen van de Rollator 1 Handgriff 1 Handgrip 1 Poignée 1 Handgreep 2 Schiebegriff 2 Adjustable Tube of Handgrips 2 Poignée réglable en hauteur 2 Hoogteverstelling 3 Bremse 3 Brake 3 Frein 3 Rem...
- Page 3 Indikation / Kontraindikation Höheneinstellung Schiebegriffe Gehhilfe für den Außen- und Innenbereich zum Ausgleich Schiebegriffe mindestens bis zur ersten Querbohrung bzw. zur Verbesserung eingeschränkter Gehleistung. in das Rahmen-Rohr einstecken. Die Fixierschraube von innen durchstecken und mit Scheibe und Sterngriff fest- Die Versorgung Versicherter mit Gehhilfen hat in der schrauben.
-
Page 4: Reinigung / Wartung
Bremsen / Parken Sicherheitshinweise Zum Bremsen während des Gehens mit dem Rollator Rollator nur als Gehhilfe verwenden! beide Bremsgriffe mit den Händen nach oben ziehen (siehe Abb 7). Immer langsam und gleichmäßig mit Rollator nur auf ebenem und festem Untergrund beiden Händen bremsen. -
Page 5: Indication / Contraindication
Indication / Contraindication Height adjustment handgrips Walking device – for indoor and outdoor use – for com- Insert the tube of the adjustable handgrip into the frame pensation and improvement respectively of restricted at least to the “first hole”. Insert the locking screw ability of walking. -
Page 6: Safety Instructions
Breaking / Parking Safety instructions Pull both brake levers upwards to apply the brakes whilst Use only as a walking aid! the Rollator is moving (see picture 7). Always brake slowly and steady. Use only on even and solid surfaces. The Rollator must not be used for standing on or as a Press both brake levers down to apply the parking brakes whilst the Rollator is stationary (picture 8). -
Page 7: Contre-Indications
Indication / Contre-indication Réglage en hauteur des poignées Déambulateur pour l’intérieur l’extérieur pour Insérer les poignées au moins jusqu’au premier trou compenser ou améliorer un handicap de déplacement. traversant dans le tube du châssis. Faire passer la vis de fixation de l’intérieur puis serrer à l’aide de la rondelle La prescription d’un déambulateur a pour but de et de la poignée à... -
Page 8: Nettoyage/Maintenance
Instructions de sécurité Freinage/Parking Tirer les deux leviers de frein vers le haut pour actionner N’utiliser le Rollator que comme déambulateur ! le frein d’arrêt lorsque le Rollator est en mouvement (voir illustration 7). Toujours exercer un freinage lent et Le Rollator ne doit être utilisé... - Page 9 Indicatie / Contra-indicatie Hoogte van handgrepen verstellen Loophulpmiddel voor binnen en buiten ter compensatie Steek de handgrepen minstens tot de eerste dwarsbo- of verbetering van beperkingen bij het lopen. ring in de buis van het frame. Steek de borgschroef er van binnenuit door en schroef deze met de ring en de Loophulpmiddelen moeten worden toegepast om stervormige knop vast.
- Page 10 Remmen/parkeren Veiligheidsinstructies Als u tijdens het lopen met de Rollator wilt remmen, trekt u Gebruik de Rollator alleen als hulpmiddel bij het lopen. beide remgrepen met de handen omhoog (zie afbeelding 7). Gebruik de Rollator alleen op een vlakke, stevige Rem altijd langzaam en gelijkmatig met beide handen.
- Page 11 Technische Daten – Technical Data – Données techniques –Technische gegevens MODELL MODEL MODÈLE MODEL TORRO TORRO S TORRO L TORRO XC Art. Nr. Item. Nr. Art. Nr. Art. Nr. 740 500 100 740 500 200 740 500 300 740 500 400...
- Page 12 Ihr Fachhändler / Your specialist Dealer / Votre revendeur spécialisé / Uw speciaalzaak: www.drivemedical.de Drive Medical GmbH & Co. KG • Leutkircher Straße 44 • D-88316 Isny/Allgäu • Germany • info@drivemedical.de • Tel.: +49 (0) 7562 9724-0 • Fax: +49 (0) 7562 9724-25...
Need help?
Do you have a question about the Torro and is the answer not in the manual?
Questions and answers