Table of Contents
Advertisement
Advertisement
Table of Contents
Troubleshooting

Related Manuals for Native Instruments Komplete Audio 6


Summary of Contents for Native Instruments Komplete Audio 6
- Page 1 MANUAL...
- Page 2 The information in this document is subject to change without notice and does not represent a commitment on the part of Native Instruments GmbH. The software described by this docu- ment is subject to a License Agreement and may not be copied to other media. No part of this...
- Page 3 6725 Sunset Boulevard 5th Floor Los Angeles, CA 90028 www.native-instruments.com NATIVE INSTRUMENTS K.K. YO Building 3F Jingumae 6-7-15, Shibuya-ku, Tokyo 150-0001 Japan www.native-instruments.co.jp NATIVE INSTRUMENTS UK Limited 18 Phipp Street London EC2A 4NU www.native-instruments.com © NATIVE INSTRUMENTS GmbH, 2016. All rights reserved.
-
Page 4: Table Of Contents
On Windows ....................... 14 3.1.2 On Mac OS X ......................14 Using the KOMPLETE AUDIO 6 as an Audio Output Device with Music Software ......15 The Hardware in Detail ....................16 Front Panel ..........................17 Rear Panel ..........................18 Top Panel ............................ - Page 5 Direct Monitoring ........................49 Troubleshooting ......................50 Solving Hardware-related Problems ................... 50 How to Check Whether the KOMPLETE AUDIO 6 Drivers are Installed Correctly ......51 Troubleshooting (Windows) ......................52 Choosing the Correct USB Cable ....................52 Getting Help ..........................52 7.5.1...
- Page 6 Table of Contents Appendix ........................55 Technical Specifications ......................55 About Latency and Buffers ......................55 Different Types of ASIO (Windows) ....................56 Index ........................57 KOMPLETE AUDIO 6 - Manual - 6...
-
Page 7: Welcome To Komplete Audio 6
▪ The KOMPLETE AUDIO 6 audio interface ▪ A USB 2.0 cable ▪ A registration flyer with your KOMPLETE AUDIO 6 hardware serial number and a link to the hardware registration page, where you can register your hardware and download the driver software for your Windows computer. -
Page 8: Document Conventions
▪ References to keys on your computer’s keyboard you’ll find put in square brackets (e.g., “Press [Shift] + [Enter]”). Single instructions are introduced by this play button type arrow. ► Results of actions are introduced by this smaller arrow. → KOMPLETE AUDIO 6 - Manual - 8... -
Page 9: Installing Komplete Audio 6
Apple. To connect the KOMPLETE AUDIO 6 to your computer: Connect the KOMPLETE AUDIO 6 to a USB 2.0 port on your computer using the USB ► cable provided in the KOMPLETE AUDIO 6 box. -
Page 10: Installing Komplete Audio 6 On Windows
Installing KOMPLETE AUDIO 6 on Windows Installing KOMPLETE AUDIO 6 on Windows In order for the KOMPLETE AUDIO 6 to work with your Windows computer, the following two components will be installed on your system during the software installation process: ▪... -
Page 11: Installing The Driver Software
Installing the Driver Software To install the KOMPLETE AUDIO 6 driver software on Windows: Locate and double-click the Komplete Audio 6 Driver Setup PC.exe file to start the installa- tion procedure. In the installation prorgam’s Welcome screen, click Next. Then, follow the on-screen in- structions. -
Page 12: Connecting The Komplete Audio 6 To Your Computer
Installing KOMPLETE AUDIO 6 on Windows On the last screen of the software installation, click Finish. All software components are now installed, and the KOMPLETE AUDIO 6 can be con- → nected to your computer as described in the following section. - Page 13 Installing KOMPLETE AUDIO 6 Installing KOMPLETE AUDIO 6 on Windows Connect the KOMPLETE AUDIO 6 to a USB 2.0 port on your computer using the USB ► cable provided in the KOMPLETE AUDIO 6 box. KOMPLETE AUDIO 6 - Manual - 13...
-
Page 14: Basic Configuration
Music Software. Selecting the KOMPLETE AUDIO 6 as Your System's Default Audio Output Device In the following sections, you will learn how to set up the KOMPLETE AUDIO 6 as your sys- tem's default audio output device. 3.1.1 On Windows Open Start >... -
Page 15: Using The Komplete Audio 6 As An Audio Output Device With Music Software
Using the KOMPLETE AUDIO 6 as an Audio Output Device with Music Software Before using the KOMPLETE AUDIO 6 with music production or DJ software, you will need to set it up as the software's audio output device. Most music production and DJ programs pro- vide direct access to the soundcard properties in the audio and MIDI setup section of their preferences dialog. -
Page 16: The Hardware In Detail
The Hardware in Detail The Hardware in Detail The KOMPLETE AUDIO 6 processes both incoming audio and the audio sent to your computer (and external equipment) in analog and digital form. It is a stand-alone device which draws power from the USB connection of your computer. Thus, an external power supply is unneces- sary. -
Page 17: Front Panel
XLR or 1/4" jack connectors. When connecting an XLR connector, an XLR lock latch- es. You can easily release the connector by pressing the release tab. The input GAIN knob lowers/raises the amount of signal going into the KOMPLETE AUDIO 6. LINE/INST toggle button selects either LINE... -
Page 18: Rear Panel
Rear Panel The rear panel of the KOMPLETE AUDIO 6. (1) Phantom power button (48V): The phantom power button supplies 48V to condenser micro- phones, which need this DC voltage to power their active electrical circuitry. This feature elimi- nates the need for direct boxes or other additional hardware when using a condenser micro- phone. - Page 19 The Hardware in Detail Rear Panel port: The port socket connects the KOMPLETE AUDIO 6 device to your computer laptop or workstation via USB 2.0. (3) MIDI: The MIDI input (IN) and output (OUT) sockets connect to MIDI devices such as MIDI controllers and hardware synths or workstations.
-
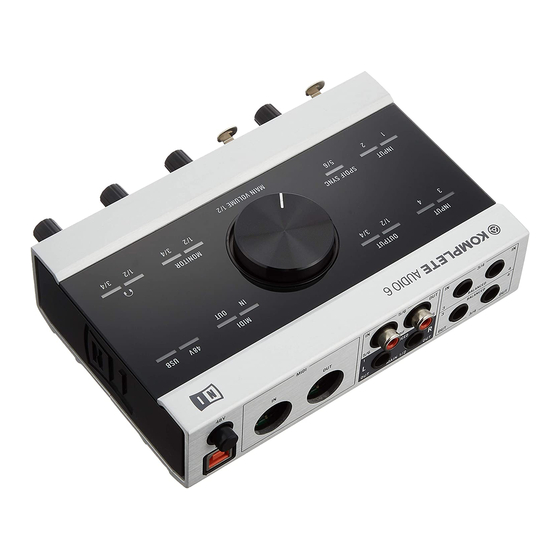
Page 20: Top Panel
The Hardware in Detail Top Panel Top Panel The top panel of the KOMPLETE AUDIO 6. ▪ Volume control knob (MAIN VOLUME 1/2): The knob at the center of the top panel provides a master volume control for the main outputs (MAIN 1/2). - Page 21 SYNC: Lights orange when External Digital Clock Sync is established; does not ◦ light when the internal clock is used (see chapters ↑5.1.1, Audio Settings Page ↑5.2.1, Input Pane for further information on synchronizing the KOMPLETE AU- DIO 6's clock to external equipment). KOMPLETE AUDIO 6 - Manual - 21...
-
Page 22: Advanced Configuration
The Control Panel software allows you to change the driver's performance settings, monitor per- formance and detect errors. To open the Control Panel: Navigate to Start > All Programs > Native Instruments > KOMPLETE AUDIO 6 Driver > ► Control Panel. -
Page 23: Audio Settings Page
Audio Settings page consists of four sections: Audio Processing, Device Monitor, Digital Sync Source, and Direct Monitoring. See the following subchapters for further information. KOMPLETE AUDIO 6 - Manual - 23... - Page 24 Process Buffer: Lower the buffer size value for a quicker response time from your computer ▪ to audio software and MIDI controller actions. KOMPLETE AUDIO 6 - Manual - 24...
- Page 25 ◦ Streaming: driver is working and processing audio data. ◦ Panic: driver stopped streaming. Too many USB I/O errors occurred in the interface communication. Output Latency: Shows the amount of output latency in milliseconds. ▪ KOMPLETE AUDIO 6 - Manual - 25...
- Page 26 This function can be accessed from the MONITOR section on the device's front panel too; see chapter ↑4.1, Front Panel for further information. Direct Monitoring section has a button and a drop-down menu: KOMPLETE AUDIO 6 - Manual - 26...
-
Page 27: Diagnostics Page
The Diagnostics page consists of the four sec- tions: Drop-Out Detection; Connection Monitor; System erformance Test; and Information. See the following subchapters for further information on these sections. KOMPLETE AUDIO 6 - Manual - 27... - Page 28 Clients: displays the number of clients connected to the interface. Multiple ▪ ASIO applications are counted separately. WDM and WASAPI increase the number by one, no matter how many WDM / WASAPI applications play audio. KOMPLETE AUDIO 6 - Manual - 28...
- Page 29 Reset button: Press this button to reset the Maximum Latency value to zero. ▪ ▪ Start/Stop: Press this button to start monitoring DPC latency. Once started, the button la- bel changes to Stop. KOMPLETE AUDIO 6 - Manual - 29...
-
Page 30: Advanced Configuration On Mac Os X (Audio Midi Setup)
To open the Audio MIDI Setup utility: Go to Applications > Utilities > Audio and MIDI Setup. ► The Audio MIDI Setup utility will pop up in a window, entitled Audio Devices. → KOMPLETE AUDIO 6 - Manual - 30... -
Page 31: Input Pane
This is relevant when connecting to an external device via the digital In/Out 5/6 sockets (see also chapter ↑4.2, Rear Panel). The drop-down menu holds the following entries: KOMPLETE AUDIO 6 - Manual - 31... -
Page 32: Output Pane
(see chapter ↑4, The Hardware in Detail). 5.2.2 Output Pane All relevant output settings of the KOMPLETE AUDIO 6 are controlled from the hardware (see ↑4, The Hardware in Detail). See chapter ↑5.2.1, Input Pane for general settings and input channel settings. -
Page 33: Using The Komplete Audio 6 (Setup Scenarios)
Connecting Speakers Using the KOMPLETE AUDIO 6 (Setup Scenarios) In this chapter, you will learn how to connect the KOMPLETE AUDIO 6 in various setup sce- narios. Although we cannot cover all imaginable setups here, the examples are general enough to apply the information to most situations. -
Page 34: Using Komplete Audio 6 In A Setup With Passive Speakers
Configuration). Passive speakers require amplification, so there will be an amplifier or powered mixer between the speakers and the KOMPLETE AUDIO 6. To use the KOMPLETE AUDIO 6 in a setup with passive speakers: Turn your stereo amplifier / mixer off. -
Page 35: Connecting Headphones
Gradually raise your stereo console's / mixer's volume control level until you reach a good listening level. Connecting Headphones KOMPLETE AUDIO 6 setup with headphones. Make sure the KOMPLETE AUDIO 6 is connected to your computer as described during the installation chapter (chapter ↑2, Installing KOMPLETE AUDIO 6), and configured as your com- puter's main audio output device (see chapter ↑3, Basic... -
Page 36: Komplete Audio 6 In A Recording Setup
DIO 6 to the right until you reach a good listening level. KOMPLETE AUDIO 6 in a Recording Setup The following instructions will assist you in using the KOMPLETE AUDIO 6 in a recording sit- uation for capturing audio to your computer, and monitoring the input and result over your speakers or headphones. -
Page 37: Connecting A Condenser Microphone
6.3.1 Connecting a Condenser Microphone KOMPLETE AUDIO 6 setup with microphone and headphones. Make sure to have connected the KOMPLETE AUDIO 6 to your computer as described during the installation chapter (chapter ↑2, Installing KOMPLETE AUDIO 6) of this manual. - Page 38 AUDIO 6's front panel. Turn the Volume Control knob (VOLUME) in the headphone sec- tion of the KOMPLETE AUDIO 6 to the left-end stop to set the volume to minimum. Open the audio preferences of your audio recording software, and select KOMPLETE AU- DIO 6 as your input and output device (you may have to restart your host software for the changes to become active).
-
Page 39: Connecting A Dynamic Microphone
6.3.2 Connecting a Dynamic Microphone KOMPLETE AUDIO 6 setup with microphone and headphones. Make sure to have connected the KOMPLETE AUDIO 6 to your computer as described during the installation chapter (chapter ↑2, Installing KOMPLETE AUDIO 6) of this manual. - Page 40 AUDIO 6's front panel. Turn the Volume Control knob (VOLUME) in the headphone sec- tion of the KOMPLETE AUDIO 6 to the left-end stop to set the volume to minimum. Open the audio preferences of your audio recording software, and select KOMPLETE AU- DIO 6 as your input and output device (you may have to restart your host software for the changes to become active).
-
Page 41: Connecting A Guitar / Bass Guitar (With Headphones)
(chapter ↑2, Installing KOMPLETE AUDIO 6) of this manual. To use the KOMPLETE AUDIO 6 in a recording setup with a guitar / bass guitar: Turn the Volume Control knob (MAIN VOLUME 1/2) on the top panel of the KOMPLETE AUDIO 6 to the left-end stop to set the volume to minimum. - Page 42 (INPUT 1 LEDs on the top panel of the KOMPLETE AUDIO 6) to make sure your input signal does not clip; adjust the input level so that the LEDs lights green on input. A red lighting LED indicates signal clipping.
-
Page 43: Connecting Line Level Equipment (Synthesizer/Computer/Tapedeck/Mixer Line Out)
See the relevant chapters for information on how to connect speakers to the KOMPLETE AUDIO 6. Always make sure the volume is set to minimum when con- necting the instrument, and gradually raise the volume afterwards until you reach a good listening level. - Page 44 Plug a pair of stereo 1/4" TRS cables from the outputs of your device into the inputs IN 3 IN 4 on the rear panel of the KOMPLETE AUDIO 6 or unbalanced ¼” cable if you are using a mono device. Open the audio preferences of your audio recording software, and select the KOMPLETE AUDIO 6 as your input and output device (you may have to restart your host software for the changes to become active).
-
Page 45: Komplete Audio 6 With Midi Devices
Connecting Speakers for instructions on how to connect speakers (active and passive) to your KOMPLETE AUDIO 6. To use the KOMPLETE AUDIO 6 in a setup with a MIDI controller: Make sure to have the Volume Control knob (MAIN VOLUME 1/2) on the top panel of the KOMPLETE AUDIO 6 turned to the left-end stop so the volume is set to minimum. - Page 46 Open the audio and MIDI settings dialog of your digital audio workstation software and ac- tivate the MIDI input and the MIDI output channel of your KOMPLETE AUDIO 6. For in- formation on where to find the relevant dialog and how to apply the settings, please refer to the documentation of your digital audio workstation software.
-
Page 47: Using The Digital Input And Output
The KOMPLETE AUDIO 6 can be set to act as a slave, and sync to external devices in such a setup. -
Page 48: Connecting A Synthesizer Via Digital I/O
↑4.3, Panel). 6.5.2 Connecting a Synthesizer via Digital I/O Make sure to connect the KOMPLETE AUDIO 6 to your computer as described during the in- stallation chapter (chapter ↑2, Installing KOMPLETE AUDIO 6) of this manual. To use the KOMPLETE AUDIO 6 with a synthesizer with digital output:... -
Page 49: Direct Monitoring
You can activate Direct Monitoring via the switch in the Monitor section, which is located on the front panel of the KOMPLETE AUDIO 6. This routes the signal of the inputs IN 1 IN 2 directly to the selected outputs. The... -
Page 50: Troubleshooting
▪ Verify that you have installed the latest driver and the latest software update. Check the Native Instruments website for further information. ▪ Make sure the KOMPLETE AUDIO 6 interface is connected to a USB 2.0 port on your com- puter (see also ↑7.3, Troubleshooting... -
Page 51: How To Check Whether The Komplete Audio 6 Drivers Are Installed Correctly
Correctly Windows Open Start > All Programs > Native Instruments > KOMPLETE AUDIO 6 Driver. There you will find the helper application Control Panel. Make sure that the device is connected to the com- puter and open the Control Panel. If all the drop-down menus are grayed out (i.e., there are no presets in the preset drop-down list and no sample rate values to choose from) there must be something wrong with the connection. -
Page 52: Troubleshooting (Windows)
Knowledge Base article: http://www.native-instruments.com/en/support/knowledge-base/show/2085/choosing-the-cor- rect-usb-cable-for-your-ni-hardware-device/ Getting Help Native Instruments provides various sources of support and information. 7.5.1 Readme, Knowledge Base, Technical Support Readme Always read the “Readme” file found on the installation CD. It contains important information and all last minute changes that could not be included in this manual. -
Page 53: Forum
▪ The exact model and technical specifications of your computer 7.5.2 Forum Check out the NI online forum to discuss all aspects of KOMPLETE AUDIO 6 with other users: http://www.native-instruments.com/forum/. Updates Whenever you encounter problems, you should also check if you have the latest driver is instal- led. -
Page 54: Resolving Ground Loop Issues
For information on how to resolve issues related to ground loops, please see this Knowledge Base article: http://www.native-instruments.com/en/support/knowledge-base/show/250/how-to-resolve- ground-loop-issues-humming-and-buzzing-sounds/ KOMPLETE AUDIO 6 - Manual - 54... -
Page 55: Appendix
(audio buffers) which are then sent to and processed by the CPU of your computer. The larger the buffer, the more delay. You might experience this as late re- sponse between hitting a key on a controller which controls music software on your computer, KOMPLETE AUDIO 6 - Manual - 55... -
Page 56: Different Types Of Asio (Windows)
DPC latency) using the DPC Latency Checker program, which is found on the web at http://www.thesycon.de/eng/latency_check.shtml. Different Types of ASIO (Windows) It is extremely important to use the dedicated ASIO driver written for the KOMPLETE AUDIO 6 and installed during software installation (chapter ↑2, Installing KOMPLETE AUDIO 6). -
Page 57: Index
[48] Hardware overview [16] Connecting an instrument [41] Connecting headphones [35] Instrument mode [17] Connecting line level equipment [44] Connecting MIDI [45] Connecting Speakers [33] active [34] passive Contact [52] Control Panel [22] KOMPLETE AUDIO 6 - Manual - 57... - Page 58 Latency optimization [24] Windows Volume control [20] Line mode [17] Phantom power [18] Sample rate setting [32] [24] Windows SPDIF SYNC [21] Sync Source [31] Windows [26] Syncing to external gear [31] Windows [26] KOMPLETE AUDIO 6 - Manual - 58...
Need help?
Do you have a question about the Komplete Audio 6 and is the answer not in the manual?
Questions and answers