Native Instruments MASCHINE STUDIO Getting Started
Hide thumbs
Also See for MASCHINE STUDIO:
- Manual (962 pages) ,
- Reference manual (245 pages) ,
- Getting started (200 pages)
Table of Contents
Advertisement
Quick Links
Advertisement
Table of Contents

Related Manuals for Native Instruments MASCHINE STUDIO


Summary of Contents for Native Instruments MASCHINE STUDIO
- Page 1 GETTING STARTED...
- Page 2 The information in this document is subject to change without notice and does not represent a commitment on the part of Native Instruments GmbH. The software described by this docu- ment is subject to a License Agreement and may not be copied to other media. No part of this...
- Page 3 6725 Sunset Boulevard 5th Floor Los Angeles, CA 90028 www.native-instruments.com NATIVE INSTRUMENTS K.K. YO Building 3F Jingumae 6-7-15, Shibuya-ku, Tokyo 150-0001 Japan www.native-instruments.co.jp NATIVE INSTRUMENTS UK Limited 18 Phipp Street London EC2A 4NU www.native-instruments.co.uk © NATIVE INSTRUMENTS GmbH, 2016. All rights reserved.
-
Page 4: Table Of Contents
To Sum Up… ..........................32 Building Your Own Drum Kit ..................33 Opening Your Project ........................33 Customizing Your Drum Kit ......................36 3.2.1 Selecting another Snare Sample ................36 3.2.2 Loading a Drumsynth ....................41 MASCHINE STUDIO - Getting Started - 4... - Page 5 Loading a Plug-in Instrument for the Bass ................. 71 5.3.1 Browsing the MASSIVE Presets .................. 72 5.3.2 Using Keyboard Mode ....................75 5.3.3 Adjusting the Base Key of the Pads on Your Controller ..........78 MASCHINE STUDIO - Getting Started - 5...
- Page 6 7.1.1 Using Step Mode ......................102 7.1.2 Adjusting the Pattern Length in Step Mode ............... 103 7.1.3 Recording Modulation in Step Mode ................104 7.1.4 A Few Notes on Step Mode ..................104 MASCHINE STUDIO - Getting Started - 6...
- Page 7 Using Other Sound Sources ......................132 9.2.1 Using Sounds and Groups as Sound Source .............. 133 9.2.2 Using an External Sound Source ................136 Sampling ............................ 140 9.3.1 How to Sample ......................140 MASCHINE STUDIO - Getting Started - 7...
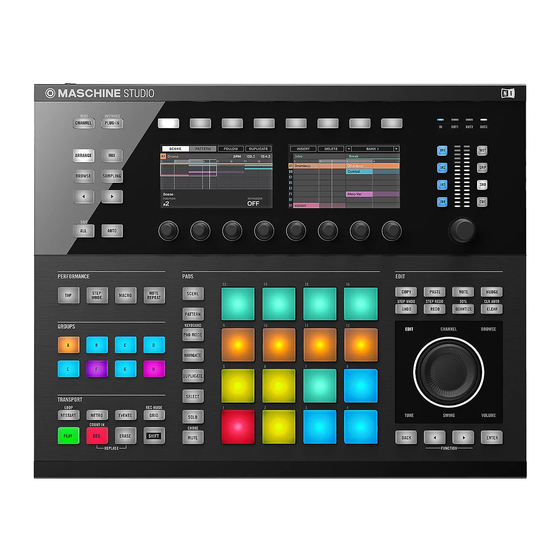
- Page 8 10.2.2 Arrangement ......................153 10.3 MASCHINE Hardware Overview ....................154 10.3.1 Hardware Overview of the MASCHINE STUDIO Controller ..........154 10.3.1.1 CONTROL Section ..................156 10.3.1.2 I/O and Level Section .................158 10.3.1.3 PERFORMANCE Section ................160 10.3.1.4 GROUPS Section ..................161 10.3.1.5 TRANSPORT Section ...................161 10.3.1.6 PADS Section .....................163...
- Page 9 Updates ........................178 11.2 Getting Help ..........................178 11.2.1 Knowledge Base ......................179 11.2.2 Technical Support ...................... 179 11.2.3 Registration Support ....................180 11.2.4 User Forum ........................ 180 12 Glossary ........................181 Index ........................189 MASCHINE STUDIO - Getting Started - 9...
-
Page 10: Welcome To Maschine
Browser to give you instant access to the sounds you are looking for. But it doesn’t stop there! You can create your own sounds and samples or use MASCHINE EXPAN- SION packs, available for purchase from the Native Instruments website to further enhance your library of sounds. -
Page 11: Where To Start
Help menu or the following location: www.native-instruments.com. Please check Service Center or the Native Instruments website regularly for up-to-date and localized versions of these documents. Additional documentation sources provide you with details on more specific topics: ▪ MASCHINE Hardware Control Reference ▪... -
Page 12: Maschine Getting Started Guide
MASCHINE via a set of tutorials covering easy and more advanced tasks in or- der to help you familiarize yourself with MASCHINE. 1.1.3 Support Channel Videos You can find a number of support videos on The Official Native Instruments Support Channel under the following url: https://www.youtube.com/NIsupportEN We recommend that you follow along with these instructions while the respective application is running on your computer. -
Page 13: Other Online Resources
Welcome to MASCHINE! Where to Start? 1.1.7 Other Online Resources If you are experiencing problems related to your Native Instruments product that the supplied documentation does not cover, there are several ways of getting help: ▪ Knowledge Base ▪ User Forum ▪... - Page 14 Manual. ◦ Chapter ↑11, Troubleshooting – Getting Help gathers useful information for trouble- shooting and getting help. ◦ Chapter ↑12, Glossary holds a glossary defining all important terms and concepts used in MASCHINE. MASCHINE STUDIO - Getting Started - 14...
-
Page 15: Document Conventions
Results of actions are introduced by this smaller arrow. → Naming Convention Throughout the documentation we will refer to MASCHINE controller (or just controller) as the hardware controller and MASCHINE software as the software installed on your computer. MASCHINE STUDIO - Getting Started - 15... - Page 16 Instruments website. Unlabeled Buttons and Knobs on the Controller The buttons and knobs above and below the displays on your MASCHINE STUDIO controller do not have labels (all other elements on the controller do). MASCHINE STUDIO - Getting Started - 16...
- Page 17 Welcome to MASCHINE! Document Conventions The unlabeled buttons and knobs on the MASCHINE STUDIO controller. For better reference, we applied a special formatting here: throughout the document, the ele- ments are capitalized and numbered, so the buttons are written Button (1–8), while the knobs are written Knob (1–8).
-
Page 18: First Steps
Please carefully follow the instructions of the Setup Guide which can be downloaded in PDF format from the Native Instruments website. Once you have followed the Setup Guide, MA- SCHINE should be installed on your computer, its basic audio settings correctly configured, and the hardware controller connected to your computer. -
Page 19: Loading A Drum Kit From The Factory Library
Header at the top of the MASCHINE window in order to show the Browser: Enable the magnifying glass to display the Browser. To load a drum kit, do the following: Click the LIBRARY tab to open the LIBRARY pane. MASCHINE STUDIO - Getting Started - 19... - Page 20 Click the Group icon to get a list of all available drum kits in the Library: In the Content selector to the right, click the icon to select only Native Instruments factory content: MASCHINE STUDIO - Getting Started - 20...
- Page 21 Loading a Drum Kit from the Factory Library In the TYPES filter, select the Kits. The Browser will then display only kits in the Result list. Select the Urban Kit sub-type tag below to further refine your search. MASCHINE STUDIO - Getting Started - 21...
- Page 22 Press the BROWSE button at the top left of your controller. BROWSE button lights up. In the left display, you now are presented with a selection of choices. MASCHINE STUDIO - Getting Started - 22...
- Page 23 USER label underneath is not highlighted — if necessary, press Button 4 to disable it. This will now allow us to select only Native Instruments factory content. Turn Knob 5 until Kits is selected, so that only drum kits are shown on the right display.
-
Page 24: Playing With The Pads
As soon as a Group is loaded (here the EK-TL A Kit) and the corresponding Group slot selected (here Group slot A), this Group can be played from the pads on your controller. Each pad trig- gers one of the Sounds included in the Group. MASCHINE STUDIO - Getting Started - 24... - Page 25 ► iar with them. When you feel ready, move on to the next section, where we will record a little rhythmic pattern using this drum kit! MASCHINE STUDIO - Getting Started - 25...
-
Page 26: Recording Your First Pattern
(the button lights up) and turn the jog wheel (the jog wheel lights up) to set your desired tempo. Alternatively, you can also MASCHINE STUDIO - Getting Started - 26... - Page 27 You just created your first Pattern! → You can now deactivate the metronome by pressing METRO again and listen to your newly cre- ated rhythm. To stop the sequencer, press PLAY again. ► MASCHINE STUDIO - Getting Started - 27...
-
Page 28: Playing With Your Pattern
Using Solo and Mute in the MASCHINE Software Soloing a Sound To solo a Sound, right-click (on Mac OS X: [Ctrl]-click) the number on the left side of the ► Sound slot in the Pattern Editor. MASCHINE STUDIO - Getting Started - 28... - Page 29 2.4.1.2 Solo and Mute Sounds using the MASCHINE Controller Press PLAY to start the sequencer. Your Pattern starts playing. You see each pad flashing as the corresponding drum is trig- gered. MASCHINE STUDIO - Getting Started - 29...
-
Page 30: Using Note Repeat
You just need to hold a pad and its Sound/note will be steadily repeated until you release the pad. ▪ When using Note Repeat all pads will be both velocity and pressure sensitive, allowing for expressive drum rolls or dynamic basslines. MASCHINE STUDIO - Getting Started - 30... -
Page 31: Save Your Work
Before we get to adding new ele- ments and editing your pattern, you should save your work right away. Saving your Work in the MASCHINE Software Click File. MASCHINE STUDIO - Getting Started - 31... -
Page 32: To Sum Up
Your Project with its new Pattern is now saved on your hard disk. Should you close MASCHINE or open another Project, you will still be able to open this Project later. Saving your Work using the MASCHINE STUDIO Controller To save your modifications to the Project, press SHIFT + ALL. -
Page 33: Building Your Own Drum Kit
Here we will use a nice feature of MASCHINE: Each file you created and saved in MASCHINE is automatically put in “User” content. Hence, we will select the User icon in the Content selector to quickly find our tutorial Project again. MASCHINE STUDIO - Getting Started - 33... - Page 34 Enable the magnifying glass to display the Browser. To open the tutorial Project, do the following: At the top left, click the button showing the Project icon to get a list of all available Projects in the Library: MASCHINE STUDIO - Getting Started - 34...
- Page 35 Project. Opening a Project using the Controller Now try operating MASCHINE via the MASCHINE STUDIO controller wherever possible. To open a Project via the controller, we will follow the same process as above, filtering MA- SCHINE objects to narrow our search until we find our tutorial Project.
-
Page 36: Customizing Your Drum Kit
Selecting another Snare Sample For the sake of providing an example, we will replace the Sample “Snare Ektl A 2” used in the Sound of the pad 6. We want something less intrusive. MASCHINE STUDIO - Getting Started - 36... - Page 37 Click the Browser button in the top row to show the Browser within the MASCHINE win- dow (the button becomes highlighted): In the top row of the Browser, click the Sample icon on the far right to get a list of all the available samples in the Library: MASCHINE STUDIO - Getting Started - 37...
- Page 38 (and Types, Subtypes…) and type the desired search query in the Search field. As with your controller, you can activate the Autoload feature to listen how the selected Sample work with the other percussions in your Pattern. To do this: MASCHINE STUDIO - Getting Started - 38...
- Page 39 Check that Button 4 above the displays is not fully lit and that the USER label under- neath is not highlighted — if necessary, press Button 4 to disable it. This will select only Native Instruments factory content. MASCHINE STUDIO - Getting Started - 39...
- Page 40 Now, instead of using Knob 8 or the jog wheel (you may need to use the FUNCTION left and right arrows to move the focus to the results list) for scrolling through the Samples, use Buttons 5 and 6 above the right display. MASCHINE STUDIO - Getting Started - 40...
-
Page 41: Loading A Drumsynth
The Control area showing some Sampler Plug-in parameters for our kick drum Sound. To the left of the Control area, you can load an Internal, Native Instruments or External Plug-in into the Plug-in List. The Plug-in List allows you to load as many Plug-ins into its slots as you want. - Page 42 ▪ Sound level: The first Plug-in slot is the only slot that can contain a sound source (e.g., a (Sampler, Drumsynth, Native Instruments or External Instrument) or an effect. The other Plug-in slots can only contain effects (Internal, Native Instruments or External).
- Page 43 At the far left of the Control area, click the small Plug-in icon to display the Plug-ins. This displays the Plug-in List on the left of the Control area: The Plug-in List in this instance contains Sampler. MASCHINE STUDIO - Getting Started - 43...
- Page 44 Click the down-pointing arrow at the right to open the Plug-in menu. The Plug-in menu opens and displays a list of all available effects. In this menu, click the Drumsynth submenu to display the Drumsynths. MASCHINE STUDIO - Getting Started - 44...
-
Page 45: Loading A Drumsynth Into A Plug-In List On The Hardware
SOUND tab. Press SHIFT BROWSE to select a Plug-in. If we would have pressed BROWSE alone here, we would have accessed the Browser. By additionally holding SHIFT, we access the Plug-in menu instead! MASCHINE STUDIO - Getting Started - 45... -
Page 46: Adjusting Volume, Swing And Tempo
SCHINE holds a powerful sampler that allows you to fine-tune many settings for each generat- ed sound. Without entering into too many details yet, let's look at a quick way to adjust the volume level and swing for each Sound in your Group. MASCHINE STUDIO - Getting Started - 46... - Page 47 To adjust the volume of an individual Sound, click and drag the left knob in the Sound ► slot. Use the left knobs in the Sound slots to adjust the volume of each Sound. MASCHINE STUDIO - Getting Started - 47...
- Page 48 To adjust the Tempo (Beats Per Minute) value of your Project, click the value, hold ► the mouse button and drag vertically. 3.2.3.2 Adjusting Volume, Tune and Swing using the MASCHINE STUDIO Controller Adjusting Volume To adjust the overall volume level: MASCHINE STUDIO - Getting Started - 48...
- Page 49 Adjusting Tune To adjust the tune (pitch) of an individual Group or Sound: Press and hold a Group button or pad then press the FUNCTION buttons (below the jog wheel) to select TUNE. MASCHINE STUDIO - Getting Started - 49...
-
Page 50: Changing The Color Of A Group Or Sound
MASCHINE allows you to change the color of each Group or Sound. It can be very useful to see at a glance to identify certain groups or sounds. Let’s assign different colors to the different types of percussions in our drum kit: MASCHINE STUDIO - Getting Started - 50... - Page 51 Sound slot. Here is an example of how you could colour sounds: Our drum kit full of colors. MASCHINE STUDIO - Getting Started - 51...
-
Page 52: Moving Your Sounds And Groups
While holding the mouse button, drag your mouse up. As the mouse cursor moves up, an insertion line appears at the places where you can drop your Sound. When the insertion line appears under the other kick, release the mouse button. MASCHINE STUDIO - Getting Started - 52... -
Page 53: Save Your Work
To save your work using the Controller: Press SHIFT to save your Project. ► To Sum Up… In this tutorial, we have learned to: ▪ Open a Project using the Browser (both on your controller and in the software). MASCHINE STUDIO - Getting Started - 53... - Page 54 ▪ Move your Sounds across your Group to assign them to other pads on your controller. Once you feel comfortable with these few tasks, proceed to the next tutorial, where we will learn more on Patterns! MASCHINE STUDIO - Getting Started - 54...
-
Page 55: Creating Beats
In case your tutorial Project “My First Project” is not open, please open it now: Open the tutorial Project “My First Project.” ► Fine-tuning our First Pattern We will start by improving our first Pattern using some of the powerful editing features of MA- SCHINE. MASCHINE STUDIO - Getting Started - 55... -
Page 56: Our Pattern In The Software
Pad view (in the picture above, the Pattern slot 1). A Pattern contains the events (the notes) that plays Sounds from the current Group. More typically this is known as a se- quence. MASCHINE STUDIO - Getting Started - 56... -
Page 57: Doubling The Pattern
While holding PATTERN, press Button 3 above the displays to select DOUBLE. In the software, you see that the Pattern now is twice as long, and all its events have been replicated in the second half of the Pattern. Release the PATTERN button. MASCHINE STUDIO - Getting Started - 57... -
Page 58: Quantizing The Rhythm
It takes a little practice to be very precise when playing the pads. Sometimes (especially if you’re new to MASCHINE) your timing may be slightly off and this will be evident when you record your Pattern. MASCHINE has a solution for this! It's called quantization. MASCHINE STUDIO - Getting Started - 58... - Page 59 Zoom tool: The Zoom Tool in the Pattern Editor. Click either end of the horizontal scroll bar, hold the mouse button, and then drag your ► mouse left or right to zoom in/out. MASCHINE STUDIO - Getting Started - 59...
- Page 60 Hence, to avoid losing the Pattern’s groove, MASCHINE lets you half-quantize your events: Events are moved half way to- ward the closest beat/subdivision. Thus, you get a tighter rhythm while keeping its human touch and groove. MASCHINE STUDIO - Getting Started - 60...
-
Page 61: Adding A Second Pattern
Pattern slot, in which we will later record our second Pattern. 4.2.1.1 Selecting a Pattern Slot in the MASCHINE Software At the top of the Pattern Editor, click an empty Pattern slot from the drop-down Pattern ► Manager menu. MASCHINE STUDIO - Getting Started - 61... - Page 62 There is a Pattern inside but the slot is not selected. ▪ Pad is fully lit: There is a blank Pattern inside and the slot is selected. ▪ All other pads are unlit: They contain no Pattern. MASCHINE STUDIO - Getting Started - 62...
-
Page 63: Adjusting The Pattern Length
Pattern Length. At the top right of the Pattern Editor, click the value and drag your mouse vertically to ► change the Pattern Length. MASCHINE STUDIO - Getting Started - 63... -
Page 64: Recording A New Pattern Using The Count-In
Control mode. Press METRO. Press SHIFT to start recording using the Count-in. The metronome is automatically activated and plays a full bar before the sequencer and the recording actually start. MASCHINE STUDIO - Getting Started - 64... -
Page 65: Switching Patterns
(the Play button must be lit). Click the drop-down pattern manager Click Pattern slot alternatively and listen how both Patterns fit together. 4.2.4.2 Switching Patterns using the Controller Press PLAY to start the sequencer. Press and hold PATTERN. MASCHINE STUDIO - Getting Started - 65... -
Page 66: Editing Patterns In The Software
You have Paint and Erase modes at your disposal for editing events in the Pattern Editor, in- cluding a Paint mode, multiple selection, copy/paste, etc. For more information, please refer to the Manual. MASCHINE STUDIO - Getting Started - 66... -
Page 67: Save Your Work
▪ Use the Count-in for recording. ▪ Edit Patterns in the software. Once you feel comfortable with these few tasks, proceed with the next tutorial, where we will add a bass line to our song! MASCHINE STUDIO - Getting Started - 67... -
Page 68: Adding A Bass Line
If you have any doubts about these tasks, please refer to the previous tutorials before proceed- ing! In case your tutorial Project “My First Project” is not open, please open it now: Open the tutorial Project “My First Project.” ► MASCHINE STUDIO - Getting Started - 68... -
Page 69: Selecting Another Group
Click the Group slot’s name to select that slot. Upon selection, the Pattern Editor below switches to display the content of the newly selected Group slot. For now, this is still empty (no Sounds, no Patterns). MASCHINE STUDIO - Getting Started - 69... -
Page 70: Renaming And Coloring The Group
Group B1 to help keep our Project well organized. This feature is only available from the MASCHINE software. To rename a Group: Double-click the Group name. The Group name becomes highlighted. MASCHINE STUDIO - Getting Started - 70... -
Page 71: Loading A Plug-In Instrument For The Bass
PRISM (a modal synthesizer), SCARBEE MARK 1 (classic electric piano) and SOL- ID BUS COMP (a superior compressor) all from Native Instruments. Among other things MAS- SIVE is ideal for fat bass sounds — exactly what we need here. -
Page 72: Browsing The Massive Presets
Show the Browser if it is currently hidden (reminder: click the magnifying glass in the MASCHINE Header). At the very top of the Browser, select the keyboard icon from the File Type selector. Select the NI icon from the Content selector MASCHINE STUDIO - Getting Started - 72... - Page 73 Adding a Bass Line Loading a Plug-in Instrument for the Bass In the Product selector click the drop-down arrow. and select Massive. MASCHINE STUDIO - Getting Started - 73...
- Page 74 Browse mode yet: We will show you some useful features for choosing your bass in the next two sections. 5.3.1.2 Loading a Plug-in Instrument using the Controller On your controller, do the following: MASCHINE STUDIO - Getting Started - 74...
-
Page 75: Using Keyboard Mode
Since we are not browsing Samples, we don’t have the Prehear feature at our disposal to choose a nice bass preset. Instead, we can make use of the Autoload feature (see ↑3.2.1, Se- lecting another Snare Sample for more information). MASCHINE STUDIO - Getting Started - 75... - Page 76 Sound. Let’s switch to Keyboard mode. 5.3.2.1 Using Keyboard Mode in the Software At the left of the Pattern Editor, click the Keyboard View button (with a keyboard icon) to ► activate the Keyboard view. MASCHINE STUDIO - Getting Started - 76...
- Page 77 As long as the Keyboard mode is active, the PAD MODE button is half lit to remind you it is switched on. Other pad modes are also available. For a detailed description of all pad modes, please refer to the Manual. MASCHINE STUDIO - Getting Started - 77...
-
Page 78: Adjusting The Base Key Of The Pads On Your Controller
If you left Browse mode in the meanwhile, press BROWSE to enter it again. Load various bass presets into Sound slot 1 and play them on the pads to choose the bass sound you would like to use. MASCHINE STUDIO - Getting Started - 78... -
Page 79: Recording A Bass Line
Count-in, adjusting the Pattern Length, editing the re- corded Pattern, etc. If you have any doubt about these tasks, please refer to the previous tutorials (notably in section ↑4, Creating Beats and chapter ↑2.3, Recording Your First Pattern). MASCHINE STUDIO - Getting Started - 79... -
Page 80: Creating A Second Bass Pattern
Sound slot 1. To circumvent this, do the following on your con- troller: Press and hold SELECT. While still holding SELECT, press pad to select Sound slot 2. Sound slot 2 is now selected. → MASCHINE STUDIO - Getting Started - 80... -
Page 81: Accessing The Plug-In Parameters
MASCHINE software’s user interface: the Control area. The Control area is located in the middle of the MASCHINE software window. The Control area showing the MASSIVE plug-in parameters for our bass Sound “Analovue.” MASCHINE STUDIO - Getting Started - 81... - Page 82 In the Plug-in List below, click Massive to select it. The Control area now displays the parameters of your bass Sound “Analovue.” You can → check this by looking in the left part of the Control area: MASCHINE STUDIO - Getting Started - 82...
- Page 83 On each page, you can click and drag the knobs to adjust the corresponding parameters. Example As an example, let’s adjust the amplification level of the second oscillator in our “Analovue” preset. Do the following: MASCHINE STUDIO - Getting Started - 83...
- Page 84 Turn any Knob 1–8 to adjust the value of the parameter indicated right above in the dis- plays. Press the Page buttons (showing two arrows) at the left of the displays to switch to anoth- er page of parameters. MASCHINE STUDIO - Getting Started - 84...
-
Page 85: Save Your Work
▪ Adjust the Plug-in parameters both from your controller and in the software (using the Con- trol area). Once you feel comfortable with these few tasks, proceed with the next tutorial, where we will add effects to our Sounds and Groups! MASCHINE STUDIO - Getting Started - 85... -
Page 86: Applying Effects
MASCHINE provides a healthy selection of effects (FX) that can be loaded in the form of Plug- ins. Each Sound, each Group and the Master can have an unlimited number of insert effects loaded in their Plug-ins slots. In each Plug-in slot you can load an Internal, Native Instruments or External Effect Plug-in. -
Page 87: Loading Effects
The Control area showing some MASSIVE plug-in parameters for our bass Sound. To the left of the Control area, you can load an Internal, Native Instruments or External Effect Plug-in into the Plug-in List. The Plug-in List allows you to load as many Plug-ins into its slots as you want. -
Page 88: Loading An Effect Into A Plug-In List
▪ Sound level: The first Plug-in slot is the only slot that can contain a sound source (e.g., a (Sampler, Drumsynth, Native Instruments or External Instrument) or an effect. The other Plug-in slots can only contain effects (Internal, Native Instruments or External). - Page 89 The actual Sound that you assign the effect to is always the one in focus. Hence, at the left of the Pattern Editor, click the Sound slot’s name (Analovue) to select that Sound slot. MASCHINE STUDIO - Getting Started - 89...
- Page 90 This displays the Plug-in List on the left of the Control area: The Plug-in List in this instance contains Massive. Click the “+” icon below to open the Plug-in menu. The Plug-in menu opens and displays a list of all available effects. MASCHINE STUDIO - Getting Started - 90...
- Page 91 → If you have VST/AU effect plug-ins installed you may also load them from the menu by selecting the Native Instruments (for Native Instruments products) or External (for third- party products) submenu at the top of the list. If you wish to load a Plug-in at the Group level, just follow the same procedure except at...
- Page 92 Turn Knob 8 to select Saturator, and press Button 8 to load it. 10. Press SHIFT BROWSE again to leave the effect selection. The Saturator Plug-in is now loaded and is ready to be tweaked. → MASCHINE STUDIO - Getting Started - 92...
-
Page 93: Playing With Effects
This way, you can directly hear how your settings affect the sound! 6.2.1.1 Adjusting the Effect Parameters in the MASCHINE Software In the Control area, you can quickly adjust each parameter with the mouse: MASCHINE STUDIO - Getting Started - 93... - Page 94 Press Button 5 or 6 to select the Saturator Plug-in. Turn Knob 1 until the MODE field reads Tube. This selects the Tube mode of the Saturator. Similarly, adjust the other parameter values by turning the corresponding Knobs. MASCHINE STUDIO - Getting Started - 94...
-
Page 95: Practice Makes Perfect
If you want to bypass an effect at the Sound or Group level, make sure you have the right Sound (click it on the left of the Pattern Editor) and/or Group (click it on the left of the Arranger) selected. MASCHINE STUDIO - Getting Started - 95... - Page 96 — if not, press it to enter Control mode. Depending on the level (Master, Group or Sound) the effect you want to bypass is located, do the following: ▪ Effect on Master: Press Button 1 (MASTER). MASCHINE STUDIO - Getting Started - 96...
-
Page 97: Modulating Effect Parameters
Modulation is not limited to effects: In MASCHINE, you can modulate just about any parameter at the Group or Sound level as soon as it has a continuous range of values — in other terms, almost any parameter controlled by a knob in the Parameter area! MASCHINE STUDIO - Getting Started - 97... -
Page 98: Recording Modulation
Press button 5 or 6 to select the plug-in slot containing the effect you want to automate. Press and hold AUTO, and turn Knob 1–8 under the displays corresponding to the param- eter that you want to automate. MASCHINE STUDIO - Getting Started - 98... -
Page 99: Editing Modulation
Click the desired parameter in the list of automated parameters (on the left) to select it. Drag the modulation points vertically in the Control Lane. For more information on editing modulation and automation, please refer to the Manual. MASCHINE STUDIO - Getting Started - 99... -
Page 100: Save Your Work
▪ How to bypass Plug-in slots. ▪ How to automate Plug-in parameters. Once you feel comfortable with these few tasks, proceed with the next tutorial, where we will discover another great way for creating beats: the step sequencer. MASCHINE STUDIO - Getting Started - 100... -
Page 101: Creating Beats With The Step Sequencer
If you have any doubts about these tasks, please refer to the previous tutorials before proceed- ing! In case your tutorial Project “My First Project” is not open, please open it now: Open the tutorial Project “My First Project.” ► MASCHINE STUDIO - Getting Started - 101... -
Page 102: Building Up A Beat In Step Mode
For now, let’s stay in Step mode — we want to show you a few more things in this mode — so press STEP MODE again if needed (STEP MODE must be lit). MASCHINE STUDIO - Getting Started - 102... -
Page 103: Adjusting The Pattern Length In Step Mode
The 16 pads representing the full Pattern (the Pattern is one bar long). The 16 pads representing the first quarter of the Pattern (the Pattern is four bars long). MASCHINE STUDIO - Getting Started - 103... -
Page 104: Recording Modulation In Step Mode
▪ In Step mode all notes are by definition quantized — i.e. they perfectly sit on the beats and their subdivisions (the steps). See Adjusting the Step Grid below for more on this. MASCHINE STUDIO - Getting Started - 104... -
Page 105: Adjusting The Step Grid
Pattern. 7.2.1 Adjusting the Step Grid in the MASCHINE Software In the Pattern Editor the Step Grid is represented by vertical lines on each step and each beat: MASCHINE STUDIO - Getting Started - 105... - Page 106 Step mode you have access to other steps on your controller. If you select Off in the Step menu, the Step Grid is disabled. Nevertheless, the default step size (1/16th note) is still used to define your events in Step mode. MASCHINE STUDIO - Getting Started - 106...
-
Page 107: Save Your Work
To save your work in the MASCHINE Software: Press [Ctrl] + [S] ([Cmd] + [S] on Mac OS X) to save your Project. ► To save your work using the Controller: MASCHINE STUDIO - Getting Started - 107... -
Page 108: To Sum Up
▪ Record modulation in Step mode. ▪ Adjust the Step Grid resolution. Once you feel comfortable with these few tasks, proceed with the next tutorial, where we will discover how to build a full arrangement for your song! MASCHINE STUDIO - Getting Started - 108... -
Page 109: Creating A Song Using Scenes
In this section we will prepare a set of Scenes. The place where you organize Scenes is the Arranger, located in the top right part of the MASCHINE window. The Arranger provides you with unlimited slots. Each slot can contain one Scene. MASCHINE STUDIO - Getting Started - 109... -
Page 110: Composing The First Scene
Pattern Editor (for playing, editing, etc.), a Clip referencing this Pattern is created in the selected Scene. Since you selected quite a few Pattern slots in both Groups while following the previous tutorials, Scene 1 already contains a Clip for each existing Group in the Arranger! MASCHINE STUDIO - Getting Started - 110... -
Page 111: Composing Other Scenes
Scene, then choosing Patterns to include from the various Groups available, then selecting the next Scene, etc.). This method allows you to quickly see how well Patterns from different Groups fit together. MASCHINE STUDIO - Getting Started - 111... - Page 112 Composing other Scenes in the MASCHINE Software In the software, do the following: In the Arranger, click the + button above the second column. Click the second row to select the Bass group. MASCHINE STUDIO - Getting Started - 112...
- Page 113 Press and hold the SCENE button. The pads now represent available Scenes. For the moment only pad is lit: This indicates that Scene slot 1 is selected and all other slots are empty. MASCHINE STUDIO - Getting Started - 113...
- Page 114 The Clip is removed from the Scene. You will note that the corresponding Pattern is still → there. Don’t forget that you can at any time press UNDO REDO to undo/redo your actions! MASCHINE STUDIO - Getting Started - 114...
-
Page 115: Pinning The Scene Mode
Depending on the current task and on your liking, pinning one or more modes can greatly → speed up your actions! See Controller Modes and Mode Pinning for more information on controller modes and mode pinning. MASCHINE STUDIO - Getting Started - 115... -
Page 116: Preparing Scenes
To move a Scene slot, click and hold its label, drag your mouse horizontally until the in- ► sertion line is at the desired place, and release the mouse button to drop the Scene slot at its new place. MASCHINE STUDIO - Getting Started - 116... -
Page 117: Duplicating And Deleting Scenes
Right-click ([Cmd] + click on Mac OS X) for example the Scene slot 2 and select Dupli- ► cate in the context menu. The content of Scene slot 2 is copied to the next Scene column and all other Scenes are → moved one Scene to the right. MASCHINE STUDIO - Getting Started - 117... - Page 118 Press and hold SCENE to enter Scene mode (or pin it by pressing SCENE + Button 1). The right display shows the names of your Scene slots. Additionally, the selected Scene slot is highlighted. MASCHINE STUDIO - Getting Started - 118...
-
Page 119: Using Scenes To Play Live
The Scene slot is removed. Scenes to the right of the removed Scene are shifted one slot → to the left to fill the gap. Using Scenes to Play Live At last we come to the real point of the Scenes: playing your song! MASCHINE STUDIO - Getting Started - 119... -
Page 120: Selecting A Loop Range
The Arranger timeline showing that the Scene 2 is looped. To select another loop range: In the Arranger timeline, click the end column of the start Scene and hold the mouse but- ton. MASCHINE STUDIO - Getting Started - 120... -
Page 121: Jumping To Other Scenes
Scene. It can be at the very moment at which you select another Scene/range, or at a set interval: on the next eight note, quarter note, etc., or even at the end of the Scene. MASCHINE STUDIO - Getting Started - 121... - Page 122 The next time you select a new Scene or loop range, it will start from the beginning. → 8.3.2.2 Jumping to Other Scenes using the Controller To adjust the Scene Sync setting: Press and hold GRID to enter Grid mode (or pin it by pressing GRID + Button 1). MASCHINE STUDIO - Getting Started - 122...
- Page 123 Scene mode (or pin it by pressing SCENE + Button 1). Press the right Page button to Select Page 2/2. At the bottom left corner of the left display you see the current RETRIGGER value (Off default). MASCHINE STUDIO - Getting Started - 123...
-
Page 124: Save Your Work
In this tutorial, we have learned to: ▪ Create Clips referencing our Patterns in different Scenes. ▪ Select a Scene for playing. ▪ Pin the various controller modes. ▪ Rename, color, move, insert, and delete Scenes slots. MASCHINE STUDIO - Getting Started - 124... - Page 125 ▪ Adjust the behavior of the sequencer when jumping between Scenes or loop ranges. Once you feel comfortable with these few tasks, proceed with the next chapter, where we will quickly introduce a few other powerful features of MASCHINE. MASCHINE STUDIO - Getting Started - 125...
-
Page 126: Using Advanced Features
In the software, after clicking the Channel icon in the upper left corner of the Control area, you see four buttons at the bottom left: The Channel Property selector in the Control area. MASCHINE STUDIO - Getting Started - 126... -
Page 127: Creating Custom Sets Of Parameters With The Macro Controls
The Macro Controls are available in the Macro properties. The Macro properties (here for a Sound) in the software. The Macro properties (here for a Sound) on the controller. MASCHINE STUDIO - Getting Started - 127... -
Page 128: Macro Control Overview
Master, Group, and Sound level (but not if you switch to another Sound or Group, of course). Using the Macro Control Shortcut on the MASCHINE STUDIO Controller On your controller, a dedicated button allow you to quickly access your Macro Controls at any... -
Page 129: Assigning Macro Controls
Pages tab in the left part of the Assignment area: Pages tab lights up and the Pages pane appears on its right. You are now ready to → assign Macro Controls to parameters. MASCHINE STUDIO - Getting Started - 129... - Page 130 Pages tab can be clicked only for Native Instruments or External Plug-ins and for Macro properties. For all other Plug-ins and properties, parameters and Parameter pages are not editable, and the Pages tab is grayed out and inactive.
- Page 131 This tool is similar to a menu containing several levels of submenus — with the notable differ- ence that every intermediary selection stays visible for faster switching. When assigning a new, unassigned Macro Control, do the following: MASCHINE STUDIO - Getting Started - 131...
-
Page 132: Using Other Sound Sources
AU plug-in. But you can also use other sound sources: ▪ You can use the audio coming from any other Group(s) and/or Sound(s). ▪ You can use the audio coming from an external source. MASCHINE STUDIO - Getting Started - 132... -
Page 133: Using Sounds And Groups As Sound Source
Click the Sound slot in the Pattern Editor to select it. Click the Plug-in icon. Open the Plug-in menu by clicking the symbol. The menu opens and lets you choose a Plug-in for loading. MASCHINE STUDIO - Getting Started - 133... - Page 134 Control area to select the Group level and display the parame- ters for the Group “Bass” that we just selected. Click the Channel icon. Click the Output icon to select the Output properties of that Group. MASCHINE STUDIO - Getting Started - 134...
- Page 135 Feel free to experiment with this feature: ▪ Add other effects in Group C’s Sound slot 1. ▪ Route other Sounds or Groups to this same effect. ▪ Adjust each auxiliary level independently. MASCHINE STUDIO - Getting Started - 135...
-
Page 136: Using An External Sound Source
To do this, we will use the first Plug-in slot of the Sound level: the Input Channel. In the software, do the following: Click File > Preferences…. The Preferences dialog opens. Click the Audio Page. MASCHINE STUDIO - Getting Started - 136... - Page 137 You then see the list of MASCHINE input ports on the left. By clicking on the fields on the right, you can assign MASCHINE input ports to the physical audio inputs available on your audio interface. MASCHINE STUDIO - Getting Started - 137...
- Page 138 Using Advanced Features Using Other Sound Sources Assign at least Maschine In 1 L Maschine In 1 R to any pair of inputs on your audio interface. MASCHINE STUDIO - Getting Started - 138...
- Page 139 MASCHINE provides you with four separate stereo inputs for using four distinct external stereo signals within your Project. For example you could try the following: ▪ Load effects in the Plug-in menu to process the signal of your turntable. MASCHINE STUDIO - Getting Started - 139...
-
Page 140: Sampling
Please refer to the Manual for detailed information. 9.3.1 How to Sample First choose an empty Sound slot to record into by clicking its name. MASCHINE STUDIO - Getting Started - 140... - Page 141 You can record Sam- ples from an internal signal (select Internal from the drop-down menu) or from one of the external inputs (select the Ext. Ster. or Ext. Mono from the drop-down menu). In this case MASCHINE STUDIO - Getting Started - 141...
- Page 142 Project tempo. Since we want to record a drum loop from the EK-TL A Kit, we select Sync. After selecting Sync, the LENGTH menu is displayed to the right. Click 1 Bar in the menu: MASCHINE STUDIO - Getting Started - 142...
-
Page 143: Editing, Slicing And Mapping Your Sample
Sample, to define a loop range within the Sample, to adjust the envelope of the Sample, and to apply various audio processing commands to your Sample. MASCHINE STUDIO - Getting Started - 143... -
Page 144: The Mix View
The Mix view can come in handy at various stages of your work, e.g., when building custom drum kits, setting up send effects, creating advanced routings, and for live performances. This section is a brief introduction to the Mix view, please refer to the Manual for more details. MASCHINE STUDIO - Getting Started - 144... - Page 145 Using Advanced Features The Mix View The Mix view with Group B1 selected. Switching between Arrange View and Mix View You can switch the MASCHINE software at any time between the Arrange and Mix view: MASCHINE STUDIO - Getting Started - 145...
- Page 146 To switch between Arrange View and Mix View on the controller: Press SHIFT NAVIGATE to switch between the Arrange view and the Mix view in the ► MASCHINE software. For detailed in information on the Mix view, please refer to the Manual MASCHINE STUDIO - Getting Started - 146...
-
Page 147: Quick Reference
Besides the default Control mode (in which the pads notably trigger your Sounds), it provides many other modes for accomplishing various tasks. These modes are enabled by specific but- tons on your controller (e.g., SCENE, BROWSE, GRID, etc.). MASCHINE STUDIO - Getting Started - 147... - Page 148 The buttons that are required to be held are in the middle column of your controller (left of the pads) along with the NOTE REPEAT, GRID, EVENTS, AUTO, and TAP, buttons: Each of these buttons needs to be held depressed in order to use the corresponding mode. MASCHINE STUDIO - Getting Started - 148...
-
Page 149: Controlling The Software Views From Your Controller
Controlling the Software Views from Your Controller Your controller provides you with numerous shortcuts to modify the display in the MASCHINE software window without having to touch your mouse. 10.1.2.1 Controlling the Software Views using the MASCHINE STUDIO Controller Press and hold the NAVIGATE button to enter Navigate mode. - Page 150 Quick Reference Using Your MASCHINE Controller The Navigate mode on the MASCHINE STUDIO controller On the left display use Knob 1 to 4 to navigate the software screen. Action Shortcut Zoom Arranger in/out Knob 1 Scroll Arranger left/right Knob 2...
-
Page 151: Maschine Project Overview
The following section will explain these two aspects in detail. 10.2.1 Sound Content The sound content aspect of a MASCHINE Project includes all the instruments and effects contained in your Project file, and how these are structured. MASCHINE STUDIO - Getting Started - 151... - Page 152 Sound slots. ◦ The controls in the MASTER section affect the sound at the main outputs of MA- SCHINE, i.e. the sound of all Groups and all Sounds. MASCHINE STUDIO - Getting Started - 152...
-
Page 153: Arrangement
▪ You load samples or plug-ins into the Sound slots (1) of the selected Group (2). ▪ You record instances of your Sounds by playing the pads (1-16). A recorded instance of a Sound is called an event (6). MASCHINE STUDIO - Getting Started - 153... -
Page 154: Maschine Hardware Overview
▪ Several Scenes add up to a song (…or a track, or an arrangement, or whatever you want to call it). 10.3 MASCHINE Hardware Overview 10.3.1 Hardware Overview of the MASCHINE STUDIO Controller This section quickly describes the areas and control elements on your hardware controller. MASCHINE STUDIO - Getting Started - 154... - Page 155 Quick Reference MASCHINE Hardware Overview Overview of the MASCHINE STUDIO hardware controller. (1) CONTROL section: Use this multi-purpose section to access to all parameters of the mode currently selected on your controller. There are also dedicated buttons to access the Browser and the Sample Editor.
-
Page 156: 10.3.1.1 Control Section
For more information on this section please view ↑10.3.1.3, PERFORMANCE Section 10.3.1.1 CONTROL Section This section gives an overview of the CONTROL section. MASCHINE STUDIO - Getting Started - 156... - Page 157 Scenes and Patterns to create the perfect arrangement. (4) MIX button: Press at any time to access an overview of your mix. Use the Mix view to edit the level and panning of each Sound and Group. MASCHINE STUDIO - Getting Started - 157...
-
Page 158: 10.3.1.2 I/O And Level Section
BROWSE button to access the Browser. Press SHIFT BROWSE to access the Plug-in menu and load a Plug-in (Internal, Native Instruments, and External, as well as Instrument and Effect) in the selected Plug-in slot. (6) SAMPLING button: Press the SAMPLING button to access the Sample Editor. - Page 159 (5) CUE button Press this button to display the Cue level in the Level meter (1) and use the Level knob (2) to adjust its volume level. (6) Level knob Turn the Level knob to adjust the level of the selected input/output. MASCHINE STUDIO - Getting Started - 159...
-
Page 160: 10.3.1.3 Performance Section
Macro Controls are very useful for playing live since you can choose a set of parameters from various sources to manipulate on one screen without having to switch screens. For detailed in- formation on Macro Controls please see the Manual MASCHINE STUDIO - Getting Started - 160... -
Page 161: Groups Section
SHIFT + Group buttons A–H to select a Group Bank. For more information on Group Banks please refer to the Manual. 10.3.1.5 TRANSPORT Section This section gives an overview of the TRANSPORT section. MASCHINE STUDIO - Getting Started - 161... - Page 162 + Button 1 to pin/unpin the Grid mode. See ↑10.1.1, Controller Modes and Mode Pinning for more information. (5) PLAY button: Press the PLAY button to activate playback. Press PLAY a second time to stop playback. MASCHINE STUDIO - Getting Started - 162...
-
Page 163: Pads Section
Knobs. All hardware shortcuts are explained in the Hardware Control Reference, available from Help menu in the MASCHINE software. 10.3.1.6 PADS Section This section gives an overview of the PADS section. MASCHINE STUDIO - Getting Started - 163... - Page 164 (2) PATTERN button: Enters Pattern mode. Pattern mode allows you to create different Patterns for the selected Group, switch between different Patterns or create a new one, etc. Dimmed Pads show existing Patterns, the fully lit pad shows the selected Pattern. MASCHINE STUDIO - Getting Started - 164...
- Page 165 (equals muting all other Sounds/Groups) by pressing its pad or Group button — useful to tweak the Sound or for performing live. The pad of the soloed Sound or Group is fully lit, while all other pads (representing the muted Sounds/Groups) are dimmed. MASCHINE STUDIO - Getting Started - 165...
-
Page 166: Edit Section
10.3.1.7 EDIT Section This section gives an overview of the EDIT section. Overview of the EDIT Section (1) COPY button: Press the COPY button to copy selected events. MASCHINE STUDIO - Getting Started - 166... - Page 167 TUNE, SWING VOLUME functions when pressing a pad or Group button. When unlit, these buttons are equal to one increment of the jog wheel when scrubbing through a song. MASCHINE STUDIO - Getting Started - 167...
-
Page 168: Maschine Software Overview
Display area, the Transport controls and the Master Volume slider. You can also use this area to toggle the Browser, connect to your hardware controller and monitor the CPU usage of your computer. MASCHINE STUDIO - Getting Started - 168... -
Page 169: Header
Samples. From the Browser you can directly search your computer or an external drive to add new files. You may also prehear (audition) Samples directly from the Browser and apply new tags. MASCHINE STUDIO - Getting Started - 169... - Page 170 (7) Audio Engine button: Click the Audio Engine button to disable the entire sound processing of MASCHINE. (8) NI logo: The NI logo and MASCHINE logo open the About screen which displays the version number and edition of your MASCHINE software. MASCHINE STUDIO - Getting Started - 170...
-
Page 171: Browser
The Browser. (1) LIBRARY tab: Use the LIBRARY tab to access your computer's hard drives via MASCHINE's selectors and filters. (2) FILES tab: Use the FILES tab to access your computer’s hard drives. MASCHINE STUDIO - Getting Started - 171... - Page 172 (11) Tag Editor: The Tag Editor allows you to edit Tags applied to files and add Tags to new files from the Bank, Types, and Modes and view Properties. Only Types and Modes Properties can be edited in the User content. The NI (Native Instruments) content is read only. You can show/hide it by clicking the EDIT button at the bottom right.
-
Page 173: Arranger
Patterns stacked vertically is called a Scene. A Scene can be moved freely by clicking the name of the Scene and dragging and dropping it into place. You can also right-click on the name of a Scene to Insert, Duplicate and Delete Scenes using the context menu. MASCHINE STUDIO - Getting Started - 173... -
Page 174: Control Area
Plug-in. The first Plug-in slot of the Sound level can also hold a plug-in instrument. Select the desired Plug-in to display its parameters in the Parameter area (6). MASCHINE STUDIO - Getting Started - 174... -
Page 175: Pattern Editor
(4) Audition button: Click this button to audition a Sound when it is selected from the Sound slots (6). (5) Sound properties icon: Click this icon to quickly access the Key, Choke, and Link settings for the selected Sound. MASCHINE STUDIO - Getting Started - 175... - Page 176 Arrow or Paint icons to toggle the Paint mode on/off. (14) Control Lane button: The Control Lane button allows you to show/hide the Control Lane (12). For a detailed explanation of each section please refer to the MASCHINE Software Man- ual. MASCHINE STUDIO - Getting Started - 176...
-
Page 177: Troubleshooting - Getting Help
▪ Please check if your computer is suited for handling real-time audio processing without dropouts. In general, it is not recommended to use laptops with shared-memory graphic cards. You will need all the memory and processing power available for your audio software. MASCHINE STUDIO - Getting Started - 177... -
Page 178: The Maschine Software Crashes
The version number of your software is displayed in the About dialog for any Native Instruments ap- plication. This dialog can be opened by clicking on the NI logo in the upper right corner of the user interface. -
Page 179: Knowledge Base
When communicating with the Native Instruments Support team, keep in mind that the more details you can provide about your hardware, your operating system, the version of the software you are running, and the problem you are experiencing, the better they will be able to help you. -
Page 180: Registration Support
11.2.4 User Forum In the Native Instruments User Forum, you can discuss product features directly with other users and with experts moderating the forum. Please be aware that the Technical Support team does not participate in the forum. If you’re encountering an issue that can’t be solved by other users, contact Native Instruments’... -
Page 181: Glossary
You then only have to set up the desired Sound(s) and Group(s) of your Project to send some of their audio to this bussing point. This basically is the way to set up send effects in MASCHINE! MASCHINE STUDIO - Getting Started - 181... - Page 182 Control mode is the default mode of your controller. In this mode, you can play or record your actions in real-time. Control mode also allows you to easily adjust any parameter of your Groups and Sounds via the Control section of your controller. MASCHINE STUDIO - Getting Started - 182...
- Page 183 Sound slot. This mode is well suited for rhythmic instruments (e.g., a drum kit). Insert Effect An insert effect is an effect directly inserted in the signal path of the audio to be processed. MASCHINE STUDIO - Getting Started - 183...
- Page 184 Any modulated parameter is displayed both in the Control Lane (at the bottom of the Pattern Editor) and as a movement of the chosen parameter itself in the Control area. MASCHINE STUDIO - Getting Started - 184...
- Page 185 Located at the bottom of the MASCHINE window, the Pattern Editor allows you to select Sound slots (on the left), display and edit your Patterns, change the Step Grid settings and create/edit automation. MASCHINE STUDIO - Getting Started - 185...
- Page 186 Glossary Plug-in A Plug-in is an instrument or effect unit, either Internal or External (by Native Instruments or a third-party manufacturer), that can be loaded into a Plug-in slot to produce or alter sound. When a Plug-in is loaded into a Plug-in slot, the Plug-in appears in the Plug-in List in the left part of the Control area.
- Page 187 Groups that can hold up to 16 Sounds each. Sounds can be played directly from the pads on your controller. A Sound can be loaded with Plug-ins of various types (sound source or effect, Internal or External, etc.). MASCHINE STUDIO - Getting Started - 187...
- Page 188 By repeating the process Sound by Sound you build up the whole Pattern. Swing The Swing parameter allows you to shift some of the events in your Pattern to create a shuf- fling effect. MASCHINE STUDIO - Getting Started - 188...
-
Page 189: Index
[71] replacing Sounds with load a plug-in [33] load a Project [36] [133] load a Sample creating send effects load a Sound [36] [87] load an effect [72] MASSIVE presets Bussing point [181] MASCHINE STUDIO - Getting Started - 189... - Page 190 Content selector [172] Control area [169] Display area [170] adjusting parameters [81] Drumsynth [41] [182] definition [41] load Control Lane DUPLICATE button [165] definition [182] Duplication [99] editing modulation Pattern Length [57] Control mode MASCHINE STUDIO - Getting Started - 190...
- Page 191 [183] soloing [28] [66] editing with the Pattern Editor GROUP tab [174] EVENTS button [162] Group view [175] External sound source [136] [183] definition Groups [173] GROUPS section [161] GRP button [159] MASCHINE STUDIO - Getting Started - 191...
- Page 192 KOMPLETE Selection Master Volume slider [170] [71] NI logo plug-in instrument [170] Transport controls Help [177] I/O and Level section [158] IN buttons [160] Input Channel [136] Insert effect [183] Jog wheel [167] MASCHINE STUDIO - Getting Started - 192...
- Page 193 Locking controller modes [147] Master Volume slider [170] Loop range [120] Melodic sounds [71] playing METRO button [162] Metronome [26] activating MIDI indicators [160] MIX button [157] Mode locking [147] Mode pinning [147] Modulation [99] MASCHINE STUDIO - Getting Started - 193...
- Page 194 MUTE button [166] hardware controller [154] [151] structure of a Project NAVIGATE button [165] NI logo [170] NOTE button [167] Note Repeat [30] [31] NOTE REPEAT button [161] Note snap [60] NUDGE button [167] MASCHINE STUDIO - Getting Started - 194...
- Page 195 [41] [87] load into Pattern Prehear [38] [61] adding a [186] definition [185] definition [36] listening to samples editing [66] Pre-listen [38] [26] recording Product selector [172] Pattern area [173] Project PATTERN button [164] MASCHINE STUDIO - Getting Started - 195...
- Page 196 Sound slot [186] definition Recording modulation QUANTIZE button [167] [104] Step mode Query [38] REDO button [167] Quick Reference [147] Repeating notes Note Repeat [31] RESTART button [162] Retriggering Scenes [122] Routing [132] MASCHINE STUDIO - Getting Started - 196...
- Page 197 SCENE button [113] [164] [28] soloing Scene mode [115] Sound slot Scene Sync [121] number [28] Search field [172] SOUND tab [174] Search results Source for sampling [141] [38] updating Step SELECT button [165] MASCHINE STUDIO - Getting Started - 197...
- Page 198 [186] definition [188] definition [71] load plug-in instruments Tag Filter [172] Waveform [143] TAP button [160] Text search [172] Zoom [59] Transport controls [170] TRANSPORT section [156] [161] Troubleshooting [177] UNDO button [167] MASCHINE STUDIO - Getting Started - 198...
Need help?
Do you have a question about the MASCHINE STUDIO and is the answer not in the manual?
Questions and answers