Table of Contents
Advertisement
Quick Links
Advertisement
Table of Contents
Troubleshooting

Related Manuals for Thermo Scientific Wellwash


Summary of Contents for Thermo Scientific Wellwash
- Page 1 Thermo Scientific Wellwash User Manual Rev. 1.1, Cat. No. N15777...
- Page 2 PURPOSE. The seller is not liable for any loss or damage arising out of or in connection with the use of the product or other indirect damages. Cat. No. N15777 February 2014 (This translation corresponds to the original master document Thermo Scientific™ Wellwash™ User Manual, Cat. No. N15777, Rev. 1.1.)
- Page 3 How to use this user manual This user manual is for the following instruments: Wellwash 1x8, Cat. No. 5165000, and Wellwash 1x12, Cat. No. 5165040. It has been written to give you the information you need to: •...
- Page 4 These symbols are intended to draw your attention to particularly important information and alert you to the presence of hazards as indicated. Safety symbols and markings used on the Wellwash The following symbols and markings appear on the type label and the instrument itself.
-
Page 5: Table Of Contents
Table of Contents Chapter 1: Introduction to the Wellwash Microplate Washer ............8 Intended use ............................ 8 Principle of operation ........................9 Chapter 2: Installation ........................10 Unpacking ............................10 How to unpack ..........................10 Checking delivery for completeness or damage ................10 Environmental requirements...................... - Page 6 Chapter 6: Menus, Tabs and Parameters ..................35 Menus ............................35 Main menu/tab ..........................35 Protocol ............................35 Creating a protocol ......................... 36 Creating a protocol in an optional way ..................39 Adding new steps to protocols ....................40 Deleting steps from protocols ....................41 Head / Plate ..........................
- Page 7 Error and warning codes ........................ 87 USB memory device ........................89 Troubleshooting guide ........................89 Chapter 14: Ordering Information ....................90 Wellwash ............................90 List of spare parts and accessories ....................91 Appendix A: System Log ........................ 92 Appendix B: Certificate of Decontamination ................93...
-
Page 8: Chapter 1: Introduction To The Wellwash Microplate Washer
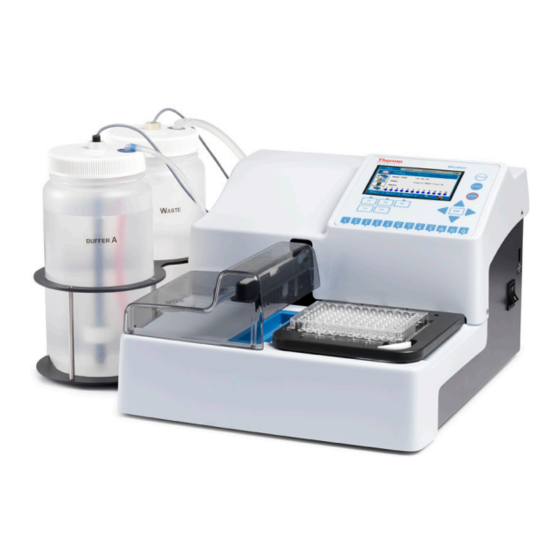
Chapter 1: Introduction to the Wellwash Microplate Washer The Wellwash (Figure 1) is a microplate washer. It is designed to use a 96-well plate format in both landscape and portrait orientation. The 96-well plates and strips are designed to be washed in 1x8 or 1x12 format. -
Page 9: Principle Of Operation
Principle of operation The Wellwash can be used to wash and prepare plates for a variety of test routines, mainly in ELISA applications. The Wellwash (Figure 1) is a microplate strip washer for automated washing, aspiration, dispensing and shaking of 96-well plates and strips in landscape or portrait plate orientation. The instrument is equipped with one wash and one waste liquid bottle each with a cap, tubing and a liquid level sensor. -
Page 10: Chapter 2: Installation
Chapter 2: Installation Warning! The Wellwash weighs 8 kg [17.6 lbs.] and care must be taken when lifting it. For more information on main parts of the instrument, refer to Chapter 3: “Wellwash Main Parts”. Unpacking How to unpack Move the packed instrument to its site of operation. To prevent condensation, the instrument should be left in its protective plastic wrapping until the ambient temperature has been reached. -
Page 11: Setups
Setups Warning! All parts of the instrument that come into contact with potentially infectious materials must be treated as potentially infectious areas. It is advisable to adhere to applicable safety precautions, such as the wearing of disposable powder-free gloves, safety glasses, and protective clothing, to avoid potential infectious disease contamination when performing cleaning procedures and also when making adjustments to the instrument. -
Page 12: Installing The Priming Vessel
Installing the priming vessel The instrument comes with the priming vessel installed. The priming vessel is correctly installed if it stays in place and does not move up. If the priming vessel is not installed, insert it downwards and pull it towards yourself (Figure 7). Figure 7. - Page 13 Figure 8. Available wash heads (A) as well as aspiration and dispensing tubes (B) Figure 9. Fitting the wash head to the connectors 3. Fit the wash head onto the wash head arm with the tips pointing downwards and ensure that the wash head moves freely up and down in the wash head arm slot (Figure 10).
-
Page 14: Liquid Bottles And Channels
Liquid bottles and channels The Wellwash includes one standard buffer bottle (2 liters) and one waste bottle (2 liters). The liquid channels are: A (for Buffer A) and W (for Waste). The liquid bottles are named and the tubing is color coded to correspond to the correct buffer source... -
Page 15: Connection Diagram
290 ml. Caution! Before disconnecting the tubings, prime the liquid system with air to avoid liquid spillage. Connection diagram Figure 14 shows the connections of the liquid level sensor cabling and liquid bottle tubing. Figure 14. Wellwash connection diagram... -
Page 16: Installing The Liquid Bottles
Installing the liquid bottles 1. Fit the liquid bottle tubing to the corresponding color-coded tube connectors on the left side panel of the instrument (Figure 15). The connectors are from left to right: W = colorless (Waste) and A blue (Buffer A). -
Page 17: Foaming
Warning! Make sure that the liquid level of the waste bottle is always kept below the maximum level indicated on the bottle to avoid potential overflow as the contents of the waste bottle is potentially infectious. Warning! The contents of the waste bottle is potentially infectious, so it is important to wear protective clothing, such as disposable gloves, a laboratory coat and safety glasses, when emptying or handling the waste bottle. -
Page 18: Connecting The Power Supply Cable
Warning! Do not operate the instrument from a power outlet that has no ground connection. Do not use a power supply cable other than the Thermo Scientific power supply cable designed for your region. 1. Ensure that the mains (I/0) switch (Figure 18) at the right-side panel of the instrument is in the off (0) position. -
Page 19: Defects And Abnormal Stresses
Warning! Do not touch switches or electrical outlets with wet hands. Switch the instrument off before disconnecting it from the mains supply. Defects and abnormal stresses Warning! If the instrument is not functioning properly, it may create electromagnetic perturbation, which could impair the operation of other devices or equipment in the usual laboratory environment. -
Page 20: Mechanical Checks Before Switching On
Mechanical checks before switching on Before switching the instrument on: • Move the wash head arm up and down, and the plate carrier back and forth to ensure that they move freely (Figure 19). • Lift the wash head arm up and move the plate carrier under the wash head. Lower the wash head arm, with the wash head in place, so that the tips touch the plate carrier. -
Page 21: Switching On
Switching on Switch the instrument on. The system performs initialization tests (= self diagnostics) each time it is switched on. To change the preferred user interface language or the local date/time, refer to “Settings menu”. Caution! Do not switch the power off or plug/unplug the USB memory device during “Performing self diagnostics”. -
Page 22: Chapter 3: Wellwash Main Parts
Chapter 3: Wellwash Main Parts Front view The front view of the Wellwash instrument is shown in Figure 21. Display Keypad Liquid bottles Wash head on wash head arm Transparent aerosol cover Priming vessel Bottle stand (option) Plate carrier Plate clamp Figure 21. -
Page 23: Side Views
Side views The side views of the Wellwash instrument are shown in Figure 23. Connectors for liquid sensor cables, from top to bottom: colorless (Waste) and A = blue (Buffer A) USB port for memory device ON/OFF (I/0) switch Left... -
Page 24: Usb Pc Port
5 Hz, amplitude 2.5 mm Medium 10 Hz, amplitude 1.5 mm High 15 Hz, amplitude 1 mm Caution! The instrument is not intended for shaking purposes only. A separate microplate shaker is available if needed (e.g. Thermo Scientific™ iEMS™ Incubator/Shaker). Refer to www.thermoscientific.com. -
Page 25: Chapter 4: Operating The Instrument
Numeric keys with letters and signs, also used for column/strip selection Figure 26. Keypad and display of the Wellwash The keys for navigating and editing are detailed below. The keys also have other functions depending on the level in the software. -
Page 26: Menus
Press the START button to start the execution of the currently selected protocol. Press the STOP button to terminate protocol execution. Pressing the key also returns the software to the previous state. Use the character keys to enter numerical data and text. •... -
Page 27: Main Menu
Main menu You can specify the protocol-related parameters and manage the run of the active protocol in the Main menu. The Main menu contains the Protocol, Head / Plate, Well, Steps, and Layout rows, and their parameters. Info text bar The clock on the menu bar shows the local time. -
Page 28: Chapter 5: Running Protocols
Chapter 5: Running Protocols General operating procedure for running a protocol 1. Ensure that the buffer solution in the buffer bottle A is correct and that there is sufficient liquid for the protocol. Also ensure that the waste bottle is not full when you begin. Ensure that the liquid level sensors are enabled and symbols are green. -
Page 29: Filling And Emptying Liquid Bottles
Note! Do not remove the plate before the end of the protocol run. Note! It is recommended to shut down the Wellwash at the end of the day. Refer to “Shutting down”. Filling and emptying liquid bottles Warning! Biohazard risk. -
Page 30: Starting A Ready-Made Protocol From The List
Starting a ready-made protocol from the list 1. Press the OK button on the Protocol row in the Main menu. Press the FILE key in the Main menu and select Open using the Down arrow key, and then press the OK button. Example protocol list 2. - Page 31 Figure 28. 1x12 orientation Caution! Ensure that the microplate is correctly oriented to match the wash head (Table 3). Caution! Ensure that the strips on a strip plate are pressed flat on the frame. Misaligned strips may increase the residual volume or limit plate carrier movement. Caution! Ensure that the plate is not covered.
-
Page 32: Priming The System
Priming the system Press the PRIME button to fill the liquid tubing completely from the buffer bottle intake tube to the wash head tips. If you prime for the first time, fill the buffer bottle completely to ensure proper priming. The default priming volume is 30 ml in order to fill the liquid tubing properly. -
Page 33: Strip Selection With The Layout Row
The following rules apply when selecting the columns/strips: • 1x8 wash head: Press the keys 1−12, any combination • 1x12 wash head: Press the keys 1–8, any combination • All columns/strips: Double-press the 8 or 12 key to select all columns/strips when the selection is empty. -
Page 34: Starting A Run
The selected columns/strips are highlighted with color. Starting a run 1. Press the START button to start the run. The microplate will be processed according to the protocol. Note! Ensure that the liquid channels work properly during dispensing and aspiration. 2. -
Page 35: Chapter 6: Menus, Tabs And Parameters
Chapter 6: Menus, Tabs and Parameters Menus The software includes the Main, Settings, and Maintenance menus/tabs. The menu tree is displayed in Table 4. Table 4. Program overview Main Settings Maintenance Protocol Prime parameters Clean ... -
Page 36: Creating A Protocol
It is possible to protect protocols from accidental editing or deleting. A locked symbol is shown in front of the protocol name when locked. To lock/unlock a protocol, select it on the protocol list and press the F3 key. For instructions on how to start protocols, refer to Chapter 5: “Running Protocols”. Creating a protocol 1. - Page 37 4. Select the wash head. If the selected wash head is different from the one that is set in the Settings menu, you must change the wash head in the Settings menu before starting the protocol. Refer to “Wash head configuration”. Caution! If you edit an existing protocol and change the wash head, the wash head related step parameters of the protocol (e.g.
- Page 38 9. Press the F3 (New step) key to open the step list box. 10. Select the step. Steps are listed and numbered in order of execution. It is possible to create several steps in the step list and process the steps in the defined sequence. Refer to “Adding new steps to protocols”...
-
Page 39: Creating A Protocol In An Optional Way
Note! You cannot use the protocol name “Untitled”. Note! You cannot save a protocol with a name already in use. Creating a protocol in an optional way You can also create a protocol using the Protocol window: 1. Select the Protocol row in the Main menu and press the OK button. 2. -
Page 40: Adding New Steps To Protocols
4. In the Main menu, set the desired protocol parameters and steps. 5. When ready, press the FILE key and select Save to save your protocol. Adding new steps to protocols 1. Select the Steps row in the Main menu and press the OK button. 2. -
Page 41: Deleting Steps From Protocols
5. Press the OK button to edit the new step. For more information on steps, refer to “Steps”. 6. Save the changes you make in each step using the File – Save functions. 7. Press the F3 (New step) key to add further new steps to the protocol. When there are more than five steps, blue arrows appear at the bottom and/or at the top of the... -
Page 42: Head / Plate
Head / Plate You can select the wash head and plate format on the Head / Plate row in the Main menu. Caution! If you edit an existing protocol and change the wash head, the wash head related step parameters of the protocol (e.g. the Wash step) are automatically reset to default values. Soak and Pause steps are not affected. - Page 43 When you press the OK button, the Well type window appears. The following settings are available: • Well bottom – Select the well shape. Different well shapes of strips and plates available are shown in Figure 31. The default well shape format is Flat.
-
Page 44: Microplate Requirements
Microplate requirements 96-well format microplates meeting the ANSI/SBS standard can be used with the Wellwash (Table 5). Note! Use only plates manufactured according to ANSI/SBS standard dimensions. Table 5. Default values used for different bottom shapes Bottom Default Thermo Scientific™... -
Page 45: Wash
Dispense height end Dispense height start Well bottom Plate bottom 0 mm Figure 34. Dispense heights • Preview – Use the Preview function to adjust the height positions in the Wash, Aspirate and Dispense steps. Select the height parameter and press the OK button to activate the height editing and Preview function. - Page 46 Note! It is possible to dispense more than the well volume and the excess liquid is aspirated, as the aspiration is always on. If a so-called overflow volume is selected where the dispensing volume is greater than the well volume, pay attention to the dispense end height. Check that the wash head tips are inside the well.
-
Page 47: Aspirate
• Aspirate speed – Define the aspirate rate Low, Medium, or High. The default is High. • Aspirate time (s) – The aspirate time ranges from 0 s to 10 s in 1 s increments. The default is 1 • Dispense height start –... -
Page 48: Dispense
Caution! Too high an aspirate height increases the residual volume. Note! The aspirate height determines the amount of residual volume in the wells. If you want the wells entirely empty, move the tips completely to the well bottom or slightly below so that the wash head rests on the bottom of the well. -
Page 49: Soak
• Yes – If Yes is selected, unused strips are processed dry. The time parameters are measured during the first protocol run. The wash head stays above unused strips for as long as it takes to process each selected strip. This selection is recommended when the timing for washing strips is critical. -
Page 50: Pause
The Prime step has the following parameter: • Prime volume (ml) – The prime volume ranges from 5 ml to 100 ml in 5 ml increments. The default is 30 ml. Priming is carried out in the priming position. Aspiration is on while priming. At the end, the priming vessel is emptied and the wash head returns to the home position. - Page 51 The selected strips are highlighted in red. Note! If the Layout step is the first step in the protocol, the selected wells are shown in blue the Layout row in the Main menu. The Layout row is then locked. If the Layout step is used, it is recommended to use the step as the first step in the protocol. If the Layout step is not the first step in the protocol, the Layout row is not locked but enabled.
-
Page 52: Settings Menu
Settings menu The Settings menu contains the Prime parameters, Sensors, Wash head configuration, System, and Reports parameters. Prime parameters Select the Prime parameters row in the Settings menu and press the OK button. Warning! If you activate the Autoprime parameter, ensure that the wash head is firmly attached. -
Page 53: Sensors
Warning! Multiple occasions of autoprime may empty the buffer bottle. Sensors Liquid level sensors are built into the caps of both bottles to avoid overflow of the waste bottle and to warn the user when the buffer bottle is almost empty. The liquid level sensors can be enabled or disabled in the Sensors window. -
Page 54: Wash Head Configuration
Wash head configuration You must always set the wash head configuration to correspond to the physically installed wash head. Refer to “Head / Plate”. Select the Wash head configuration row in the Settings menu and press the OK button. The Wash head configuration window has the following parameters: •... -
Page 55: System
To export a report, attach a USB memory device to the USB memory device port in the instrument, select the desired report and press the OK button. The selected report is exported to the USB memory device under an automatically generated folder named “WELLWASH”. -
Page 56: Maintenance Menu
The reports available are: • Error log – The error log shows the date and time of the error and the error(s). • Status report – The status report shows the following parameters: report name, date and time, instrument name, version and serial number, current protocol, prime and rinse parameters, sensor settings and status, wash head configuration, system settings, calibration parameters for all wash heads, offset values, and pump usage hours. -
Page 57: Cleaning/Disinfection Procedure
Cleaning/Disinfection procedure The procedure cleans or disinfects the instrument according to a set of actions. Refer to Chapter 11: “Maintenance”, particularly “Decontamination procedure”. 1. Press the OK button on the Cleaning/Disinfection procedure row. 2. Empty all bottles and fill the buffer bottle with cleaning reagent. Press the OK button. - Page 58 5. Empty all bottles and fill the buffer bottle with deionized distilled water. Press the OK button. Priming, preparing the soak and soaking take place. The default soak time is 2 s. Finally the priming vessel is emptied. 6. Empty all bottles and press the OK button. Priming is then carried out.
-
Page 59: Clean Wash Head
Clean wash head The procedure cleans the wash head according to a set of actions. Carry out this procedure if the wash head is dirty or clogged. The instrument fills the priming vessel with a selected liquid and soaks the wash head for a selected period of time. -
Page 60: Soak Wash Head
5. Press the OK button when the procedure is ready. Repeat the wash head cleaning procedure with deionized distilled water if cleaning agent has been used. Note! If the tips are still clogged, refer to “Cleaning the wash head”. Soak wash head The procedure soaks the wash head according to a set of actions. -
Page 61: Move Wash Head
3. Press the F2 key to abort the soaking and to continue the procedure. The priming vessel is emptied. 4. Press the OK button when the procedure is ready. Move wash head The procedure moves the wash head down into the priming vessel to the soak position. You need to add deionized distilled water or a suitable cleaning agent manually into the priming vessel. -
Page 62: Empty Priming Vessel
3. Press the F2 key to end the procedure. Empty priming vessel The procedure aspirates the priming vessel empty of liquid. The procedure can be carried out, for example, after the Move wash head procedure. Refer to “Move wash head”. 1. -
Page 63: Calibration
Calibration The wash head supplied with the instrument is calibrated during production. The wash head box includes an instrument serial number to which it has been calibrated. Refer to “Active calibration”. Ensure that the wash head type corresponds to the wash head setting in the Settings menu. Each wash head type has its own calibration. -
Page 64: Active Calibration
Select the Calibration row in the Maintenance tab and press the OK button. The following calibrations are available: Active calibration • Factory – For service purposes only. This can only be temporarily activated and is active until the power is turned off. •... - Page 65 2. Press the OK button to start the calibration. The dispense pump speed is first calibrated. 3. Insert the first tare weighed plate onto the plate carrier and press the F1 key to continue. Dispensing is carried out. 4. Weigh the dispensed plate and enter the mass of the dispensed liquid in grams using the number keys.
- Page 66 6. Weigh the dispensed plate and enter the mass of the dispensed liquid in grams using the number keys. 7. Press the F1 key to continue calibration. Press the F2 key to cancel calibration. Press the F3 key to repeat calibration when the software informs that the Delta% or accuracy are not acceptable.
- Page 67 9. Press the F1 key to continue calibration. Press the F2 key to cancel calibration. Press the F3 key to repeat calibration when the software informs that the Delta% or accuracy are not acceptable. (The accuracy must be 2.5 to 3.5 x that of 100 µl.) 10.
-
Page 68: Service
Service Service procedures are set in the Service window. The Service window has the following parameter: • Boost prime – Use the Boost prime option when no liquid enters the tubing during priming. Warning! There is a risk of liquid spillage if Boost prime is not stopped when liquid starts to flow and reaches the wash head. -
Page 69: Chapter 7: Exporting And Importing
Chapter 7: Exporting and Importing It is possible to export and import the stored protocols to or from one instrument to another of the same type. Exporting a protocol To export a protocol from the instrument to a USB memory device: 1. -
Page 70: Importing A Protocol
5. Select Export and press the OK button. The protocol is exported to the USB memory device under an automatically generated folder named “WELLWASH”. The file extension of an exported protocol is .PRO. The file is in binary format. You can export protocols one at a time. -
Page 71: Exporting Protocols As Text Files
4. Select Import and press the OK button. A list of protocols stored on the USB memory device opens. The list also shows protocols of the Wellwash Versa instrument if they are stored on the memory device. They cannot be imported. -
Page 72: Chapter 8: Deleting
4. Press the FILE key to open the File menu. 5. Select ASCII Export and press the OK button. The protocol is exported to the USB memory device. The ASCII exported file name is the same as that of the binary file with the .TXT extension. You can open the file with a text editor, print it or save Chapter 8: Deleting Deleting a protocol 1. -
Page 73: Chapter 9: Shutdown
Chapter 9: Shutdown Shutting down It is recommended to shut down the Wellwash at the end of each working day. 1. Remove any plate still in the instrument. 2. Empty the buffer bottle and fill it with deionized distilled water. -
Page 74: Chapter 10: Emergency Situations
Warning! The wash head and priming vessel may be contaminated after the instrument has been used. Warning! When handling the waste bottle, it is advisable to observe applicable safety precautions, including the wearing of disposable powder-free gloves, safety glasses and protective clothing, to avoid potential infectious disease contamination. -
Page 75: Maintenance Checklist
Maintenance checklist Table 7. Maintenance checklist Item req. Perform the operational check. See “Performing the operational check after switching on”. Prime the instrument with deionized distilled water after use. See “Instrument care”. Keep the instrument free of dust. See “Instrument care”. Wipe away spilled saline solutions, solvents, acids or alkaline solutions from outer surfaces immediately to prevent damage, and wipe with deionized distilled water. -
Page 76: Cleaning Of The Instrument
Clean the instrument regularly as stated below. Caution! Although the Wellwash is constructed from high-quality materials, you must immediately wipe away spilled saline solutions, solvents, acids or alkaline solutions from the outer surfaces to prevent damage and wipe them with deionized distilled water. -
Page 77: Cleaning The Priming Vessel
Cleaning the priming vessel The instrument comes with the priming vessel installed. The priming vessel is correctly installed if it stays in place and does not move up. The priming vessel is removed for maintenance purposes only. To remove the priming vessel: 1. -
Page 78: Cleaning Liquid Bottles
Figure 37. Cleaning the plate carrier and the surrounding area 6. Move the plate carrier back to its normal position once it has been cleaned. Cleaning liquid bottles Empty the waste bottle before cleaning it according to disposal regulations (see “Disposal of materials”). -
Page 79: Checking The Liquid Level Sensors
Checking the liquid level sensors Check the performance of the liquid level sensors as described in the “Liquid bottles and channels” and “Performing the operational check after switching on”. Autoclavation You may autoclave, that is, sterilize materials with pressurized steam. Autoclavable and un- autoclavable parts of the washer unit are listed in Table 8. -
Page 80: Mechanical Cleaning Of The Wash Head
Mechanical cleaning of the wash head • Detach the wash head from the tubing. • Remove the wash head plugs and use the declogging tool to clean the tips. • Rinse both channels with deionized distilled water using the syringe supplied with the instrument. -
Page 81: Checking The Aspirate Height
Checking the aspirate height Check the aspirate height by aspirating at the 0.0 mm level. Make a protocol with an Aspirate step: Aspirate mode: Normal, Aspirate height: 0.0, Aspirate time: 10. Disable the Plate sensor. Select the first column/strip and press Start without a plate. The wash head moves to the 0.0 mm level. -
Page 82: Decontamination Procedure
Warning! The samples can be potentially infectious. Dispose of all used plates, disposable gloves, syringes, disposable tips, and so on as biohazardous waste. Be cautious and always use disposable gloves. Warning! Treat the used microplate, waste bottle, priming vessel on the plate carrier, disposables and all substances used in accordance with good laboratory practice (GLP) guidelines. -
Page 83: Refitting The Transport Lock
12. After performing this decontamination procedure, enclose a signed and dated “Certificate of Decontamination” (see Appendix B) both inside the transport package and attached to the outside of the package. Refitting the transport lock When you relocate the instrument or ship it for service, make sure that you refit the transport lock. 1. -
Page 84: Maintaining A System Log
Refer to Appendix A: “System Log”. Packing for service To pack the Wellwash for service: • Provide information about the use of hazardous materials. •... -
Page 85: Disposal Of The Instrument
Disposal of the instrument If the Wellwash is exposed to potentially infectious chemical samples, toxic or corrosive chemicals or radioactive chemicals, waste management of the complete instrument must be carried out to ensure that there is no risk of contamination. -
Page 86: Performance Specifications
Table 9. General specifications General specifications Overall dimensions ca. 345 mm (W) x 385 mm (D) x 240 mm (H) [13.6” (W) x 15.2” (D) x 9.4” (H)] Weight 8 kg [17.6 lbs.] Operating conditions +10°C to +40°C; maximum relative humidity 80% for temperatures up to 31°C decreasing linearly to 50% relative humidity at 40°C Indoor use only! Transportation conditions... -
Page 87: Safety Specifications
Safety specifications In conformity with the requirements Wellwash bears the following markings: Type 888 100–240 Vac, 50/60 Hz, 80 VA max., Class I CE marking cTÜVus The safety specifications are also met under the following environmental conditions in addition to or in excess of those stated in the operating conditions:... - Page 88 Table 11. Error codes reported Code Explanation Suggested action Computer command not recognized. Check the syntax. Invalid computer command argument. Check the syntax. Plate position error. Check the carrier movement. Contact authorized technical service. Head position error. Check the head movement. Contact authorized technical service.
-
Page 89: Usb Memory Device
It is not recommended to use multiple drive USB memory devices that contain virtual CD drives. The multiple drive USB memory devices normally contain one or more removable disk-type memory spaces, but can also contain virtual CD drive-type memory spaces. The Wellwash does not support virtual CD drive-type memory spaces. -
Page 90: Chapter 14: Ordering Information
Contact authorized technical service. Chapter 14: Ordering Information Contact your local Thermo Fisher Scientific representative for ordering and service information (Table 14 and Table 15). Wellwash Table 14. Instrument catalog number Code Item 5165000 Wellwash 1x8 100−240V 50/60Hz 5165040 Wellwash 1x12 100−240V 50/60Hz... -
Page 91: List Of Spare Parts And Accessories
2305290 Serial cable F9/F25 SP-00245 PM Kit Wellwash (incl. bottle and wash head tubing, valve tubing, liquid filter, wash head plugs, O-rings, track slider, and cable ties) * Longer USB cables available from PC stores Figure 44. Wash head tubing connectors... -
Page 92: Appendix A: System Log
Appendix A: System Log Instrument name/number: User Date Comments... -
Page 93: Appendix B: Certificate Of Decontamination
Appendix B: Certificate of Decontamination Name: Address: Tel./Fax: Instrument: Serial No.: A) I confirm that the returned items have not been contaminated by body fluids, toxic, carcinogenic or radioactive materials or any other hazardous materials. B) I confirm that the returned items have been decontaminated and can be handled without exposing the personnel to health hazards. - Page 94 Glossary decontamination Removal or neutralization of radiologic, bacteriological, chemical or other contamination. disinfection The destruction of pathogenic bacteria, usually with an antiseptic chemical or disinfectant. Enzyme immunoassay. An immunoassay using a color-changing enzyme- substrate system for indicating results. A diagnostic test method to measure or detect a substance using antibody-antigen reactions.
Need help?
Do you have a question about the Wellwash and is the answer not in the manual?
Questions and answers