
Related Manuals for ePropulsion VAQUITA


Summary of Contents for ePropulsion VAQUITA
- Page 1 VAQUITA USER MANUAL Feb, 2019 Version 1.1 Copyright © 2019 ePropulsion All Rights Reserved...
-
Page 3: Acknowledgements
By using this product, you hereby agree that you have fully read and understood all contents of this manual. ePropulsion accepts no liability for any damage or injury caused by operations that contradict this manual. -
Page 4: Product Identification
Product Identification Below Figure 0-1 indicates the position of the serial number for VAQUITA Battery. Figure 0-2 and Figure 0-3 indicate the position of serial numbers for VAQUITA Remote Control and VAQUITA Motor. Model: VAQUITA Battery CAUTIONS Rated Capacity: 324Wh... -
Page 5: Table Of Contents
3. Installation ..................15 3.1 Installation of VAQUITA Motor ............15 3.1.1 Installing with Standard Adapters .......... 15 3.1.2 Installing with VAQUITA Universal Adapter ......17 3.2 Fixing VAQUITA Battery ..............19 3.3 Connecting Battery to Motor ............21 3.4 Attaching VAQUITA Remote Control ..........21 4. - Page 6 6. Transport and Storage ............... 37 6.1 Transport ..................37 6.2 Storage ..................37 7. Routine Maintenance ................. 38 8. Warranty ....................39 8.1 Warranty Policies ................39 8.2 Out of Warranty ................40 8.3 Warranty Claim Procedures ............40...
-
Page 7: Important Safety Instructions
Before Operation Users who are allowed to use VAQUITA should be in good physical state, know how to swim and how to paddle. Always wear a life vest and always wear a leash when operating. - Page 8 Never drop the battery. Only VAQUITA Charger designed for the battery. Other chargers may lead to shortened runtime, premature battery failure, or even fire or explosion. Clean VAQUITA Motor with fresh water after each use.
-
Page 9: Product Overview
2. Product Overview VAQUITA is a set of electric propulsion kit designed for SUP board/kayak. VAQUITA is compatible with nearly all SUP boards, kayaks, canoes, etc. This product mainly consists of VAQUITA Motor, VAQUITA Battery and VAQUITA Remote Control. This small but mighty propulsion kit supports over 1 hour of full-speed running, perfectly backing you up whether you need a rest or want to go further. - Page 10 Certificate & Lanyard Attach the VAQUITA Motor to the bottom of the watercrafts by using a standard adapter which is compatible with the fin box on the watercraft, or using the VAQUITA universal adapter for watercrafts that have different fin boxes or without a fin mounting system.
-
Page 11: Parts And Diagrams
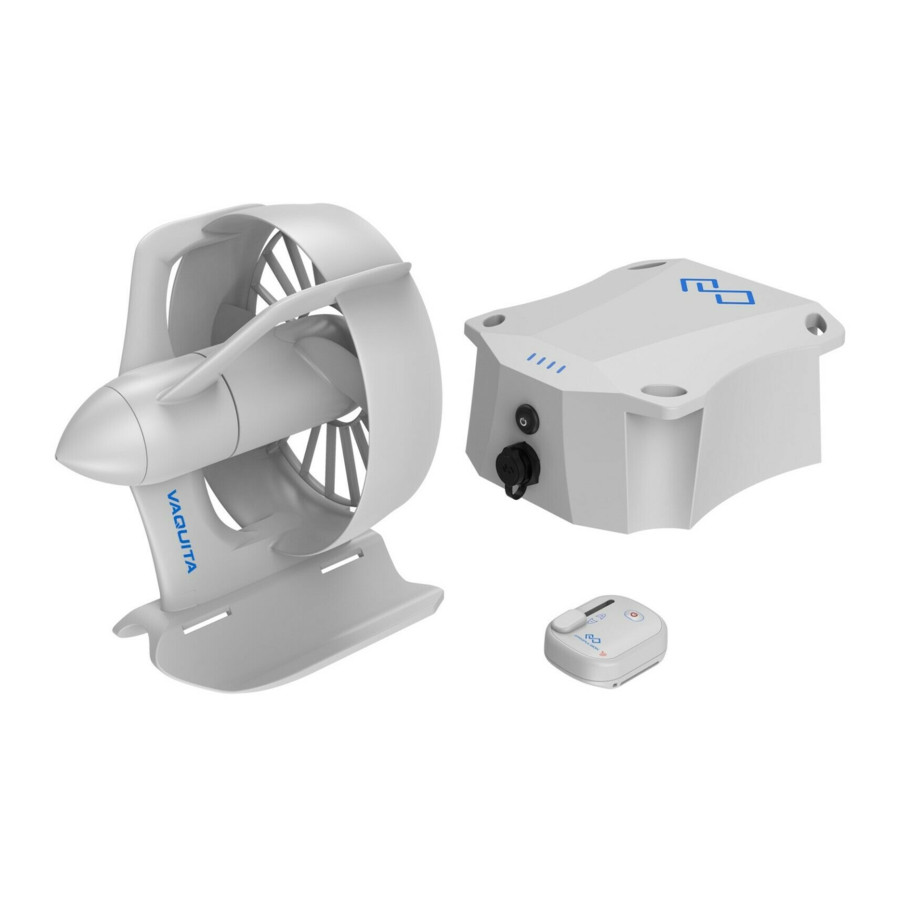
Power Cable VAQUITA Motor Figure 2-1 Overview Propeller Motor Module Protective Power Cable Cover Motor Base Front View Side View Figure 2-2 VAQUITA Motor LED Lights Battery Power Button Buckles Charge/Discharge Port Front View Bottom View Figure 2-3 VAQUITA Battery... - Page 12 Throttle LED On/Off Button Signal Reception Area Loop Band Figure 2-4 VAQUITA Remote Control Inflatable SUP fin box adapter Retaining Clip Screw US fin box adapter Back Nut Strap Buckle VAQUITA Ratchet universal Strap adapter Figure 2-5 Adapters...
-
Page 13: Technical Data
2.3 Technical Data VAQUITA General Data Input power 300 W Static thrust 23 lbs. Total weight 5 kg / 11 lbs . VAQUITA Motor weight 1.5 kg / 3.3 lbs. 182 mm x 168 mm x 182 mm / Dimension 7.2”... - Page 14 VAQUITA Charger Input power 180 W Input voltage (AC) 100 V ~ 240 V Input frequency 50 Hz / 60 Hz Input current ≤ 3 A Output voltage (DC) 25.2 V / 7 A Operating: -29˚C ~ 45.5˚C / -20.2˚F ~ 113.9˚F Temperature range Storage: -40˚C ~ 75˚C / -40˚F ~ 167˚F...
-
Page 15: Declaration
2.4 Declaration Object of the Declaration: Product: Kayak/SUP Motor Model: VAQUITA, VAQUITA S Company Name: Dongguan ePropulsion Intelligence Technology Limited Company Address: Room 202, Bldg.17A, Headquarter No.1, 4th XinZhu Road, SongShan Lake District, Dong Guan City, Guang Dong Province, China... - Page 16 The manufacturer is not responsible for any radio or TV interference caused by unauthorized modifications to this equipment. Such modifications could void the user's authority to operate the equipment. Signature: Shizheng Tao, Chief Executive Officer & Cofounder of Dongguan ePropulsion Intelligence Technology Limited...
-
Page 17: Installation
3. Installation VAQUITA comes with two adapters that can be fit into two major standard fin boxes which are widely used on most SUP boards and a universal adapter for kayaks and any small watercraft without standard fin boxes. 3.1 Installation of VAQUITA Motor Before installing the VAQUITA Motor to a SUP board/kayak, etc., note that... - Page 18 ③ Move the nut in the slot to align it with the hole of the adapter, then insert the screw through the hole and into the back nut. ④ VAQUITA motor is well attached to the US fin box. back nut...
-
Page 19: Installing With Vaquita Universal Adapter
If the SUP board/kayak, etc. has no fin box or if both the two standard adapters can’t fit into the existing fin mounting system, it’s suggested to use VAQUITA universal adapter to attach VAQUITA Motor. ① Turn the SUP board/kayak, etc. bottom up. - Page 20 Figure 3-5 ③ Penetrate the strap into the buckle . ④ Repeat unfolding and folding the buckle to tense the strap. Fold the buckle when the strap is tensed. Figure 3-6...
-
Page 21: Fixing Vaquita Battery
3.2 Fixing VAQUITA Battery a. Fixing VAQUITA Battery on SUP board There are mainly two ways to fix VAQUITA Battery on a SUP board. For SUP board with bungee system, the battery can be fixed with bungee cords. SUP board bungee cord... - Page 22 For SUP boards without bungee system, users can make use of the buckles on the bottom of the VAQUITA Battery to clip a ratchet strap tied around the SUP board. Fix the redundant cable with a Velcro tape Ratchet strap...
-
Page 23: Connecting Battery To Motor
3.4 Attaching VAQUITA Remote Control VAQUITA Remote Control can be attached to a paddle or wrist for easy access. You need to penetrate the band through the side opening of VAQUITA Remote Control and bind the strap tightly around the wrist or paddle as shown in Figure 3-12. - Page 24 Method 1 Wear VAQUITA Remote Control on the wrist. Method 2 Attach VAQUITA Remote Control to a paddle. Figure 3-12...
-
Page 25: Operation
4. Operation To operate VAQUITA, it’s critical to understand how to use the battery and remote control correctly. Read this part carefully before any operation. 4.1 Using the Battery 4.1.1 Battery LEDs The four LEDs of VAQUITA Battery display battery level, indicate errors and show pairing status. - Page 26 (for 3s) and the error (for 3s) alternately. If multiple errors occur simultaneously, the errors will be displayed in this priority sequence: Error4 Error3 Error1 Error2. Error4 VAQUITA Battery over-temperature may occur during charging. If the error persists, please consult the authorized dealers for help.
-
Page 27: Switching On/Off Vaquita Battery
4.1.2 Switching On/Off VAQUITA Battery Power Button Figure 4-2 The below table indicates how to switch on/off VAQUITA Battery. Operation Description In power-off state, press the power button and hold until all LEDs light up one by one. Then release the button. -
Page 28: Charging The Battery
Remove the battery off the SUP board/kayak and take it to a dry and safe place. 2) Plug the output cable of VAQUITA Charger into the charge/discharge port of VAQUITA Battery and tighten the connector. Then plug the input cable of VAQUITA Charger into the socket. -
Page 29: Use Of Vaquita Remote Control
4.2 Use of VAQUITA Remote Control 4.2.1 Switching On/Off the Remote Control Before switching on the remote control, please check to - make sure the throttle is at zero position. - make sure the motor is securely attached to the SUP board or kayak. -
Page 30: Controlling The Motor
Press the on/off button on the VAQUITA remote control to stop the motor immediately in emergency situations. Never get close to the running propeller to avoid injury. 4.2.2 Controlling the Motor If the throttle is not at zero position when switching on the remote control, the LED will flash slowly. -
Page 31: Replacing Battery For Remote Control
4.2.3 Replacing Battery for Remote Control VAQUITA Remote Control is powered by an in-built battery (model: CR2032). If the remote beeps every 1s for 5 successive times when normally switching on the remote control, it indicates the remote control is running out of power, and it is necessary to replace a new button cell of the same type. -
Page 32: Pairing Remote Control With Battery
4.3 Pairing Remote Control with Battery VAQUITA Remote Control and VAQUITA Battery in each package are well paired prior to delivery, but if: ① the remote is a new one, or ② the battery is a new one, communication will fail and users need to build wireless communication between the remote control and the battery. -
Page 33: Detaching Vaquita Motor
After using VAQUITA, please detach VAQUITA Motor from the SUP board/ kayak in correct procedures. Notes before detaching VAQUITA Motor. First, take the VAQUITA Battery out of your SUP board/kayak, etc. by below procedures: 1) Long press the power button to switch off the VAQUITA Battery. - Page 34 Step3: Pull the release buckles in direction ① about 2mm and slide the adapter in direction ② . Release buckle Figure 5-3 Step4: When the rear part of the adapter is slid to the position as shown in below left figure, remove the adapter. Rear part of the adapter Figure 5-4 Clean the motor and adapter with fresh water after the motor is...
- Page 35 Step1: Draw out the retaining clip from the inflatable SUP fin box. Figure 5-5 Step2: Slide VAQUITA Motor and adapter out of the fin box. Figure 5-6 Step3: Hold the motor, then obliquely pull the release buckle about 2mm and slide the adapter backward in the direction of arrow ②...
- Page 36 Step4: When the rear part of the adapter is slid to the position as shown in below left figure, remove the adapter. Rear part of the adapter Figure 5-8 Clean the motor and adapter with fresh water after getting them detached.
- Page 37 Step2: Detach VAQUITA universal adapter and VAQUITA Motor from the SUP board/kayak (Figure 5-10). Figure 5-10 Hold VAQUITA Motor while loosening the ratchet strap. Step3: Hold the motor, then obliquely pull the release buckle about 2mm and slide the universal adapter in the direction of arrow ② .
- Page 38 Step4: When the rear part of the universal adapter is slid to the position as shown in below left figure, take out the adapter. Rear part of the adapter Figure 5-12 If you are not going to use the universal adapter very soon, it’s advised to detach the ratchet straps from the adapter.
-
Page 39: Transport And Storage
Check applicable laws and regulations before transport. 6.2 Storage If you are not going to use VAQUITA for a long time, it is advised to clean and check it prior to storage. It is recommended to pack VAQUITA with its original package for storage. -
Page 40: Routine Maintenance
Routine maintenance is very important for keeping VAQUITA in its optimal operating state. It’s suggested to take VAQUITA Motor out of the water after use. Check the cable regularly for damage. Charge VAQUITA Battery after each use. -
Page 41: Warranty
8. Warranty The ePropulsion limited warranty is provided for the first end purchaser of an ePropulsion product. Consumers are entitled to a free repair or replacement of defective parts or parts which do not conform with the sales contract. This warranty operates in addition to your statutory rights under your local consumer law. -
Page 42: Out Of Warranty
Warranty Card, ex-factory serial number, and evidence of purchase. 2. Send the defective product to your authorized ePropulsion service point after getting the confirmation. Note that the label should be kept intact. - Page 43 3. The defective components or parts will be either repaired or replaced according to the diagnosis made by the ePropulsion authorized service partner. 4. If your warranty claim is accepted, the equipment will be repaired or replaced free of charge.
- Page 46 Thanks for reading this user manual. If you have any concerns or find any problems while reading, please don't hesitate to contact us. We are delighted to offer service for you. Dongguan ePropulsion Intelligence Technology Limited Website: www.epropulsion.com Email: service@epropulsion.com...
Need help?
Do you have a question about the VAQUITA and is the answer not in the manual?
Questions and answers