Table of Contents
Advertisement
Quick Links
Advertisement
Table of Contents

Related Manuals for Riedel Bolero


Summary of Contents for Riedel Bolero
- Page 1 Bolero Next Generation Wireless User Manual...
- Page 2 Radiofrequency radiation exposure Information (for the Beltpack): For body worn operation, this equipment has been tested and meets the FCC RF exposure guidelines when used with the Riedel accessories supplied or designated for this product. Use of other accessories may not ensure compliance with FCC RF exposure guidelines.
-
Page 3: Table Of Contents
Bolero User Manual A20 CONTENT Preface Information ................................ 6 About Bolero ..............................9 Bolero Beltpack Operating Elements ............................11 Status LEDs ..............................13 Basic Operation ............................... 14 2.3.1 StartUp ..............................14 2.3.2 Key Functions ............................15 2.3.3 Headset Type ............................15 2.3.4... - Page 4 Bolero User Manual A20 3.4.4 System Logs .............................. 54 3.4.5 Settings ..............................55 3.4.5.1 Firmware Manager ......................55 3.4.5.2 Network Service ........................55 3.4.5.3 Save Net Config ........................55 3.4.5.4 Upload Net Config ....................... 56 3.4.5.5 Login/Logout ........................56 Features in Detail ............................57 3.5.1...
-
Page 5: Preface
Riedel Communications GmbH & Co. KG shall not be liable for any errors, inaccuracies or for incidental or consequential damages in connection with the furnishing, performance or use of this manual, the software or the examples herein. -
Page 6: Information
Bolero User Manual A20 1.1 Information Symbols The following tables are used to indicate hazards and provide cautionary information in relation to the handling and use of the equipment. Danger Indicates an imminently hazardous situation which, if not avoided, will result in death or serious injury. - Page 7 For best performance charge the battery fully before initial use or reusing it after being stored for a long period. In order to ensure air transport safety, the Bolero Battery Pack is tested according to UN 38.3 – Transport of dangerous goods.
- Page 8 Bolero User Manual A20 Environment · Never place the devices in an area of high dust particles or humidity. · Never expose the device to any liquids. · If the devices have been exposed to a cold environment and transferred to a warm environment, condensation may form inside the housing.
-
Page 9: About Bolero
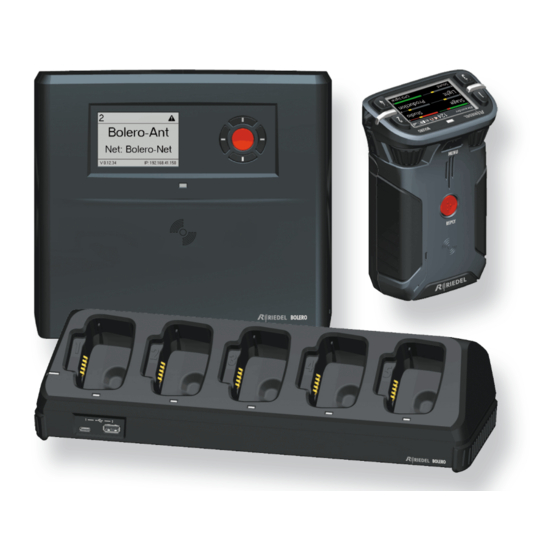
The Beltpack features 6 buttons for 6 intercom channels or point to point communications, plus a separate “Reply” button that easily facilitates a reply to the last person that called. Bolero’s sunlight readable and dimmable display can be inverted so that it is readable in any orientation. The Beltpack can be used without a headset like a walkie-talkie radio utilizing an integrated mic and speaker. -
Page 10: Bolero Beltpack
Beltpack to the antenna and GO. The Bolero Wireless Beltpack has a user replaceable XLR connector for headset, a 3.5mm jack for a line-in signal and a USB port for firmware updates. Bolero Beltpacks support Bluetooth 4.1, allowing a Smartphone to be connected. When a Smartphone is connected, the Beltpack can act like a car's "hands free"... -
Page 11: Operating Elements
Bolero User Manual A20 2.1 Operating Elements Figure 1: Beltpack – Operating Elements (front/top, rear/bottom) Full color sunlight readable display Lanyard or safety cord mounting holes Walkie-Talkie keys 5+6 (side) Rotary encoder (2) Speaker Microphones Keys 1...4 (top) Rotary encoder (1) - Page 12 The USB connector is used to charge the Beltpack. Furthermore the connector is used for firmware updates. By default the Beltpack is updated in the Bolero Charger. Charging is only possible with >500 mA USB ports. 100 mA are not supported.
-
Page 13: Status Leds
Bolero User Manual A20 2.2 Status LEDs Figure 5: Beltpack – Status LEDs (top) Status Beltpack is turned off · green Beltpack ready (System ok) · USB charging, battery full green blinking USB charging, battery level 90–99% · booting ·... -
Page 14: Basic Operation
An unregistered Beltpack shows "Not registered!" on the splash screen. Pushing the 'Reply' key for a second opens the Registration menu to register the Beltpack in a Bolero-Net. The Main-View appears after successful registration and establishing a connection to a Net:... -
Page 15: Key Functions
Bolero User Manual A20 2.3.2 Key Functions While the display is showing the Main View, users may talk individually or at the same time to all channels. Pushing one of the six keys allows talking in the respective channel. The Call LED is indicating if one channel is active at least. Each active channel has a colored indication in the display. -
Page 16: Volume Adjustment
Bolero User Manual A20 2.3.4 Volume Adjustment The signal level is normalized and limited in the matrix. In the Beltpack the signal level can be manually leveled and limited. Rotating either rotary encoder adjusts the master volume of the speaker or headset if the display shows the Main-View. -
Page 17: Quick Menu
Bolero User Manual A20 2.3.5 Quick Menu The Quick-Menu is opened by pressing and holding (>0.5 sec. / <3 sec.) the Menu key. The Quick-Menu allows using user defined shortcuts to frequently used menu commands. Navigate with one of the rotary encoders to the desired menu item and press the menu key to open the respective menu. -
Page 18: Main Menu
Bolero User Manual A20 2.3.6 Main Menu The Main-Menu is opened by pressing and holding (>3 sec.) the Menu key. Basic information is displayed and settings can be modified in the Main-Menu. The Main-Menu contains following entries: Audio Gain Settings... - Page 19 Bolero User Manual A20 Brightness Brightness Mode Selection between one user defined and three pre-defined brightness definitions: Custom, Low, Medium, High Custom Settings Display Normal brightness level of the display: 10 ... 100% [50] Display Dim Dimmed brightness level of the display: 10 ...
- Page 20 Bolero User Manual A20 Registration Register to net Registers the Beltpack to an existing net. A list of available nets are displayed: · Over The Air (OTA) Connect to pre- Registers the Beltpack to previous registered nets. A list of available pre-...
- Page 21 · Hardware: xx.xx · Serial Number: (13 digits) Area Protected menu – for Riedel service purpose only default values are underlined or displayed in [square brackets] OTA registration PIN necessary (Admin PIN by default) Admin PIN necessary Service PIN necessary...
-
Page 22: Features In Detail
Bolero User Manual A20 2.4 Features in Detail 2.4.1 Speaker In the menu 'Audio > Speaker' is defined, if the audio signal is routed to the internal speaker or to an attached headset. Connecting a headset will switch the speaker off. Removing a headset won't change the current setting. -
Page 23: Profiles
Bolero User Manual A20 2.4.3 Profiles A Profile is assigned to every Beltpack when it is registered. The profile contains default settings for the whole Beltpack- Config and user rights indicating which settings of the Beltpack-Config the Beltpacks user is allowed to see and/or to change. -
Page 24: Silent Mode
Bolero User Manual A20 2.4.5 Silent Mode If the Silent Mode is activated, the speaker and vibration are disabled. 2.4.6 Display Mode The menu 'General Settings > Display-Mode' allows selecting between the standard view, a view with bigger text and a Flip Screen mode. -
Page 25: Bluetooth
Bolero User Manual A20 2.4.8 Bluetooth The Beltpack provides a Bluetooth 4.1 wireless connection, which is available even when no antenna connection is available or the Beltpack is not registered. Figure 12: Bluetooth The menu Bluetooth State allows defining the device to be paired as the source of an audio signal. -
Page 26: Bluetooth State
Bolero User Manual A20 2.4.8.1 Bluetooth State In the menu 'Bluetooth > Bluetooth State' is selected, if the Beltpack should be connected to a Mobile/PC. Figure 13: Bluetooth – Bluetooth State Mobile/PC A mobile device (mobile phone, tablet) or PC is able to connect to the Beltpack. In this mode the Beltpack (including the wired headset) acts like a Bluetooth headset. -
Page 27: Pair
In the menu 'Bluetooth > Pair' the pairing process between the Beltpack and a Bluetooth device can be started. After selecting this menu the Beltpack is visible as an audio device called "Bolero" for other Bluetooth devices. Figure 14: Bluetooth – Pair Start the pairing process and confirm the generated PIN on the Mobile/PC. -
Page 28: Share To Net
2.4.9 Registration Before a Beltpack can connect to a Bolero-Net, it has to be registered to it. Registration means, that the Bolero-Net knows the Beltpack, the Beltpack knows the Bolero-Net and an encryption key is generated to be used by both sides. -
Page 29: Antenna Ota
2.4.9.1 Antenna OTA This registration mode allows registering a Beltpack at an already registered Antenna over the air (DECT). Following steps are necessary to register a Beltpack via Antenna-OTA to a Bolero Net: · At first the 'Registration Method (OTA)' must be activated. This can be done in two ways:... -
Page 30: Antenna Nfc
· After registration, the Beltpacks will immediately connect to the Bolero net. · This setting is system wide and stays active until disabled or the registration timeout runs out (timeout is the same as for OTA registration). -
Page 31: De-Registration
Figure 21: Delete pre-registered net The De-Registration is also possible via the Antennas Web Interface (see chapter 'Bolero Antenna > Features in Detail > De-Registration > Beltpacks'. 2.4.11 Walk-Test The Walk-Tests (Pro) lets the user analyze the signal quality to the visible antennas. -
Page 32: Reset
Bolero User Manual A20 2.4.12 Reset The Beltpack-Menu 'Service > Reset' offers two different ways to reset the Beltpack to factory default settings. Figure 24: Beltpack – Reset Menu Profile Defaults This resets the Beltpacks' Profile data the current default settings of the net. -
Page 33: Battery
Bolero User Manual A20 2.4.14 Battery Light and powerful custom lithium rechargeable battery packs are used to operate the Beltpacks. Batteries can be charged in following ways: · Beltpack (with battery) in the Charger · single Battery in the Charger ·... -
Page 34: Charging In The Charger
Bolero User Manual A20 2.4.14.2 Charging in the Charger · Plug the Beltpack or just the battery itself in an empty position in the charger. The radio is switched off when the Beltpack is plugged into the Charger. · The charging procedure will start automatically. -
Page 35: Replacing The Battery
Bolero User Manual A20 2.4.14.3 Replacing the Battery The Beltpack battery can be replaced by following these steps: · Pull the battery release button upwards... · and push the battery at the belt clip to the bottom side of the Beltpack. -
Page 36: Firmware Update
ü Beltpack firmware package (for example "bolero_v1.23.package") ü Bolero-Beltpacks to be updated It is possible to update the firmware of up to five Beltpacks simultaneously in one Bolero-Charger. · Connect the Charger with mains. · Copy the new firmware package in the root directory of an USB pen drive. - Page 37 Bolero User Manual A20 · At first, the Charger's firmware will be updated. · During this process the Charger's Status-LED will blink green and the Charger will be restarted. · The current process will be also displayed on the Beltpacks' display.
-
Page 38: Technical Specifications
Bolero User Manual A20 2.5 Technical Specifications Beltpack Product Code BL-BPK-1006-19 Multi-path delay spread Yes, ADR (Advanced DECT Receiver) protection Audio Bandwidth 200 Hz ... 7 KHz (-3dB) Mode of Operation Full-duplex on all routes Encryption AES256 Bit encryption Line in 3.5 mm jack, 40 Hz ... -
Page 39: Bolero Antenna
3 Bolero Antenna Bolero active Antennas run over a standard AES67 IP network. Up to 100 antennas and 100 Beltpacks are able to connect to a system. The intelligent and highly efficient use of bandwidth results in 10 Beltpacks per Antenna. The decentralized Antennas allow the use of existing standard structured cabling and provide a wide area between the Antennas connected to AES67 switches and the Artist frames equipped with AES67 client cards. - Page 40 D3+ / PoE+ (p) D3- / PoE+ (p) D2- / PoE+ (n) D4+ / PoE+ (n) D4- / PoE+ (n) Figure 36: RJ45 1Gbit Ethernet connection is necessary to operate the Bolero net. USB Type-C Description Description SSTXp1 SBU1 SSTXn1...
-
Page 41: Status Leds
Bolero User Manual A20 3.2 Status LEDs Figure 38: Antenna – Status LEDs (front, bottom) Status not powered green Antenna ready (System ok) red blinking Antenna power error orange Antenna powered up (Radio OFF) orange blinking booting Power no XLR input power... -
Page 42: Basic Operation
Bolero User Manual A20 3.3 Basic Operation 3.3.1 StartUp The Antenna starts automatically after it is attached to power. Either with a separate power supply or via a switch including PoE+ functionality. The Main-View appears after booting and is showing following information:... -
Page 43: Main Menu
Bolero User Manual A20 3.3.3 Main Menu The Main-Menu is opened by pressing any key. In the Main-Menu information are displayed and basic settings can be modified. The Main-Menu contains following entries: Node Settings Name Antenna Name (12 characters) User ID... -
Page 44: Web Interface
Figure 40: Antenna – Web-Interface [Net-Name] / General settings of the Bolero Net Antenna The name of the Net is displayed between the brackets (e.g. "Bolero-Net"). Beltpack Profiles Create and Edit Beltpack profiles. Registered Table of all registered Beltpacks. The Beltpack settings can be modified here. -
Page 45: Net / Antenna
Bolero User Manual A20 3.4.1 Net / Antenna The Net / Antenna window features following functions: · Creating Nets · Assigning Nodes (Antennas, Artist AES67 cards) to Nets · General settings of Nets · Defining the registration method of Beltpacks Figure 41: Web-Interface –... -
Page 46: Edit
Bolero User Manual A20 3.4.1.1 Edit Clicking the Edit symbol opens a dialog with the following setting. The dialog can be closed by pressing the ESC key without saving any changes. Apply Stores all changes. Cancel Discards all changes. Edit Antenna Settings Name Name of the Antenna. -
Page 47: Menu
General Name Name of the Bolero Net. Settings Multicast IP IP address for the communication between the Bolero Net and the Artist system. Admin PIN Defines the admin PIN (is required to log into the system, see chapter Login/Logout). System Mode Defines if the Net is operated in stand-alone mode (AES67) or if the Net is connected to an Artist system (Artist). -
Page 48: Beltpack Profiles
Bolero User Manual A20 3.4.2 Beltpack Profiles The Beltpack Profiles window features the following functions: · List of all available Profiles · Creation of Profiles · Changing of Profile settings Figure 42: Web-Interface – Beltpack Profiles Unique ID of the Profile. -
Page 49: Edit
Bolero User Manual A20 3.4.2.1 Edit Clicking the Edit symbol opens a dialog with the following settings. The dialog can be closed by pressing the ESC key without saving any changes. The user of the Beltpack has the rights to edit the respective functions on the Belt Pack itself. -
Page 50: Menu
Bolero User Manual A20 Brightness (Display, Keys) Brightness mode High, Medium, Low, Custom (see Beltpack Brightness Mode) Brightness Slider to adjust the normal display/key brightness. Dimmed Slider to adjust the dimmed display/key brightness. Dimm Timer Slider to adjust the timeout, how fast the display/key illumination is dimmed. -
Page 51: Registered Beltpacks
Bolero User Manual A20 3.4.3 Registered Beltpacks The Registered Beltpacks window features the following functions: · Listing of all registered Beltpacks in the Net. · Changing of Beltpack settings · Changing of assigned Profiles · Removing Beltpacks from Nets ·... -
Page 52: Edit
Bolero User Manual A20 3.4.3.1 Edit Clicking the Edit symbol opens a dialog with the following settings. The dialog can be closed by pressing the ESC key without saving any changes. Apply Stores all changes. Cancel Discards all changes. Beltpack Properties... -
Page 53: Menu
Auto-assign User IDs Assigns the User IDs of the selected Beltpacks automatically. The initial value is one ("1"). Registration Mode Enabling the Registration Mode of the Net (see chapter 'Bolero Antenna > Web Interface > Net/Antenna > Menu – Registration... -
Page 54: System Logs
Bolero User Manual A20 3.4.4 System Logs Status messages and errors are displayed in this tab. Errors in the Fault List can be confirmed and hidden by clicking on Acknowledge. The events in the Event Log can be cleared by clicking the plus symbol and choosing Clear Logs. -
Page 55: Settings
Bolero User Manual A20 3.4.5 Settings 3.4.5.1 Firmware Manager The Firmware of Nodes can be updated in this tab. Figure 45: Web-Interface – Firmware Proceed following steps to update one or multiple Nodes: 1. Click 'Select Firmware Image' and select the desired firmware file (.package). -
Page 56: Upload Net Config
Bolero User Manual A20 3.4.5.4 Upload Net Config This function allows loading a previous stored Net configuration into the system. Figure 48: Web-Interface – Upload Net Config After executing this function a dialog is opened to select the desired ".bol" file. -
Page 57: Features In Detail
Bolero User Manual A20 3.5 Features in Detail 3.5.1 Bolero-Artist Setup This chapter describes the required steps to integrate a Bolero-System with an Artist-System. The following devices are required: ü Artist frame with AES67 client card ü Bolero Antenna ü... - Page 58 A dialog is opened to enter the Net name and the Admin PIN. Figure 59: Create Network Space · Enter a name for the Bolero net in the field Name (e.g. Bolero-Net). · Define an Admin PIN (4 digits, 0–9).
- Page 59 Bolero User Manual A20 Figure 62: Assigned Antenna and AES67 card · Click on the plus symbol and select the entry Registration Mode. A dialog is opened to enter the registration options. Figure 63: Registration Mode · Enable the OTA and/or NFC registration method.
-
Page 60: Switch Recommendations
After reading these pages, you should be able to determine, if a switch is suitable for Bolero by looking at the spec sheet. If you classify the network you are building, choosing a switch can be done without excessive testing. - Page 61 The lowest supported number in the complete system is the limit. QoS (IEEE 802.1p), based on DiffServ (RFC 2474) · Traffic from the Bolero Antennas can be prioritized when transmitted through a larger network. ·...
- Page 62 • Multicast traffic mode When using Power over Ethernet use PoE+ (PoE plus) switches only! The power of switches that are supporting PoE only is not sufficient! A 1Gbit Ethernet connection is necessary to operate the Bolero net. Network Size Classifications Requirements ·...
-
Page 63: Registration
Open the web interface of the Antenna to access the configuration: · Enter the IP address of a Bolero Antenna in the Web-Browser (e.g. 192.168.41.151). Figure 71: Web interface of the Antenna Take care that the Antennas IP address is in the same IP range like the existing Net. The IP settings can be modified in the web interface ( ) as well as in the Antennas' menu (IP Settings). - Page 64 Figure 74: Dialog – Select Network Space This example shows the new added Antenna in the existing Network Space Bolero-Net. Figure 75: Added new Antenna in the Bolero-Net Do not forget to assign a unique User ID to the new Antenna.
-
Page 65: De-Registration
Bolero User Manual A20 3.5.4 De-Registration In the Antennas Webinterface it is possible to remove registered Antennas as well as registered Beltpacks from a Net. 3.5.4.1 Antennas To de-register Antennas from a Net, choose the register 'Net/Antenna'. Then select the desired Antennas. -
Page 66: Beltpacks
Bolero User Manual A20 3.5.4.2 Beltpacks To de-register Beltpacks from a Net, choose the register 'Registered Beltpacks'. Then select the desired Beltpacks. Figure 81: Web Interface – Registered Beltpacks Click on the plus symbol and select the menu item 'Deregister'. -
Page 67: Firmware Update
Bolero User Manual A20 3.5.5 Firmware Update This chapter describes the update procedure of Bolero Nodes (Bolero-Antennas and Artist-AES67 client cards). The following devices are required: ü ü Bolero firmware package (for example "bolero_v1.23-456.package") ü Network Switch (optionally with PoE+ functionality) ü... - Page 68 Bolero User Manual A20 · Click on the gear icon and select the entry Firmware Manager. · A dialog is opened to reenter the Admin PIN. Figure 88: Firmware Manager The Firmware Manager is opened. · Click on the 'Select Firmware Image' button.
- Page 69 Caution: Do not remove the power from any devices. Figure 94: Firmware-Manager – progress All Nodes must be rebooted to finish the update process. · Click the 'Reboot Bolero System & Exit Manager' button. The firmware update is finished now. Figure 95: Firmware-Manager – Reboot devices...
-
Page 70: Mechanical Drawings
Bolero User Manual A20 3.6 Mechanical Drawings Below are the Antenna's dimensions illustrated (in mm). 210,5 POWER AES67 / CONFIG LINK 1 LINK 2 Figure 96: Antenna – Mechanical Drawing (front, bottom) 67,1 19,5 170,2 151,7 126,7 68,7 43,7 30,2... -
Page 71: Technical Specifications
Bolero User Manual A20 3.7 Technical Specifications Antenna Product Code BL-ANT-1010-19 No of Beltpacks per Antenna RF Frequency Range 1.880 ... 1.930GHz (region dependent, not changeable by the user) Antenna Coverage Indoor (structure dependent): ~200 ... 400m Outdoor (free line of sight): ~300 ... 500m Beltpack to Indoor (structure dependent): ~100 ... -
Page 72: Bolero Charger
Beltpack as well as separately in the 5-bay charger. Via the additional USB Type A and USB Type C connectors on the front side, two additional Bolero Beltpacks or any other USB devices can be charged. - Page 73 VBUS VBUS SSRXn2 SSRXp2 Figure 100: USB Type-C The USB connector is used to update the firmware and to charge an additional Bolero Beltpack or any other USB device. The maximum output current is 1.5 A. USB Type-A Description VBUS...
-
Page 74: Status Leds
Bolero User Manual A20 4.2 Status LEDs Figure 103: Charger – Status LEDs (top) System no input power orange booting green Charger ready Slot (1 ... 5) slot empty, not charging orange blinking charging, battery level 0–89% charged green blinking charging, battery level 90–99% charged... -
Page 75: Charging Batteries
Bolero User Manual A20 4.3 Charging Batteries · Connect the charger to mains. The System-LED indicates the overall status. · Push the Beltpack or the battery in one charging slot. The Beltpack's radio is switched off when the Beltpack is plugged into the Charger. -
Page 76: Technical Specifications
Bolero User Manual A20 · When the Beltpack is fully charged, the display shows the following content. · Remove the Beltpack or battery out of the charger. 4.4 Technical Specifications Charger Product Code BL-CHG-1005-R No of Beltpack slots Beltpack Charge Time... -
Page 77: Appendix
Bolero User Manual A20 5 Appendix 5.1 Glossary Antenna Access Right Identity allows identifying a system or service provider. Beltpack Charger DECT DECT (Digital Enhanced Cordless Telecommunications) is an international standard for cordless radio communications. Near-Field Communication is a transmission standard that enables wireless data transfer. -
Page 78: Maintenance Recommendations
Bolero User Manual A20 5.2 Maintenance Recommendations Following points are strongly recommended to prevent malfunction of the system. General None Daily None Weekly None Monthly None Yearly Check the capacity of the battery and replace it if necessary. Other None... -
Page 79: Service
Repair Your primary point of contact for any service issues is your local dealer. In addition, Riedel Customer Service in Wuppertal, Germany is also available to assist you. Telephone: +49 (0) 202 292 9400 (Monday - Friday, 8am – 5pm, Central European Time) -
Page 80: Notes
Bolero User Manual A20 5.4 Notes... - Page 81 Bolero User Manual A20 Notes...
-
Page 82: Index
Bolero User Manual A20 De-Registration (Antennas) Index De-Registration (Beltpacks) Display Mode (Beltpack) - 3 - Disposal 3.5mm Jack female - E - - A - Edit Network Space About Bolero Email Admin PIN Enable Network Space RF Antenna NFC Environment... - Page 83 Bolero User Manual A20 Mechanical Drawings (Antenna) - S - Monthly Maintenance Recommendations Save Net Config (Web Interface Antenna) Multicast IP Service 6, 79 - N - Signalization 23, 46, 49, 52 Net / Antenna (Web Interface Antenna) Silent Mode...
- Page 84 Riedel Communications GmbH & Co. KG Uellendahler Str. 353 42109 Wuppertal Germany www.riedel.net...
Need help?
Do you have a question about the Bolero and is the answer not in the manual?
Questions and answers