Table of Contents

Related Manuals for Intellijel Scales


Summary of Contents for Intellijel Scales
- Page 1 1/17/2019 Scales Manual - Google Docs Scales Manual Scales Dual Channel Note Quantizer and Step Sequencer Manual Revision: 2019.01.13 https://docs.google.com/document/d/1E2YynODFarEabLqQuu7qZUZX6-dO9na7ODlIk6Os98k/edit# 1/48...
- Page 2 1/17/2019 Scales Manual - Google Docs Scales Table of Contents Table of Contents Compliance Installation Installing Your Module Overview Front Panel Inputs & Outputs Controls MODES Scale Display Mode LEARN Mode CONFIG Mode ...
- Page 3 1/17/2019 Scales Manual - Google Docs Scales SAVE Mode LOAD Mode Appendix A: Using SEQ Mode Enter SEQ Mode Record a Sequence Playback a Sequence Transpose a Sequence Replace Notes In a Sequence ...
- Page 4 (2) this device must accept any interference received, including interference that may cause undesired operation. Changes or modifications not expressly approved by Intellijel Designs, Inc. could void the user’s authority to operate the equipment. Any digital equipment has been tested and found to comply with the limits for a ...
-
Page 5: Installation
Installation Intellijel Eurorack modules are designed to be used with a Eurorack-compatible case and power supply. We recommend you use Intellijel cases and power supplies. Before installing a new module in your case, you must ensure your power supply has a free ... - Page 6 Eurorack case. Ensure the red stripe on the cable lines up with the -12V pins on the bus board. On Intellijel power supplies the pins are labelled with the label “-12V” and a thick white stripe: ...
- Page 7 (or both); to a trigger or gate transmitted in sync with one sent to the module’s trigger input. And since the module is called “Scales” (plural) and not “Scale” (singular), you can bet it has the ability to save and recall up to 35 different scale patterns, arranged in 5 banks (black keys) of 7 ...
-
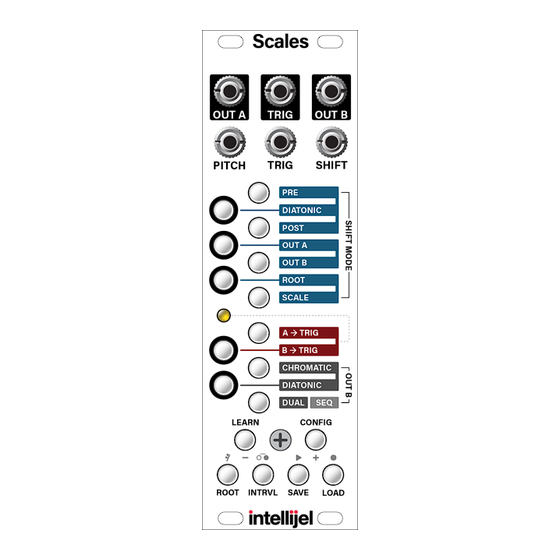
Page 8: Front Panel
1/17/2019 Scales Manual - Google Docs Scales Front Panel Inputs & Outputs A. PITCH IN - Connect the signal you wish to quantize to this input. Any voltage from -10V to 10V will be quantized and sent to the OUT A and OUT B jacks in accordance with ... - Page 9 B. TRIG IN - With a trigger or gate signal inserted in this jack, Scales will sample the PITCH input every time the trigger goes high, sending the nearest quantized pitch to OUT A and OUT B (in accordance with their output configuration settings). ...
- Page 10 Specifically, if both A > TRIG and B > TRIG are turned off in CONFIG Mode, then Scales thru’s any gate arriving at the TRIG In jack to the TRIG Out jack. If either (or both) A > TRIG and B > TRIG are turned on in CONFIG Mode, then Scales sends a ...
- Page 11 Mode to enter a scale via the PITCH input jack. This is particularly useful if, for example, you want to quantize Scales to match the scale used by another sequencer or pitch source, and don’t know exactly what scale that device is using. ...
- Page 12 When recording is enabled, the note, rest and tie buttons are used to step-record a sequence. 8. Trigger LED - Lights every time Scales sends a trigger (or gate) signal to its TRIG out jack. ...
- Page 13 The following sections discuss these various modes in detail. Scale Display Mode When none of the lower buttons are lit, Scales is in Scale Display Mode. In this mode, the 12 Multifunction buttons are used to display and define an active scale (the notes ...
-
Page 14: Learn Mode
Press the LEARN button to enter Learn Mode. Use Learn Mode to enter a scale via the PITCH input jack. This is particularly useful if, for example, you want to quantize Scales to match the scale used by another sequencer or pitch source, and don’t know exactly what scale that device ... -
Page 15: Config Mode
● Configure OUT B to either chromatically or diatonically offset its pitch, relative to OUT A, by a defined INTERVAL amount. ● Configure Scales as a DUAL quantizer. In this mode, the PITCH input is quantized to the active scale and sent to OUT A, while the SHIFT input is quantized to the same active ... - Page 16 Look at the example to the right. Assume Scales is set to a C Major scale. If the PITCH input is C# (1 semitone above C) and the SHIFT input is D (2 semitones above C), then the sum ...
- Page 17 Look at the example to the right. Assume Scales is set to a C Major scale. If the PITCH input is C# (1 semitone above C) then it is shifted to D by the C Major scale. If the SHIFT ...
- Page 18 PITCH input and the resulting sum is sent to the shifted output. Look at the example to the right. Assume Scales is set to a C Major scale. If the PITCH input is C# (1 semitone above C), then it is shifted to D by the C Major scale (2 semitones ...
- Page 19 1/17/2019 Scales Manual - Google Docs Scales SHIFT MODE: OUT A In CONFIG Mode, press the OUT A (G#) button to enable or disable Shift Mode for OUT A. ● If Shift Mode is OFF for OUT A, then the button in unlit, and OUT A contains ...
- Page 20 0.7V (approximately) will load a new scale, with 0V selecting the first scale in the bank (the one assigned to the C-note slot). NOTE: If Scales is in SCALE Shift Mode, then front panel scale editing is not possible (since scale selection is under voltage control). If you want to manually enter scale patterns, you ...
- Page 21 Because of this, there is a possibility that Scales might sample its PITCH input before the source module has stabilized, resulting in a false reading or some pitch ‘chattering’. To ...
- Page 22 Both the A > TRIG and the B > TRIG buttons can be turned on simultaneously, resulting in a trigger signal being output whenever either OUT A or OUT B change in pitch. If neither the A > TRIG nor the B > TRIG buttons are turned on, then Scales sends any gate signal present at the TRIG input directly to the TRIG output. ...
- Page 23 The interval value of OUT B is summed with any additional Shift values assigned to OUT B using the SHIFT MODE functions described previously. In the example shown here, Scales is set to C Maj, and Shift Mode is turned off for both OUT A and OUT B. ...
- Page 24 The interval value of OUT B is summed with any additional Shift values assigned to OUT B using the SHIFT MODE functions described previously. In the example shown here, Scales is set to C Maj, and Shift Mode is turned off for both OUT A and OUT B. ...
- Page 25 In the example shown here, Scales is in DUAL mode, and set to quantize inputs to C Maj. So if C# is sent to the PITCH input, Scales quantizes it up to a D, and sends it to OUT A. Similarly, if ...
- Page 26 (indicating DUAL mode) and flashing red (indicating SEQ mode). If the button is red, but not flashing, Scales is in DUAL mode, so press the button once more to switch into SEQ mode. Sequences can be a maximum of 256 ...
- Page 27 1/17/2019 Scales Manual - Google Docs Scales ROOT Mode This mode sets the root of the active scale pattern. Pushing any of the note buttons transposes the scale pattern so it’s rooted at that note. Holding any of the note buttons sets that note as the ...
- Page 28 1/17/2019 Scales Manual - Google Docs Scales INTRVL Mode This mode sets the interval of OUT B relative to OUT A. The actual interval played depends on whether you select OUT B: CHROM OUT B: DIATONIC in Config Mode. ...
-
Page 29: Save Mode
In Tuning Mode, Scales sends 0V to both OUT A and OUT B, plus a high gate signal to the TRIG out jack. This gives you a quick and easy tuning source for your oscillators. ... -
Page 30: Load Mode
1. Turn off the power to Scales. 2. Hold the SAVE button while powering Scales back on. This erases any custom scale patterns you previously saved, and reverts Scales to its factory default settings and banks of scale patterns (as detailed in ... -
Page 31: Appendix A: Using Seq Mode
3. Once in SEQ Mode, press the CONFIG button again to exit Config Mode. Scales remains in SEQ Mode as indicated by the blue SAVE and LOAD buttons, which now function as PLAY and REC buttons. ... - Page 32 It will flash to indicate that Scales’ step-recording feature is now enabled, and any note buttons contained within the currently active scale will glow yellow. 4. Press one of the note buttons on Scales to record that note into the step sequence and advance the sequence one step. ...
- Page 33 Playback a Sequence 1. Connect an external clock to Scales’ TRIG IN jack to drive the sequencer. 2. Connect OUT B to the oscillator or synth voice you wish to play. 3. Connect the TRIG OUT jack to your synth voice’s trigger input, or to an envelope ...
- Page 34 1/17/2019 Scales Manual - Google Docs Scales Replace Notes In a Sequence 1. Connect a clock to the TRIG IN jack, and press the PLAY button to begin playing back a sequence. 2. At any point during playback, press the REC button again to freeze the playhead at the ...
- Page 35 1/17/2019 Scales Manual - Google Docs Scales Overwrite An Existing Sequence 1. Connect a clock to the TRIG IN jack, and press the PLAY button to begin playing back a sequence. 2. At any point during playback, press the PLAY button again to stop the sequence. ...
- Page 36 The custom sequence will be saved to EEPROM (overwriting any sequence previously stored in the slot), extinguishing the SAVE button and exiting Save Mode. NOTE: To erase every sequence in every bank, turn off the power to Scales, then hold down the INTRVL button while powering it back on. ...
- Page 37 ● If you keep the A > TRIG button on and connect a TRIG input, then with each trigger input, Scales looks to see if OUT A is a different quantized pitch than it was the last time it got a trigger input. If it is, then the sequence advances and a trigger is sent to the TRIG ...
-
Page 38: Appendix B: Factory Scales
Appendix B: Factory Scales Scales ships from the factory with 5 banks of scales. You’re free to erase, modify and program your own scales/banks instead. These can serve as a starting point or provide inspiration on how to set up you own banks. ... - Page 39 1/17/2019 Scales Manual - Google Docs Scales Bank 2: Melodic Minor Scale & Modes Bank 2 (assigned to the D# button) contains all seven modes of a melodic minor scale, the root of which is set via ...
- Page 40 1/17/2019 Scales Manual - Google Docs Scales Bank 3: Harmonic Minor Scale & Modes Bank 3 (assigned to the F# button) contains all seven modes of a harmonic minor scale, the root of which is set via ...
- Page 41 — the root of which is set via the ROOT button. The seven scales are assigned to the seven “white key” buttons, with the first (chromatic) assigned to the bottom button ( C ) and the seventh (blues) assigned to ...
- Page 42 Bank 5: World Scales Bank 5 (assigned to the A# button) contains seven varieties of world music scales — the root of which is set via the ROOT button. The seven scales are assigned to the seven “white key” buttons, with the first ...
-
Page 43: Appendix C: Calibration
Appendix C: Calibration Scales comes calibrated from the factory, and the following processes might never be required. However, should you need to calibrate your unit for some reason, you can do so by entering a special Calibration Mode from within CONFIG Mode. ... - Page 44 1/17/2019 Scales Manual - Google Docs Scales The note buttons are used to perform the calibration procedure. Top buttons (F and above) select the calibration target: ● OUT A (G#) - Selects OUT A as ...
- Page 45 5. Monitor the voltage from OUT A using a voltmeter, and use the two increment and two decrement buttons to adjust Scales’ output to match the intended target (-4V; +4v; 0V). That is, use the E button to increase the voltage output ...
- Page 46 5. Monitor the voltage from OUT B using a voltmeter, and use the two increment and two decrement buttons to adjust Scales’ output to match the intended target (-4V; +4v; 0V). That is, use the E button to increase the voltage output in ...
- Page 47 4. Press the F# (ROOT) button to select PITCH input for calibration. 5. Press the C (DUAL) button. Scales automatically configures its PITCH input using the previously calibrated output values. 6. Press and hold the SAVE button to write the calibration to EEPROM memory. ...
-
Page 48: Appendix D: Firmware
Version 1.0 (Jan 2019) ● Initial release Firmware Version Display Scales displays the current version number during start up, in an X.YZ format. The bottom six buttons (LEARN, CONFIG, ROOT, etc) display the X value of the firmware version. The left column of Multifunction buttons ...
Need help?
Do you have a question about the Scales and is the answer not in the manual?
Questions and answers