Advertisement
Smart WiFi
User Manual
Includes
• Important Safeguards
• Helpful Links
• Getting Started
• Control Panel
• WiFi Pairing
• Venting Methods
• Initial Test Run (Water Test)
• Pressure Cooking
• Slow Cooking
• Sautéing
• Yogurt
• Care & Cleaning
• Warranty
Download Instant Pot
Cooker Control & Recipe App
• 500+ Recipes
• New User Tips
• Getting Started Videos
Advertisement
Table of Contents

Related Manuals for Instant Pot Smart WiFi


Summary of Contents for Instant Pot Smart WiFi
- Page 1 Smart WiFi User Manual Includes • Important Safeguards • Helpful Links • Getting Started • Control Panel • WiFi Pairing • Venting Methods • Initial Test Run (Water Test) • Pressure Cooking • Slow Cooking • Sautéing • Yogurt • Care & Cleaning •...
-
Page 2: Important Safeguards
IMPORTANT SAFEGUARDS IMPORTANT SAFEGUARDS When using electrical appliances, basic safety precautions should always be followed: READ ALL INSTRUCTIONS. Do not touch hot surfaces. Only use side handles for carrying or moving. Do not place the appliance on or in close proximity to a hot gas CAUTION or electric burner, or a heated oven;... - Page 3 IMPORTANT SAFEGUARDS 13. Do not lean over or place your hands or face over the steam release valve/ handle or float valve when the appliance is in operation or has residual pressure. Do not touch the metal portion of the lid when the appliance is in operation;...
- Page 4 IMPORTANT SAFEGUARDS 23. Intended for countertop use only. Keep the appliance on a stable, heat- resistant platform. Do not place on anything that may block the vents on the bottom of the appliance. Do not place on hot stove. Spilled food can cause serious burns. Keep appliance and cord WARNING away from children.
-
Page 5: Helpful Links
34. The use of accessory attachments not recommended by the appliance manufacturer may cause injuries. SAVE THESE INSTRUCTIONS. Helpful Links Troubleshooting: Read the full Manual: www.instantpot.com/english-manuals www.instantpot.com/troubleshooting Register your Instant Pot: Find tips, videos, and FAQs: www.instantpot.com/support/register www.instantpot.com/faq/#resources Getting Started: Cooking Time Tables: www.instantpot.com/faq/getting-started-instant-pot www.instantpot.com/instantpot-cooking-time... -
Page 6: Getting Started
Getting Started Read Manual & Place Cooker Install Condensation Collector Install: Align grooves on condensation collector over Read all Important Safeguards. Do not remove warning or identifications stickers from cooker. tabs on back of cooker base, and push into place. Place cooker on a stable surface. - Page 7 Getting Started Check Sealing Remove & Install Anti-Block Shield Ring & Sealing Ring Rack Remove: Grip lid and press firmly against side Remove: Pull sealing ring out from of anti-block shield (pressing towards side of lid behind sealing ring rack. and up) until it pops off prongs underneath.
-
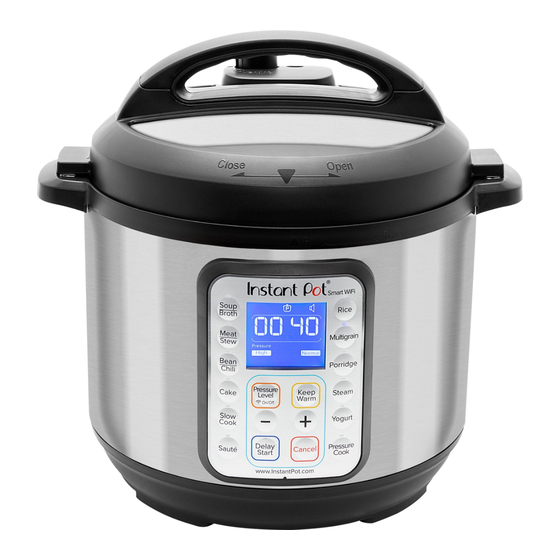
Page 8: Control Panel
Control Panel Cooker Status Icons WiFi Enabled Element is Heating Pressure Cooking Program Keep Warm ON/OFF Sound ON/OFF LCD Display Local Time & Cooking Display Pressure Indicators Less / Normal / More Pressure Cooking 3 Pre-Set Time Options Program Indicator Indicate when a Slow Cook &... - Page 9 Control Panel Pressure Level Select a pressure cooking program and press to toggle between High (10.2~11.6psi) and Low (5.8~7.2psi). Higher pressure results in higher temperature. Cancel Key & Standby Mode When cooker is plugged in but not in operation, display will read “OFF” to indicate Standby mode. Press Cancel to stop a Program at any time—cooker will go to Standby.
-
Page 10: Wifi Pairing
2. Visiting www.instantpot.com/app band to function with App 3. Using Apple / Google Store and searching for “Instant Pot” Instant Pot App Current users: “Sign In” to existing account Note: You must have a registered account to continue with WiFi pairing. -
Page 11: Venting Methods
Venting Methods Natural Release (NR) Quick Release (QR) No action is taken. Allow cooker to cool To vent, turn steam release handle from naturally, dissipating heat and pressure “Sealing” to “Venting” position. Float valve will over time until float valve drops. drop into lid when cooker has depressurized. -
Page 12: Pressure Cooking
Pressure Cooking When pressure cooking, add at least 1½ cups (375 mL / 12 oz) of liquid to inner pot, unless otherwise specified in recipe. Suitable Liquids: Water, broth/stock, fruit/vegetable juice, beer/wine (low alcohol content), and water- based cooking sauces. Do not fill inner pot higher than “PC MAX —... -
Page 13: Non-Pressure Cooking
Warming Corresponds to LOW Follow recipe directions for slow cooking. Normal on most temperature You may use the Instant Pot tempered glass lid. Slow Cook controlled slow cookers If using the stainless steel lid, ensure steam release Corresponds to HIGH handle is set to “Venting”... - Page 14 Non-Pressure Cooking Sautéing Insert inner pot into cooker base. Select Sauté. Press again to toggle between “Less / Normal / More” temperature settings. After 10 seconds, the cooker will When the display reads “Hot”, add Press Cancel when finished beep 3 times and display “On” to recipe ingredients.
-
Page 15: Page Title
Page Title Yogurt Pasteurize Milk Add milk to inner pot, then insert Place and close lid. Turn steam release handle to inner pot into cooker base. “Venting” position. Select Yogurt. Press again to toggle to “More”. After 10 seconds Display will read “boiL”. cooker will beep 3 times. - Page 16 Yogurt Add Starter Culture Purchase a yogurt starter culture or use store-bought yogurt as a starter. If using store-bought yogurt as a starter, ensure flavor is “plain” and cultures are “active”. • Yogurt Starter Culture: Follow instructions on packaging • Store-Bought Yogurt: Add 2 tablespoons (10mL) yogurt for every 1/2 gallon (1.8L) of milk Cool pasteurized milk to Follow instructions for adding Leave mixture in inner pot,...
-
Page 17: Care And Cleaning
Care & Cleaning Unplug the Instant Pot and let it cool to room temperature before cleaning. Cleaning Method Part Cleaning Tip Accessories • Steam Rack Never use harsh chemical detergents, powders or scouring • Soup Spoon pads on accessories • Rice Paddle Place on top rack of dishwasher •... -
Page 18: Limited Warranty
Warranty Limited Warranty This Limited Warranty is effective for one year from the date of original consumer purchase. Proof of original purchase date and, if requested by an authorized representative of Instant Brands Inc. (“Instant Brands”), return of your appliance, is required to obtain service under this Limited Warranty. - Page 19 Warranty Limitation of Remedies; Exclusion of Incidental and Consequential Damage YOUR SOLE AND EXCLUSIVE REMEDY UNDER THIS LIMITED WARRANTY SHALL BE APPLIANCE REPAIR OR REPLACEMENT AS PROVIDED HEREIN. INSTANT BRANDS SHALL NOT BE LIABLE FOR INDIRECT, INCIDENTAL OR CONSEQUENTIAL DAMAGES ARISING OUT OF OR IN CONNECTION WITH THE USE OR PERFORMANCE OF THE APPLIANCE OR DAMAGES WITH RESPECT TO ANY ECONOMIC LOSS, PERSONAL INJURY, LOSS OF PROPERTY, LOSS OF REVENUES OR PROFITS, LOSS OF ENJOYMENT OR USE, COSTS OF REMOVAL, INSTALLATION OR OTHER INDIRECT, INCIDENTAL OR CONSEQUENTIAL DAMAGES OF ANY NATURE OR KIND.
- Page 20 Telephone: 1-800-828-7280 Web: www.InstantPot.com Store: www.Store.InstantPot.com US & Canada Email: Support@InstantPot.com Download Free Recipe App To enhance your cooking experience with Instant Pot, join the Official Instant Pot Community: www.facebook.com/groups/instantpotcommunity @instantpot @instantpot @instantpotofficial @instantpot @theinstantpot Copyright © 2018 Instant Brands Inc.
Need help?
Do you have a question about the Smart WiFi and is the answer not in the manual?
Questions and answers