Table of Contents
Advertisement
Voyager Pro User's Guide
User's Guide Help
Hello Adventurer!
Trail Tech brings functionality and life to your motor vehicle with high quality
and innovation. To ensure long and trouble-free operation, this embedded
user's guide contains valuable information about how to operate and
maintain your digital gauge properly.
Please read this manual carefully.
Tap the ? in the top corner of menu screens to get useful tips and
information.
Use the links below to navigate.
Thanks for riding with Trail Tech!
Precautions Help
1. To charge Voyager Pro using a wall outlet, a Trail Tech approved wall
charger is required. Attempting to charge Voyager Pro directly off an outlet
will result in failure of your device.
2. Read all instructions before using Voyager Pro.
Advertisement
Table of Contents

Related Manuals for Trail Tech Voyager Pro


Summary of Contents for Trail Tech Voyager Pro
- Page 1 Thanks for riding with Trail Tech! Precautions Help 1. To charge Voyager Pro using a wall outlet, a Trail Tech approved wall charger is required. Attempting to charge Voyager Pro directly off an outlet will result in failure of your device.
- Page 2 9. Do not disassemble Voyager Pro or its accessories. 10. Do not operate Voyager Pro while driving/riding. 11. Do not rely on Voyager Pro for operations requiring precise measurements of distance or direction. All GPS devices inherently contain some amount of error. Use the wheel sensor for the most precise data.
- Page 3 How long does the internal battery take to charge fully? Voyager Pro takes 3-8 hours to fully charge depending on charge mode. You don't need to pre-charge; connect and ride. How do I get the best GPS reception? The internal antenna is designed for optimum reception potential. If Voyager Pro is mounted with metal blocking the internal antenna, consider purchasing an external GPS antenna for better positioning.
- Page 4 (<11.5V) to allow for proper operation. For applications where DC power is not available, Trail Tech offers an AC wall charger for Voyager Pro to charge the internal battery.
- Page 5 Trail Tech believes an accurate odometer and hour meter are critical features. To maintain this accuracy, a wheel sensor is recommended. 1. When using a wheel sensor, Voyager Pro knows to stop logging when the vehicle stops moving. When you start rolling again, Voyager Pro knows to resume logging (without a GPS induced lag.)
- Page 6 There are a few things to know about the outside of Voyager Pro: 1. The four buttons on the case are for Menu/Power/Confirm, Back, Up and Down. 2. The large button at the top of the dock releases Voyager Pro. The dock should be mounted securely and wired in.
- Page 7 3. External antennas extend the range of Voyager Pro's features. 4. Voyager Pro is compatible with the popular RAM mounts. Kits may include handlebar, suction cup, or steering column mounts. 5. The MicroSD card is the primary way to transfer data files to and from...
- Page 8 6. Installing all the vehicle sensors isn't required, Voyager Pro will do its best to use GPS data. However, each installed sensor unlocks new features of Voyager Pro. Buttons Help Touch Screen Control Voyager Pro's maps and menus by tapping and swiping the touch screen.
- Page 9 The dock should be secured to the vehicle and wired in. The quick-release dock allows for swapping Voyager Pro between several vehicles. The Dock's Button Press the large button at the top of the dock to release Voyager Pro from the dock.
- Page 10 The dock's wires connect to the vehicle sensors. Wheel sensor for speed, spark sensor for tach, battery connection for power and voltage, and thermometer for temperature. Voyager Pro will operate without any vehicle sensors attached by using GPS data, but you should at least install the power wire to keep the internal battery charged up.
- Page 11 Voyager Pro is not seated in the dock. Locking the Dock A small Allen wrench can be used to lock Voyager Pro to the dock for added security. Turn the small Allen screw inside 6 times to lock or unlock.
- Page 12 The internal GPS antenna is great for normal use. If there is excessive metal around the mounting location it could interfere with reception. An external GPS antenna can be installed into the dock's GPS antenna port in order to achieve a better antenna mounting position. Antenna Ports Two brass antenna ports are found on the dock next to the sensor wires.
- Page 13 The omni antenna mounts to plastics, like the plastic roof of a UTV. Installing an omni antenna enables the buddy tracking features. Mounting Help Voyager Pro's dock is ready for mounting with the AMPs hole pattern. RAM Mounts RAM brand mounts are recommended. Voyager Pro can be mounted...
- Page 14 Bar Mounting Kits intended for motorcycles include bar clamps for 7/8" through 1-1/8" handlebars. An aluminum center mount is available from Trail Tech for 1-1/8" handlebars. Surface Mounting...
- Page 15 AMPs hole pattern and secure with bolts. MicroSD Card Help Insert any MicroSD card into the side of Voyager Pro. Make sure the card slot cover is properly seated to keep debris out. An installed MicroSD card enables import/export of tracks.
- Page 16 Tracks saved on your computer can be placed on the MicroSD memory card, then imported onto Voyager Pro for viewing and route following. This is a great way to share tracks with your friends, or for pre-planning your own trips.
- Page 17 Tach Sensor 3. The ignition sensor enables the tach bargraph screen and over-RPM warning lights. The tach signal can pause track recording while the engine is turned off. Wheel Sensor 4. The wheel sensor provides slightly more accurate speed and distance than GPS.
- Page 18 Connect the power cable directly to the vehicle's 12-volt battery. A 0.5-amp fuse (not provided) should be used. Voyager Pro can be set to charge always, or to only charge when the engine is running to protect the vehicle battery.
- Page 19 Vehicle Accessory Socket If Voyager Pro is mounted inside a vehicle using the suction cup or steering column mounts, it may make more sense to draw power from the vehicle's accessory power socket. Ignition Sensor Help The ignition sensor detects the on/off status of the engine. When the engine is shut off, Voyager will go to sleep for power conservation.
- Page 20 If tach readings are erratic, there may be electrical static. Try using more or less sensor wraps and avoid running the sensor wire along other heavily charged wires. Adding an inline fuse may help. If tach readings are way off, check your PPR (pulses per revolution) setting. Temperature Sensors Help A temperature sensor tells you how hot your vehicle is getting.
- Page 21 Radiator Hose Sensor For water-cooled machines. Hose sensors are the most accurate because they directly take the coolant temperature as it leaves the radiator and enters the engine. Installation requires cutting the radiator hose. Be sure to measure the inner diameter of the hose to make sure you have the right sensor BEFORE CUTTING THE HOSE.
-
Page 22: Wheel Size
Many Motorcycles and ATVs have special installation procedures. Refer to the online model-specific instructions for more information. Wheel Size Knowing your exact wheel size is critical for the wheel sensor to calculate correct speed and distance data. The more accurate the wheel size, the better Voyager Pro performs. - Page 23 Knowing your exact wheel size it critical for the wheel sensor to calculate correct speed and distance data. The more accurate the wheel size, the better Voyager Pro performs. When comparing calibration to GPS data, use a long straight section of road.
- Page 24 On a flat surface, mark the tire sidewall and the ground with a marking pen. Roll the wheel until the mark on the tire completes one revolution and is back on the ground. Mark the ground at this location. Measure the distance between the marks on the ground in millimeters (multiply inches by 25.4 to convert to mm).
- Page 25 There are several Main Screens Voyager Pro has a series of main information screens: the gauge cluster screen with a large speedometer, the tach screen with an animated tach graph, the map screen, the user definable screen, the stop watch screen, and the GPS satellites screen.
- Page 26 Notification Bar Help The bar across the top of the main screens shows the time of day and a variety of helpful icons. It displays color-coded icons for Bluetooth connection, cellphone connection, headset connection, phone message notification, incoming call notification, buddy tracking status, track logging status, cell signal strength, GPS status, and internal battery level and charging status.
- Page 27 Cluster Screen Help The main gauge screen displays speed and other data from the sensors. It displays current speed, elevation, engine temperature, ambient temperature, trip distance, and engine voltage. To reset the trip distance, tap and hold the trip gauge and then tap the Ok button.
- Page 28 You can adjust the maximum value of the tach graph in Settings>Vehicle Profile: PPR, tach indicator lights, and tach graph max scale. To reset the trip distance, tap and hold the trip gauge and then tap the OK button. RPM features only work if an ignition sensor is installed. Map Screen Help The map screen shows your current GPS position.
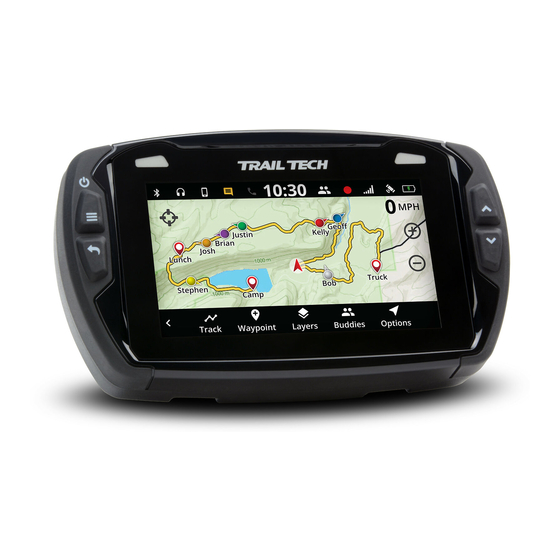
- Page 29 Track Recording When track recording is turned on, Voyager Pro creates a track behind you. You can also place waypoint map markers at points of interest. The tracks and waypoints can be saved (and reloaded) as GPX files from the MicroSD card.
- Page 30 The top left button on the map screen will change the centering behavior. You can touch and drag on the map to pan. Pan Lock Tap and hold the center lock icon to turn on pan lock. A small locked icon will appear next to the center lock icon.
- Page 31 Map Mini-Menu Help The map screen's mini-menu provides quick access to helpful map features. While on the map screen, press the back button or the 3-dots icon (in the lower left) to open the map mini-menu bar across the bottom. You can pause or record track logging, set a new waypoint marker, toggle map layers, setup or join a buddy track group, and save or load tracks to MicroSD.
- Page 32 GPS devices, or by a desktop computer app or website. When loading a GPX file from the MicroSD card, Voyager Pro will scan it for all the waypoints, tracks and routes. Then it will add them to internal memory and display them on the map as normal.
- Page 33 Load GPX Help Select a GPX file to load. Loading GPX adds any new tracks/routes/waypoints to the stored list of previously loaded GPX tracks. Save GPX Help Save the stored list of tracks as a GPX file. The file will be saved on the MicroSD card.
- Page 34 Waypoints Help Use waypoints to mark important locations, such as where the truck is parked or where camp is located. Add a waypoint at your current location using the waypoint icon on the map's mini-menu. Long-press on the map screen to drop a waypoint at that location. Tap a waypoint to open a slideout with more information about the waypoint.
- Page 35 the waypoint. Icons at the bottom hide or edit the waypoint, and set it as the destination waypoint. Hide a Waypoint Help Tap on a waypoint to open its slideout menu, then tap the eye icon to hide the waypoint so that it no longer appears on the map. Unhide hidden waypoints by tapping the Layers icon on in the map's mini- menu.
- Page 36 Waypoint Edit Help Tap on a waypoint to open its slideout menu, then tap the edit icon where you can change the waypoint's name, delete it, or change the marker color. Set Destination Waypoint Help Tap on a waypoint to open its slideout menu, then tap the set destination icon.
- Page 37 Map Layers Help Each type of object on the map exists on a layer, and you can toggle the visibility of each layer. Hide information you aren't using to keep the map easy to read. The elevation topo-lines and hill shading can be toggled. If you enjoy technical data, extra onscreen readouts can be enabled to show current latitude/longitude and the actual zoom level.
- Page 38 In the Utilities > Software Update area of the settings menu you can new Map Styles and Map Data from the MicroSD card. Here you can select from the loaded styles and source data. GPX Display Options Help When you import a GPX file, it can load various tracks, routes and waypoints.
- Page 39 Buddy Tracking works using sub-gigahertz short-wave radio signals. It will have excellent reception extremely far if there is line of sight. The more things in the way, the shorter the range. An external Trail Tech antenna is required to use buddy tracking features.
- Page 40 (Please keep it PG-rated.) Join Buddy Group Help Voyager Pro will scan the area to see if there are any buddy tracking groups already set up. If there is, tap on it in the list to join the group.
- Page 41 Create Buddy Group Help If no group has been formed, you will have to step up and take the leadership role. Put in a name that represents your group, fine-tune the size and then tap create group. Screen updates are faster with smaller group sizes. Emergency Beacon Help...
- Page 42 When you activate the Emergency Beacon, your map marker flashes red on everyone elses screens. It is not a rescue beacon, the national guard will NOT be notified. Map Options Help In the map's mini-menu, tap the options icon to open the map options. You can between perspective or flat maps, track up or north up, and customize the map marker colors.
- Page 43 Customize the colors of tracks, routes and waypoints for the map screen. Recorded Tracks Recorded Tracks are the current tracks being recorded using the track logging features. GPX Tracks GPX Tracks are tracks that have been loaded into internal memory by loading a GPX file.
- Page 44 Tap a swatch to select a new color. Press the back button to cancel. User Screen Help The user screen is customizable. You can choose 1-6 gauges from a long list of available readouts. Select fewer gauges to make the remaining ones larger.
- Page 45 Choose Gauges Help Tap each gauge position to bring up the list of available selections. The top option is 'None.' Selecting nothing for a position will cause the other readouts to increase in size on the user screen. To open this menu, navigate to the user screen and press the back button. Media Screen Help The media screen is the center for phone and headset interaction.
- Page 46 Tap and hold the icon to open up a volume slider. Music Source Help Voyager Pro controls music playback, but it must know where to load the music from. Open the music source menu by pressing the back button while on the media screen, or by tapping the media source icon on the media screen.
- Page 47 Driver Contacts Help When a phone is paired to Voyager Pro as the "Driver's Phone," the contact list can be accessed. To open the contact list for the driver's phone, tap the Contacts icon on the media screen. Call History Help...
- Page 48 Dialer Help When a phone is paired to Voyager Pro as the "Driver's Phone," calls can be placed using Voyager Pro's onboard dial pad. Open the dialer by tapping the Dialer icon the media screen.
- Page 49 When a phone is paired to Voyager Pro as the "Driver's Phone," the messages list can be accessed. For privacy, only messages that have occurred since pairing the phone will appear. Open the messages list by pressing the Messages icon on the media screen.
- Page 50 The graph to the side shows the relative signal strength of each satellite. Settings Help The Settings Menu is where Voyager Pro is customized to your needs. You can access the settings menu from the main screens by pressing the menu button.
- Page 51 In the settings menu you can hide main screens, adjust the display sleep timers, customize the speed source, wheel size and alert thresholds, select different measurement units, connect Bluetooth devices, use the file and data utilities, and more. Enable Screens Help The main screens include Cluster, TachBar, Map, User, Media, Stopwatch, and GPS Satellites screens.
- Page 52 The display setup screen controls the screen's backlight levels, the night mode theme, and the sleep timer. Voyager Pro has an ambient light sensor. When it gets dark outside, night mode switches the map screen to a style that is easier to read at night.
- Page 53 Or, manually choose a style and stick with Sleep Help Voyager Pro remains awake while connected to power, either from a vehicle or AC wall adapter. You can configure the wake detection setting to enter...
- Page 54 Vehicle Profile Help Use the vehicle profile menu to customize Voyager Pro to the vehicle it is mounted on. Set up the odometer and engine hours, and values to configure the wheel...
- Page 55 When in sleep mode, Voyager Pro waits for a sign to wake up. 1. If wired behind key switch power, Voyager Pro can wake up whenever the vehicle is switched on. 2. If the ignition sensor is installed, Voyager Pro can wake as the spark plugs start firing.
- Page 56 3. If the wheel sensor is installed, Voyager Pro can wake up as the wheel starts spinning. Speed Source Help Choose which sensor to pull speed data from: 1. Installing a Trail Tech magnetic wheel sensor will return precision speed data.
- Page 57 Temp Yellow Indicator Help When the engine temperature reaches this customizable temperature level, Voyager Pro will turn on yellow lights to alert you to the threat. Use the tumblers to select the yellow alert temperature threshold, then tap Ok to save it.
- Page 58 Temp Red Indicator Help When engine temperature exceeds this customizable temperature level, Voyager Pro will flash the red alert lights to indicate the engine temperature is in the danger zone. Use the tumblers to select the red alert threshold, then tap Ok to save it.
- Page 59 Most modern fuel-injected dirt bikes are 1 PPR. Tach Yellow Indicator Help When the engine revs above this customizable threshold, Voyager Pro will send an alert by turning on the yellow indicators. Use the tumblers to select the RPM yellow alert threshold, then tap Ok to...
- Page 60 Tach Red Indicator Help When the engine is revving over this danger threshold, Voyager Pro will turn on the red alert indicator lights. Use the tumblers to select the RPM red alert level, then tap Ok to save it. Tach Graph Max Scale Help...
- Page 61 Charge Mode Help Voyager Pro usually charges up it's internal battery whenever it is connected to power. However, if Voyager Pro is wired directly to the vehicle battery (instead of behind a key switch) then the vehicle battery may be drained. In that case to avoid draining the vehicle battery, set Voyager Pro to only charge when the engine is running (i.e.
- Page 62 Units Setup Help Customize the measurement units displayed on the gauge screens. Choose between standard or metric readouts. Speed & Distance Units Help Choose to display speed in miles or kilometers per hour. This choice will take effect in all places where speed is displayed.
- Page 63 Elevation Units Help Choose to display elevation in feet or meters. This choice will affect all elevation readouts. Temperature Units Help Choose to display temperature in Fahrenheit or Celsius. This choice will take effect in all temperature displays.
- Page 64 Date & Time Help Set Voyager Pro's internal clock to your local time. For consistency, the time does not jump around for daylight savings time or time zones. Set Time of Day Help Use the touchscreen tumblers to select your local time.
- Page 65 To save the selection tap ok, or press the back button to cancel without saving. Set Date Help Use the touchscreen tumblers to select today's date. To save the selection tap ok, or press the back button to cancel without saving.
- Page 66 The Autolog Source can pause track logging if the vehicle isn't moving. For instance, you don't want it to record when the bike is in the back of the truck, or parked at camp. Install a tach or wheel sensor so Voyager Pro knows exactly when the bike is in motion.
- Page 67 Log Frequency Help Log frequency determines how often a new track point is logged to memory. You can choose time based or distance based. The largest values are fine for most needs and keep the file sizes smaller. Auto Split Help Auto-split will create a new track segment when there is a big gap between two points in the track (instead of drawing a long line between them.)
- Page 68 Coordinate Format Help Coordinate values can be displayed in a few different formats. The default is deg, min.dec. Examples: Degrees in decimal (deg.dec): 40.446° N 79.982° W Degrees decimal minutes (deg, min.dec): 40° 26.767' N 79° 58.933' W Degrees minutes seconds (deg, min, sec): 40°...
- Page 69 Voyager Pro's public name, and then connect phones and headsets. Two phones and two headsets can be connected. Bluetooth Devices Help On the device pairing screens, Voyager Pro scans for nearby Bluetooth devices to connect with. After Voyager Pro finds the phone or headset, tap...
- Page 70 its name to pair them. Remember to put the phone or headset in pairing mode so that it will be visible to the scans. Bluetooth Connection Help A successfully paired device can be temporarily disconnected, or unpaired/forgotten entirely. A forgotten device takes longer to connect with next time than a device that was just disconnected.
- Page 71 The file browser lets you view the contents of the MicroSD card. Tap jpg files to view the image. The software update lets you choose an upgrade file from the MicroSD card to update the onboard software, maps, and themes. View the system information for software versions plus internal voltage and core temp readouts.
- Page 72 Software Update Help Voyager Pro can update its own firmware code, map data, and map styles via the MicroSD card. A firmware update is an upgrade to the user interface and the code backbone. It could refine the interface or introduce entirely new features.
- Page 73 Included in the system information is a unique device production serial number and the running hardware and software versions. The voltage and temperature reports should be used during installation and troubleshooting to assure that power is arriving to Voyager Pro as expected.
- Page 74 The technician area is a place for the developers to run science tests, but it is of little interest to anyone else. The password is 1234. Try not to mess stuff up. Contact Trail Tech Help Still confused? You can contact Trail Tech support and we'll do our best to walk you through it.
- Page 75 Email: technicalservice@apexproductgroup.com Instagram and Facebook On Instagram, get inspired by daily photographs about the powersports lifestyle from the Trail Tech library of riding adventures. Follow #ridetrailtech. Warranty and FCC Help Keep Your Info If you call to request service for your digital gauge, you need the date of purchase, dealer's name, address, and telephone number.
- Page 76 Call before shipping to get an RMA (return merchandise authorization) number. Warranty Within one year from the date of original purchase, Trail Tech will repair or replace, at its option, any Trail Tech powersport computer which is deemed defective in workmanship or materials. Please contact Trail Tech or the dealer where the item was purchased for assistance.
- Page 77 Caution: Changes or modifications not expressly approved by the party responsible for compliance could void the user's authority to operate the equipment. A copy of the Declaration of Conformity is available on request from Trail Tech: 1600 SE 18th Ave Battle Ground, WA 98604 Phone: (844) 378-8143 Email: sales@apexproductgroup.com...
Need help?
Do you have a question about the Voyager Pro and is the answer not in the manual?
Questions and answers