
Related Manuals for Hunter RAIN CLIK WR-CLIK


Summary of Contents for Hunter RAIN CLIK WR-CLIK
- Page 1 Wireless RAIN LIK ensor Rain Sensor Shutoff for Automatic Irrigation Systems Owner’s Manual and Installation Instructions WR-CLIK Wireless Rain-Clik WRF-CLIK Wireless Rain/Freeze-Clik ® ®...
-
Page 2: Table Of Contents
TABLE OF CONTENTS Features..........................3 Wireless.Rain-Clik .Components................... 4 ™ Mounting.the.Receiver......................7 Adjustments.and.Operation....................12 FCC.Notice......................... 16 FCC.Declaration.of.Conformity.................... 17 Industry.of.Canada.Notice....................18 CE.&.Australia.Notice......................19... -
Page 3: Features
FEATURES .................. Wireless.Rain-Clik .sensors.attach.quickly.and. irrigation.will.resume. ™ easily.to.your.controller..Wireless.Rain-Clik ™ Wireless Rain/Freeze-Clik (WRF-CLIK). features.include: the.Wireless.Rain/Freeze-Clik..includes.a.freeze. •. Quick Response .unique.technology.that.turns. sensor.that.is.designed.to.keep.the.irrigation. ™ off.the.irrigation.system.immediately.–.not.after. system.from.operating.when.temperatures.drop. it.has.accumulated.a.fixed.amount.of.rain..No. to.37˚F.or.below..When.temperatures...rise.above. calibration.is.required. 37˚F,.the.sensor.will.enable.automatic.watering. •. Maintenance-free.design.provides.trouble-free. •. Automatic Synchronization.–.the.Wireless. operation.for.up.to.ten.years..There.are.no. Rain-Clik .transmitter.will.send.wireless. ™ batteries.to.replace.. signals.every.hour.to.the.receiver.to.assure. that.the.sensor.and.receiver.are.continuously. •. Wireless operation up to 800 ft. (275m). synchronized. -
Page 4: Wireless.rain-Clik ™ .Components
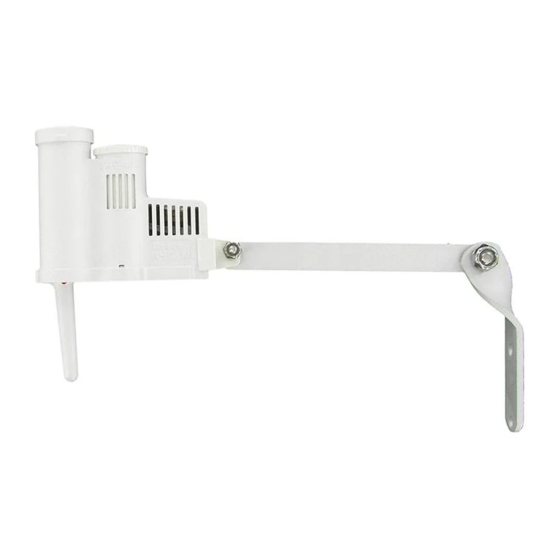
WIRELESS RAIN-CLIK COMPONENTS ....... ™ 3.. Radio Antenna.–.transmits.a.wireless.signal. Wireless Rain-Clik Transmitter ™ to.the.receiver.up.to.800.ft..(275m).It.is. 1.. Manual Test Spindle.–.press.and.hold. recommended.that.the.antenna.be.oriented. the.manual.test.spindle.to.confirm.proper. vertically. operation.of.your.transmitter. 4.. Mounting Arm.–. 2.. Vent Ring.–.used.to.adjust.the.reset.rate.or. metal.extension.arm. dry.out.time.for.the.sensors..Opening.the. for.mounting.the. vents.will.decrease.the.reset.rate,.while. sensor. closing.the.vents.will.increase.the.time.it. 5.. Battery Status takes.for.the.discs.to.dry.out. LED.–.used.to. determine.the. status.of.the.sealed. battery..Pushing. - Page 5 Wireless Rain-Clik Receiver ™ 1.. Bypass Button.–.allows.automatic.or. manual.watering.when.the.sensor.is.active. 2.. Sensor Bypass LED –.indicates.when. sensor.has.been.bypassed. 3.. Sensor Status LED.–.used.to.indicate.the. Red light indicates SENSOR BYPASS sensor is bypassed status.of.the.sensor. GREEN = Sensor is dry SENSOR STATUS RED = Sensor is wet Press to bypass, press 4..
- Page 6 WIRELESS RAIN-CLIK COMPONENTS (continued) ..™ 6.. Sensor Wires (See.page.5).–.the.sensor. 7.. Rubber Cover –.used.to.protect.the. wires.are.attached.to.either.the.sensor. receiver.when.mounted.in.outdoor. terminals.in.the.controller.or.in-line.with. locations. the.valve.common.wire. Blue/White Wires.(used.for.normally. closed.sensor.applications) Blue/Orange Wires.(used.for.normally. open.sensor.applications)
-
Page 7: Mounting.the.receiver
MOUNTING THE RECEIVER............ Wiring the Receiver to a Hunter SRC Using.the.hardware.supplied,.mount.the. receiver.to.the.wall.next.to.the.irrigation. 1.. Attach.the.two.yellow.wires.to.the. controller..It.is.recommended.that.the.receiver. AC.terminals. be.installed.away.from.sources.of.electrical. 2.. Attach.the.blue.wire.to.the.RS.terminal. interference.and.metal.objects.to.maximize. 3.. Attach.the.white.wire.to.the.C.terminal. communication.range..Extend.and.straighten. 4.. Attach.the.valve.common.wire.to.the. the.antenna.upward..Make.sure.to.attach. RS.terminal. the.rubber.cover.under.the.receiver.when. installing.the.receiver.in.an.outdoor.location. Wiring the Receiver to your Controller SENSOR BYPASS Red light indicates... - Page 8 MOUNTING THE RECEIVER (continued) ......Wiring the Receiver to a Hunter XC, Wiring the Receiver to Other Controllers: Pro-C, ICC, I-CORE and ACC Normally Closed Sensor Applications 1.. Remove.the.sensor.jumper.across.the.two. 1.. Attach.the.two.yellow.wires.to.the.24. SEN.terminals.in.the.controller. VAC.terminals. 2.. Attach.the.blue.and.white.wire.to.the. 2.. Attach.the.two.yellow.wires.to.the.24. sensor.terminals.(if.available).or.in-line... VAC.terminals..with.the.valve.common.wire.
- Page 9 Normally Open Sensor Applications Wireless.Rain-Clik .receiver.to.the. ™ “common”.terminal.on.the.controller. 1.. A.few.controllers.on.the.market.require. normally.open.rain.sensors..To.attach. Pump the.receiver.to.this.type.of.controller,. AC AC attach.the.blue.and.orange.wire.to.the. sensor.input. Red light indicates SENSOR BYPASS Controllers with 24 VAC solenoids and sensor is bypassed SENSOR STATUS GREEN = Sensor is dry RED = Sensor is wet Press to bypass, press again to re-enable Line-In...
- Page 10 MOUNTING THE TRANSMITTER .......... Standard Mounting Gutter Mounting (Optional) Using.the.screws. The.sensor.gutter. provided.with.your. mount.can.be. sensor,.mount.the. purchased.as.an. transmitter.on.any. optional.accessory. surface.where.it. for.your.Wireless. will.be.exposed. Rain-Clik .(order. ™ to.unobstructed. p/n.SGM)..The. rainfall,.but.not. SGM.allows.the. in.the.path.of. transmitter.to.be. sprinkler.spray.. mounted.directly. The.sensor.should. to.the.edge.of. Standard Mount Gutter Mount be.oriented.upright. a.gutter..Install. (as.pictured),.but.the.swivel.bracket.can.be.moved. the.SGM.on.the.transmitter.by.removing.the.
- Page 11 Hints for mounting the transmitter C.. Correct.placement.of.the.Wireless. Rain/Freeze-Clik.model.is.important.for. A.. Choose.a.location.such.as.the.side. accurate.temperature.sensing..The.best. of.a.building.or.post..The.closer.the. location.would.be.out.of.direct.sunlight. transmitter.is.to.the.receiver,.the.better.the. D.. The.reset.rate.refers.to.the.amount.of. reception..Do.not.exceed.800.ft.(275.m). time.it.takes.for.the.sensor.to.dry.out. B.. To.assure.maximum.range.in. sufficiently.for.the.sprinkler.system.to.be. communication,.mount.the.receiver. allowed.to.come.back.on..The.mounting. and.transmitter.away.from.sources.of. location.will.affect.this.rate..For.example,. electrical.interference.(i.e..control.panels,. mounting.the.transmitter.in.a.very.sunny. transformers,.etc.).or.metal.objects.. location.may.cause.the.sensor.to.dry.out. Best.performance.is.obtained.when.no. sooner.than.desired..Similarly,.mounting. physical.obstruction.is.between.the. the.sensor.in.constant.shade.may.keep.the. transmitter.and.receiver. sensor.from.drying.out.sooner.
-
Page 12: Adjustments.and.operation
ADJUSTMENTS AND OPERATION ........Transmitter Operation SENSOR BYPASS LED: There.is.nothing.to.set.up.with.the. RED.–.rain.sensor.is.bypassed.(even. Wireless.Rain-Clik though.the.sensor.is.bypassed,.the. ™ STATUS.LED.will.continue.to.alert.you.of. Receiver Operation the.state.of.the.sensor.(wet.or.dry). The.receiver.has.two.LED.lights.that.indicate. OFF.–.rain.sensor.is.enabled. the.state.of.the.system.. FLASHING RED.–.indicates.that. communication.between.the.transmitter. SENSOR STATUS LED: and.receiver.was.lost. RED.–.sensor.is. Note: wet.(watering. When.you.first.apply.power.to.the. disabled). receiver,.the.SENSOR.STATUS.LED.will.be. Red light indicates SENSOR BYPASS RED..Press.the.manual.test.spindle.on.the. sensor is bypassed GREEN.–.sensor. - Page 13 Bypassing the Sensor Setting the Transmitter Address at the Receiver The.sensor.may.be.bypassed.by.using.the. built.in.bypass.feature.on.the.receiver..To. bypass.the.sensor,.press.the.SENSOR.BYPASS. Note: Units.purchased.as.a.kit.will.already. button.on.the.receiver..The.bypass.status.light. have.their.communication.address.preset.. will.turn.red.when.the.sensor.is.bypassed.. No.addressing.is.necessary,.however,.if.the. Pressing.the.SENSOR.BYPASS.button.again. receiver.or.transmitter.is.replaced.you.need. will.re-enable.the.sensor.and.the.sensor. to.reset.the.address. bypass.light.will.go.out. Each.transmitter.is.produced.with.a.unique. address..A.receiver.must.learn.this.address.to. work.with.that.transmitter..This.step.is.only. necessary.if.transmitters.and.receivers.are. purchased.separately.
- Page 14 ADJUSTMENTS AND OPERATION (continued) ....Battery Life 1.. Prior.to.applying.power.(yellow.wires).to. the.receiver,.press.and.hold.the.bypass. The.Wireless.Rain-Clik .transmitter.is. ™ button.on.the.receiver. designed.to.operate.up.to.ten.years.with. 2.. While.the.bypass.button.is.depressed,. it’s.sealed,.maintenance-free.battery..The. apply.power.to.the.receiver..The.sensor. transmitter.is.available.as.a.replacement.part.. status.indicator.light.should.light.up. (WRC-TR).Should.you.need.to.change.the. yellow.indicating.that.the.receiver.is.ready. transmitter,.the.receiver.will.have.to.learn.the. to.learn.a.new.address. new.transmitter.address. 3.. Press.and.hold.the.quick.response.button. To check the status of the battery in on.the.transmitter. the transmitter: 4.. Within.4.seconds,.the.receiver’s.sensor. status.indicator.light.should.turn.red..
- Page 15 System will not shut off even after 2.. Within.a.few.seconds.the.LED.light.on.the. bottom.of.the.sensor.will.briefly.flash. heavy rainfall: 3.. Release.the.spindle.and.the.LED.light.will. A.. Remove.the.sensor.jumper.across.the.two. flash.again..If.the.LED.flashes,.the.battery. SEN.terminals. in.the.transmitter.is.good. B.. Check.to.make.sure.that.rainfall.is.hitting. If.you.are.experiencing.problems.with.your. the.sensor. Wireless.Rain-Clik .sensor,.follow.these. ™ C.. Look.for.breaks.in.the.wire.leading.to.the. simple.checks.first.before.assuming.the.unit.is. receiver.and.check.all.connections. defective.and.replacing.it. D.. Check.the.battery.in.the.transmitter. System will not come on at all: (See.page.14).
-
Page 16: Fcc.notice
FCC NOTICE ................Sensor.FCC.ID:M3UWRCE This.device.complies.with.FCC.rules.Part.15..Operation.is.subject.to.the.following.two.conditions: . 1...This.device.may.not.cause.harmful.interference.and . 2..T his.device.must.accept.any.interference.received,.including.interference.that.may.cause.undesired. operation.. This.equipment.has.been.tested.and.found.to.comply.with.the.limits.for.class.B.digital.devices,.pursuant. to.part.15.of.the.FCC.Rules..These.limits.are.designed.to.provide.reasonable.protection.against.harmful. interference.in.a.residential.installation..This.equipment.generates,.uses,.and.can.radiate.radio.frequency. energy.and.if.not.installed.and.used.in.accordance.with.the.instructions,.may.cause.harmful.interference. to.radio.communications..However,.there.is.no.guarantee.that.interference.will.not.occur.in.a.particular. installation..If.this.equipment.does.cause.harmful.interference.to.radio.or.television.reception,.which. can.be.determined.by.turning.the.equipment.on.and.off,.the.user.is.encouraged.to.try.to.correct.the. interference.by.one.or.more.of.the.following.measures: . •..Reorient.or.relocate.the.receiving.antenna. . •..Increase.the.separation.between.the.equipment.and.the.receiver. . •..Connect.the.equipment.to.an.outlet.on.a.circuit.different.from.that.to.which.the.receiver.is.connected. . •..Consult.the.dealer.or.an.experienced.radio/TV.technician.for.help The.user.is.cautioned.that.changes.and.modifications.made.to.the.equipment.without.the.approval.of.the. manufacturer.could.void.the.user’s.authority.to.operate.this.equipment. -
Page 17: Fcc.declaration.of.conformity
FCC DECLARATION OF CONFORMITY ........TRADE.NAME Wireless.Rain/Freeze-Clik MODEL.NUMBER WR-Clik-R COMPLIANCE.TEST.REPORT.NUMBER B00217D3 COMPLIANCE.TEST.REPORT.DATE Jan..29,.2010 RESPONSIBLE.PARTY Hunter.Industries.Incorporated ADDRESS 1940.Diamond.St.,.San.Marcos.CA.92078 TELEPHONE 760-744-5240 This.equipment.has.been.tested.and.found.to.comply.with.the.limits.for.class.B.digital.devices,.pursuant. to.part.15.of.the.FCC.Rules..These.limits.are.designed.to.provide.reasonable.protection.against.harmful. interference.in.a.residential.installation..This.equipment.generates,.uses,.and.can.radiate.radio.frequency. energy.and.if.not.installed.and.used.in.accordance.with.the.instructions,.may.cause.harmful.interference. to.radio.communications..However,.there.is.no.guarantee.that.interference.will.not.occur.in.a.particular. installation.. -
Page 18: Industry.of.canada.notice
FCC DECLARATION OF CONFORMITY (continued) ..... If.this.equipment.does.cause.harmful.interference.to.radio.or.television.reception,.please.refer.to.you.user’s. manual.for.instructions.on.correcting.the.problem. I.the.undersigned,.hereby.declare.that.the.equipment.specified.above.conforms.to.the.above.requirements. Signature: Place:.San.Marcos,.CA Full.Name:.Peter.Woytowitz Date:.March.18,.2010 Position:.Engineering.Manager INDUSTRY OF CANADA NOTICE ..........Sensor.-.IC:2772A-WRCE. Receiver.-.IC:2772A-WRCER Operation.is.subject.to.the.following.two.conditions: . This.device.may.not.cause.harmful.interference.and . . T his.device.must.accept.any.interference.received,.including.interference.that.may.cause.undesired. operation. -
Page 19: Ce.&.Australia.notice
CE & AUSTRALIA NOTICE ........Hunter.Industries.hereby.declares.that.this.remote.control.device.is.in.compliance.with.the.essential. requirements.and.other.relevant.provisions.of..Directive.1999/5/CE.. Declaration.of.Conformity:.We,.Hunter.Industries.Incorporated,.1940.Diamond.Street,.San.Marcos,.CA. 92078,.declare.under.our.own.responsibility.that.the.Wireless.Rain/Freeze-Clik,.model.numbers.WR-Clik-TR,. WRF-Clik-TR.and.WR-Clik-R,.to.which.this.declaration.refers,.conforms.with.the.relevant.standards: Emissions:..ETSI..EN..300..220-1..V2.1.1. Immunity:. ETSI..EN..301..489-1..V1.4.1.. ETSI..EN..300..220-2..V2.1.1. (per.IEC61000-4-2.through..IEC61000-4-6,.. ETSI..EN..301..489-1.(per.EN55022). and.IEC61000-4-11) EN.61000-3-2. EN61000-3-3 Signature: Place:.San.Marcos,.CA Full.Name:.Peter.Woytowitz Date:.March.18,.2010 Position:.Engineering.Manager... - Page 20 Hunter Industries Incorporated • The Irrigation Innovators 1940 Diamond Street • San Marcos, California 92078 © 2010 Hunter Industries Incorporated www.hunterindustries.com P/N 715182 23-594 03/10...
Need help?
Do you have a question about the RAIN CLIK WR-CLIK and is the answer not in the manual?
Questions and answers