
Related Manuals for ALDEN Satlight Track 60

Summary of Contents for ALDEN Satlight Track 60
- Page 1 ALD-14717 050718 Portable Satellite Antenna Satlight Track 60 HD Installation and user’s guide Specifications may change without notice info@alden.net.au Alden Australia, PO Box 7520 Garbutt QLD 4814...
- Page 2 Alden draws your attention to the risks that may occur if the mounting is not correct. Alden declines all responsability if the product is not mounted in the correct way and especially if it is installed by a non professional person.
- Page 3 You must provide a separate power supply equipped with a 3 Amp. fuse directly from the main electric board to the S.S.C /receiver/A.I.O for the Plus after ignition connection (only with Alden automatic satellite systems). ® ® You must protect the ends of the motor and coax. cables with paper tape during installation (especially when threading the cables through furniture).
- Page 4 , receiver) to a line controlled by the camping car central control ® panel. In all cases, Alden recommends a direct line on the battery with a 5A fuse. If it was technically not possible to draw an independent line, it will be mandatory to ensure accessibility of the demodulator switch and to inform the customer of the need to switch the receiver off in case of storing the vehicle in a garage or parking under an obstacle, tree, porch, bridge, etc.
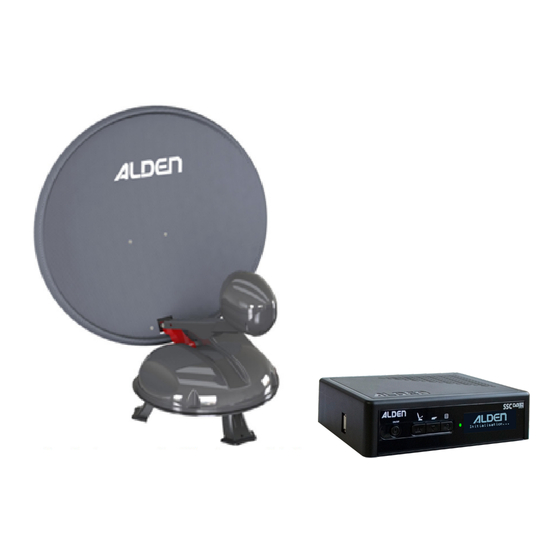
- Page 5 Installation and use of the antenna with SSC HD module Installation Zone de recherche Place your portable VANSAT satellite Rotation 360° antenna on a stable area on the floor. Orientate approximately your antenna to the south. The search area is ope- rated 360 °, make sure there is no obs- tacle located near the antenna.
- Page 6 The satellite parameters are modifiable manually from the SSC units “Menu System” or by upgrading them via it’s USB port. *Simple and Quick Satellite parameters and firmware Upgrade via the usb port ! ALDEN SSC (Front View) Designation Function * Supplied with a «Male end»...
-
Page 7: Wiring Diagram
3 : Out to demo F Type coaxial Connection used to connect the SSC module to the receiver or satellite TV. 4 : Data For Alden’s use only 5 : USB Used to update the data. 6: MOTOR Power Used for the motorisation of the sat-unit. -
Page 8: Working Principle
The S.S.C. HD Module (Satellite Search Control) is a module designed to search for satellites such as OPTUS C3 - OPTUS C1 - OPTUS D2 - INTELSAT 19. The module can be used with all Alden’s satellite systems and connected to any digital receiver allowing the reception of the broadcasted programmes on the chosen satellite. - Page 9 How to use the S.S.C. HD 1. Turn the S.S.C. Module on by pressing q. 2. By using w, choose the satellite. Keep pressing this button to switch from one satellite to another. Each time you change satellites you will hear a beep tone. The satellites are programmed in the following order: OPTUS D3 •...
-
Page 10: Setting Menu
1. TRANSP. MOD : Search data settings. This menu enables to select and set the data used for the search of the satellite. Caution: if not used correctly you may cause the module to dysfunction. Do not use without Alden’s or your dealer’s advice. -
Page 11: Dimensions And Weight
Poser l’antenne sur une surface plane, stable, ou directement sur le sol. La tête LNB doit être obligatoirement dirigé vers le sud. Aucun obstacle doit etre Handle weight Satlight Track 60 cm platinium 63 cm 49 cm 22 cm 65 cm... -
Page 12: Technical Features
Make sure there is no obstacle in front of the satellite unit (building, tree...). When the transmitter changes the frequencies, the positionning will not be done properly. Contact a technician info@alden.net.au or connect to our website Technical features Frequencybord : Frequency : 10,7 à... - Page 13 Alden warrants to the initial Buyer the products for a standard period of two years from the original date of purchase of the product by the end user. The end user must return the warranty form that is enclosed in the user’s guide with a copy of the invoice to Alden. If this document is not returned, the warranty will begin at the date of purchase by the initial Buyer.
-
Page 14: Warranty Form
The buyer will contact his retailer if problems occur with the product. WARNING: The warranty will be cancelled if you interfer on the product without Alden’s agreement. Complete the following form and send it back to the following address with a copy of the purchasing invoice: info@alden.net.au...
Need help?
Do you have a question about the Satlight Track 60 and is the answer not in the manual?
Questions and answers