Table of Contents
Advertisement
Quick Links
Download this manual
See also:
User Manual
Advertisement
Table of Contents

Related Manuals for dji Lightbridge 2


Summary of Contents for dji Lightbridge 2
- Page 1 LIGHTBRIDGE 2 User Manual V1.0 2015.9...
- Page 2 Profile A complete Lightbridge 2 comprises of an air system and a Ground System. It is a high definition video transmitter, and supports Ground System using the 2.4GHz frequency band. As it is small, power efficient and highly sensitive, the Lightbridge 2 can be used for many activities.
- Page 3 When the Lightbridge 2 transmits the Ground System signal, the Ground System works as a transmitter while the air system works as a receiver. The Ground System supports Dual Ground System mode. In Dual Controllers mode, the “ Master” Ground System operator controls the orientation of the aircraft, while the “Slave”...
- Page 4 Air System Antennas x 2 Air system communication signals output. DBUS Cable (A) x 1 Connect to A2/WooKong-M flight control system DBUS port for communication. DBUS Cable (B) x 1 Connect to other DJI flight control system DBUS port for communication.
- Page 5 GIMBAL Cable Connect to Air system GIMBAL port, one end for DJI HD gimbal, the other for CAN port. AV Cable x 1 Connect camera’s AV output to Air system AV port. HDMI Cable x 1 Connect camera’s HDMI output to Air system HDMI port..
- Page 6 Mobile Device Holder x 1 Mounting your mobile device onto the Ground System to launch the DJI GO app. Optional Packet(Purchased Separately) Optional HDMI Screen Holder Packet 1 × 1 SDI Cable x 1 BNC Adapter x 1 Optional Packet 2...
-
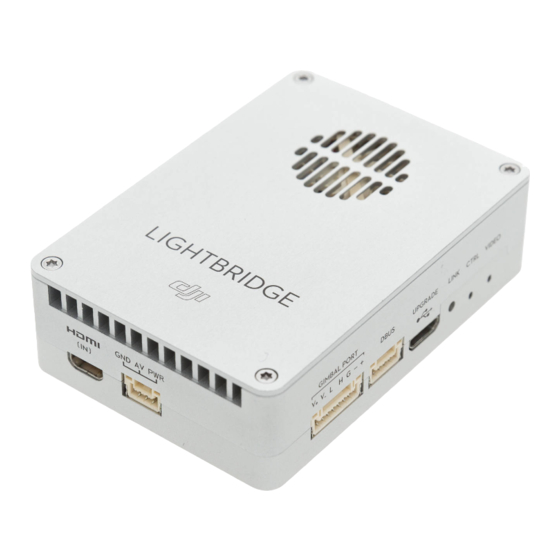
Page 8: Air System Diagram
[2] AV Port Connect to AV input device. [3] GIMBAL PORT Connect this port to the G7 port on a DJI HD gimbal or to other ports for the functions listed below: a) Power supply: (V+,V-) On-board battery (9~12V) power connection. -
Page 9: Indicator Description
Air system or Ground System Transmission failed. power cycle required. No video source detected or not Check camera and connection. supported by Lightbridge 2. [9] Ventilation inlet Do not obstruct ventilation fan outlet to ensure maximum cooling efficiency. [10] Antenna Port... - Page 10 1.2 Ground System Diagram [1] Antennas Relays aircraft control and video signal. [2] Mobile Device Holder Port Mounting place for the mobile device holder. [3] Control Stick Controls the aircraft movement. [4] Return Home (RTH) Button Press and hold the button to initiate Return to Home (RTH). [5] Transformation Switch Customizable button in flight controller assistant.
- Page 11 connected to the aircraft. Ground System error. [8] Power Button Used to power on or power off the Ground System. [9] RTH LED Circular LED around the RTH button displays RTH status. RTH LED Sound Aircraft Status Return-to-Home procedure is activated. Sending Return-to-Home command to the aircraft.
- Page 12 HDMI OUT Port Connect an HD compatible monitor. [19] USB Port Connect to mobile device to launch DJI GO app, which displays the live camera preview and OSD information. [20] GPS Module Used to pinpoint the location of the Ground System.
-
Page 13: Installation
Note that the panel antenna should be at a 90 degree angle to the landing gear. Watch the video tutorials on the DJI website for more... - Page 14 Connect your mobile device to the Ground System with a USB cable, and mount your mobile device safely with a mobile device holder. Use DJI GO App for video and flight controller information. The below example uses the USB port connection, prepare a slotted screwdriver.
-
Page 15: Connection Scenario
Do not attach SDI and HDMI devices to the Ground System simultaneously. 2.3 Connection Scenario Lightbridge 2 offers several solutions to connect the gimbal to the flight controller. This section provides information about the most commonly seen solutions and their connection diagram. - Page 16 1. Connect Gimbal Port on the air system with supplied Gimbal cable,then connect it to G7 port on DJI HD gimbal and CAN 2 Bus port on the flight controller. 2. Connect HDMI /AV port on the air system to the FPV camera.
- Page 17 2.3.2 Ground System Dual Ground Systems Mode More than one Ground System can connect to the same aircraft in Dual Ground System mode. In Dual Controllers mode, the Master Ground System controls the movement of the aircraft, while the Slave Ground System controls the movement of the gimbal and camera.
- Page 18 Use the gimbal dial on the Ground System to control the pitch movement of the camera in the single Ground System mode, however, you cannot pan the camera.
-
Page 19: Ground System Operations
3.1 Ground System Operations 3.3.1 Powering On and Off the Ground System The Lightbridge 2 Ground System is powered by a 2S rechargeable battery with a capacity of 6000mAh. The battery level is indicated by the Battery Level LEDs on the front panel. - Page 20 3.3.2 Charging Ground System Charge the Ground System via the provided charger. 3.3.3 Controlling Aircraft This section explains how to use the various features of the Ground System. Mode 2 (throttle stick on the left) is set by default. Stick Neutral/mid point: Control sticks of the Ground System are placed at the central position.
- Page 21 Moving the Left Stick up/down changes aircraft’s elevation. Push it up to ascend and down to descend. Use this stick to take off when the motors are spinning at idle speed. The aircraft will hover in place if the Left Stick is released. Moving the Left Stick left/right changes the heading of the aircraft.
- Page 22 Toggle the switch to select the desired flight mode. You may choose between; P mode, F mode and A mode. Figure Flight Mode F mode A mode P mode P mode (Positioning): P mode works best when GPS signal is strong. A mode (Attitude): The GPS is not used for holding position.
- Page 23 3.2 Setting up Dual Ground Systems Mode The Dual Ground Systems mode is disabled by default. Users must enable this feature on the Master Ground System through the DJI GO app. Follow the steps below for setup: Master Ground System: 1.
- Page 24 4. Enter the connection password for the Slave Ground System. Slave Ground System: 1. Select Slave in the Set RC Status section to set the Ground System as the Slave Ground System.
-
Page 25: Linking The Ground System
The Ground System cannot link to the aircraft or control aircraft movement if it is set to Slave. Set the Ground System as Master in the DJI GO app if you want to link the Ground System to the aircraft. - Page 26 The Ground System cannot link to the aircraft or control aircraft movement if it is set to Slave. Set the Ground System as Master in the DJI GO app if you want to link the Ground System to the aircraft.
- Page 27 3.4 Ground System Compliance The Ground System is compliant with CE and FCC standards.
-
Page 28: Specification
Air System Operating Amperage 650mA(@12V) Ground System Battery 7.4V 6000mAH Ground System Operating 900mA Amperage 4.2 Supported DJI Products Please upgrade to the latest firmware version. DJI HD Gimbal Z15-GH4, Z15-5D3, Z15-A7 Flight Control System A2, WooKong-M 4.3 Supported Video Sources... - Page 29 Mode Format PAL25,NTSC30 720p50,720p60,1080i50,1080i60,1080p25,1080p30, HDMI 1080p50,1080p60 4.4 Supported Video Outputs Mode Format HDMI 720p50,720p60,1080i50,1080i60,1080p50,1080p60 720p50,720p60,1080i50,1080i60,1080p50,1080p60...
- Page 30 Changes or modifications not expressly approved by the party responsible for compliance could void the user’s authority to operate the equipment. This equipment has been tested and found to comply with the limits for a Class B digital device, pursuant to Part 15 of the FCC Rules. These limits are designed to provide reasonable protection against harmful interference in a residential installation.
- Page 31 radioélectrique subi, même si le brouillage est susceptible d'en compromettre le fonctionnement.
Need help?
Do you have a question about the Lightbridge 2 and is the answer not in the manual?
Questions and answers