Table of Contents
Advertisement
Quick Links
Advertisement
Table of Contents

Related Manuals for dji LIGHTBRIDGE 2

Summary of Contents for dji LIGHTBRIDGE 2
- Page 1 DJI LIGHTBRIDGE 2 User Manual V1.0 2015.09...
-
Page 2: Using This Manual
2. DJI LIGHTBRIDGE 2 User Manual Check to see that you have all of the components listed in the DJI LIGHTBRIDGE 2 In the Box manual. Complete the assembly with the help of this manual and the video tutorial on the DJI website. -
Page 3: Disclaimer
This product and manual are copyrighted by DJI with all rights reserved. No part of this product or manual shall be reproduced in any form without the prior written consent or authorization of DJI. -
Page 4: Before Use
5. Switch your mobile device to Airplane Mode to avoid distractions from incoming calls or messages. 6. Turn up your mobile device’s volume until you can hear warning alerts from the DJI GO app clearly. 7. If the video breaks up, adjust the orientation of the Ground System antennas. -
Page 5: Table Of Contents
Contents Using this Manual Legends Before Flight Watch the Video Tutorials Download the DJI GO App Disclaimer Caution Installation Before Use Profile In the Box Overview Air System Ground System Installation Installing the Air System on Your Aircraft Connecting the Ground System to Your Display Device Standard Configurations Ground System Ground System Operations Dual Ground Systems Mode Linking the Ground System Ground System Compliance © 2015 DJI. All Rights Reserved. - Page 6 DJI GO App Launching DJI GO App Camera View Image Transmission Settings Appendix Specifications Supported DJI Products Supported Video Inputs Supported Video Outputs © 2015 DJI. All Rights Reserved.
-
Page 7: Profile
Profile DJI Lightbridge 2 is a long range video downlink capable of transmitting 1080p60 full HD video at distances up to 1.2 miles (2 km). Lightbridge 2 integrates the remote controller module into the Ground System, which comes with a number of aircraft and gimbal controls as well as some customizable buttons. - Page 8 DJI Lightbridge 2 User Manual AV Cable × 1 Sends video data from the camera to the Air System. HDMI Cable × 1 Sends HD video data from the camera to the Air System. USB Cable × 1 Used to upgrade the Air System firmware through your PC.
- Page 9 DJI Lightbridge 2 User Manual Air System Antenna Extension Cables × 2 Optional Packet 3 Air System Antenna Mounts × 2 Optional Packet 4 CAN Hub × 1 Optional Packet 5 Air System Cable Set × 1 Includes all Air System components. © 2015 DJI. All Rights Reserved.
-
Page 10: Overview
V : Receives power from the DJI HD gimbal. b) L H: Transmits data to the DJI flight controller through the CAN port. (CAN 2 port on the DJI A2 Flight Controller). c) G - + : Receives DVSB video input from the DJI HD gimbal. - Page 11 DJI Lightbridge 2 User Manual [7] Control Indicator Indicates the status of the Air System and Ground System. LED Pattern Description Link button pressed. Air System is attempting to link with the Blinks Red Ground System. Blinks Green Signal detected but not linked to the Ground System.
-
Page 12: Ground System
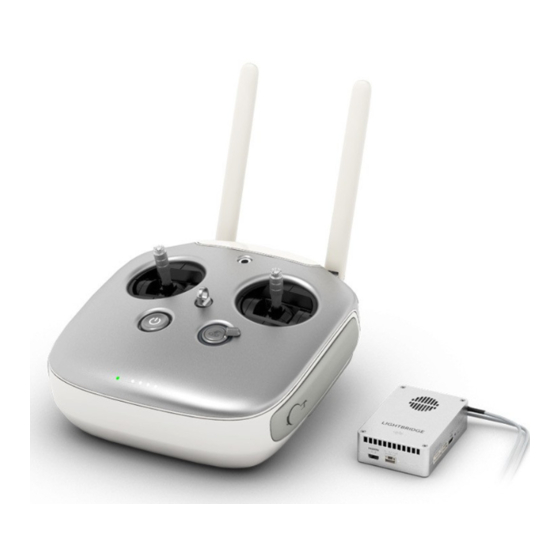
DJI Lightbridge 2 User Manual Ground System The Ground System uses the same interfaces as the remote controller for the DJI Inspire 1, which is used as an illustration below. The interfaces marked with an asterisk (*) can be mapped to the channels of the A2 Flight Controller. - Page 13 DJI Lightbridge 2 User Manual Ground System error, enter DJI GO app for D-D-D ..Blinks Red more details. [8] Power Button [9] Return-to-Home (RTH) Indicator Used to turn on/off the Ground System. Circular LED around the RTH button that displays the RTH status.
- Page 14 DJI Lightbridge 2 User Manual [20] GPS Module Pinpoints the position of the Ground System. [20] [21] C1 Button* Customizable button in the DJI Flight [22]* [21]* Controller Assistant. [22] C2 Button* Customizable button in the DJI Flight [23] Controller Assistant.
-
Page 15: Installation
For larger aircrafts, use an extension cable to connect the antennas to the Air System. The DJI Spreading Wings series come with an antenna mount which is used to position the antennas perpendicular to the landing gear. Watch the video tutorials on the official DJI website for more details. - Page 16 USB – Mount your mobile device onto the Mobile Device Holder and connect it to the Ground System using a USB cable. Launch the DJI GO app to access video and flight telemetry. The SDI or HDMI cable can be attached to the Ground System handle using the Wire Clip (optional accessory).
-
Page 17: Standard Configurations
Air System. Connect the system as follows: 1. Connect the gimbal port on the Air System to the G7 port on the DJI HD gimbal and the CAN BUS port on the flight controller. 2. Connect the HDMI or AV port on the Air System to the FPV camera. - Page 18 DJI Lightbridge 2 User Manual DJI Lightbridge 2 User Manual Ground System - Dual Ground Systems Mode More than one Ground System can connect to the same aircraft in Dual Ground System Mode. In Dual Ground System Mode, the Master Ground System controls the movement of the aircraft, while the Slave Ground System controls the movement of the gimbal and camera.
-
Page 19: Ground System
The Ground System features a number of standard interfaces intended for aircraft and camera control, which are explained below with their most typical functions. However, you can remap these interfaces to the flight controller channels using the DJI Flight Controller Assistant. Compliance: The Ground System is compliant with both CE and FCC regulations. - Page 20 DJI Lightbridge 2 User Manual Charging the Ground System Only use the official DJI battery charger to charge the Ground System’s 6000mAh 2S built-in battery. Power Outlet Charger Controlling the Aircraft The following table describes the functions of the Ground System for the default settings - Mode 2.
- Page 21 DJI Lightbridge 2 User Manual Vertical movement of the right stick controls the aircraft’s pitch. Push up to fly forwards and press down to fly backwards. Move the stick further for a larger pitch angle and faster flight. Horizontal movement of the right stick controls the aircraft’s roll.
- Page 22 If a GPS signal is present, the aircraft will still return to the last recorded Home Point if the Ground System signal is lost. F-Mode (Function): Acts as A-Mode (default) or Manual Mode for Lightbridge 2. Select the desired mode in the DJI Flight Controller Assistant.
-
Page 23: Dual Ground Systems Mode
The Dual Ground Systems Mode is disabled by default. To enable this feature, connect your mobile devices to the desired Master and Slave Ground Systems, launch the DJI GO app and then following the steps below for each Ground System. -
Page 24: Linking The Ground System
1. Place the Air System and Ground System at roughly 1.5 meters from each other. 2. Turn on the Ground System and connect your mobile device. 3. Launch the DJI GO app, and go to Camera View > > RC Control Settings. Click ‘Linking RC’. -
Page 25: Ground System Compliance
DJI Lightbridge 2 User Manual RC Control Settings RC Calibration Stick Mode Default stick mode is Mode 2, changing stick modes alters the way the aircraft is controlled. Do not change unless familiar with your new mode. Linking RC 4. The Ground System Status Indicator will blink blue and emit a beep sound when the Ground System is ready to link. -
Page 26: Dji Go App
2. The Control Indicator and the Video Indicator on the Air System will glow solid green if the Air System and Ground System are communicating normally. 3. Launch the DJI GO app on your mobile device. You will see a live video feed after you enter Camera View if the Lightbridge 2 system is working normally. -
Page 27: Camera View
DJI Lightbridge 2 User Manual Camera View On the Equipment page, you can enter Camera View, operate Lightbridge 2 settings or view your flight records. The screen contains a live HD video feed from the camera. [10] P-GPS Safe to Fly (GPS) 14.2 M/S... - Page 28 DJI Lightbridge 2 User Manual [5] Video Downlink Signal : Shows the signal strength of the video downlink between the Air System and Ground System. Tap to enter Image Transmission Settings. [6] Battery Level :Shows the current battery level. [7] General Settings :Tap to view settings for the unit of measurement, flight route display and live streaming.
-
Page 29: Image Transmission Settings
DJI Lightbridge 2 User Manual Image Transmission Settings Go to the Camera View, and tap to enter the Lightbridge 2 image transmission settings window. Image Transmission Settings Auto Custom -100 Channel Stable Quality Unstable Quality Current Channel Channel Channel Image Transmission Quality 10Mbps(0.7km) - Page 30 DJI Lightbridge 2 User Manual [2] Transmission Mode Low Latency Mode: Optimized for smooth transmission, the channel latency is about 50ms in interference-free environments. High Quality Mode: Optimized for high quality transmission. [3] Output Port Select HDMI or SDI as your output device.
-
Page 31: Appendix
14° to 104° F (-10° to 40° C) Charging Temperature 32° to 104° F (0° to 40° C) Video Output Port HDMI, SDI, USB Battery Charger Output Voltage 17.4 V Rated Power 57 W © 2015 DJI. All Rights Reserved. -
Page 32: Supported Dji Products
DJI Lightbridge 2 User Manual Supported DJI Products Only use these products with the latest firmware. HD Gimbals Z15-GH4, Z15-5D III, Z15-A7, Z15-BMPCC Flight Control Systems A2, WooKong-M Flying Platforms S1000+, S1000, S900, S800 EVO, F550, F450 Supported Video Inputs... - Page 33 This content is subject to change. Download the latest version from http://www.dji.com/product/lightbridge-2 If you have any questions about this document, please contact DJI by sending a message to DocSupport@dji.com. © 2015 DJI. All Rights Reserved.
Need help?
Do you have a question about the LIGHTBRIDGE 2 and is the answer not in the manual?
Questions and answers