berlinger Fridge-tag 2 L User Manual
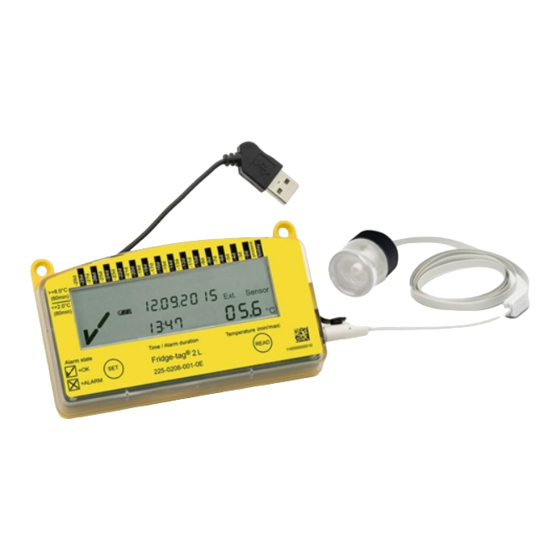
Internal/external sensor
Hide thumbs
Also See for Fridge-tag 2 L:
- User manual (59 pages) ,
- Operation manual (34 pages) ,
- Setup (10 pages)
Table of Contents
Advertisement
Advertisement
Table of Contents

Related Manuals for berlinger Fridge-tag 2 L


Summary of Contents for berlinger Fridge-tag 2 L
- Page 1 User Manual Fridge-tag 2 L INTERNAL/EXTERNAL SENSOR...
-
Page 2: Table Of Contents
Content 1. Display explanations Page 1. Display explanations ______________________________ 3 2. State of delivery / sleep mode ______________________ 4 3. Read out information prior to activation _______________ 4 4. Placing the Fridge-tag 2 L or its sensor ________________ 6 Ext. Int.Sensor Sensor 5. Activation process ________________________________ 7 1 - 888 max. °F 8888 5.1. Overview: sequences of activation °C min. 5.2. Activation 5.3. Setting the calendar format 5.4. Use of READ and SET (OK symbol) or (alarm symbol) 5.5. Setting the date 5.6. Setting the time... -
Page 3: State Of Delivery / Sleep Mode
2. State of delivery / sleep mode Pressing the READ button Displayed Information After 1st pressing of READ The Fridge-tag 2 L is shipped in sleep mode. > 25°C (15min) < 8°C (15min) Ext. Int.Sensor Display test: 1 - 888 max. °F 8888 min. °C all segments activated Temperature (min/max) 0123456789012 After 2nd pressing of READ Indication of date and production test >... -
Page 4: Activation Process
4. Placing the Fridge-tag 2 L 5. Activation process Placing the Fridge-tag 2 L with an internal sensor 5.1. Overview: sequences of activation The activated Fridge-tag 2 L must be placed immediately after activation (see chapter 5.) in its predetermined location. It is State of delivery recommended and important to place the device in the center of the refrigerator for an optimal temperature observation. Please do not place the device into a freezer as the screen will freeze 5.2. Activation and the battery will lose power prematurely. Placing the Fridge-tag 2 L with an external sensor 5.3. Setting the calendar... - Page 5 Option 2: Setting the calender format to: mm.dd.yyyy 5.2. Activation of the device To activate the device press, the SET and the READ button simultaneously during at least 3 seconds. > 25°C Note: Once the device (15min) < 8°C (15min) is activated, it cannot be stopped anymore. Temperature (min/max) Alarm state Time / Alarm duration > 25°C = OK dd.mm.yyyy (15min) Press READ to change 0123456789012 = ALARM < 8°C ® (15min) Fridge-tag the calendar format.
-
Page 6: Setting The Date
5.5. Setting the date The 3rd digit is flashing. The following example shows how to set the date to: > 25°C (15min) 16 February 2018 (16.02.2018) in European format. < 8°C (15min) The 1st digit is flashing. Alarm state Temperature (min/max) Time / Alarm duration = OK dd.mm.yyyy 0123456789012 > 25°C = ALARM 15min) ® Fridge-tag < 8°C 15min) Press READ until “0” appears as the third Press SET to save. -
Page 7: Setting The Time
The 2nd digit is The 8th digit is > 25°C flashing. flashing. (15min) < 8°C (15min) > 25°C (15min) < 8°C (15min) 1 00 Alarm state Temperature (min/max) Time / Alarm duration = OK dd.mm.yyyy 0123456789012 = ALARM Press READ until ® Alarm state Time / Alarm duration Temperature (min/max) Fridge-tag = OK... -
Page 8: Setting The Alarm Limits (Not Standard)
> 25°C (15min) The 3rd digit of the duration of < 8°C Note: If the device is configured with self-programmable alarm (15min) the alarm limit is flashing. limits proceed with the following chapter (5.7.). 0 00 As soon as the last digit of the time setting is confirmed, the Alarm state Time / Alarm duration Temperature (min/max) = OK dd.mm.yyyy Press READ to adjust activation is completed. 0123456789012 = ALARM ®... - Page 9 Instruction for setting a positive temperature limit between Setting a negative temperature limit below 0°C/0°F 0°C/0°F and +50°C/+122°F (internal sensor) or 0°C/0°F and +55°C/+131°F (external sensor) > 25°C (15min) < 8°C (15min) - 80 > 25°C (15min) < 8°C °C (15min) Temperature (min/max) Alarm state...
-
Page 10: Connection Error (External Sensor)
6. Read and change settings / 5.8. Connection error (external sensor only) How to correct setting mistakes After 10 minutes (factory standard) without a connection 6.1. Overview: menu between the device and the external sensor the following display appears and: • The buzzer will beep twice at intervals of three minutes for a Device activated maximum of 168 hours (7 days). • The whole display starts blinking. • Any confirmation will stop the display from blinking. • The buzzer only stops if the connection error is corrected. If the 6.2. Initial menu error still exists, the buzzer continuously beeps at a three-min- ute interval for 168 hours (7 days). 6.2.1. Menu: OUTSIDE/SET DATE (change date and/or time) > 25°C (15min) <... - Page 11 (15min) < 8°C (15min) 6.2. Initial menu (read and change settings) 6.2.1. Access the menu “SET DATE” External sensor: The display shows OUTSIDE. Press READ until To change the date format, the date, the time, the temperature the display shows SET DATE. measurement unit or the alarm settings or to read the preset Internal sensor: The display shows the menu “SET DATE”. Press alarm limits please proceed as follows: SET to access the menu to adjust the date format, date or time Temperature (min/max) Alarm state Time / Alarm duration settings. Then follow the steps as described in chapter 5.5. and 5.6. = OK dd.mm.yyyy Note: Time and date adjustments have no effect on the alarm re- 0123456789012 = ALARM ®...
-
Page 12: Screen Displays During Measurement
7. Screen displays during 8. Alarm trigger function measurement mode 8.1. Single-event alarm triggering The upper or lower alarm triggering is done with a single-event Indication for max. 1 alarm algorithm. Any kind of alarm is triggered if the tempera- minute after completing ture is continuously out of the preset alarm limits for longer than > 25°C (15min) < 8°C (15min) the activation or after the preset alarm trigger time. Int.Sensor Sensor connecting the device with max. 0 00 °C the external Alarm state Time / Alarm duration Temperature (min/max) = OK dd.mm.yyyy... -
Page 13: Alarm Display And Confirmation Options
Lower alarm triggering 8.2. Alarm display and confirmation options Setting lower limit: Temperature <–0.5°C, duration >1 hour Option 1: Alarm indication “all alarms” For a lower alarm to be triggered the temperature needs to be With this option the alarms will be visible on the display with an continuously below –0.5°C for more than 1 hour. alarm symbol for 30 days. > 25°C (15min) Alarm triggered: < 8°C (15min) Int.Sensor alarm symbol and – 0.5°C 1 42 °C warning symbol Alarm state Time / Alarm duration Temperature (min/max) displayed. - Page 14 Settings: upper tem- Option 2: Alarm indication “unconfirmed alarms”: perature limit >8.0°C The alarms are shown with the alarm symbol until all alarms 8°C and duration >1 hour, (in the 30-day history) have been confirmed as solved by pres- –0.5°C lower temperature limit sing the READ button. Afterwards the display will show the OK >1 h >1 h < 0.5°C and duration – symbol until a new alarm is triggered. 1 hour 24 h 1. Alarm triggered: alarm symbol and warning symbol on display > 25°C (15min) < 8°C (15min) 2. Alarm confirmed within the set temperature limits: (OK Int.Sensor symbol) on display 1 42 °C 3.
-
Page 15: Cumulative Daily Time Above/Below The Limit
10. Reading the history / Readout mode 8.3. Cumulative daily time above/below the limit The alarm trigger algorithm is based on a single event, although The information of the temperature deviations can either the Fridge-tag 2 L is measuring on a daily basis the individual be viewed for the past 30 days directly on the device or for total time above or below the temperature limits. This measure- 28/56/84/112 days in the generated files (PDF/ASCII). ment is not used for any alarm condition. These recordings are Note: The external sensor of the Fridge-tag 2 L can remain at its only available in the generated PDF/ASCII files. location for the readout process. Please consider that there may occur a connection error after more than 10 minutes without Note: It could be that the total cumulative time above/below connection between the device and the sensor. the temperature limits is longer than the configured single-event alarm time without any alarm triggering. 10.1. Option 1: Read out day per day directly on the device (30-day history) Example setup: lower temperature limit Example of an OK display during readout of the history... - Page 16 Note: Press repeatedly the READ button to read out day per day The following additional information is indicated on the screen: the details of the past 30 days. • Lowest recorded temperature (example: –1.1˚C) When you reach an alarm event, the indication on the screen of • The duration ot the exceedance of the preset low temperature the Fridge-tag 2 L will be different than the OK display. limit (example: 01:35; hh:mm) • Temperature recording in this example with internal sensor Example of an alarm display during readout of the history 1st display of a “lower alarm event” 10.2. Option 2: Read out alarms directly on the device – use the Alarm Super Jump function (30-day history) >...
- Page 17 10.3. Option 3: Read out data from the files generated 2nd display of the latest alarm event by the Fridge-tag 2 L by connecting it with a computer > 25°C Plug the Fridge-tag 2 L into any computer via USB interface. (15min) < 8°C (15min) Make sure the device is plugged in properly. Int.Sensor max. Note : Disconnect the external sensor from the device first. 1 24 °C Press READ again Alarm state...
- Page 18 The hard drive of the Fridge-tag 2 L is shown in your explorer. Open the desired file generated by the device. FT-2L (F:) FT-2L (F:) Note: To disconnect the device properly, please always use the function “Safely Remove Hardware” on your PC/Mac. Right-click the icon “Safely Remove Hardware and Eject Media” in the Windows taskbar (lower right corner). (Choose the corresponding FT-2L (F:) device to remove.) Do not disconnect the device before you receive the depitcted message, otherwise the device can be damaged. Note: For this process no additional software is necessary.
-
Page 20: Autoscaling Of Graphs In Pdf
10.5. Autoscaling of graphs in PDF Sample of a PDF file generated by a Fridge-tag 2 L with internal sensor The graph of the report is created dynamically depending on the following settings: PDF document of the Fridge-tag® 2 L PDF document of the Fridge-tag® 2 L • the alarm limits of the device • the highest and lowest measured value Identification number: 510500000006 Identification number: 510500000006... -
Page 21: Temperature Record Duration
10.7. Verification process 10.6. Temperature record duration (optional factory setting) This process verifies if the files (PDF and ASCII) created by the Selectable record duration: 28, 56, 84, 112 days. Fridge-tag 2 L are authentic and have not been manipulated or accidentally changed (meets the strict FDA 21 CFR Part 11 Note: File names on the Fridge-tag 2 L are write protected. The requirements). names may only be changed after downloading the files onto a Step 1 computer. Changing is either possible directly on unopened files or via open and save commands with Adobe Reader. Using other Download the software Berlinger Verifier from programs may cause loss of the digital signature. our website: www.berlinger.com/verifier Step 2 Date: Date of measurement Open the software. The following window will appear: Event: t Time/date changed Event: a Alarm configuration changed Step 3 Event: hh:mm Time stamp: status checked Average temp. -
Page 22: Expiry Code Explanation
11. Explanations of terms Accuracy of time measurement ± 30 minutes/year Temperature measurement interval every minute Readout mode Operating lifetime Fridge-tag 2 L up to 31/2 years In order to avoid incorrect data, the Fridge-tag 2 L does not Estimated battery lifetime check battery measure the temperature while settings are changed or during indicator or Readout mode (e.g. changing time, date and during reading Protection class (internal sensor) IP64 of history). The Fridge-tag 2 L will fall back into normal operation Protection class (external sensor) IP50 after approx. 60 seconds without pressing any buttons. * For temperatures below 0°C (+32°F) we highly recommend to use an external External sensor: After 10 minutes (factory setting) without con- sensor in order to avoid a shorter battery life. nection between external sensor and device, two audio signals sound every three minutes for a maximum of 168 hours (7 days) 14. Important Information and the entire display starts flashing. Liability HI or LO indicator (external sensor): If the Fridge-tag 2 L mea- The manufacturer shall not be held liable: sures temperatures above +55°C or below –40°C, it shows HI or •... - Page 23 Useful life The device can be used up to 31/2 years after production date (1/2 year storage / 3 years useful life) on the condition that: • the buttons are not pressed for very long time. Note: Avoid jamming the device between the goods to be moni- tored in a shipment. • storage and operation of the device remains inside the rec- ommendations of the manufacturer. Especially temperatures below 0°C or +32°F could have a negative influence for the operating lifetime of the battery. The end of the lifetime of the battery is indicated by the battery indicator on the display (see chapter “1. Display explanations”). Attention • The Fridge-tag 2 L measures the ambient temperature and not the quality of the monitored goods. Its purpose is to signal if product quality evaluation is required. Berlinger & Co. AG Mitteldorfstrasse 2 9608 Ganterschwil Switzerland Tel. +41 71 982 88 11 E-mail info@berlinger.com Web www.berlinger.com Subject to change. Please note that all information in this document is correct at the time of pub- lication. Due to our policy of continuous product development, we reserve the right to change this information without prior notice. 201805_User Manual Fridge-tag 2 L_EN_V2...
Need help?
Do you have a question about the Fridge-tag 2 L and is the answer not in the manual?
Questions and answers