HBM QuantumX CX22B-W Operating Manual
Hide thumbs
Also See for QuantumX CX22B-W:
- Operating manual (220 pages) ,
- Operating manual (154 pages)

Related Manuals for HBM QuantumX CX22B-W


Summary of Contents for HBM QuantumX CX22B-W
- Page 1 Operating Manual | Bedienungsanleitung English Deutsch CX22B / CX22B-W Data Recorder - Datenrekorder...
- Page 2 Tel. +49 6151 803-0 Fax +49 6151 803-9100 info@hbm.com www.hbm.com Mat.: 7-2001.3169 DVS: A3169-8.0 HBM: public 08.2017 E Hottinger Baldwin Messtechnik GmbH. Subject to modifications. All product descriptions are for general information only. They are not to be understood as a guarantee of quality or durability.
- Page 3 Operating Manual | Bedienungsanleitung English Deutsch CX22B / CX22B-W Data Recorder...
-
Page 4: Table Of Contents
....Using Ethernet and WLAN in parallel ......CX22B / CX22B-W A3169-8.0 HBM: public... - Page 5 ........... . CX22B / CX22B-W A3169-8.0 HBM: public...
-
Page 6: Safety Instructions
In the event of a fault, these precautions establish safe operating conditions. This can be done, for example, by mechanical interlocking, error signaling, etc. CX22B / CX22B-W A3169-8.0 HBM: public... - Page 7 The protection class under the IP standard DIN EN 60529 is IP20. S Please observe the permissible maximum ambient temperatures stated in the specifications. S Make sure that the side ventilation openings are not covered. CX22B / CX22B-W A3169-8.0 HBM: public...
- Page 8 In the following cases, the protection provided for the de vice may be adversely affected. Liability for device func tionality then passes to the operator: S The device is not used in accordance with the operat ing manual. CX22B / CX22B-W A3169-8.0 HBM: public...
- Page 9 Supply voltage DC 10 V … 30 V. The supply connection and all other connections must be installed in such a way that electromagnetic interference does not adversely affect device functionality (HBM rec ommendation: "Greenline shielding design", download able from the Internet at http://www.hbm.com/greenline).
- Page 10 Safety instructions When exchanging complete modules, use only original parts from HBM. The module is delivered from the factory with a fixed hardware and software configuration. Changes can only be made within the possibilities documented in the manu als. Qualified personnel This device is only to be installed and used by quali...
- Page 11 Safety instructions Maintenance and repair work on an open device with the power on may only be carried out by trained personnel who are aware of the dangers involved. CX22B / CX22B-W A3169-8.0 HBM: public...
-
Page 12: Markings Used
Device -> New Bold text indicates menu items, as well as dialog and window headings in the program environment. Arrows between menu items indicate the sequence in which the menus and sub-menus are called up CX22B / CX22B-W A3169-8.0 HBM: public... -
Page 13: Symbols On The Module And Their Meaning
The CE mark enables the manufacturer to guarantee that the product complies with the requirements of the rele vant EC directives (the Declaration of Conformity can be found on the HBM support website www.hbm.com/ support and HBMdoc). Statutory waste disposal mark The electrical and electronic devices that bear this sym... - Page 14 The connection should be applied to the protective con ductor potential. If necessary, integrate the measurement module into your functional grounding via this connection so that interference currents can be discharged and inter ference signal injection prevented. CX22B / CX22B-W A3169-8.0 HBM: public...
-
Page 15: Introduction
S Online Help in the catman EASY and MX-Assistant software S Tips for use on topics such as Integration of GPS, camera or how to connect wheel force transducers like Kistler RoaDyn or KiRoad Performance. CX22B / CX22B-W A3169-8.0 HBM: public... - Page 16 " operating system and pre-installed catman Easy software from HBM. Most of the software functionality is described in the data sheet. Interfaces on the back of the QuantumX Data Recorder: S 2 x FireWire (ODU socket, 4-pin) for connecting QuantumX modules such as MX840B, MX471B or also SomatXR modules such as MX1615B-R.
-
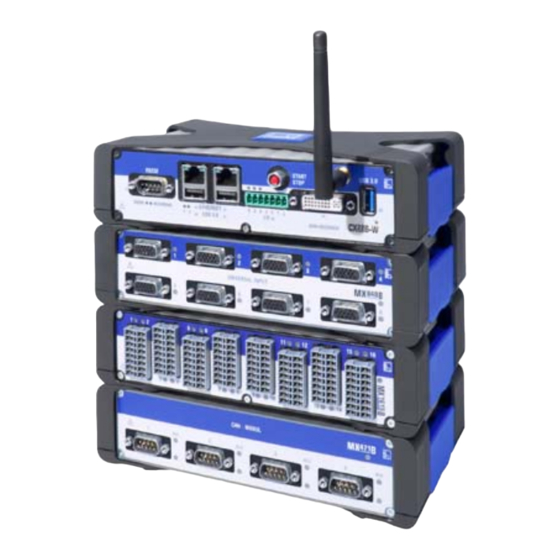
Page 17: Connections And Displays
Connections and displays Connections and displays WLAN antenna Ethernet START/STOP button USB 3.0 RS‐232‐C Monitor (DVI-D) Status LEDs Digital I/Os Fig. 4.1 CX22B‒W connections on the front CX22B / CX22B-W A3169-8.0 HBM: public... - Page 18 Status LEDs Digital I/Os Fig. 4.2 CX22B connections on the front Grounding CFast Backplane con Supply voltage DC 10 30 V FireWire nector strip Fig. 4.3 Connections on the back for CX22 and CX22B‒W CX22B / CX22B-W A3169-8.0 HBM: public...
-
Page 19: Voltage Supply
10 V when a combustion en gine starts up, which would automatically cause the modules to restart. HBM offers the NTX001 power supply for laboratory or general steady-state operation. On the primary side, this provides a selection of international connector types and 24 V and 30 watts on the secondary side. -
Page 20: Ground Connection And Grounding
The data recorder hosts a small buffer battery (type CR2032, lithium). This battery keeps date and time during power interruptions. The battery shall only be replaced by HBM service. Ground connection and grounding Lay the signal and data leads separately from current- carrying power lines. -
Page 21: Communication With The Data Recorder
- Direct connection via an Ethernet patch cable - Wireless connection (WLAN) - In a network (LAN) - Remote access via an Internet connection and a mobile services provider using a mobile services gateway CX22B / CX22B-W A3169-8.0 HBM: public... -
Page 22: Connector Strip For Backplane Integration
An NMEA‐based GPS sensor can be connected via RS232, for instance. The interface does not provide a voltage supply. Other serial buses can be integrated to the software on demand. A wide range of solutions is already available. CX22B / CX22B-W A3169-8.0 HBM: public... -
Page 23: Digital Inputs And Outputs
You can start and/or stop a DAQ job with the START/ STOP button. To do this, use a trigger for starting and/or stopping the DAQ job and assign CX22B‒W digital in put 3 - START/STOP button as the trigger channel. CX22B / CX22B-W A3169-8.0 HBM: public... -
Page 24: Led Displays
3. Otherwise the "Active" (LOW) state will be triggered by pressing the button and by a LOW signal at terminal 3. 4.10 LED displays Fig. 4.4 Position of the LEDs Function Operating condition status Ethernet status CX22B / CX22B-W A3169-8.0 HBM: public... - Page 25 Connections and displays Function 4, 5, 6 Status of digital outputs Module LED Operating condition of the CFast memory card (rear of module) ERROR RECORDING Fig. 4.5 Position of the LEDs without WLAN CX22B / CX22B-W A3169-8.0 HBM: public...
- Page 26 Connections and displays Digital In‐/Outputs Dig In 2 (same for 1 and 3) Dig Out 4 (same for 5 and 6) > 1 mA Fig. 4.6 Pin assignment digital In ‐ and Output CX22B / CX22B-W A3169-8.0 HBM: public...
- Page 27 and events in catman EASY. To do this select Set dig ital output: CX22B digital output in the Configure limit value and event monitoring dialog and enter the required LED in Bit/Condition . CX22B / CX22B-W A3169-8.0 HBM: public...
- Page 28 HIGH. LED for the operating condition of the CF card The LED on the rear of the module flashes yellow when data are written to or read from the CF card. CX22B / CX22B-W A3169-8.0 HBM: public...
-
Page 29: Connecting Quantumx Modules
You can connect up to 12 modules to the CX22B‒W Data Recorder via FireWire, with a supply feed required for at least every 4th module, with approximately the same voltage value. The general QuantumX operating manual contains more detailed data on this. CX22B / CX22B-W A3169-8.0 HBM: public... - Page 30 Data Recorder and is located in the sub-directory C:\Program Files (x86)\HBM\catmanEasy_EN\Firmware\QuantumX-B\ DC 10 V ... 30 V X102 X101 FireWire connection 1-Kab272-x: connection cables of various lengths (x m) Fig. 5.1 Connecting QuantumX modules to the Data Recorder via FireWire CX22B / CX22B-W A3169-8.0 HBM: public...
- Page 31 Connecting QuantumX modules DC 10 V ... 30 V X102 X101 Ethernet WLAN DC 10 V ... 30 V Fig. 5.2 Connecting QuantumX modules to the Data Recorder via Ethernet CX22B / CX22B-W A3169-8.0 HBM: public...
-
Page 32: Operating The Data Recorder
If necessary, use the Windows control panel ("Regional and Language Options") to set the Location) to your country. The setting influences the digit settings and the time, for example. Make other settings via the Data Recorder start screen. CX22B / CX22B-W A3169-8.0 HBM: public... -
Page 33: Operation Via A Pc
Easy software can be updated free of charge for 12 months from the date of delivery. To run an update, you must first register with HBM, in order to benefit from software maintenance. To do this, simply send us the registration file created during initial start-up. - Page 34 To make it easier to set up a connection when the CX22B‒W settings are unknown, use the HBM program HBM Device Scan, which is part of the system software and included in the package as a DVD. It is also available to download from (www.hbm.com ->...
-
Page 35: A Direct Ethernet Line Between Pc And Data Recorder
CAT5e or higher. ► Install the HBM Device Manager program, which can be found on the HBM support sites or in the software package QuantumX / SomatXR system software. ► Launch the HBM Device Manager program on the PC: Windows Start menu−>... - Page 36 CX22B‒W address, for example. The latter is de scribed below. ► Select the CX22B‒W from the list. ► In the TCP/IP settings for CX22B‒W field, click on LAN and enter the required IP address and subnet CX22B / CX22B-W A3169-8.0 HBM: public...
- Page 37 ► If Windows asks whether the connection should be set up to this remote computer, set up the connection (Fig. 6.2).We recommend activating the option Don't ask me again for connections to this computer. CX22B / CX22B-W A3169-8.0 HBM: public...
- Page 38 ► Depending on the configuration of your Windows operating system, another query as to whether the connection should be set up may be displayed (iden tity of the remote computer, Fig. 6.3). If necessary, activate the option to prevent the query. CX22B / CX22B-W A3169-8.0 HBM: public...
- Page 39 Operating the Data Recorder Fig. 6.3 Identity of the remote computer display The connection to the CX22B‒W Data Recorder will now be implemented and you must register with the device (Windows login dialog). CX22B / CX22B-W A3169-8.0 HBM: public...
- Page 40 This will permanently save the new settings. The recorder will then restart. You will have to set up the connection again after the restart. CX22B / CX22B-W A3169-8.0 HBM: public...
-
Page 41: Connection Via A Network
► Install the "HBM Device Manager" program from the system CD. ► Launch the program on your desktop or via the Win dows Start menu −> All programs −> HBM −> HBM Device Manager ► Click on Find modules. ► All the QuantumX and Somat modules, including the Data Recorder, will appear in the list. -
Page 42: Connection Via Wlan
The WLAN connection that was previously set-up is lost). ► You can then remove the network cable and use your PC to find the CX22B‒W wireless network and con nect to it. CX22B / CX22B-W A3169-8.0 HBM: public... - Page 43 Operating the Data Recorder ► Now use the HBM Device Manager tool to set up an Adhoc connection to the CX22B‒W. Configuring the CX22B‒W for an Access Point ► To set up the wireless connection, you must first cre ate access to the CX22B‒W. This is done convention...
-
Page 44: Connection Via A Tablet
For other operating systems, there are numerous pro grams for setting up a remote desktop connection to a Windows PC, such as the Remote Desktop for Mobiles RDM+ program for BlackBerry, Android or iPad. CX22B / CX22B-W A3169-8.0 HBM: public... -
Page 45: Connection Via Remote Desktop
Operating the Data Recorder Connection via remote desktop If you do not want to use HBM's HBM Device Manager program or are working with a permanent IP address at the recorder end, you can also set up the connection di... - Page 46 Enter the IP address of the CX22B‒W and click on Options. S Change the definition used by the HBM Device Man ager program. To do this, open the CX22B.rdp file in the installation directory of the HBM Device Manager software.
- Page 47 Fig. 6.6 Remote desktop connection local resources tab ► Click on Next in the Local resources tab. ► Enable the required drives of your PC for use in the CX22B‒W (Fig. 6.7). CX22B / CX22B-W A3169-8.0 HBM: public...
- Page 48 ► Close the dialog. ► Save the configuration via the General tab either under a new name (Save as) or as a default setting for the connection via HBM Device Manager (Save), see Fig. 6.8. CX22B / CX22B-W A3169-8.0 HBM: public...
- Page 49 If you double-click this configuration file (or a link to it), a connection to the CX22B‒W is immediately set up, and you only have to enter the password. If you authorize Save credentials (see Fig. 6.8), this is done automati cally. CX22B / CX22B-W A3169-8.0 HBM: public...
-
Page 50: Detecting And Resolving Connection Problems
Operating the Data Recorder Detecting and resolving connection problems If the CX22B‒W does not appear in the HBM Device Manager list, or the setup of the remote desktop connec tion is canceled, there are several possible causes. Check the following points and then repeat the search: S Has the CX22B‒W been switched on for at least 1... -
Page 51: Using Ethernet And Wlan In Parallel
S If your PC has several Ethernet interfaces, try deactivating all the other Ethernet interfaces. S If the HBM Device Manager cannot find the CX22B‒W, try setting up a "standard" remote desktop connection. - Page 52 S Connect PC to CX22B‒W via WLAN (Adhoc also pos sible), connect modules via Ethernet (switch or hub required). S Integrate the CX22B‒W in the WLAN network, con nect PC (and modules) via the (Ethernet) network. CX22B / CX22B-W A3169-8.0 HBM: public...
-
Page 53: The Cx22B-W Data Recorder Start Screen
Also see Section12.2. S Permanently store configuration changes: Commit changes and reboot.. You must always click on this button if you have im plemented any changes via the Settings button or in CX22B / CX22B-W A3169-8.0 HBM: public... - Page 54 Recalling the start screen If you have used Exit to Windows to exit the start screen, you can recall it via CX22Shell (on the Windows desktop). The link brings the start screen to the top. CX22B / CX22B-W A3169-8.0 HBM: public...
-
Page 55: The First Daq Job With Catman
EASY, each channel is identified by its name, so you must use meaningful names where possible. ► Mark the channels to be set to zero and run a zero balance (zero balance, group zero balance). CX22B / CX22B-W A3169-8.0 HBM: public... - Page 56 We recommend using the Automatically at end of job setting for data storage. Otherwise a monitor must be connected during measurement in order to save the data. ► Generate visualization − if a monitor is connected. CX22B / CX22B-W A3169-8.0 HBM: public...
- Page 57 DAQ job cannot be started. The "ERROR" LED flashes if the available free memory drops below 1 GByte. More information about catman EASY can be found in EASY online Help. the catman CX22B / CX22B-W A3169-8.0 HBM: public...
- Page 58 ► If you want to carry out a great many calculations with vast data sets, and a sizable CFast card has been installed, also create the catman working directory on drive E:, e. g. "E:\HBM\catWorkingDir". Sensor database The sensor database is an easy way to adjust the mea...
- Page 59 ► In catman EASY, use the Sensor database context tab and the File menu to load the relevant sensor database from the installation directory "C:\Program Files (x86)\HBM\catmanEasy_DE\" or "C:\Program Files (x86)\HBM\catmanEasy_FR\". ► Save this sensor database under a different name to ...
-
Page 60: Transferring Data/Files To The Pc
4. Data exchange via a PC drive integrated into the CX22B‒W as an external drive: Configure your remote desktop connection so that one or more of your PC's drives are integrated as additional CX22B‒W drives, see Section 6.3. CX22B / CX22B-W A3169-8.0 HBM: public... - Page 61 In the factory set tings, the device name is "CX serial number" and the user name is HBMCX22. In this case, enter HBMCX22 and the password hbm (Fig. 8.3). CX22B / CX22B-W A3169-8.0 HBM: public...
-
Page 62: Data Analysis
S On your PC: To do this, you can use catman EASY/AP, catman Post Process or GlyphWorks from HBM, for example. The recorded file formats can basically be converted into any other format, such as MAT, ASCII and many CX22B / CX22B-W... -
Page 63: Monitoring Functionality
It has its own set of channels to be recorded and individual sample rates including downsampling. Recordings can be repeated, i.e. after one recording the recorder again starts waiting CX22B / CX22B-W A3169-8.0 HBM: public... - Page 64 HBM in the Internet) to any mobile smart device (e.g. iPhone, Android based devices) worldwide. On the mobile device you only need to install the HBM Push App ("HBM Push") which you can download from the App Store (e.g. Google Play Store for android based devices or Apple App Store for iPhone or iPad).
-
Page 65: Configuring The Cx22B-W For Self-Contained Measurements
Configuring the CX22B‒W for self-contained measurements Configuring the CX22B‒W for self-contained measurements Catman can be launched via the start screen (Settings button). Fig. 9.1 CX22 catman start‐up settings CX22B / CX22B-W A3169-8.0 HBM: public... - Page 66 ► Activate the option Execute first DAQ job automati cally. ► Go to DAQ channels in the Channels and sensors group. ► Activate the option Automatically deactivate faulty channels and continue measurement (behavior if channel initialization fails). CX22B / CX22B-W A3169-8.0 HBM: public...
- Page 67 The data already present in the catman EASY tempo rary measurement data memory are not lost if the power supply is interrupted. Any additional files will be assigned a counter at the end of the file name. CX22B / CX22B-W A3169-8.0 HBM: public...
-
Page 68: Saving Data On The Data Recorder
Section 10.4). In the start screen, click on Commit changes and reboot, to permanently save the new set tings or the newly installed software. The CX22B‒W is then rebooted, so you must set up the connection again after the restart. CX22B / CX22B-W A3169-8.0 HBM: public... - Page 69 The scope of supply for the CX22B‒W Data Recorder includes an 8 GByte CF card, although cards with a higher memory capacity can also be used (for example 64, 128, 256 or 512 GB). CX22B / CX22B-W A3169-8.0 HBM: public...
-
Page 70: Removing And Inserting The Cfast Memory Card
The CFast must disappear completely inside the slot. ► Swivel the cover plate downwards and secure the card. ► Tighten the retaining screw by hand. CX22B / CX22B-W A3169-8.0 HBM: public... -
Page 71: Memory Performance
Test conditions: 14 modules (FireWire), 56 DAQ channels, 8 bytes per measured value, 2 data rate groups, no visualization objects Test conditions: 14 modules (FireWire), 56 DAQ channels, 8 bytes per measured value, 1data rate group, no visualization objects CX22B / CX22B-W A3169-8.0 HBM: public... -
Page 72: Ewf, Safeguarding Your Settings Against Change
If you want to permanently save settings or programs on C:, you must use Commit changes and reboot in the start screen ("CX22Shell"). Changes will then be perma nently applied and will also be available the next time you restart the CX22B‒W. CX22B / CX22B-W A3169-8.0 HBM: public... -
Page 73: Operating The Cx22B/Cx22B-W As Gateway
11.2 Activate/deactivate gateway mode To activate/deactivate the gateway mode, go in the Shell settings of the CX22B-W into the "General" tab. Check the option "Activate gateway functionality" to activate the option and uncheck it to deactivate it. CX22B / CX22B-W A3169-8.0 HBM: public... -
Page 74: Connect To A Quantumx Module Behind A Cx22B-W
CX22B-W, start catman on your PC and search for mod ules in the device manager..The modules routed by the CX22B-W are displayed as child elements of the CX22B-W. Unlike the CX27B Ethernet / EtherCAT gate way, you can select QuantumX modules individually. CX22B / CX22B-W A3169-8.0 HBM: public... - Page 75 Operating the CX22B/CX22B-W as gateway Important note: You can connect only time simultane ously to a QuantumX module being routed by the CX22B-W. CX22B / CX22B-W A3169-8.0 HBM: public...
-
Page 76: Performances
CX22B-W: Maximum cumulative data througput (gateway mode) LAN (Gigabit) MS/s > 3 WLAN interface (adhoc) MS/s > 0.2 Test conditions: 12 modules (FireWire), 48 DAQ channels Test conditions: 14 modules (FireWire), 108 DAQ channels CX22B / CX22B-W A3169-8.0 HBM: public... -
Page 77: System Settings, Update And Recovery
CX22B‒W Data Recorder. If addi tional software is installed, the functionality of the CX22B‒W Data Recorder can no longer be guaranteed and HBM can no longer provide support for any faults arising in this connection. In practice, drivers have already been successfully installed and operated for the following terminal equip... -
Page 78: Changing System Settings (Settings)
This name is displayed in the network, for example. S Password (Remote access password tab) The password is required to log In. S Run catman EASY after switching on the CX22B‒W (launch catman after CX22 startup, General tab) CX22B / CX22B-W A3169-8.0 HBM: public... -
Page 79: Updating The Software
(ID), the device serial number and the firmware ver sion. 12.3 Updating the software You can update catmanEASY only, or enable additional function packages such as EasyVideo, EasyRoadLoad and EasyScript or a full catmanAP at any time, if you CX22B / CX22B-W A3169-8.0 HBM: public... -
Page 80: System Restoration (Recovery)
USB flash drive, a keyboard and, where possible, a (digital) monitor that you can connect directly to the CX22B‒W (DVI output). Please contact our support site (http://www.hbm.com/support). 12.5 Potential sources of error and remedial action Long Ethernet cables... - Page 81 Module decoupled A module or an entire module string may become detached, particularly in the distributed module group, e.g. in trains. You have the option to configure catman so that measurement continues or is canceled. CX22B / CX22B-W A3169-8.0 HBM: public...
-
Page 82: Fcc (Usa) And Ci (Canada) Statement
15, §103 of the FCC rules and ICES-003, chapter 4. Connection of equip ment, changes or modifications not expressly aut horized by HBM (e.g. by this product manual) may cause additional interference and could void the users authority to operate the CX22B. - Page 83 → Instruments → Universal Data Recorders → Downloads Every connection of equipment, changes or modifi cations not expressly authorized by HBM may cause additional interference and could void the user’s authority to operate the CX22B-W. This is particularly applicable when replacing the antenna.
-
Page 84: Waste Disposal And Environmental Protection
Packaging The original packaging of HBM devices is made from recyclable material and can be sent for recycling. For ecological reasons, empty packaging should not be returned to us. -
Page 85: Index
Cleaning, 6 CompactFlash card, 66 Connections, 15, 27, 30 Language CX22 changed from catmanAP, 77 shut down, 52 von catmanAP ändern, 51 start screen, 51 Log On change, 51, 76 CX22 Start screen, 51 CX22B / CX22B-W A3169-8.0 HBM: public... - Page 86 Password change, 51, 76 PC, connection via WLAN, 43 Tablet PC, connected with CX22, Protective conductor, 11 RECORDING (LED), 25 Recovery, 78 CX22-System, 78 Remote desktop, close, 52 Remote Desktop for Mobiles, 42 Sensor database, 56 CX22B / CX22B-W A3169-8.0 HBM: public...
- Page 87 Operating Manual | Bedienungsanleitung English Deutsch CX22B / CX22B-W Datenrekorder...
- Page 88 ....Ethernet und WLAN parallel nutzen ......CX22B / CX22B-W A3169-8.0 HBM: public...
- Page 89 ........CX22B / CX22B-W A3169-8.0 HBM: public...
-
Page 90: Sicherheitshinweise
Bei Anlagen, die aufgrund einer Fehlfunktion größere Schäden, Datenverlust oder sogar Personenschäden verursachen können, müssen zusätzliche Sicherheitsvor kehrungen getroffen werden. Im Fehlerfall stellen diese Vorkehrungen einen sicheren Betriebszustand her. Dies kann z. B. durch mechanische Verriegelungen, Feh lersignalisierung usw. erfolgen. CX22B / CX22B-W A3169-8.0 HBM: public... - Page 91 S Schützen Sie das Modul vor direktem Kontakt mit Wasser. S Schützen Sie das Modul vor Schmutz und Feuchtig keit oder Witterungseinflüssen wie beispielsweise Regen, Schnee usw. Die Schutzklasse laut DIN EN 60529 beträgt IP20. CX22B / CX22B-W A3169-8.0 HBM: public...
- Page 92 Modul oder an die Anschlüsse gelangt. Restgefahren Der Leistungs‐ und Lieferumfang des QuantumX‐Sys tems deckt nur einen Teilbereich der Messtechnik ab. Sicherheitstechnische Belange der Messtechnik sind zusätzlich vom Anlagenplaner/Ausrüster/Betreiber so zu planen, zu realisieren und zu verantworten, dass Rest CX22B / CX22B-W A3169-8.0 HBM: public...
- Page 93 DC 10 V ... 30 V betragen. Der Versorgungsanschluss sowie alle anderen Anschlüsse müssen so installiert werden, dass elektro magnetische Einstreuungen keine Beeinträchtigung der Gerätefunktionen hervorrufen (Empfehlung HBM ”Green line‐Schirmungskonzept”, Internetdownload http://ww w.hbm.com/greenline). Module und Einrichtungen der Automatisierungstechnik müssen so verbaut werden, dass sie gegen unbeabsich...
- Page 94 Insbesondere sind jegliche Reparaturen, Lötarbeiten an den Platinen (Austausch von Bauteilen) untersagt. Bei Austausch gesamter Baugruppen sind nur Originalteile von HBM zu verwenden. Das Modul wurde ab Werk mit fester Hard‐ und Softwa rekonfiguration ausgeliefert. Änderungen sind nur im Rahmen der in den Handbüchern dokumentierten Mög...
- Page 95 Sinngemäß gilt dies auch bei Verwendung von Zubehör. Wartungs‐ und Reparaturarbeiten am geöffneten Gerät unter Spannung dürfen nur von einer ausgebildeten Person durchgeführt werden, die sich der vorliegenden Gefahr bewusst ist. CX22B / CX22B-W A3169-8.0 HBM: public...
-
Page 96: Verwendete Kennzeichnungen
Diese Kennzeichnung weist auf Anwendungstipps oder andere für Sie nützliche Informationen hin. Tipp Hervorhebung Kursive Schrift kennzeichnet Hervorhebungen im Siehe … Text und kennzeichnet Verweise auf Kapitel, Bilder oder externe Dokumente und Dateien. CX22B / CX22B-W A3169-8.0 HBM: public... -
Page 97: Auf Dem Modul Angebrachte Symbole Und Ihre Bedeutung
CE‐Kennzeichnung Mit der CE‐Kennzeichnung garantiert der Hersteller, dass sein Produkt den Anforderungen der relevanten EG‐ Richtlinien entspricht (die Konformitätserklärung finden Sie auf der Support‐Website von HBM www.hbm.com/ support und HBMdoc). Gesetzlich vorgeschriebene Kennzeichnung zur Entsorgung Elektrische und elektronische Geräte, die dieses Symbol tragen, unterliegen der europäischen Richtlinie... - Page 98 Zum Beispiel für Tastatur, Maus, externen Speicher Anschlusspunkt zur Einbindung in ein Potentialausgleichssystem Der Anschluss sollte auf Schutzleiterpotenzial liegen. Integrieren Sie ggf. das Messmodul über diesen Anschluss in ihre Funktionserdung, um Störströme abzu leiten und Störeinkopplungen zu vermeiden. CX22B / CX22B-W A3169-8.0 HBM: public...
-
Page 99: Einleitung
Sie zu den Messdaten gelangen. Zusätzlich steht folgende Dokumentation zur Verfügung: S Allgemeine Bedienungsanleitung mit Anschlussbele gung der MX‐Module S Datenblätter S Onlinehilfen in der Software catman EASY und MX- Assistent CX22B / CX22B-W A3169-8.0 HBM: public... - Page 100 Betriebssystem „Windows Embedded‐8 Stan dard “ und vorinstallierter Software catman Easy von HBM. Der Funktionsumfang der Software wird in großen Teilen im Datenblatt beschrieben. Rückseitige Schnittstellen des QuantumX-Daten rekorders: S 2 x FireWire (ODU‐Buchse, 4 pol.) zur Anbindung von QuantumX‐Modulen wie z.B.
- Page 101 S 2 x Gigabit Ethernet, 1 x WLAN (nur CX22B-W), 1 x USB 3.0 und 2 x USB 2.0, 1 x DVI‐D S 3 x digitale Ein- und 3 x Ausgänge und Taster für Start/Stop‐Belegung CX22B / CX22B-W A3169-8.0 HBM: public...
-
Page 102: Anschlüsse Und Anzeigen
Anschlüsse und Anzeigen Anschlüsse und Anzeigen WLAN‐Antenne Ethernet START/STOP‐ Taste USB 3.0 RS‐232‐C Monitor (DVI-D) Status‐LEDs Digitale I/Os Abb. 4.1 Anschlüsse des CX22B‒W auf der Vorderseite CX22B / CX22B-W A3169-8.0 HBM: public... - Page 103 Monitor (DVI-D) Status‐LEDs Digitale I/Os Abb. 4.2 Anschlüsse des CX22B auf der Vorderseite Erdung CFast Steckleiste Versorgungs Modulträger spannung FireWire DC 10 30 V Abb. 4.3 Anschlüsse auf der Rückseite für CX22 und CX22B‒W CX22B / CX22B-W A3169-8.0 HBM: public...
-
Page 104: Spannungsversorgung
Module automatisch einen Neustart ausführen. Für den Labor‐ oder allgemein stationären Betrieb bietet HBM das Netzteil NTX001 an. Es bietet auf der Primär seite eine Auswahl internationaler Steckertypen und auf der Sekundärseite 24 V und 30 Watt. Darüber können ein CX22B‒W und ein weiteres Modul gespeist werden. -
Page 105: Masseverbindung Und Erdung
Lithium) integriert. Sie gewährleistet den Erhalt der Uhr zeit und des Datums, wenn der Datenrekorder von der Spannungsversorgung getrennt ist.Diese Batterie darf nur vom HBM‐Servicepersonal gewechselt werden. Masseverbindung und Erdung Verlegen Sie Signal‐ und Datenleitungen getrennt von stromführenden Starkstromleitungen. Ideal sind Kabel... -
Page 106: Kommunikation Mit Dem Datenrekorder
S Zugriff über einen PC oder Tablet mittels „Remote desktopverbindung“ (Standard bei Windows) - Direkte Verbindung über ein Ethernet‐Patchkabel - Verbindung über Funk (WLAN) - In einem Netzwerk (LAN) - Fernzugriff über eine Internetverbindung und einen Mobilfunkanbieter durch ein Mobilfunk‐Gateway CX22B / CX22B-W A3169-8.0 HBM: public... -
Page 107: Steckleiste Zur Integration In Den Modulträger
Schnittstelle RS232 Über RS232 kann z.B. ein NMEA‐basierter GPS‐Sensor angebunden werden. Die Schnittstelle bietet keine Spannungsversorgung. Andere serielle Busse können auf Anfrage in die Software integriert werden. Ein breites Spektrum an Lösungen ist bereits verfügbar. CX22B / CX22B-W A3169-8.0 HBM: public... -
Page 108: Digitale Ein- Und Ausgänge
Bei Start eines Messjobs alle Digitalaus gänge des CX22B‒W zurücksetzen aktivieren. START/STOP‐Taste Mit der Taste START/STOP können Sie einen Messjob starten und/oder stoppen. Verwenden Sie dazu einen Trigger für den Start und/oder den Stopp des Messjobs CX22B / CX22B-W A3169-8.0 HBM: public... -
Page 109: Led-Anzeigen
Sie deshalb den Eingang 3 nicht beschalten. Andernfalls wird der Zustand „Aktiv“ (LOW) sowohl von einem Tastendruck als auch von einem LOW‐Signal an Klemme 3 ausgelöst. 4.10 LED‐Anzeigen Abb. 4.4 Lage der LEDs CX22B / CX22B-W A3169-8.0 HBM: public... - Page 110 Anschlüsse und Anzeigen Funktion Status Betriebszustand Ethernetzustand 4, 5, 6 Status digitale Ausgänge Modul‐LED Betriebszustand Cfast‐Speicherkarte (Modulrückseite) ERROR RECORDING Abb. 4.5 Lage der LEDs ohne WLAN CX22B / CX22B-W A3169-8.0 HBM: public...
- Page 111 Anschlüsse und Anzeigen Digitale Ein‐ und Ausgänge Dig In 2 (identisch für 1 und 3) Dig Out 4 (identisch für 5 und 6) > 1 mA Abb. 4.6 Anschlussbelegung Digitalein‐/ und Digitalausgang CX22B / CX22B-W A3169-8.0 HBM: public...
- Page 112 Speicher unter 1 GByte fällt. Alle Status‐LEDs können auch über Grenzwerte und Ereignisse von catman EASY angesteuert werden. Wählen Sie dazu Digitalausgang setzen: CX22B Digi talausgang im Dialog Grenzwert‐ und Ereignisüber CX22B / CX22B-W A3169-8.0 HBM: public...
- Page 113 Die Ausgänge 5 und 6 werden über Bit 1 (LED 5) und Bit 2 (LED 6) aktiviert. LED für den Betriebszustand der CF‐Karte Die LED an der Rückseite des Moduls blinkt gelb, wenn Daten auf die CFast geschrieben oder von ihr gelesen werden. CX22B / CX22B-W A3169-8.0 HBM: public...
-
Page 114: Anschließen Von Quantumx-Modulen
Sie können bis zu 12 Module über FireWire mit dem CX22B‒W‐Datenrekorder verbinden, die Einspeisung der Speisespannung muss mindestens an jedem 4. Modul erfolgen und annähernd den gleichen Spannungswert haben. Ausführliche Angaben dazu enthält die Allge meine QuantumX‐Bedienungsanleitung. CX22B / CX22B-W A3169-8.0 HBM: public... - Page 115 EASY überprüft die Firmware automatisch und fordert Sie bei Bedarf auf die Firmware zu aktualisieren. Das entsprechende Firmwarepaket wird mit dem Daten rekorder mitgeliefert und befindet sich im Unterverzeich nis C:\Program Files (x86)\HBM\catmanEasy_EN\Firm ware\QuantumX-B\ DC 10 V ... 30 V X102 X101 FireWire‐Anschluss...
- Page 116 Anschließen von QuantumX‐Modulen DC 10 V ... 30 V X102 X101 Ethernet WLAN DC 10 V ... 30 V Abb. 5.2 Anschluss von QuantumX‐Modulen an den Datenrekorder via Ethernet CX22B / CX22B-W A3169-8.0 HBM: public...
-
Page 117: Bedienen Des Datenrekorders
Taskleiste die Eingabesprache ändern. Stellen Sie bei Bedarf über die Systemsteuerung von Windows („Regional and Language Options“) den Aufent haltsort (Location) auf Ihr Land ein. Die Einstellung beeinflusst z. B. die Zahlendarstellung und die Uhrzeit. CX22B / CX22B-W A3169-8.0 HBM: public... - Page 118 Easy kann ab dem Auslieferungsdatum für 12 Monate kostenlos aktualisiert werden. Um eine Aktualisierung durchführen zu können müssen Sie sich bei HBM registrieren, um die Software- Wartung zu nutzen. Schicken Sie uns dazu einfach die bei der Erstinbetriebnahme erstellte Registrierungsdatei zu.
-
Page 119: Bedienen Über Einen Pc
Gerät nicht gefunden werden konnte. Um das Herstellen einer Verbindung bei unbekannten Einstellungen des CX22B‒W zu erleichtern, können Sie das HBM‐Programm HBM Device Manager verwenden, welches Teil der Systemsoftware ist und als DVD dem Paket beiliegt oder als Download zur Verfügung steht (www.hbm.com ->... -
Page 120: Direkte Ethernetleitung Zwischen Pc Und Datenrekorder
Verbinden Sie Ihren PC und CX22B‒W über ein Ethernet‐Kabel der Kategorie CAT5e oder besser. ► Installieren Sie das Programm HBM Device Manager, zu finden auf den Supportseiten von HBM oder im Softwarepaket QuantumX / SomatXR Systemsoft ware. ► Starten Sie das Programm HBM Device Manager auf dem PC: Windows‐Startmenü... - Page 121 Adresse der CX22B‒W ändern. Letzteres ist im Folgenden beschrieben. ► Wählen Sie dazu die CX22B‒W in der Liste aus. ► Klicken Sie im Bereich TCP/IP‐Einstellungen für CX22B‒W auf LAN und geben Sie die gewünschte CX22B / CX22B-W A3169-8.0 HBM: public...
- Page 122 ► Falls Windows fragt, ob die Verbindung zu diesem Remotecomputer hergestellt werden soll, stellen Sie die Verbindung her (Abb. 6.2). Wir empfehlen, die Option Nicht erneut nach Verbindungen mit diesem Computer fragen zu aktivieren. CX22B / CX22B-W A3169-8.0 HBM: public...
- Page 123 ► Je nach Konfiguration Ihres Windows‐Betriebssys tems erfolgt evtl. noch eine weitere Nachfrage, ob die Verbindung hergestellt werden soll (Identität des Remotecomputers, Abb. 6.3). Aktivieren Sie gegebenenfalls auch hier die Option, nicht erneut nachzufragen. CX22B / CX22B-W A3169-8.0 HBM: public...
- Page 124 Bedienen des Datenrekorders Abb. 6.3 Anzeige zur Identität des Remotecomputers Die Verbindung mit dem CX22B‒W‐Datenrekorder wird nun hergestellt, und Sie müssen sich am Gerät anmelden (Windows‐Anmeldedialog). CX22B / CX22B-W A3169-8.0 HBM: public...
- Page 125 Save and restart, falls Sie in den Ein stellungen noch nicht die Sprache umgestellt haben. Damit werden die neuen Einstellungen dauerhaft gespei chert. Der Rekorder wird dann neu gestartet. Sie müssen die Verbindung nach dem Neustart daher erneut wieder aufbauen. CX22B / CX22B-W A3169-8.0 HBM: public...
-
Page 126: Verbindung Über Ein Netzwerk
Fall auch von Ihrer Netzwerkkonfiguration ab. Kontaktieren Sie deshalb Ihren Netzwerkadministrator, um die richtigen Einstellungen zu erhalten. ► Installieren Sie das Programm „HBM Device Ma nager“ von der System-CD. ► Starten Sie das Programm auf Ihrem Desktop oder über Windows‐Startmenü... -
Page 127: Verbindung Über Wlan
Nehmen Sie folgende Einstellung vor: WLAN Adhoc- Verbindung beim Start aktivieren ► Speichern Sie die Änderungen dauerhaft (nach dieser Aktion wird der Datenrekorder neu gebootet). Bei diesem Vorgang geht die vorher aufgebaute WLAN- Verbindung verloren. CX22B / CX22B-W A3169-8.0 HBM: public... - Page 128 Sie können das Netzwerkkabel jetzt entfernen und das Funknetzwerk der CX22B‒W über Ihren PC suchen und sich damit verbinden. ► Bauen Sie über das Werkzeug HBM Device Manager nun eine Adhoc-Verbindung zur CX22B‒W auf. CX22B‒W für Access Point einrichten ►...
-
Page 129: Verbindung Über Ein Tablet
Voraussetzung dafür ist, dass ein geeignetes Programm auf dem jeweiligen Gerät installiert ist. Die Bildschirmauf lösung sollte 1000 x 750 Punkte betragen, da sonst nur Teile des CX22B‒W‐Datenrekorder‐Bildschirms zu sehen sind und der Ausschnitt immer wieder verschoben werden muss. CX22B / CX22B-W A3169-8.0 HBM: public... - Page 130 (kostenlos von der Website von Microsoft herunterlad bar). Für andere Betriebssysteme existieren zahlreiche Pro gramme, mit denen eine Remotedesktopverbindung zu einem Windows‐PC hergestellt werden kann, z. B. das Programm Remote Desktop for Mobiles RDM+ für Black Berry, Android oder iPad. CX22B / CX22B-W A3169-8.0 HBM: public...
-
Page 131: Verbindung Über Remotedesktop
Bedienen des Datenrekorders Verbindung über Remotedesktop Falls Sie das Programm HBM Device Manager von HBM nicht verwenden möchten oder mit einer festen IP‐Adresse auf der Rekorderseite arbeiten, können Sie die Verbindung auch direkt über das Programm „Remote desktop“ aufbauen (das Programm ist Bestandteil des Windows‐Betriebssystems). - Page 132 Starten Sie das Programm Remote desktopverbindung. Geben Sie die IP‐Adresse des CX22B‒W ein und klicken Sie auf Optionen. S Die vom Programm HBM Device Manager verwendete Definition ändern. Öffnen Sie dazu die Datei CX22B.rdp im Installationsverzeichnis der Soft...
- Page 133 Abb. 6.6 Register Lokale Ressourcen der Remotedesktopverbindung ► Klicken Sie auf Weitere im Register Lokale Res sourcen. ► Geben Sie die gewünschten Laufwerke Ihres PCs für die Verwendung im CX22B‒W frei (Abb. 6.7). CX22B / CX22B-W A3169-8.0 HBM: public...
- Page 134 Schließen Sie den Dialog. ► Speichern Sie die Konfiguration über das Register Allgemein entweder unter einem neuen Namen (Speichern unter) oder als Voreinstellung für die Ver bindung über den HBM Device Manager (Speichern), siehe Abb. 6.8. CX22B / CX22B-W A3169-8.0 HBM: public...
- Page 135 Wenn Sie auf diese Konfigurationsdatei (oder einen Link darauf) doppelklicken, wird direkt eine Verbindung mit dem CX22B‒W aufgebaut und Sie müssen nur noch das Passwort eingeben. Falls Sie das Speichern der Anmeld einformation (siehe Abb. 6.8) zulassen, erfolgt dies automatisch. CX22B / CX22B-W A3169-8.0 HBM: public...
-
Page 136: Verbindungsprobleme Erkennen Und Lösen
Bedienen des Datenrekorders Verbindungsprobleme erkennen und lösen Erscheint kein CX22B‒W in der Liste des HBM Device Managers oder wird der Verbindungsaufbau der Remote desktopverbindung abgebrochen, gibt es mehrere mögli che Ursachen. Prüfen Sie folgende Punkte und wiederholen Sie dann die Suche: S Ist der CX22B‒W seit mindestens 1 Minute einge... - Page 137 S Falls Ihr PC mehrere Ethernet‐Schnittstellen besitzt, deaktivieren Sie versuchsweise alle anderen Ether net‐Schnittstellen. S Falls der CX22B‒W vom HBM Device Manager nicht gefunden wird, versuchen Sie, eine „normale“ Remo tedesktopverbindung aufzubauen. S Falls Sie den CX22B‒W in einem größeren Netzwerk einsetzen, kontaktieren Sie Ihren Netzwerkadministra...
-
Page 138: Ethernet Und Wlan Parallel Nutzen
über Ethernet anbinden (Switch oder Hub erforderlich). S PC mit CX22B‒W über WLAN verbinden (auch Adhoc möglich), Module über Ethernet anbinden (Switch oder Hub erforderlich). S CX22B‒W in WLAN‐Netzwerk integrieren, PC (und Module) über (Ethernet) Netzwerk anbinden. CX22B / CX22B-W A3169-8.0 HBM: public... -
Page 139: Der Startbildschirm Des Cx22B-W-Datenrekorders
Im Startbildschirm (CX22Shell) des CX22B‒W können Sie: S Das Programm catman EASY starten. S Wichtige Einstellungen des CX22B‒W ändern: Ein stellungen. Hierüber können Sie z. B. den Gerätenamen (CX‐Seriennummer) und das Passwort sowie die CX22B / CX22B-W A3169-8.0 HBM: public... - Page 140 Sie für ca. 5 Sekunden die Stromzufuhr, um ihn wieder einzuschalten. S Das Verzeichnis mit der Dokumentation zum Quan tumX‐System aufrufen: Hilfe. S Das Standardverzeichnis mit den Messdaten auf rufen: Daten. Das bei Einstellungen auf dem Register Allgemein festgelegte Verzeichnis wird geöffnet. CX22B / CX22B-W A3169-8.0 HBM: public...
- Page 141 Der Startbildschirm des CX22B‒W‐Datenrekorders Startbildschirm wieder aufrufen Falls Sie den Startbildschirm mit Zu Windows wechseln verlassen haben, können Sie ihn über CX22Shell (liegt auf dem Windows Desktop) wieder aufrufen. Die Verknüpfung bringt den Startbildschirm in den Vordergrund. CX22B / CX22B-W A3169-8.0 HBM: public...
-
Page 142: Der Erste Messjob Mit Catman
Vergeben Sie eindeutige Kanalnamen Über das Kontextmenü Umbenennen können Sie Kanalnamen mit laufender Nummerierung erzeugen oder die Sensorbezeichnung übernehmen lassen. Jeder Kanal wird in catman EASY über seinen Namen identifiziert, verwenden Sie deshalb möglichst aussagekräftige Namen. CX22B / CX22B-W A3169-8.0 HBM: public... - Page 143 Klicken Sie auf Datenspeicherung (Gruppe Einstel lungen) und legen Sie die Einstellungen zur Si cherung der Daten nach oder während der Messung fest. Wir empfehlen, die Einstellung Automatisch am Ende des Jobs für die Datensicherung zu CX22B / CX22B-W A3169-8.0 HBM: public...
- Page 144 EASY vorliegt, z. B. wenn die Verbindung zu Gerä ten beim Projektstart nicht hergestellt werden kann oder wenn der Messjob nicht gestartet werden kann. Die LED „ERROR“ blinkt, wenn der verfügbare freie Speicher un ter 1 GByte fällt. CX22B / CX22B-W A3169-8.0 HBM: public...
- Page 145 CFast‐Karte eingebaut wurde, legen Sie auch das cat ‐Arbeitsverzeichnis auf dem Laufwerk E: an, z. B. „E:\HBM\catWorkingDir“. Sensordatenbank Die Sensordatenbank dient zur einfachen Einstellung der Messkette auf den verwendeten Sensor. Sie müssen die Kennwerte eines Sensors nur einmal eingeben und CX22B / CX22B-W A3169-8.0 HBM: public...
- Page 146 ► Laden Sie in catman EASY über das Kontextregister Sensordatenbank und das Menü Datei die entspre chende Sensordatenbank aus dem Installationsver zeichnis „C:\Program Files (x86)\HBM\catmanE asy_DE\“ bzw. „C:\Program Files (x86)\HBM\catmanEasy_FR\“. ► Speichern Sie diese Sensordatenbank unter anderem Namen auf das Laufwerk D oder E und öffnen Sie sie erneut.
-
Page 147: Übertragen Von Daten/Dateien Zum Pc
Schalten Sie das Modul aus, entnehmen Sie die CFast‐Karte und stecken Sie die Karte in Ihren PC. Kopieren Sie dann die Daten von der Karte. 2. Über einen USB‐Speicher, z. B. einen USB‐Speicher stick: CX22B / CX22B-W A3169-8.0 HBM: public... - Page 148 Laufwerke Ihres PCs als wei tere Laufwerke des CX22B‒W eingebunden werden, siehe Kapitel 6.3. 5. Über den Windows‐Explorer: Geben Sie die IP‐Adresse des CX22B‒W in den Windows‐Explorer ein (Abb. 8.2, \\ vor der Adresse eingeben). CX22B / CX22B-W A3169-8.0 HBM: public...
- Page 149 Geben Sie im Anmeldedialog den Namen des CX22B und den Benutzernamen sowie das Passwort ein. In der Werkseinstellung ist der Gerätename „CX‐Seri ennummer“ und der Benutzername HBMCX22. Ge ben Sie in diesem Fall HBMCX22 und das Passwort hbm ein (Abb. 8.3). CX22B / CX22B-W A3169-8.0 HBM: public...
-
Page 150: Auswerten Von Daten
Starten Sie dazu in catman EASY ein Auswertepro jekt oder wechseln Sie vom Messmodus in den Aus wertemodus. S Auf Ihrem PC: Dazu können Sie z.B. catman EASY/AP, catman Post Process oder GlyphWorks von HBM verwenden. CX22B / CX22B-W A3169-8.0 HBM: public... -
Page 151: Monitoring-Funktion
Rekorder sehr wohl parallel arbeiten! Ein gutes Beispiel für den Einsatz von Rekordern ist das Monitoring einer Eisenbahnbrücke, wo jede der beiden Schienen getrennt überwacht werden sollte. Ein Datenrekorder gehört immer zu einem normalen Messjob. Dieser Messjob ist der "übergeordnete" oder CX22B / CX22B-W A3169-8.0 HBM: public... - Page 152 Hintergrund ausgeführt, behindert also nicht weitere Messjobs. Wenn ein Messjob Videoaufnahmen enthält, können die Videodateien ebenfalls hochgeladen werden. Die FTP-Konfiguration wird als Teil der Messjob- Einstellungen in der Registerkarte "Remote data storage" (Remote-Datenspeicherung) vorgenommen CX22B / CX22B-W A3169-8.0 HBM: public...
- Page 153 Android-Geräte) gesendet werden können. Auf dem mobilen Endgerät brauchen Sie nur die HBM Push App ("HBM Push") zu installieren, die Sie aus dem App Store herunterladen können (z. B. dem Google Play Store für Android-Geräte oder dem Apple App Store für iPhone oder iPad).
-
Page 154: Cx22B-W Für Autarke Messungen Konfigurieren
CX22B‒W für autarke Messungen konfigurieren CX22B‒W für autarke Messungen konfigurieren Catman kann über den Startbildschirm (Button Einstel lungen) gestartet werden: Abb. 9.1 CX22 catman ‐Einstelldialog CX22B / CX22B-W A3169-8.0 HBM: public... - Page 155 Zeile Messprojekt aus. ► Aktivieren Sie die Option Ersten Messjob automa tisch ausführen. ► Gehen Sie zu Messkanäle in der Gruppe Kanäle und Sensoren. ► Aktivieren Sie die Option Fehlerhafte Kanäle automatisch deaktivieren und Messung fortsetzen CX22B / CX22B-W A3169-8.0 HBM: public...
- Page 156 Geräte und Kanäle. Wichtig Die bereits im temporären Messdatenspeicher von cat EASY vorhandenen Daten gehen bei einer Un terbrechung der Stromversorgung nicht verloren. Zusätz liche Dateien werden mit einem Zähler am Ende des Dateinamens versehen. CX22B / CX22B-W A3169-8.0 HBM: public...
-
Page 157: Daten Speichern Auf Dem Datenrekorder
10.4). Klicken Sie daher im Startbildschirm auf Änderungen sichern und neu starten, um neue Ein stellungen oder neu installierte Software dauerhaft zu speichern. Der CX22B‒W wird dann neu gestartet, Sie müssen die Verbindung nach dem Neustart daher erneut aufbauen. CX22B / CX22B-W A3169-8.0 HBM: public... - Page 158 Karte einzusetzen, damit eine hohe Datenrate erzielt werden kann. Im Lieferumfang des CX22B‒W‐Datenrekorders ist eine CFast‐Karte mit 8 GByte enthalten, die Verwendung von Karten mit größerer Speicherkapazität ist möglich (wie z.B. 64, 128, 256 oder 512 GB). CX22B / CX22B-W A3169-8.0 HBM: public...
-
Page 159: Entfernen Und Einsetzen Der Cfast-Speicherkarte
Schacht bis die Speicherkarte einrastet. Die CFast muss komplett im Schacht verschwinden. ► Drehen Sie die Abdeckung nach unten und sichern Sie die Karte. ► Ziehen Sie die Sicherungsschraube handfest an. CX22B / CX22B-W A3169-8.0 HBM: public... -
Page 160: Speicherperformance
(BIN) Im FastStream‐Modus MS/s > 5 Testbedingungen: 14 Module (FireWire), 56 Messkanäle, pro Messwert 8 Byte, 2 Messratengruppen, ohne Visualisierungsobjekte Testbedingungen: 14 Module (FireWire), 56 Messkanäle, pro Messwert 8 Byte, 1 Messratengruppe, ohne Visualisierungsobjekte CX22B / CX22B-W A3169-8.0 HBM: public... -
Page 161: Ewf, Die Sicherung Gegen Einstellungsänderungen
Um Einstellungen oder Programme dauerhaft auf C: speichern zu können, müssen Sie Änderungen sichern und neu starten im Startbildschirm („CX22Shell“) verwenden. Damit werden Änderungen dauerhaft über nommen und stehen auch nach dem nächsten Neustart des CX22B‒W zur Verfügung. CX22B / CX22B-W A3169-8.0 HBM: public... - Page 162 Sie in den Shell-Einstellungen des CX22B-W in das Register "Allgemein". Setzen Sie das Häkchen für die Option "Gateway-Funktionalität anschalten", um die Op tion zu aktivieren, bzw. entfernen Sie es, um sie zu deak tivieren. CX22B / CX22B-W A3169-8.0 HBM: public...
- Page 163 Sie catman auf ihrem PC und suchen im Device Manager nach Modulen. Die über den CX22B-W angeschlossenen Module werden als untergeordnete Elemente des CX22B-W angezeigt. Im Unterschied zu CX27B Ethernet / EtherCAT gateway können Sie Quan tumX-Module einzeln auswählen. CX22B / CX22B-W A3169-8.0 HBM: public...
- Page 164 Betrieb des CX22B/CX22B-W als Gateway Wichtig Sie können die Verbindung zu einem über den CX22B-W angeschlossenen QuantumX-Modul nur zeitgleich her stellen. Nacheinander ausgeführte Verbindungsversuche schlagen fehl. CX22B / CX22B-W A3169-8.0 HBM: public...
- Page 165 Bewertung der Leistungen des Gateway-Modus beim CX22B-W durchgeführt haben: Maximaler kumulativer Datendurchsatz (Gateway- Modus) LAN (Gigabit) MS/s > 3 WLAN-Schnittstelle (Adhoc) MS/s > 0,2 Prüfbedingungen: 12 Module (FireWire), 48 DAQ-Kanäle Prüfbedingungen: 14 Module (FireWire), 108 DAQ-Kanäle CX22B / CX22B-W A3169-8.0 HBM: public...
-
Page 166: Systemeinstellungen, Update Und Wiederherstellen
Stabilität des CX22B‒W‐Datenrekorders nicht zu ge fährden. Bei der Installation weiterer Software kann die Funktion des CX22B‒W‐Datenrekorders nicht mehr ga rantiert werden und ein Support von HBM für damit im Zusammenhang stehende Fehler kann nicht erfolgen. In der Praxis wurden bereits Treiber für die folgenden Endgeräte erfolgreich installiert und in Betrieb genom... -
Page 167: Systemeinstellungen Ändern (Einstellungen)
Klicken Sie im Startbildschirm auf Einstellungen und gehen Sie zum Ändern auf das entsprechende Register. Sie können folgende Einstellungen ändern: S Gerätename (CX‐Seriennummer, Register Allge mein) Dieser Name wird z. B. im Netzwerk angezeigt. S Passwort (Register Passwort Remote‐Zugang) CX22B / CX22B-W A3169-8.0 HBM: public... - Page 168 Bewahren Sie das Passwort bei einer Änderung gut auf. Bei Verlust müssen Sie sonst das System wiederher stellen, um wieder Zugang zum CX22B‒W zu erhalten. Das Register Info enthält Informationen zur CX22B‒Hardware (ID), zur Seriennummer des Gerätes und zur Firmware‐Version. CX22B / CX22B-W A3169-8.0 HBM: public...
-
Page 169: Software Aktualisieren
Sie benötigen zur Wiederherstellung einen speziell vorbereiteten bootfähigen USB‐Speicherstick, eine Tastatur und nach Möglichkeit auch einen (digitalen) Bildschirm, den Sie direkt an den CX22B‒W anschließen können (DVI‐Ausgang). Bitte kontaktieren Sie dazu un seren Support ( http://www.hbm.com/support). CX22B / CX22B-W A3169-8.0 HBM: public... -
Page 170: Mögliche Fehlerquellen Und Abhilfe
Gerade im verteilten Modulverbund, z.B. in Zügen kann es vorkommen, dass ein Modul oder ein ganzer Modul strang abgenommen wird. Sie haben die Möglichkeit cat man so zu konfigurieren, dass die Messung weiterläuft oder abbricht. CX22B / CX22B-W A3169-8.0 HBM: public... -
Page 171: Erklärung Zur Fcc (Usa) Und Ci (Canada) Konformität
Teil 15, §103 der FCC sowie der ICES-003, Kapitel 4 Regularien. Anbindung von zusätzlichen Geräten oder Veränderungen dieses Geräts ohne die explizite Autorisierung durch HBM, z.B. durch die Bedienungsanleitung, kann zusätzliche Interfe renzen und Störungen verursachen und damit zum CX22B / CX22B-W A3169-8.0 HBM: public... - Page 172 Der Betrieb dieses Geräts im Wohn bereich kann Funkstörungen verursachen. In diesem Fall ist der Benutzer verpflichtet, diese Funkstörungen auf eigene Kosten zu beseitigen. Die EU-Konformitätserklärung ist über die HBM- Internetseite wie folgt zu erreichen: www.hbm.com → Messverstärker → Universelle Datenrekorder →...
- Page 173 Erklärung zur FCC (USA) und CI (Canada) Konformität Jeder nicht durch HBM autorisierte Anschluss von Zusatzgeräten oder Änderungen und Umbauten am CX22B-W selbst können zu zusätzlichen Stö rungen führen. In diesem Fall kann die Betriebs genehmigung für den Kunden erlöschen. Dies gilt insbesondere auch für den Ersatz oder die Ver...
-
Page 174: Entsorgung Und Umweltschutz
Art von Entsorgung oder Recycling in Ihrem Land vorgeschrieben ist. Verpackungen Die Originalverpackung der HBM‐Geräte besteht aus recyclebarem Material und kann der Wiederverwertung zugeführt werden. Aus ökologischen Gründen sollte auf den Rücktransport der leeren Verpackungen an uns ver... - Page 175 VGA, 31 Digitale Eingänge, 22 catman AP Eingabesprache, 31 automatisch starten, 82 Einstellungen, 81 Sprache ändern, 82 ERROR (LED), 26 starten, 53 EWF, 75 CF‐Karte entfernen, 73 LED, 27 CompactFlash‐Karte, siehe Firmware‐Version, 82 CF-Karte, 71 CX22B / CX22B-W A3169-8.0 HBM: public...
- Page 176 DVI, digital, 31 System wiederherstellen, 83 VGA, 31 Systemeinstellungen, ändern, 81 Passwort ändern, 53, 81 Tablet‐PC, Verbindung mit CX22, PC, über WLAN verbinden, 45 Tastatur, 31 Tastaturlayout, 31 RECORDING (LED), 26 Taste START/STOP, 22 Recovery, 83 CX22B / CX22B-W A3169-8.0 HBM: public...
- Page 177 Stichwortverzeichnis Umgebungsbedingungen, 5 Wartung, 6 Wiederherstellung, des CX22‐Systems, 83 Windows, CX22‐Betriebssystem aufrufen, 54 CX22B / CX22B-W A3169-8.0 HBM: public...
- Page 178 HBM Test and Measurement Tel. +49 6151 803-0 Fax +49 6151 803-9100 info@hbm.com measure and predict with confidence...
Need help?
Do you have a question about the QuantumX CX22B-W and is the answer not in the manual?
Questions and answers