
Related Manuals for Qiagen QIAcube HT


Summary of Contents for Qiagen QIAcube HT
- Page 1 December 2017 QIAcube HT User Manual For use with the QIAcube HT Prep Manager Software Sample to Insight...
-
Page 2: Table Of Contents
General information ......................1-3 1.3.1 Technical assistance ..................1-3 1.3.2 Policy statement ..................1-3 1.3.3 Version management ..................1-3 Intended use of the QIAcube HT ......................1-3 Requirements for QIAcube HT users ......................1-4 Requirements for some kits ......................1-4 Safety information ......................2-2 Proper use ......................2-2 Electrical safety ......................2-4... - Page 3 Installation of tip disposal box holder ..................4-11 4.3.5 UV lamp ..................4-12 4.3.6 Installation of AC power cord ..................4-12 4.3.7 Connecting the computer to the QIAcube HT ..................4-13 Software installation ......................4-14 4.4.1 Installing QIAcube HT Prep Manager Software ..................4-14 4.4.2 Uninstalling QIAcube HT Prep Manager Software ..................4-15...
- Page 4 4.4.4 Upgrading from legacy QIAcube HT Software ..................4-17 4.4.5 Installing additional kits ..................4-18 Getting started ......................5-2 Start the software ......................5-2 Customizing global settings ......................5-3 Customize user settings ......................5-7 Managing users ......................5-9 5.4.1 Changing password ..................5-15 Managing labware ......................5-16 Assembling the vacuum chamber ......................5-18...
- Page 5 ................6-25 Pausing/Stopping a run ................6-26 Vacuum performance check ................6-27 Run completion ................6-29 Finishing work and shutting down ......................6-30 QIAcube HT Prep Manager Software ......................7-2 Basic concepts and general software usage ......................7-2 7.1.1 Concepts ..................7-2 User roles concept ................7-2 Experiments and templates ................7-3...
- Page 6 Create an experiment from an existing experiment ................7-39 Report ......................7-39 Administrative tasks ......................7-44 7.4.1 Configuring QIAcube HT ..................7-44 7.4.2 Viewing software version ..................7-44 7.4.3 View system audit trail ..................7-44 Maintenance procedures ......................8-2 Cleaning agents ......................8-2 QIAcube HT User Manual 12/2017...
- Page 7 Emptying the waste bottle ..................8-7 8.3.5 Cleaning accessories ..................8-8 8.3.6 Using UV lamp ..................8-10 Periodic maintenance ......................8-11 8.4.1 Maintenance of the QIAcube HT instrument ..................8-11 8.4.2 Maintenance schedule ..................8-12 8.4.3 Maintenance of the QIAcube HT pipettor ..................8-15 8.4.4 Replacing the HEPA filters ..................8-15 8.4.5...
- Page 8 Vapeurs toxiques ................11-10 11.3.5 Traitement des déchets ..................11-10 11.3.6 Dangers mécaniques ..................11-11 11.3.7 Sécurité relative à la maintenance ..................11-12 11.3.8 Symboles sur le QIAcube HT ..................11-14 11.4 Appendix D Sicherheitshinweise ......................11-15 11.4.1 Sachgemäße Handhabung ..................11-15 11.4.2 Elektrische Sicherheit ..................11-17 11.4.3 Biologische Sicherheit ..................11-18...
- Page 9 11.6.1 License Terms ..................11-26 11.6.2 Copyright information ..................11-63 QIAcube HT User Manual 12/2017...
-
Page 10: Introduction
Introduction QIAcube HT User Manual 12/2017... -
Page 11: Provided User Manuals
HT. We are confident it will become an integral part of your laboratory. Before using the QIAcube HT, it is essential that you read this user manual carefully and pay particular attention to the safety information. The instructions and safety information in this user manual must be followed to ensure safe operation of the instrument and to maintain the instrument in a safe condition. -
Page 12: General Information
The QIAcube HT is intended for molecular biology applications. This product is not intended for the diagnosis, prevention or treatment of a disease. The QIAcube HT instrument is intended to be used only in combination with QIAcube HT Kits for applications described in the respective kit handbooks. -
Page 13: Requirements For Qiacube Ht Users
Regularly trained, certified and authorized by preventive maintenance Specialists only QIAGEN Requirements for some kits For more information about available kits and protocols for the QIAcube HT, please visit www.qiagen.com/QIAcubeHT or contact QIAGEN Technical Services. QIAcube HT User Manual 12/2017... -
Page 14: Safety Information
Safety information QIAcube HT User Manual 12/2017... -
Page 15: Proper Use
Safety information Before using the QIAcube HT, it is essential that you read this user manual carefully and pay particular attention to the safety information. The instructions and safety information in the user manual must be followed to ensure safe operation of the instrument and to maintain the instrument in a safe condition. - Page 16 WARNING/ Risk of personal injury and material damage [W3] CAUTION The QIAcube HT is too heavy to be lifted by one person. To avoid personal injury or damage to the instrument, do not lift the instrument alone. WARNING/ Risk of personal injury and material damage [W4] CAUTION Do not attempt to move the QIAcube HT during operation.
-
Page 17: Electrical Safety
In case of emergency, switch off the QIAcube HT at the power switch at the rear of the instrument and unplug the power cord from the power outlet. -
Page 18: Biological Safety
If the instrument becomes electrically unsafe, prevent other personnel from operating it, and contact QIAGEN Technical Services. The instrument may be electrically unsafe when: The line power cord appears to be damaged. It has been stored for a prolonged period of time in conditions which are outside of the “Storage Conditions” outlined Appendix It has been subjected to severe transport stresses. -
Page 19: Chemicals
WARNING Moving parts [W12] Avoid contact with moving parts during operation of the QIAcube HT. Under no circumstances should you place your hands under the pipetting arm when it is lowering. Do not attempt to move any plates or tubes while the instrument is operating. -
Page 20: Maintenance Safety
WARNING Moving parts [W15] To avoid contact with moving parts during operation of the QIAcube HT, the instrument must be operated with the lid closed. If the lid sensor is not functioning correctly, contact QIAGEN Technical Services. CAUTION Damage to the instrument [C3] Do not apply any manual force to the Y-arm (i.e., the pipetting head). - Page 21 Never clean the instrument side panels with alcohol or alcohol-based solutions. WARNING/ Risk of fire [W16] CAUTION When cleaning QIAcube HT instruments with alcohol-based disinfectant, leave the instrument hoods open to allow flammable vapors to disperse. QIAcube HT User Manual 12/2017...
- Page 22 Relocating the QIAcube HT [C10] The most important component of the packaging is the wooden support that immobilizes the Y-arm. This support must be used when the QIAcube HT is moved. Failure to do so will void the warranty. QIAcube HT User Manual 12/2017...
-
Page 23: Symbols On The Qiacube Ht
Symbols on the QIAcube HT Symbol Location Description Worktable and near the type Warning symbol plate Worktable and near the tip chute Biohazard symbol outlet Worktable Squeezing warning symbol Type plate on the back of the CE mark for European Conformity... -
Page 24: General Description
General description QIAcube HT User Manual 12/2017... - Page 25 General description QIAcube HT enables automated mid- to high-throughput nucleic acid purification in 96-well format using silica membrane technology. Users can quickly and easily purify DNA, RNA and miRNA from almost any type of sample – including cells, tissues and food material, as well as from bacteria and viruses in animal and human samples. Automated protocols and dedicated QIAcube HT purification kits and plasticware increase reliability and convenience and save valuable time.
-
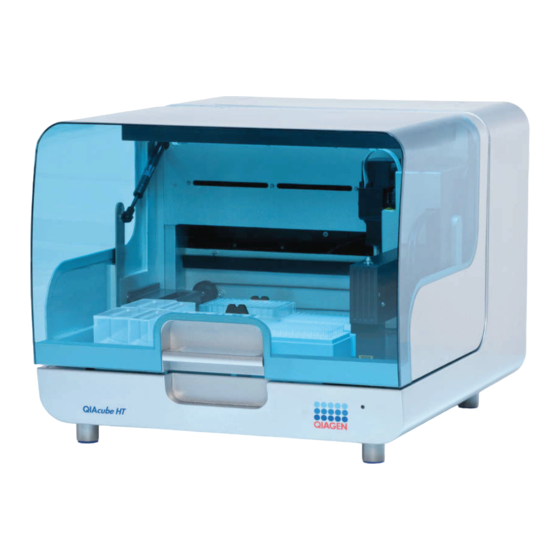
Page 26: Qiacube Ht Instrument
The QIAcube HT: Reagent plate R1 and troughs UV lamp Lysis plate Pipettor head (robotic arm) 9,10 Vacuum chamber with filter plate Tip chute HEPA filter Tip racks Accessory panel Reagent plate SBS and troughs Feet QIAcube HT User Manual 12/2017... -
Page 27: Lid
Feet The feet of the instrument have a non-slip base to ensure that the QIAcube HT remains securely positioned on a laboratory bench. Do not attempt to slide the instrument on a bench. Always lift the instrument to avoid damage to the base of the feet. -
Page 28: Tip Chute
3.1.3 Tip chute Used tips are discarded through the tip chute. Located at the left hand side of the QIAcube HT, the tip chute is held in place by a locating block, allowing easy placement and removal for cleaning. 3.1.4 Tip disposal box Discarded tips are collected in a tip disposal box, located at the side of the QIAcube HT. -
Page 29: Hepa Filter
Note: Before using the UV lamp, the tip chute must be covered with the Tip Chute Protective Cap and placed into the instrument. For increased safety, an electronic lid sensor ensures that the UV lamp operates only when the instrument lid is closed. QIAcube HT User Manual 12/2017... -
Page 30: Pipettor Head And Robotic Arm
A1, A2: the positions of the vacuum chamber R1: where reagents can be placed using the reagent through adapter B1, B2, C1, C2: where tips, plates and reagents can be placed QIAcube HT User Manual 12/2017... - Page 31 B2, and clamp I between C1 and C2 with the open side towards C1. Note: The Reagent Plate SBS adapter needs more space than e.g. a QIAGEN S-block 96 Well or a tip rack. Therefore, it can be placed only on worktable position C1 next to the open side of a clamp I. If for a protocol the adapter needs to be placed on another position, the clamps must be adjusted.
-
Page 32: Accessory Panel
3.1.9 Accessory panel All connectors are located on the accessory panel on the rear of the QIAcube HT. QIAcube HT accessory panel Accessory 1 Accessory power outlet Accessory 2 Main power input socket Accessory 3 Power switch Serial RS-232 socket... -
Page 33: Vacuum Chamber
Vacuum chamber Empty vacuum chamber, channeling adapter, and riser block EMTR. The QIAcube HT vacuum chamber is composed of two separate chambers for waste (left) and elution (right). This configuration is one of many measures to minimize sample cross-contamination during purification. - Page 34 Vacuum hoses must not be modified (e.g., shortened or lengthened). The transfer carriage provides a platform for transporting the filter plate between the waste and elution chambers of the vacuum chamber. Transfer carriage for use with filter plates (e.g., QIAamp 96 plate) QIAcube HT User Manual 12/2017 3-11...
-
Page 35: Vacuum Control Station And Waste Bottle
3.1.11 Vacuum control station and waste bottle Vacuum control station. QIAcube HT User Manual 12/2017 3-12... - Page 36 3 Red LED (standby) 6 Power switch The vacuum control station, an integral component of the QIAcube HT, provides vacuum to the vacuum chamber for processing. Vacuum pressure is precisely controlled by the QIAcube HT Prep Manager Software. A 4-liter waste bottle is housed in the vacuum control station. The waste bottle is connected to the vacuum chamber by a silicone hose that branches just before passing through the pinch valve.
-
Page 37: Pinch Valve
To empty the bottle, follow the procedure described in section Emptying the waste bottle. 3.1.12 Pinch valve Pinch valve (base) and silicone hoses. Silicone hoses Pinch bar QIAcube HT User Manual 12/2017 3-14... - Page 38 Pressing either button moves the pinch valve in the direction that the button is pushed, opening the vacuum to the opposite station. Pressing both buttons simultaneously moves the pinch valve to the center position, opening the vacuum to both stations. IMPORTANT: In case of protocol failure, do not push override during processing. QIAcube HT User Manual 12/2017 3-15...
-
Page 39: Internal Features Of The Qiacube Ht
3.1.13 Internal features of the QIAcube HT QIAcube HT User Manual 12/2017 3-16... - Page 40 X-axis Worktable Y-axis Reagent plate SBS and troughs Z-axis Reagent plate R1 and troughs Pipettor head 10 Tip racks and tips Vacuum elution chamber 11 Y-arm Vacuum waste chamber 12 Tip chute QIAcube HT User Manual 12/2017 3-17...
-
Page 41: Computer
Computer The QIAcube HT is operated via a computer. A laptop with the correct specification for operation of the QIAcube HT and QIAcube HT Prep Manager is supplied as part of the QIAcube HT System. However, if a different computer is used to operate the QIAcube HT or to run the QIAcube HT Prep Manager, then a computer hosting system with the following specifications is recommended. - Page 42 If virus protection software is required, ensure that the following tasks are scheduled to run outside the operating times of the QIAcube HT: Scans (also ensure that files that are created by the QIAcube HT Prep Manager are not scanned during creation or on access)
-
Page 43: Installation Procedures
Installation procedures QIAcube HT User Manual 12/2017... -
Page 44: System Delivery
QIAGEN instruments, such as the QIAgility Troughs and Plates A set of labware can be used with the QIAcube HT that is already pre-installed in the software and can be found in the Labware manager. The following labware are supplied with the instrument:... -
Page 45: Requirements
Reagent trough layout for the QIAcube HT specific reagent trough adapter. Tips 200 µl Filtered Tips can be used on QIAcube HT. Supplied tips are filtered and hold in single compartments in the tip rack. Important: Do not use tips from other suppliers. -
Page 46: Power Requirements
The QIAcube HT operates at these power conditions: 100–240 V, 250 VA, 50–60 Hz, T5A 250V fuse. Make sure the voltage rating of the QIAcube HT and laptop are compatible with the AC voltage available at the installation site. Main supply voltage fluctuations should not exceed ±10% of nominal supply voltages. -
Page 47: Unpacking And Installation
1. Remove the lid from the QIAcube HT shipping container. 2. Check that the QIAcube HT is not damaged and that there are no loose parts. If anything is damaged, contact QIAGEN Technical Services. -
Page 48: Releasing Transport Locks
Relocating the QIAcube HT [C10] The most important component of the packaging is the wooden support that immobilizes the Y-arm. This support must be used when the QIAcube HT is moved. Failure to do so will void the warranty. Important: The instrument packaging may be updated over time. In case the transport locks on your instrument are different from the images below, refer the unpacking instructions delivered with the instrument. -
Page 49: Installation Of Vacuum Control Station
Important: The wooden support must be kept and used again whenever the QIAcube HT is moved. 4.3.2 Installation of vacuum control station The vacuum control station is best placed directly below the laboratory table upon which the instrument is placed. - Page 50 Hoses visible in the gap between the rear cover and the pinch valve. Make sure that the hoses are not twisted and that they exit from under the rear cover without kinking. QIAcube HT User Manual 12/2017...
- Page 51 6. Plug the Polycap filter into the correct opening on the vacuum station. 7. Connect the hoses between the Polycap filter, vacuum station and waste bottle cap. 8. Connect the cable between the vacuum station and waste bottle cap. QIAcube HT User Manual 12/2017...
- Page 52 12. Connect one end of the AC power cord (standard 3-wire IEC mains cable) to the power connector of the vacuum control station, and the other end to the AC power outlet. QIAcube HT User Manual 12/2017 4-10...
-
Page 53: Installation Of Pinch Valve
The tip disposal box is held in place by the tip disposal box holder to ensure the correct positioning of the tip disposal box under the tip chute. Lock the tip disposal box holder with the instrument’s feet on the left side of the instrument. QIAcube HT User Manual 12/2017 4-11... -
Page 54: Uv Lamp
Installation of AC power cord Connect the QIAcube HT to the power outlet as follows: 1. Ensure that the power switch of the QIAcube HT is set to the "Off" position. 2. Plug the power cord into the main power input socket. -
Page 55: Connecting The Computer To The Qiacube Ht
Unpacking the QIAcube HT). The laptop is in its final location near the instrument. Note: Before connecting the QIAcube HT to the computer for the first time, ensure that the QIAcube HT Prep Manager has been installed (see section Software installation). -
Page 56: Software Installation
Note: Windows administrator privileges are required for software installation only. 3. Close any programs running on the computer and make sure that the QIAcube HT is not connected to the computer (i. e., unplug the USB or RS-232 cable from the computer). -
Page 57: Uninstalling Qiacube Ht Prep Manager Software
Click Install to install the QIAcube HT driver. After driver installation, click Finish in the Device Driver Installation Wizard. Note: If you do not install the driver software, the QIAcube HT Prep Manager will not be able to operate the QIAcube 12. After installation, click Exit Setup in the CD menu, or Finish in the wizard. -
Page 58: Updating Qiacube Ht Prep Manager Software
Note: Windows administrator privileges are required for software installation only. 3. Close any programs running on the computer and make sure that the QIAcube HT is not connected to the computer (i. e., unplug the USB or RS-232 cable from the computer). -
Page 59: Upgrading From Legacy Qiacube Ht Software
8. Click Next to start the installation. 9. If you are updating from QIAcube HT Prep Manager version 1.0, a message will appear to inform you that a wrong SiLabs USB driver version has been detected and will be replaced during installation by the new driver version. This new driver version is required to operate the QIAcube HT Prep Manager. -
Page 60: Installing Additional Kits
Manager computer. 2. Use a Windows account with administrator privileges. 3. Close any programs running on the computer and make sure that the QIAcube HT is not connected to the computer. 4. Extract the kit installation package .zip file. 5. Double-click on the ConfigurationInstaller.exe file, and follow the instructions in the setup wizard. -
Page 61: Getting Started
Getting started QIAcube HT User Manual 12/2017... -
Page 62: Start The Software
This allows the QIAcube HT to connect to the QIAcube HT Prep Manager. If the QIAcube HT is connected to the computer via USB, you can switch on the QIAcube HT later after the software has already started. The QIAcube HT automatically connects to the QIAcube HT Prep Manager. This may take around 5 to 10 seconds. -
Page 63: Customizing Global Settings
The Global Settings tab of the Configuration screen enables users to define general settings such as default directories, e- mail server details (for e-mail notifications), printing and password options and more. Maintenance options Specify the settings for the cleaning procedures. QIAcube HT User Manual 12/2017... - Page 64 Option Description UV lamp cleaning duration Enter the time duration for the UV lamp cleaning procedure. QIAGEN recommends a duration of 30 minutes. The UV lamp cleaning procedure can be initiated from the Cleaning Procedure tab of the Service environment.
- Page 65 Select..A dialog offers a list of printers that are available from the computer, i.e., all printers which have been configured in Windows. Select No printer if you do not want to use this option. Bar code printing is then not available. QIAcube HT User Manual 12/2017...
- Page 66 The general network settings for the mail server and an optional proxy server must to be entered in order for the e-mail notification to function. In case you do not know these details, contact your network administrator. QIAcube HT User Manual 12/2017...
-
Page 67: Customize User Settings
QDEF file, but with extension .csv. It will be saved side by side with the QDEF file. As an example, the QIAcube HT Prep Manager provides one .xslt file that transforms the output file in a .csv file: C:\Users\Public\QIAGEN\QIAcubeHT \QIAcubeHTData\KitConfiguration\QCHT_SampleInformationFile.xslt... - Page 68 The selected directory serves as a starting point for the file dialog that opens when you save an output file after the run. Initially, the standard directories are defined to be subfolders of C:\Users\Public\QIAGEN\QIAcubeHT. Notification Two kinds of notifications can be configured: a sound notification or a notification via e-mail, for various kinds of events.
-
Page 69: Managing Users
Managing users When starting the QIAcube HT Prep Manager for the first time, we recommend that you change the password from the default admin, and create user profiles to suit your needs. - Page 70 Creating a user Note: To configure the QIAcube HT Prep Manager, a user profile with administrator role is required. To operate the QIAcube HT Prep Manager, the user role operator is sufficient. The initially provided user admin has the user role administrator and is sufficient to configure and operate the QIAcube HT Prep Manager.
- Page 71 Spaces are not allowed (in general, blank spaces are not allowed) Once the user profile has been created, the field can no longer be changed First/Last name May not contain more than 50 characters Numerical and non-numerical characters are allowed May not be empty QIAcube HT User Manual 12/2017 5-11...
- Page 72 1. Open the User Management screen by clicking Configuration in the main toolbar and then clicking the User Manager tab. 2. Click the Edit user icon ( ) in the Actions row for the user you want to change. QIAcube HT User Manual 12/2017 5-12...
- Page 73 1. Open the User Management screen by clicking Configuration in the main toolbar and then clicking the User Manager tab. 2. Click the Delete user icon in the Actions row for the user you want to delete. 3. The following confirmation dialog is opened: QIAcube HT User Manual 12/2017 5-13...
- Page 74 Note: If you deactivate a user profile while this option is activated, the user profile will not be listed in the Registered users table. To show the deactivated user, you must first remove the check from this box to deactivate this option. QIAcube HT User Manual 12/2017 5-14...
-
Page 75: Changing Password
Standard policy is configured and an empty password is not allowed. 5. Click OK to save the new password. Use the new password for the next login. If an empty password has been set, leave the Password field empty during login. QIAcube HT User Manual 12/2017 5-15... -
Page 76: Managing Labware
Managing labware The QIAcube HT Prep Manager contains a labware library that includes all labware supported by the QIAcube HT. During run setup, the software automatically plans the worktable for the run. As the basis for this plan, you must first indicate which labware (e.g., plates, troughs) is available in your laboratory. - Page 77 3. The Labware Manager screen will be displayed and the Adapter step will be active. However, since all adapters that can be used with the QIAcube HT are by default present in the Available in laboratory list, this step can be skipped.
-
Page 78: Assembling The Vacuum Chamber
Note: The worktable planning might fail if you remove the large trough. In some situations, there might be not sufficient worktable positions to place the necessary number of small troughs. Assembling the vacuum chamber The assembly of the vacuum chamber differs for run and calibration. Assembly for calibration. Assembly for standard purification protocols. QIAcube HT User Manual 12/2017 5-18... -
Page 79: Assembly For Calibration
2. Push it firmly downwards to engage the outlet into the drain. The channeling block holder (2) is held firmly in place by a rubber O-ring on the outlet. 3. Place the channeling block (3) into the channeling block holder (2). QIAcube HT User Manual 12/2017 5-19... - Page 80 Note: For worktable position A1, the calibration needs to be performed into the channeling adapter only (i.e., without a filter plate) to increase calibration precision. QIAcube HT User Manual 12/2017 5-20...
-
Page 81: Assembly For Standard Purification Protocols
2. Push it firmly downwards to engage the outlet into the drain. The channeling block holder (2) is held firmly in place by a rubber O-ring on the outlet. 3. Place the channeling block (3) into the channeling block holder (2). QIAcube HT User Manual 12/2017 5-21... - Page 82 7. Place the riser block EMTR (6) in the right (elution) side of the vacuum chamber (1) with the pin of the riser block EMTR in the right top position. 8. Remove the cap from the elution microtubes rack (EMTR) (7) and load the rack into the right (elution) chamber of the vacuum chamber (1). QIAcube HT User Manual 12/2017 5-22...
-
Page 83: Instrument Calibration
Instrument calibration An instrument calibration must be performed before the QIAcube HT can be used, to ensure precision positioning and pipetting. No runs can be started if the required calibrations have not been performed. Calibration includes: Volume calibration The actual volume calibration is performed at the manufacturer's site and only requires that the user enters the measured calibration data. - Page 84 The calibration tasks are bundled in the Calibration tab of the Configuration environment. All calibration steps are built in a wizard-style format that allows you to move forward or backward one screen using the Next or Back button in the button bar, respectively. QIAcube HT User Manual 12/2017 5-24...
-
Page 85: Calibrate Volumes
Labware calibration step. For the first calibration, this order is required, and the next step will only be available after the previous step has been completed. Note: If the QIAcube HT is moved, we recommend recalibration, starting from step Tip Rack. Click on the Tip Rack step to start there. - Page 86 5. For the first target volume entry in the table (20 µl) enter the corresponding P-axis value from the calibration report to the Value column. Press the Enter key to confirm and to navigate to the next entry. QIAcube HT User Manual 12/2017 5-26...
-
Page 87: Calibration Positioning Buttons
Note: The Next button is available only if volume calibration data for the current pipettor head have been saved. 5.7.2 Calibration positioning buttons For corrections to calibration positions, the software provides several positioning buttons. The positioning buttons are arranged in two groups, one for the Z-axis and one for the XY-axis. QIAcube HT User Manual 12/2017 5-27... -
Page 88: Calibrate Tip Racks
Fast down Fast backward 5.7.3 Calibrate tip racks The tip rack calibration is essential to ensure a reliable pickup of tips. Tip rack calibration is available only if the volume calibration has already been performed. QIAcube HT User Manual 12/2017 5-28... - Page 89 1. If not activated, click the worktable position you want to test: B2 or C2. 2. Click the Test tip pickup button to start the test. Note: The button is active only if a calibration has been already performed on that worktable position. QIAcube HT User Manual 12/2017 5-29...
-
Page 90: Calibrate Labware
All labware that has already been calibrated for the currently connected instrument will be listed in the Calibration history table. Initially, the table is empty. Note: The calibration history will also be empty after the pipettor head has been changed, because calibration data are individual for an instrument and a pipettor head. QIAcube HT User Manual 12/2017 5-30... - Page 91 Note: The list contains all labware that has been made available in the Labware Manager. If a labware item is missing, make it available in the Labware Manager first. For details refer to chapter Managing labware. QIAcube HT User Manual 12/2017 5-31...
- Page 92 Sometimes it is better to create a smaller work list and to calibrate the labware in subsets. Note: Filter plates do not need Z-axis calibration. QIAcube HT User Manual 12/2017 5-32...
- Page 93 Note: 170 ml troughs will not be XY-calibrated themselves, but will be replaced by 70ml troughs during XY- calibration, instead. However, during Z-calibration, again the 170 ml will be used. Note: No labware needs to be calibrated on worktable position A2, because this is already covered by calibration of position A1. QIAcube HT User Manual 12/2017 5-33...
-
Page 94: Prepare Worktable For Labware Calibration
The dialog displays the required number of tips in the Required column of the table. Initially, the button B2 is displayed in yellow to indicate that the number of available tips, initially set to zero, is insufficient and that the loaded state has not yet been confirmed. QIAcube HT User Manual 12/2017 5-34... - Page 95 5. Place the tip rack into worktable position C2. 6. Repeat steps 2–3 for the tip rack at position C2. 7. Once you have placed a sufficient number of available tips and have confirmed the Loaded state at least for tip rack QIAcube HT User Manual 12/2017 5-35...
-
Page 96: Calibrate X- And Y-Axis
1. Place the labware, adapter or accessory listed at the top right onto the worktable position indicated in the worktable indicator: For worktable position A1, follow the loading instruction described in Assembly for calibration. QIAcube HT User Manual 12/2017 5-36... - Page 97 Z-calibrations must still be performed. The labware calibration wizard will be closed and the initial labware calibration screen will be shown. All labware items will remain QIAcube HT User Manual 12/2017 5-37...
-
Page 98: Calibrate Z-Axis
3. Click the Perform calibration... button. The pipettor head ejects the tips, picks up a new column of tips and moves to the calibration position. 4. The pipettor head automatically moves down to the bottom of the labware and repeats this procedure with a new QIAcube HT User Manual 12/2017 5-38... - Page 99 6. Click Next to move forward to the next Z-calibration step, or click Close if this was the last calibration step. To determine if this was the last calibration step, look at the progress bar in the lower left of the window. QIAcube HT User Manual 12/2017 5-39...
-
Page 100: Saving And Importing Calibration Data
Note: Labware calibration data can only be saved together with volume and general instrument calibration data. Note: If you intend to change the laptop that controls the QIAcube HT or if the QIAcube HT Prep Manager needs to be reinstalled, check all options. - Page 101 Note: If you changed the laptop that controls the QIAcube HT or if the QIAcube HT Prep Manager has been reinstalled, check all options.
-
Page 102: Operating Procedures
Operating procedures QIAcube HT User Manual 12/2017... -
Page 103: Starting A Run
QIAcube HT Prep Manager Software. The QIAcube HT lid must remain closed during operation of the instrument. Only open the lid when the instrument is not operating or when instructed to do so by the software. Note: Opening the lid during operation of the QIAcube HT will cause the system to pause. The instrument will complete the current movement, which may take up to 10 seconds. -
Page 104: Setup Step
Setup step will be the only active step. 1. If not yet selected, select the kit from the Select kit drop-down menu. 2. The Kit information, Sample type, Pre-treatment and Select protocol fields are displayed. QIAcube HT User Manual 12/2017... - Page 105 6. Select a protocol from the Select protocol drop-down menu. The entries in this menu are kit-dependent. Refer to the kit handbook for more information. Below, a short description about the selected protocol is displayed. After you selected the protocol, at the right an Optional steps pane is shown. QIAcube HT User Manual 12/2017...
-
Page 106: Labware Selection Step
QIAGEN is not responsible and does not support experiment with modified advanced options. You are acting on your own risk if you change these options. - Page 107 Note: For more details about the sample editor refer to the section Working with tables. 8. Click OK to close the Sample editor. Proceed to step 13. QIAcube HT User Manual 12/2017...
- Page 108 Then the output file from the first run can be loaded and used as a starting point for the second run. After the second run, the information from both runs can be saved in the output file. QIAcube HT User Manual 12/2017...
-
Page 109: Select Other Input Labware
Labware Selection screen is colored yellow to indicate that this information is required. 1. Click on the Input labware type drop-down menu. 2. All previously selected labware types will be listed. The Choose other labware option will be listed last. QIAcube HT User Manual 12/2017... - Page 110 Note: Before you can use the labware for a run, it must be indicated as Available in the laboratory in the Labware Manager. If the labware has never been used before on the QIAcube HT, it also must be calibrated.
- Page 111 Reset filter If you click the button, the software clears all filter options to the initial state. Apply filter If you click the button, the software lists all labware that matches the search criteria. QIAcube HT User Manual 12/2017 6-10...
-
Page 112: Assignment
If you hover the mouse pointer over an output position, the software displays the sample ID for that position. Use the List tab of the output panel to view the sample definitions that have been assigned. QIAcube HT User Manual 12/2017 6-11... -
Page 113: Assigning Samples
4. Repeat the steps until all columns of the output side have been defined for the planned run. 5. If the QIAcube HT instrument is not yet connected, switch it on now. Wait until the instrument has connected with the... -
Page 114: Removing Assignment
The Worktable selector at the top shows a visualization of the worktable positions to be loaded. To navigate, use the Next and Back buttons or just click on a position in the Worktable selector. QIAcube HT User Manual 12/2017 6-13... - Page 115 If several throughs need to be loaded to the worktable position, the table will display one row for each trough. You must confirm that the labware has been loaded by checking the box in the Loaded column. Table of troughs to be loaded to the worktable position R1. QIAcube HT User Manual 12/2017 6-14...
- Page 116 Therefore, you must set singular, multiple or all tips To available or To unavailable in the interactive tip rack according to the available tips on the tip rack on the worktable. For details, refer to Loading tips. QIAcube HT User Manual 12/2017 6-15...
-
Page 117: Preparing The Worktable
Worktable selector. 4. After you have confirmed that all worktable positions have been loaded, the Start run button and the Run step will be activated. Proceed with the instructions described in Starting a run. QIAcube HT User Manual 12/2017 6-16... -
Page 118: Checking The Waste Bottle Status
We recommend that you empty the waste bottle before run. 1. Empty the waste bottle. 2. Click Emptied. 3. Click Next to proceed to the next worktable position chute. QIAcube HT User Manual 12/2017 6-17... -
Page 119: Preparing Tip Chute And Tip Disposal Box
1. Place the tip chute at the rear-left of the QIAcube HT into the locating block so that the chute is over the tip disposal box. - Page 120 Tip chute. Alignment of tip disposal box holder to the instrument and the tip disposal box. QIAcube HT User Manual 12/2017 6-19...
-
Page 121: Preparing The Vacuum Chamber
Loading tips 6.1.4.5 A full tip rack has been loaded on B2. 1. Check that the number of tips is sufficient. If not, load additional tips. Ensure that the lids have been removed from the QIAcube HT User Manual 12/2017 6-20... - Page 122 Use the tip availability buttons below the rack graphic to set the availability of the rack. QIAcube HT User Manual 12/2017 6-21...
- Page 123 Available number of tips According to the settings selected in the tip rack graphic on the right, the software will display the number of available tips of that tip type in the column Available. QIAcube HT User Manual 12/2017 6-22...
-
Page 124: Loading Reagents And Samples
4. Confirm that the position has been loaded by checking the box in the Loaded column or click Confirm all to confirm all positions. 5. Click Next to continue with the next worktable position. QIAcube HT User Manual 12/2017 6-23... -
Page 125: Starting A Run
The run progress can be monitored in the Run step of the Experiment environment. Single tasks and their progress are listed in a table. The instrument icon in the main toolbar as well as the progress indicator on the run step show the overall run progress. During run. QIAcube HT User Manual 12/2017 6-24... -
Page 126: Open System Test
If the achieved pressure is too low, this implies a leak, perhaps due to poor connections or incorrect fitting of the bottle cap. When the test fails, a warning dialog box appears. After attempting the suggested corrections from the dialog box, if the problem persists, contact QIAGEN Technical Services for further assistance. Plate detection test 6.1.5.2 For every protocol run that uses the vacuum pump, a plate detection test is also performed. -
Page 127: Pausing/Stopping A Run
2. A confirmation message will be displayed asking whether you really want to stop the run now. Click OK to confirm to stop the run now. Otherwise, click Cancel to keep the run running. QIAcube HT User Manual 12/2017 6-26... -
Page 128: Vacuum Performance Check
The marked positions will be marked in the report as well. To mark a single position in the filter plate: 1. Open the lid. Note: The lid sensor is disabled during the vacuum performance check, allowing to observe the wells during vacuum. QIAcube HT User Manual 12/2017 6-27... - Page 129 Note: If a membrane has been clogged, it might be necessary that you pause the run again later (after liquid tasks) by opening the lid and pipetting the liquid out of the clogged wells to ensure that no liquid spills over. Well B2 has been marked. Columns 7-12 are not used during the run. QIAcube HT User Manual 12/2017 6-28...
-
Page 130: Run Completion
Note: Refer to Customize user settings or contact QIAGEN Technical Services if you need another file format. Note: Use this option also in case one run is not sufficient to completely fill the output labware. In these situations, you can perform more than one run to completely fill the output labware. Save the output file after the first run. To set up the second run properly, you must select the option that you are Using an existing output labware in the Labware Selection step, and load this file from the first run as the starting point for the output labware of the second run. -
Page 131: Finishing Work And Shutting Down
Exit from the File menu to close the software. 5. The software shows a confirmation message if there are any unsaved changes in experiments. If you are unsure, click QIAcube HT User Manual 12/2017 6-30... - Page 132 Exit from the File menu to close the software. Note: To skip the cleaning procedure or the UV lamp task and shut down immediately, click in the top right corner of the screen or select Exit from the File menu. QIAcube HT User Manual 12/2017 6-31...
-
Page 133: Qiacube Ht Prep Manager Software
QIAcube HT Prep Manager Software QIAcube HT User Manual 12/2017... -
Page 134: Basic Concepts And General Software Usage
User roles are an essential concept in the QIAcube HT Prep Manager. A user role defines the rights and permissions of a user. At least one user role must be assigned to every user. There are two user roles in the QIAcube HT Prep Manager:... - Page 135 Experiments and templates 7.1.1.2 To facilitate the process of defining experiments, the QIAcube HT Prep Manager provides the option to use templates. The general workflow is to select a kit from the Home environment, define the experiment in the Experiment environment...
- Page 136 Experiments and templates have different file extensions. The file extension for experiments is *.qpmx, and for templates *. qpmt (QIAcube HT Prep Manager Experiment and Template, respectively). Templates and experiments can be selected from the Home environment, for setting up a new experiment based on the experiment data in the selected template.
-
Page 137: Protection Of Files
The file is invalid if the checksum does not match the file’s content or is missing. In the event that a file is modified outside the QIAcube HT Prep Manager, the file can no longer be used. If the modified file is a configuration file, it is possible that the software can no longer be used (in the worst case). -
Page 138: Use Of Color
Use of color 7.1.2.2 For an optimal user interaction, the QIAcube HT Prep Manager uses a dedicated color concept for presenting information. The coloring assists you in your workflow. Following is an overview of the different colors used in the software and their meanings:... -
Page 139: Displaying Errors And Warnings
Displaying errors and warnings 7.1.2.3 Errors and warnings are essential information that indicate a problem or an erroneous situation. QIAcube HT Prep Manager differentiates between 4 different problem levels: Priority... -
Page 140: Entering Data
The general structure of an error message is described below. When communicating with QIAGEN Technical Services, provide the error ID, which is unique and unambiguously characterizes the error situation. If you receive a message that contains a Help button, click on it to get more information. - Page 141 Change to the previous or next month by clicking the arrow icons ( and ). Hovering over the year label displays additional control arrows, which can be used to quickly jump to the next (up arrow) or previous year (down arrow): QIAcube HT User Manual 12/2017...
-
Page 142: Working With Tables
3. The date picker disappears and the date field is populated with the selected date. Working with tables 7.1.2.5 Tables are an essential element of the QIAcube HT Prep Manager. They are widely used to display and enter data. The interactive icon ( ) marks cells in which you can enter data. -
Page 143: Selecting Samples
To select a rectangular area of adjacent wells in a sample graphic, first click on the starting well for the selection, hold down the left mouse key and drag to the last well on the opposite site of the rectangular area to be selected. QIAcube HT User Manual 12/2017 7-11... - Page 144 Because the QIAcube HT always handles 8 samples in a column simultaneously, in the Sample editor and most sample graphics samples are selected column-wise. An exception is the Check vacuum performance dialog, where wells can be marked individually. Left-click on cursor position selects all samples on plate column 1. The field on cursor position can be edited.
-
Page 145: General Elements
Left-click on A1 selects samples of the whole column. 7.1.3 General elements QIAcube HT Prep Manager uses a modern task-focused GUI design to facilitate the user's interaction with the application. The following general user interface elements are described in this section: Menu... - Page 146 Change your current password. The Change password dialog is shown in which you will enter your current password and the new password. Service login This login is used by QIAGEN service personnel only. Exit Close the application. QIAcube HT User Manual 12/2017...
- Page 147 Note: As an alternative to using the View menu to change to the Home screen, you can also use the Home and Experiment buttons from the main toolbar to switch between these two environments. QIAcube HT User Manual 12/2017 7-15...
-
Page 148: Main Toolbar
Environment Description Used to jump to the home screen. From here, you can create or open experiments. See Home for details. Used to set up experiments. See Experiments for details QIAcube HT User Manual 12/2017 7-16... - Page 149 Bundles tasks for maintenance, system check and support of QIAcube HT. See Service for details. Bundles the tasks' custom settings, user and labware management, and calibration. See Configuration for details. Instrument icons The instrument icon is placed on the right of the toolbar. Use it to inspect the connection, running and maintenance status of the instrument.
-
Page 150: Button Bar
The button bar is placed at the bottom of the screen. It contains buttons specific for the selected screen of an environment. Generally, the buttons for saving, exporting and importing can be found here. Status bar 7.1.3.4 The status bar is always visible and gives an overview about the session status. QIAcube HT User Manual 12/2017 7-18... -
Page 151: File Dialog
Path indicates the current path. The initial path shown when the file dialog opens can be configured in the user settings. Note: When the file dialog opens for the first time after clicking the Open other experiment or Create from other template button from the Home screen, the initial path will be C:. QIAcube HT User Manual 12/2017 7-19... - Page 152 The list shows all drive letters that are configured in the Windows file explorer. To navigate to a sub folder, either left-click the sub folder name in the list and then click Open or double-click the name. QIAcube HT User Manual 12/2017 7-20...
- Page 153 *.pdf For reports The QIAcube HT Prep Manager provides the option to use UNC syntax to open files from and save files to network shares that are not directly known in the Windows file explorer. QIAcube HT User Manual 12/2017...
- Page 154 7. Click Open or OK to open or save the file, respectively. If you encounter issues accessing the network share, contact your network administrator and ensure that the path has been entered correctly and is accessible. QIAcube HT User Manual 12/2017 7-22...
-
Page 155: Scan Plate Barcode Dialog
Scan plate barcode dialog 7.1.3.6 To define samples, the QIAcube HT Prep Manager provides the option to load the sample information based on the barcode on the labware. Click the Scan labware barcode button to open the Scan plate barcode dialog. -
Page 156: Home
Home for details. Used to set up experiments. See Experiments for details Bundles tasks for maintenance, system check and support of QIAcube HT. See Service for details. Bundles the tasks' custom settings, user and labware management, and calibration. See Configuration for details. -
Page 157: Experiments
Before a run is started, the corresponding experiment must be saved. The maximum number of experiments that can be opened at a time is 8. Attempting to open more than 8 experiments will result in a warning message. QIAcube HT User Manual 12/2017 7-25... - Page 158 To switch to another step, click on the step marker step or use the Back and Next buttons in the QIAcube HT User Manual 12/2017 7-26...
-
Page 159: Service
Service 7.1.4.3 The Service environment bundles all tasks needed to check and maintain the QIAcube HT, along with tools to facilitate the communication with QIAGEN Technical Services for technical assistance. This environment is organized in five different tabs. You can switch between these tabs by clicking on the respective button in the tab bar. -
Page 160: Configuration
Checking for movement reliability Checking the reliability of the liquid-level sensor Support Package Create a support package to assist your communication with QIAGEN Technical Services, in case you have an issue. Audit Trail Allows you to view the system audit trail. -
Page 161: Getting Help
7.1.5 Getting help QIAcube HT Prep Manager comes with a detailed help system. The help is provided as both a user manual in PDF format and also as a context-sensitive help system. To access the context-sensitive help, click the button at the top right of the software window or press the F1 key while you are viewing screens or dialogs. - Page 162 In the Contents tab the help content can be browsed by topics. Search Specific help topics can be found by entering search terms. Favorites Shortcuts to individual help topics can be added and managed. QIAcube HT User Manual 12/2017 7-30...
-
Page 163: Working With Experiments
3. Select the directory where the template should be saved. 4. Enter a name for the template. 5. Select the file extension .qpmt for a template. 6. Click Save. 7. Add the created template to the favorite templates section. QIAcube HT User Manual 12/2017 7-31... -
Page 164: Manage Favorite Templates
Adding a template 1. Click on the Home icon in the main toolbar to change to the Home environment. 2. The Favorite Templates list in the middle will display all favorite templates. QIAcube HT User Manual 12/2017 7-32... - Page 165 8. The selected template is removed from the Favorite Templates list. Note: Removing a template using the steps above will not physically delete or modify the template file. It will only be removed from the Favorite Templates list. QIAcube HT User Manual 12/2017 7-33...
-
Page 166: View Recent Experiments
Optional step: If the experiment is not listed because it has been pushed off the list by newer experiments, click on the Open other experiment button at the bottom and select the experiment from the file dialog. QIAcube HT User Manual 12/2017 7-34... -
Page 167: Creating An Experiment
Creating an experiment You can create an experiment in two different ways: create a new, blank experiment without any data, or create an experiment with data inherited from a previously saved experiment or template. QIAcube HT User Manual 12/2017 7-35... -
Page 168: Create An Empty Experiment
To create a new experiment using the main menu, select File from the main menu and move the mouse pointer over the Create New Experiment command. Select QIAcube HT from the submenu to create a new, blank experiment. QIAcube HT User Manual 12/2017... -
Page 169: Create An Experiment Using A Template
Create from other template button at the bottom. This opens the file dialog that allows you to select a template. In both cases, a new experiment will be created containing all data from the selected template. QIAcube HT User Manual 12/2017 7-37... - Page 170 Create New Experiment from Template command. The File Open dialog is opened, allowing you to select a template. When you confirm the file dialog, a new experiment will be created containing all data from the template. For details of the template concept, refer to Experiments and templates. QIAcube HT User Manual 12/2017 7-38...
-
Page 171: Create An Experiment From An Existing Experiment
Experiment environment. Report The QIAcube HT Prep Manager offers two types of reports: a basic report that gives a short overview and an advanced report that contains all details. The Basic report contains:... - Page 172 This symbol is only used if an output file has been loaded as a starting point for the output plate (e.g., when using several runs to fill the output labware). The symbol represents a position that was not part of this run, although it is not empty. QIAcube HT User Manual 12/2017 7-40...
- Page 173 Shows the status of the position: either ok, warning or error, corresponding to the symbols of the graphic. Note: The table contains only those positions on the output labware that were subject to this run. Empty or unused positions are listed for reference below the table. QIAcube HT User Manual 12/2017 7-41...
- Page 174 Setup screen or assignments have been made on the Assignment screen that are not recommended), the following message will be shown: "Changes were programmed that are not recommended or tested by QIAGEN." Descriptions of the sections that are only included in the Advanced report are below.
- Page 175 A short form indicating which option (button) of the message dialog was pressed. Worktable information Lists for each worktable position the liquids that have been placed there. Additionally, lists the waste bottle status and QIAcube HT User Manual 12/2017 7-43...
-
Page 176: Administrative Tasks
View system audit trail The audit trail is a versatile tool to keep track of events that occur in the QIAcube HT Prep Manager. You can filter for specific events using the date or date ranges and user criteria. Results matching the criteria are displayed and can be exported to a PDF file. - Page 177 Criteria you can use are specific dates, date ranges or specific users. All audit trail entries that meet the criteria are listed in the Result table on the right of the screen. You can also generate a PDF file of the results. QIAcube HT User Manual 12/2017 7-45...
- Page 178 To export the results of a specific filter, click on the Print to PDF button at the bottom right. A PDF will be created and opened, displaying the current result table. Note: To view reports generated in PDF format, a PDF reader must be installed on the computer, see Computer. QIAcube HT User Manual 12/2017 7-46...
-
Page 179: Maintenance Procedures
Maintenance procedures QIAcube HT User Manual 12/2017... -
Page 180: Cleaning Agents
Only perform maintenance that is specifically described in this user manual. Discard waste according to local safety regulations. Switch the instrument off and disconnect the line power cord of the QIAcube HT and of the vacuum station from the power outlet before maintenance and servicing. - Page 181 Alcohol will damage the lid. To clean the lid, use distilled water only. CAUTION Damage to the QIAcube HT side panels [C6] Never clean the instrument side panels with alcohol or alcohol-based solutions. QIAcube HT User Manual 12/2017...
-
Page 182: Servicing
Servicing Servicing The QIAcube HT is supplied with a warranty that lasts for one year, beginning on the date of shipment. The warranty includes all repairs due to mechanical breakdown. Application development, software upgrades, accessories and disposable items are not included in the warranty. -
Page 183: Cleaning The Instrument Before Shutting Down
Cleaning the instrument before shutting down WARNING/ Risk of fire [W16] CAUTION When cleaning QIAcube HT instruments with alcohol-based disinfectant, leave the instrument hoods open to allow flammable vapors to disperse. CAUTION Damage to the instrument [C9] Do not use spray bottles containing alcohol or disinfectant to clean surfaces of the QIAcube HT. - Page 184 To clean the QIAcube HT: 1. In the main toolbar click Service to switch to the Service environment. On the Cleaning procedure tab, select Daily cleaning procedure. 2. Click Start to start the procedure. The first wizard step is displayed: 3.
-
Page 185: Cleaning The Lid
Do not use alcohol solvents, reagents containing acids, alkalis or abrasives to clean the instrument lid as this could damage the hood and its absorbing capacity. If solvents or saline, acidic, or alkaline solutions are spilled on the QIAcube HT or if QIAGEN buffers splash the instrument lid, wipe the liquid away immediately. -
Page 186: Cleaning Accessories
1. Apply a thin film of grease to the O-ring on the channeling block holder as indicated with a red arrow in the following figure. Channeling block holder O-ring. QIAcube HT User Manual 12/2017... - Page 187 Cleaning air bleed holes The QIAcube HT has air bleed holes positioned at strategic points on the vacuum chamber, as shown in the following figures. Air bleed holes of the vacuum chamber. Each of these air bleeds has a small stainless steel aperture inserted in the hole to specifically control the rate of air flow.
-
Page 188: Using Uv Lamp
An electronic lid sensor ensures that the instrument lid must be closed for operation of the UV lamp. Under no circumstances should this lid sensor be disabled. If the lid sensor is not functioning correctly, contact QIAGEN Technical Services. To use the UV lamp, follow the instructions below. -
Page 189: Periodic Maintenance
Note: The operating time of the UV lamp can be configured by the administrator in the Settings. Periodic maintenance QIAGEN recommends that a regular preventive maintenance service is carried out on the QIAcube HT. The service should be performed by a trained QIAGEN Field Service Specialist. Contact your local QIAGEN Field Service Specialist or your local distributor for more information. -
Page 190: Maintenance Schedule
Maintenance schedule QIAcube HT Prep Manager provides a maintenance tracking tool to give you an overview of scheduled upcoming service tasks and recent tasks. You can find this tool in the Regular Schedule step of the Maintenance tab in the Service... - Page 191 Description of the task User Which user performed the task Comments Comment noted by the QIAGEN Field Service Specialist Opens the View service task dialog with detailed information; see below View icon ( ) QIAcube HT User Manual 12/2017 8-13...
- Page 192 The View icon ( ) has the identical functionality in both tables: it opens the View service task dialog with detailed information. QIAcube HT User Manual 12/2017 8-14...
-
Page 193: Maintenance Of The Qiacube Ht Pipettor
Replacing the HEPA filters HEPA filters should be replaced on a regular basis. The QIAcube HT Prep Manager will remind you when it is time to replace the HEPA filters. Additionally, the instrument icon will display a screwdriver as long as the maintenance is due. - Page 194 Then switch off the instrument and disconnect the line power cord from the power outlet. Finally, click Done to proceed. Note: When the instrument is switched off, the pipettor head will drop approximately 70 mm. 4. Lift the HEPA filter cover and remove it. QIAcube HT User Manual 12/2017 8-16...
- Page 195 The service task remains due, indicated in the Scheduled service tasks table and on the instrument icon. Performed HEPA filter exchange is listed in the "Last service tasks" table. QIAcube HT User Manual 12/2017 8-17...
-
Page 196: Replacing Filters On Vacuum Station
Replacing filters on vacuum station Vacuum filters should be replaced on a regular basis. The QIAcube HT Prep Manager will remind you when it is time to replace the vacuum filters. Additionally, the instrument icon will display a screwdriver as long as the maintenance is due. - Page 197 3. If the instrument is still switched on, you will be prompted to switch it off. Then switch off the instrument and disconnect the line power cord from the power outlet. Finally, click Done to proceed. 4. Remove all hoses from the Polycap filter. 5. Unplug the Polycap and the Carbon-Cap filters from the vacuum station. QIAcube HT User Manual 12/2017 8-19...
- Page 198 Scheduled service tasks table and on the instrument icon. Note: For ordering information for the QIAcube HT vacuum filters, see Appendix E. For waste disposal of the used filters of the vacuum station, follow procedures in accordance with your local regulations.
-
Page 199: Troubleshooting
Troubleshooting QIAcube HT User Manual 12/2017... - Page 200 If you need to contact QIAGEN Technical Services for technical assistance, note down the steps that occurred leading up to the issue. Alternatively, save or choose the applicable support package from the run, and then send this to QIAGEN Technical Services. This will help the QIAGEN Field Service Specialist resolve the issue.
-
Page 201: Support Packages
Click the Close button to return to the message dialog. Support packages Support packages are folders containing multiple files that help QIAGEN Technical Services to analyze issues that might have been observed. The function to export support packages is located in the Support Package tab in the Service... - Page 202 Click on Apply filter. 4. All available support package information created within the selected date range will be displayed in the Support packages from experiments table and the Support packages from system checks table, listing the run experiments QIAcube HT User Manual 12/2017...
- Page 203 9. The support package is exported to the selected directory. 10. Navigate to the newly created directory and send all files in it to QIAGEN Technical Services. The directory contains the support packages of the selected experiments and/or system test results, including plug-in specific files, user information, settings, labware database and instrument specific data combined in a zip file.
-
Page 204: System Setup
Check the power connection. b) Fuse blown Replace the fuse according to the following procedure: 1. Switch off the QIAcube HT using the main power switch. 2. Unplug the power cord from the power outlet and from the rear of the instrument. - Page 205 In this case, another dialog opens. Click Yes to install the Microsoft SQL Server. This may take some time. If you click No, the QIAcube HT Prep Manager will not be installed.
- Page 206 Comments and suggestions a) will not be able to operate the QIAcube HT if you install the QIAcube HT Prep Manager for the first time, or b) might not be able to operate the QIAcube HT correctly in case of an update installation because an older driver version remains active on the computer.
-
Page 207: Operation
Vacuum chamber air bleed holes are blocked. Clean the air bleed holes as stated in Cleaning accessories c) Open system test failed Vacuum system may have unrestricted air flow. Contact QIAGEN Technical Services. d) Plate detection test failed Adapters and labware used in vacuum chamber are misplaced. For... - Page 208 Refer to the kit handbook. b) Wrong pretreatment Refer to the kit handbook. Ensure to select the correct pretreatment in the Setup screen. c) Bad purification results Refer to the kit handbook for more details. QIAcube HT User Manual 12/2017 9-10...
-
Page 209: Self-Diagnostic Tools
Self-diagnostic tools QIAcube HT Prep Manager provides several different checks to verify whether the most important instrument parts are working correctly. The tests are designed to collect information to help with troubleshooting. They are bundled in the System Check tab of the Service environment: Note: The tests are only available if the instrument is connected. -
Page 210: Connection Check
9.4.2 Cycle pipettor head If the QIAcube HT has not been used for a long period of time, it is recommended to cycle the pipettor head. This helps to distribute the grease evenly. 1. In the step marker, click on Cycle Pipettor head. The description is shown. -
Page 211: Check For Loss Of Steps
Support package now. Ensure that the performed test is listed in the table Support packages from system tests and checked. Click Export selected packages and contact QIAGEN Technical Services for further assistance. Click Restart if you want to repeat the task. Click on another step marker to perform another test or click to another part in the software for another task. -
Page 212: Check For Home-Opto Alignment
Support package now. Ensure that the performed test is listed in the table Support packages from system tests and checked. Click Export selected packages and contact QIAGEN Technical Services for further assistance. Click Restart if you want to repeat the task. Click on another step marker to perform another test or click to another part in the software for another task. -
Page 213: Glossary
Glossary QIAcube HT User Manual 12/2017 10-1... - Page 214 This process is termed calibration. Calibration report The calibration report is a printed document delivered with the QIAcube HT. It defines the alignment of each pipettor head to the volume to be transferred. The values must be entered when configuring QIAcube HT.
- Page 215 Ready-to-use composition of reagents and consumables for a given protocol. Kit configuration A set of protocols describing all possible actions to be performed on the instrument based on a kit. For each kit to be used on QIAcube HT, one kit configuration is available. Labware library The labware library is delivered with the software and contains all labware to be used on QIAcube HT instrument.
- Page 216 Plates can be placed in an adaptor or as standalone onto the instrument worktable. Power switch A button located at the back of the QIAcube HT. It allows the user to switch the QIAcube HT on and off. Protocol A set of instructions for the instrument describing a specific sequence of action to be performed during a run.
- Page 217 Vacuum station The vacuum station is part of the QIAcube HT. It contains the vacuum pump, a waste bottle and vacuum filters. It is connected to the QIAcube HT bench top unit via waste hoses.
- Page 218 QIAcube HT User Manual 12/2017 10-6...
-
Page 219: Appendices
Appendices QIAcube HT User Manual 12/2017 11-1... -
Page 220: Technical Data
Appendices 11.1 Appendix A 11.1.1 Technical data QIAGEN reserves the right to change specifications at any time. 11.1.2 Environmental conditions Operating conditions Power 100–240 V AC, 50–60 Hz, 250 VA Mains supply voltage fluctuations are not to exceed ±10% of the nominal supply voltages... -
Page 221: Waste Electrical And Electronical Equipment
Recycling can be provided by QIAGEN upon request at additional cost. In the European Union, in accordance with the specific WEEE recycling requirements and where a replacement product is being supplied by QIAGEN, free recycling of its WEEE-marked electronic equipment is provided. -
Page 222: Fcc Declaration
QIAGEN GmbH, Germany is not responsible for any radio television interference caused by unauthorized modifications of this equipment or the substitution or attachment of connection cables and equipment other than those specified by QIAGEN GmbH, Germany. -
Page 223: Liability Clause
Appendix C Consignes de sécurité Avant d’utiliser le QIAcube HT il est impératif de lire attentivement ce manuel et de porter une attention particulière aux consignes de sécurité. Afin de garantir un fonctionnement de l’appareil en toute sécurité et de maintenir l’appareil en bon état de marche, il est impératif de suivre les instructions et consignes de sécurité... -
Page 224: Utilisation Appropriée
AVERTISSEMENT/ Risque d’accident corporel et de détérioration du matériel [W3] ATTENTION Le QIAcube HT est trop lourd pour être soulevé par une seule personne. Afin d’éviter tout accident corporel et toute détérioration du matériel, ne pas soulever l’appareil seul. AVERTISSEMENT/ Risque d’accident corporel et de détérioration du matériel [W4]... - Page 225 En cas d’urgence, éteindre le QIAcube HT à l’aide de l’interrupteur d’alimentation situé à l’arrière de l’appareil et débrancher le cordon d’alimentation de la prise de courant.
-
Page 226: Sécurité Électrique
Si le capteur de couvercle ne fonctionne pas correctement, prendre contact avec les services techniques de QIAGEN. Afin que le QIAcube HT fonctionne de manière satisfaisante et en toute sécurité, suivre les conseils suivants: Le cordon d’alimentation de l’appareil doit être branché sur une prise d’alimentation munie d’un conducteur de protection (terre/masse). -
Page 227: Sécurité Biologique
† ACGIH : American Conference of Government Industrial Hygienists (États-Unis d’Amérique) (Conférence américaine des hygiénistes industriels gouvernementaux). ‡ COSHH : Control of Substances Hazardous to Health (Royaume-Uni) (Contrôle des substances dangereuses pour la santé). QIAcube HT User Manual 12/2017 11-9... -
Page 228: Produits Chimiques
Pour plus d’informations sur le conteneur d’embouts usagés, consulter la section Tip disposal box. Pour plus d’informations sur la mise au rebut du QIAcube HT, voir l’Annexe A. QIAcube HT User Manual 12/2017 11-10... -
Page 229: Dangers Mécaniques
En cas de déplacement manuel accidentel du bras Y, il est fortement recommandé de redémarrer le système. Afin que le QIAcube HT fonctionne de manière satisfaisante et en toute sécurité, suivre ces instructions : Utiliser uniquement les embouts et portoirs d’embouts recommandés. -
Page 230: Sécurité Relative À La Maintenance
ATTENTION Détérioration de l’appareil [C9] Ne pas employer de flacons pulvérisateurs contenant de l’alcool ou un agent désinfectant pour nettoyer les surfaces des appareils QIAcube HT. ATTENTION Détérioration du capot du QIAcube HT [C5] Ne pas utiliser de solvants ni de réactifs contenant des acides, des bases ou des composés abrasifs pour nettoyer le capot de l’appareil. - Page 231 Réinstallation du QIAcube HT [C10] La pièce la plus importante de l’emballage est le support en bois qui immobilise le bras Y. Ce support doit être réutilisé si vous déplacez le QIAcube HT. Le non- respect de cette instruction annule la garantie.
-
Page 232: Symboles Sur Le Qiacube Ht
11.3.8 Symboles sur le QIAcube HT Symbole Emplacement Description Table de travail et près de la Symbole de mise en garde plaque signalétique Table de travail et près de la sortie Symbole de danger biologique des tips Table de travail Symbole de risque d’écrasement... -
Page 233: Appendix D Sicherheitshinweise
11.4 Appendix D Sicherheitshinweise Lesen Sie dieses Handbuch sorgfältig durch, bevor Sie den QIAcube HT benutzen. Beachten Sie dabei insbesondere die Sicherheitshinweise. Die Gebrauchsanweisungen und Sicherheitshinweise im Handbuch müssen befolgt werden, um einen sicheren Betrieb des Geräts zu gewährleisten und das Gerät in einem sicheren Zustand zu erhalten. - Page 234 WARNUNG/ Verletzungsgefahr und Beschädigung des Geräts [W3] ACHTUNG Der QIAcube HT ist zu schwer, um von einer einzelnen Person gehoben zu werden. Zur Vermeidung einer Verletzung oder Beschädigung des Gerätes heben sie das Gerät nicht alleine an. WARNUNG/ Verletzungsgefahr und Beschädigung des Geräts [W4] ACHTUNG Der QIAcube HT darf auf keinen Fall während des Betriebs fortbewegt werden.
-
Page 235: Elektrische Sicherheit
Gerätehaube. Klicken Sie nicht auf die Maus und drücken Sie nicht auf eine Taste der Tastatur, während sich Ihre Hände oder andere Körperteile im Arbeitsbereich des Roboterarms befinden. Schalten Sie im Notfall den QIAcube HT aus (der Netzschalter befindet sich auf der Geräterückseite), und ziehen Sie den Netzstecker aus der Steckdose. 11.4.2 Elektrische Sicherheit Ziehen Sie das Netzanschlusskabel aus der Steckdose, bevor Sie Wartungsarbeiten am Gerät vornehmen. -
Page 236: Biologische Sicherheit
Falls die elektrische Sicherheit bei der Bedienung des Geräts nicht mehr gewährleistet werden kann, muss das Gerät gegen unbefugte oder unabsichtliche Benutzung gesichert werden. Kontaktieren Sie anschließend den Technischen Service von QIAGEN. Die elektrische Sicherheit des Geräts ist nicht mehr gegeben, wenn: das Netzkabel beschädigt ist;... -
Page 237: Giftige Dämpfe
Sicherheitsbestimmungen gesammelt und entsorgt werden. Informationen zur Verwendung des Abfallbehälters für Pipettenspitzen finden Sie im Abschnitt Tip disposal box. Beachten Sie bei der Entsorgung des QIAcube HT die gesetzlichen Bestimmungen zur Entsorgung von Elektro- und Elektronik-Altgeräten (siehe Anhang A). 11.4.6 Gefahren durch mechanische Teile WARNUNG Sich bewegende Geräteteile [W12]... -
Page 238: Sicherheitshinweise - Wartungsarbeiten
Wir empfehlen dringend, einen Neustart des Systems durchzuführen, falls der Y-Arm versehentlich von Hand bewegt wurde. Um einen zufriedenstellenden und sicheren Betrieb des QIAcube HT zu gewährleisten, befolgen Sie bitte die nachstehenden Richtlinien: Verwenden Sie nur die empfohlenen Pipettenspitzen und -Racks. - Page 239 Beschädigung der QIAcube HT Gerätehaube [C5] Verwenden Sie weder Alkohol noch Lösungsmittel oder Reagenzien, die Säuren, Laugen oder Abrasivstoffe enthalten, um die QIAcube HT Haube zu reinigen. Alkohol schädigt die Gerätehaube. Verwenden Sie zum Reinigen der Gerätehaube ausschließlich destilliertes Wasser.
- Page 240 Standortwechsel des QIAcube HT [C10] Der wichtigste Bestandteil der Verpackung ist die Holzstütze, die den Y-Arm fixiert. Diese Stütze muss verwendet werden, wenn der QIAcube HT an einen anderen Standort verlagert wird. Anderenfalls erlischt jeglicher Garantieanspruch. QIAcube HT User Manual 12/2017...
-
Page 241: Symbole Auf Dem Qiacube Ht
11.4.8 Symbole auf dem QIAcube HT Symbol Beschreibung Arbeitsplattform und nähe Typenschild Symbol „Achtung“ Auf der Arbeitsplattform und nähe „Tip Symbol „Biogefährdung“ ejector“ Ausgang Arbeitsplattform Symbol „Quetschgefahr“ Typenschild auf der Rückseite des CE-Kennzeichnung Instruments Typenschild auf der Rückseite des Symbol der CSA-Zertifizierung in Kanada und den Instruments Typenschild auf der Rückseite des... -
Page 242: Qiacube Ht Accessories
S-Blocks (24) 96-well blocks with 2.2 ml wells, 24 per case 19585 Elution Microtubes RS (24 x Elution Microtubes RS (EMTR) for use with QIAcube HT: 24 x 96 120008 Elution Microtubes in racks of 96; includes strip caps HEPA filter... - Page 243 Box of 10; waste collection box to fit 990550 tip ejector chute Tip Disposal Box Holder Holds the tip disposal box in place and ensures correct 9243592 positioning under the tip ejector chute; suitable for QIAcube HT, QIAxtractor and QIAgility instruments QIAcube HT User Manual 12/2017 11-25...
- Page 244 11.6 Appendix F 11.6.1 License Terms Xceed license QIAcube HT Prep Manager uses the Xceed library version 4.2.0, which is licensed under the Xceed Software License Agreement. Xceed Software License Agreement Revised January 23rd, 2007 IMPORTANT NOTICE PLEASE READ THIS CONTRACT CAREFULLY. BY USING ALL OR ANY PORTION OF THE SOFTWARE YOU ACCEPT ALL THE TERMS AND CONDITIONS OF THIS AGREEMENT.
- Page 245 Software may be Used by any number of software developers on any number of computers located at any of the Licensee's premises. 3. GRANT OF DUPLICATION AND DISTRIBUTION LICENSE The Software includes certain runtime libraries and binary files intended for QIAcube HT User Manual 12/2017 11-27...
- Page 246 Source Code for the sole purposes of education, troubleshooting, and customizing features. If Licensee modifies the Source Code, Licensee may compile the modified Source Code and use and distribute the resulting object code solely as a replacement for the corresponding Redistributable Files the QIAcube HT User Manual 12/2017 11-28...
- Page 247 Sample Code and/or derivative works thereof, and (iv) otherwise comply with the terms of this agreement. Licensee shall not permit further distribution of the Sample Code and/or derivative works by third parties. 6. CUSTOMIZATION CODE LICENSE QIAcube HT User Manual 12/2017 11-29...
- Page 248 About dialog or the method by which it may be invoked. Licensee may not rent or lease the Software. Violations will be prosecuted to the maximum extent possible under the law. QIAcube HT User Manual 12/2017 11-30...
- Page 249 13. PARTIES BOUND If Licensee is executing this Agreement on behalf of an entity, then Licensee represents he or she has the authority to execute this agreement on behalf of such entity. 14. COPYRIGHT QIAcube HT User Manual 12/2017 11-31...
- Page 250 Agreement and the remainder of the Agreement will continue to be fully enforceable and valid. iTextSharp license QIAcube HT Prep Manager uses the iTextSharp library version 4.1.7.0, which is licensed under the MOZILLA PUBLIC LICENSE, version 1.1. MOZILLA PUBLIC LICENSE Version 1.1...
- Page 251 Original Code or any previous Modifications. When Covered Code is released as a series of files, a Modification is: A. Any addition to or deletion from the contents of a file containing Original Code or previous Modifications. QIAcube HT User Manual 12/2017 11-33...
- Page 252 Original Code (or portions thereof) with or without Modifications, and/or as part of a Larger Work; and (b) under Patents Claims infringed by the making, using or selling of Original QIAcube HT User Manual 12/2017 11-34...
- Page 253 Contributor with other software (except as part of the Contributor Version) or other devices; or 4) under Patent Claims infringed by Covered Code in the absence of Modifications made by that Contributor. QIAcube HT User Manual 12/2017 11-35...
- Page 254 Sections 2.1 or 2.2, Contributor must include a text file with the Source Code distribution titled "LEGAL" which describes the claim and the party making the claim in sufficient detail that a recipient will know whom to contact. If QIAcube HT User Manual 12/2017 11-36...
- Page 255 Source Code version of the Covered Code is available under the terms of this License, including a description of how and where You have fulfilled the obligations of Section 3.2. The notice must be conspicuously QIAcube HT User Manual 12/2017 11-37...
- Page 256 This License applies to code to which the Initial Developer has attached the notice in Exhibit A and to related Covered Code. 6. Versions of the License. 6.1. New Versions. Netscape Communications Corporation ("Netscape") may publish revised and/or QIAcube HT User Manual 12/2017 11-38...
- Page 257 You fail to comply with terms herein and fail to cure such breach within 30 days of becoming aware of the breach. All sublicenses to the Covered Code which are properly granted shall survive any termination of this QIAcube HT User Manual 12/2017 11-39...
- Page 258 8.4. In the event of termination under Sections 8.1 or 8.2 above, all end user license agreements (excluding distributors and resellers) which have been validly granted by You or any distributor hereunder prior to termination shall survive termination. 9. LIMITATION OF LIABILITY. QIAcube HT User Manual 12/2017 11-40...
- Page 259 Convention on Contracts for the International Sale of Goods is expressly excluded. Any law or regulation which provides that the language of a contract shall be construed against the drafter shall not apply to this License. 12. RESPONSIBILITY FOR CLAIMS. QIAcube HT User Manual 12/2017 11-41...
- Page 260 [___] License. If you do not delete the provisions above, a recipient may use your version of this file under either QIAcube HT User Manual 12/2017 11-42...
- Page 261 SQL Compact ASP.NET Membership, Role and Profile provider license and Extended WPF Toolkit license QIAcube HT Prep Manager uses the SQL Compact ASP.NET Membership, Role and Profile provider version 4.0, and the Extended WPF Toolkit version 2.0.0.0, which are licensed under the Microsoft Public License (Ms-PL).
- Page 262 Windows Installer XML (WiX) license QIAcube HT Prep Manager uses the Windows Installer XML (WiX) version 3.7.1224.0, which is licensed under the Microsoft Reciprocal License (MS-RL). QIAcube HT User Manual 12/2017...
- Page 263 (B) Patent Grant- Subject to the terms of this license, including the license conditions and limitations in section 3, each contributor grants you a non- QIAcube HT User Manual 12/2017 11-45...
- Page 264 Lua license QIAcube HT Prep Manager uses Lua, which is licensed under the MIT license. The MIT License (MIT) Copyright © 1994–2015 Lua.org, PUC-Rio. Permission is hereby granted, free of charge, to any person obtaining a copy of...
- Page 265 OUT OF OR IN CONNECTION WITH THE SOFTWARE OR THE USE OR OTHER DEALINGS IN THE SOFTWARE. NHibernate license QIAcube HT Prep Manager uses NHibernate version 3.3, which is licensed under the GNU LESSER GENERAL PUBLIC LICENSE, version 2.1. GNU LESSER GENERAL PUBLIC LICENSE Version 2.1, February 1999...
- Page 266 For example, on rare occasions, there may be a special need to encourage the widest possible use of a certain library, so that it becomes a de-facto standard. To achieve this, non-free programs must be allowed to use the QIAcube HT User Manual 12/2017 11-48...
- Page 267 Library (independent of the use of the Library in a tool for writing it). Whether that is true depends on what the Library does and what the program that uses the Library does. QIAcube HT User Manual 12/2017 11-49...
- Page 268 In addition, mere aggregation of another work not based on the Library with the Library (or with a work based on the Library) on a volume of a storage or distribution medium does not bring the other work under the scope of this License. QIAcube HT User Manual 12/2017 11-50...
- Page 269 Library will still fall under Section 6.) Otherwise, if the work is a derivative of the Library, you may distribute the object code for the work under the terms of Section 6. Any executables QIAcube HT User Manual 12/2017 11-51...
- Page 270 It may happen that this requirement contradicts the license restrictions of other proprietary libraries that do not normally accompany the operating QIAcube HT User Manual 12/2017 11-52...
- Page 271 License would be to refrain entirely from distribution of the Library. If any portion of this section is held invalid or unenforceable under any particular circumstance, the balance of the section is intended to apply, and QIAcube HT User Manual 12/2017 11-53...
- Page 272 FITNESS FOR A PARTICULAR PURPOSE. THE ENTIRE RISK AS TO THE QUALITY AND PERFORMANCE OF THE LIBRARY IS WITH YOU. SHOULD THE LIBRARY PROVE DEFECTIVE, YOU ASSUME THE COST OF ALL NECESSARY SERVICING, REPAIR OR CORRECTION. QIAcube HT User Manual 12/2017 11-54...
- Page 273 ZXing license, Log4Net license, Stateless license, Enterprise license, Unity license QIAcube HT Prep Manager uses ZXing version 0.12.0.0, the Log4Net library version 1.2.10.0, the Stateless library version 2.2.1.1, the Microsoft Enterprise Library for .Net version 5.0.414.0, and the Microsoft Unity Application Block version 2.1.505.2, which are licensed under the Apache License 2.0 (Apache).
- Page 274 Licensor for inclusion in the Work by the copyright owner or by an individual or Legal Entity authorized to submit on behalf of the copyright owner. For the purposes of this definition, QIAcube HT User Manual 12/2017 11-56...
- Page 275 4. Redistribution. You may reproduce and distribute copies of the Work or Derivative Works thereof in any medium, with or without modifications, and in Source or Object form, provided that You meet the following conditions: QIAcube HT User Manual 12/2017 11-57...
- Page 276 License, without any additional terms or conditions. Notwithstanding the above, nothing herein shall supersede or modify the terms of any separate license agreement you may have executed with Licensor regarding such Contributions. 6. Trademarks. QIAcube HT User Manual 12/2017 11-58...
- Page 277 Contributor by reason of your accepting any such warranty or additional liability. Report Viewer license QIAcube HT Prep Manager uses the Microsoft Reportviewer 2010, which is licensed under the MICROSOFT SOFTWARE QIAcube HT User Manual 12/2017 11-59...
- Page 278 * display your valid copyright notice on your programs; and * indemnify, defend, and hold harmless Microsoft from any claims, including attorneys’ fees, related to the distribution or use of your programs. iii. Distribution Restrictions. You may not QIAcube HT User Manual 12/2017 11-60...
- Page 279 You must comply with all domestic and international export laws and regulations that apply to the software. These laws include restrictions on destinations, end users and end use. For additional information, see www.microsoft.com/exporting. QIAcube HT User Manual 12/2017 11-61...
- Page 280 It also applies even if Microsoft knew or should have known about the possibility of the damages. The above limitation or exclusion may not apply to you because your country may not allow the exclusion or limitation of incidental, consequential or other damages. QIAcube HT User Manual 12/2017 11-62...
- Page 281 (Adobe Systems Inc.). Registered names, trademarks, etc. used in this document, even when not specifically marked as such, are not to be considered unprotected by law. © 2009-2017 QIAGEN, all rights reserved. 1109028 12/2017 HB-2120-003 QIAcube HT User Manual 12/2017...
- Page 282 Technical Support www.support.qiagen.com 1109028 12/2017 HB-2120-003...
Need help?
Do you have a question about the QIAcube HT and is the answer not in the manual?
Questions and answers